


一、RecyelerView和CardView介绍和导入
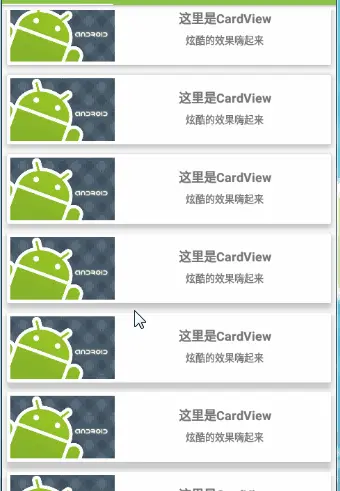
RecyelerView和CardView是5.0,support-v7包中的新控件。效果是这个样子的:
使用的话还是要导入的,毕竟不是自带的。
Modle的build.gradle里面添加:
 dependencies {
      compile 'com.android.support:recyclerview-v7:25.2.0'
      compile 'com.android.support:cardview-v7:25.2.0'
 }
记住导入的版本必须和appcompat的版本一致要不然会报错的

二、RecyelerView、ListView和GrideView区别
RecyelerView提供了三种布局管理器 ,他们都继承自抽象类LayoutManager:
LinearLayoutManager(线性布局效果)、
GridLayoutManager(网格布局效果)、
StaggeredGridLayoutManager(瀑布流布局效果)。
它是集ListView和GridView于一身的强大控件不但可以实现listview、gridview的横向滚动,还可以实现瀑布流效果,简单易用,效果强大。
看效果:
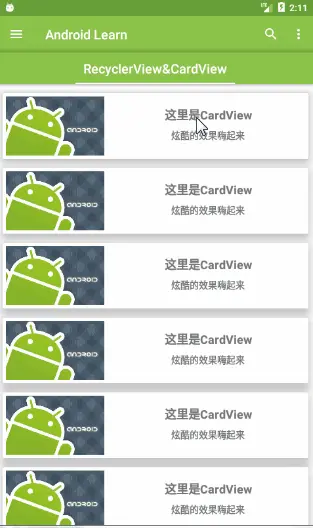
三.CardView:一个带圆角和阴影背景的FrameLayout.
上面的演示动画里全都是cardview,那我们就来看一下布局文件吧。
 <?xml version="1.0" encoding="utf-8"?>
 <android.support.v7.widget.CardView
    xmlns:android="http://schemas.android.com/apk/res/android"
   xmlns:app="http://schemas.android.com/apk/res-auto"
  android:id="@id/cardView"
  android:clickable="true"
  android:focusable="true"
  android:layout_width="match_parent"
  android:layout_height="wrap_content"
  android:layout_margin="7dp"
  app:cardElevation="10dp"
 >
<LinearLayout
    android:layout_width="match_parent"
    android:layout_height="100dp"
    android:clickable="true"
    android:foreground="?android:attr/selectableItemBackgroundBorderless"
    >

    <ImageView
        android:id="@id/image1"
        android:layout_width="150dp"
        android:layout_height="match_parent"
        android:layout_margin="5dp"
        android:scaleType="centerCrop"
        android:src="@drawable/androidimage2" />

    <LinearLayout
        android:layout_width="match_parent"
        android:layout_height="match_parent"
        android:orientation="vertical">

        <TextView
            android:id="@id/textView1"
            android:layout_width="match_parent"
            android:layout_height="wrap_content"
            android:layout_marginTop="20dp"
            android:gravity="center"
            android:text="这里是CardView"
            android:textSize="18sp"
            android:textStyle="bold" />

        <TextView
            android:id="@id/textView2"
            android:gravity="center"
            android:layout_width="match_parent"
            android:layout_height="wrap_content"
            android:layout_marginTop="10dp"
            android:text="炫酷的效果嗨起来" />
    </LinearLayout>
  </LinearLayout>
</android.support.v7.widget.CardView>
这里有几个重点要说的属性;
1.阴影效果的加深或者说cardview控件Z轴提升属性:
* app:cardElevation=”10dp” *
2.给点击添加水波纹的效果,属性要添加到子控件里才有效:
* android:foreground=”? android:attr/selectableItemBackgroundBorderless”*
还要添加
** android:clickable=”true”
android:focusable=”true” **
才可以哦。
四、RecyelerView加CardView代码实现
1.布局页面里添加RecyelerView:
  <?xml version="1.0" encoding="utf-8"?>
   <RelativeLayout xmlns:android="http://schemas.android.com/apk/res/android"
   android:orientation="vertical"
   android:layout_width="match_parent"
    android:layout_height="match_parent"
  >
   <android.support.v7.widget.RecyclerView
    android:id="@id/recycleview"
    android:layout_width="match_parent"
    android:layout_height="match_parent"
   ></android.support.v7.widget.RecyclerView>
</RelativeLayout>
2.在Layout文件夹下新建card_view.xml,布局文件代码在上面第三章。
3.自定义Adapter。
public class Adapter extends RecyclerView.Adapter<ViewHolder> {
    private Context mContext;
    ArrayList<ArrayList> mlist;
    TextView tv1;
    TextView tv2;
    ImageView iv;
    CardView cv;

 public Adapter(Context context, ArrayList<ArrayList> list) {
    this.mContext = context;
    this.mlist=list;
}

@Override
public int getItemCount() {
    return mlist.size();
}

@Override
public ViewHolder onCreateViewHolder(ViewGroup parent, int arg1) {
    View view = LayoutInflater.from(mContext).inflate(R.layout.card_view,parent,false);
    cv = (CardView)view.findViewById(R.id.cardView);
    tv1 = (TextView) view.findViewById(R.id.textView1);
    tv2 = (TextView) view.findViewById(R.id.textView2);
    iv = (ImageView) view.findViewById(R.id.image1);
    ViewHolder viewHolder = new ViewHolder(view){};
    return viewHolder;
}

@Override
public void onBindViewHolder(ViewHolder holder, int position) {
    tv1.setText((String)mlist.get(position).get(0));
    tv2.setText((String)mlist.get(position).get(1));
    iv.setImageResource((int)mlist.get(position).get(2));
  }
 }
4.初始化代码:
 RecyclerView rv = (RecyclerView)view.findViewById(R.id.recycleview);
  LinearLayoutManager layoutManager= new LinearLayoutManager(getActivity());
 //GridLayoutManager layoutManager=new GridLayoutManager(getActivity(),3);
 //StaggeredGridLayoutManager layoutManager = new StaggeredGridLayoutManager(3, StaggeredGridLayoutManager.VERTICAL);
 rv.setLayoutManager(layoutManager);
 rv.setAdapter(new Adaper(getActivity(),inintList()));


       public ArrayList inintList() {
    ArrayList<ArrayList> list = new ArrayList<ArrayList>();
    list.add(inintmLis("这里是CardView","炫酷的效果嗨起来",R.drawable.android1));
    list.add(inintmLis("这里是CardView","炫酷的效果嗨起来",R.drawable.android1));
    list.add(inintmLis("这里是CardView","炫酷的效果嗨起来",R.drawable.android1));
   }
   private ArrayList inintmLis(String str1,String str2,int s) {
     ArrayList list1 = new ArrayList();
    list1.add(str1);
    list1.add(str2);
    list1.add(s);
    return list1;
  }
LinearLayoutManager、GridLayoutManager、StaggeredGridLayoutManager
需要哪个布局管理器就初始化哪个。
总结
这些都是一些最基础的知识,希望我们一起努力,进入Android的大家庭。


 2214
2214

 被折叠的 条评论
为什么被折叠?
被折叠的 条评论
为什么被折叠?
 到【灌水乐园】发言


