


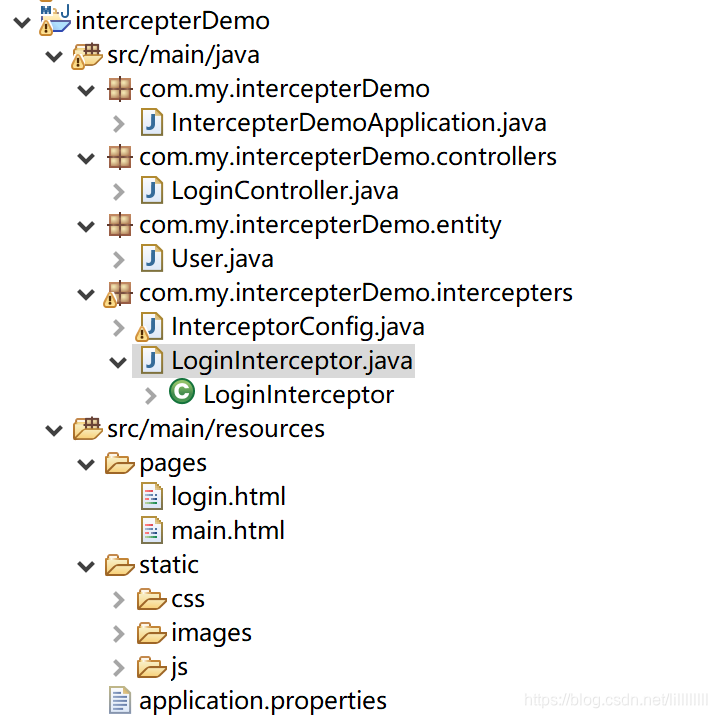
拦截器实现比较简单,主要步骤包括定义拦截器和注册拦截器两个步骤 。下图是项目结构图。
配置文件也比较简单,没有实现数据库,用户名和密码直接写在代码里进行模拟。
spring.thymeleaf.prefix=classpath:/pages/
spring.thymeleaf.suffix=.html
spring.thymeleaf.mode=HTML
spring.thymeleaf.encoding=UTF-8
spring.thymeleaf.cache=false
server.port= 9999
具体实现步骤如下:
(1)写一个User实体类
package com.my.intercepterDemo.entity;
public class User {
	Integer id;
	private String  username;
	private String password;
	public Integer getId() {
		return id;
	}
	public void setId(Integer id) {
		this.id = id;
	}
	public String getUsername() {
		return username;
	}
	public void setUsername(String username) {
		this.username = username;
	}
	public String getPassword() {
		return password;
	}
	public void setPassword(String password) {
		this.password = password;
	}
}
(2)写拦截器,名称是LoginInterceptor 需要实现spring 提供的接口HandlerInterceptor
package com.my.intercepterDemo.intercepters;
import javax.servlet.http.HttpServletRequest;
import javax.servlet.http.HttpServletResponse;
import javax.servlet.http.HttpSession;
import org.springframework.stereotype.Component;
import org.springframework.web.servlet.HandlerInterceptor;
import org.springframework.web.servlet.ModelAndView;
import com.my.intercepterDemo.entity.User;
@Component
public class LoginInterceptor implements HandlerInterceptor {
	@Override
	public boolean preHandle(HttpServletRequest request, HttpServletResponse response, Object handler)
			throws Exception {
		System.out.println("interceptor!!!");
		HttpSession session=request.getSession();
		User user =(User) session.getAttribute("user_session");
		if(user!=null)
			return true;
		response.sendRedirect("/login");
		return false;
	}
	@Override
	public void postHandle(HttpServletRequest request, HttpServletResponse response, Object handler,
			ModelAndView modelAndView) throws Exception {
	}

	@Override
	public void afterCompletion(HttpServletRequest request, HttpServletResponse response, Object handler, Exception ex)
			throws Exception {

	}

	}
(3)注册拦截器,名称是InterceptorConfig,需要实现spring 提供的接口WebMvcConfigurer,然后在InterceptorConfig中的addInterceptors中添加上面的拦截器实例。
package com.my.intercepterDemo.intercepters;

import org.springframework.beans.factory.annotation.Autowired;
import org.springframework.context.annotation.Configuration;
import org.springframework.web.servlet.config.annotation.InterceptorRegistration;
import org.springframework.web.servlet.config.annotation.InterceptorRegistry;
import org.springframework.web.servlet.config.annotation.WebMvcConfigurer;
@Configuration
public class InterceptorConfig implements WebMvcConfigurer{
    @Autowired
    private LoginInterceptor interceptor;
    @Override
    public void addInterceptors(InterceptorRegistry registry) {
      registry.addInterceptor(interceptor).addPathPatterns("/*").excludePathPatterns("/login");

    }
}
(4) 写Controller
package com.my.intercepterDemo.controllers;
import javax.servlet.http.HttpSession;
import org.springframework.stereotype.Controller;
import org.springframework.web.bind.annotation.GetMapping;
import org.springframework.web.bind.annotation.PostMapping;
import com.my.intercepterDemo.entity.User;

@Controller
public class LoginController {
	@GetMapping("/login")
	String login() {
		return "login";
	}

	@GetMapping("/main")
	String main() {
		return "main";
	}

	@PostMapping("/login")
	public String userLogin(User user, HttpSession session) {
		if (user.getUsername() != null && user.getUsername().equals("zhangsan")
				&& user.getPassword() != null && user.getPassword().equals("123")) {
			session.setAttribute("user_session", user);
			return "redirect:main";
		} else
			return "login";
	}

	@GetMapping("/logout")
	String loginout(HttpSession session) {
		session.invalidate();
		return "redirect:login";
	}

}
(5)编写两个页面,一个是login.html ,一个是main.html。
login.html
<!DOCTYPE html>
<html xmlns:th="http://www.thymeleaf.org"
	xmlns="http://www.w3.org/1999/xhtml"
	xmlns:layout="http://www.ultraq.net.nz/web/thymeleaf/layout">
<head>
<meta charset="UTF-8">
<title>Insert title here</title>
<link rel="stylesheet" href="../css/bootstrap.min.css">
<script src="../js/jquery-1.11.3.min.js"></script>
<script src="https://cdn.staticfile.org/vue/2.2.2/vue.min.js"></script>
<script src="https://cdn.staticfile.org/axios/0.18.0/axios.min.js"></script>
<script src="https://unpkg.com/vee-validate@2.2.15/dist/vee-validate.js"></script>
<style type="text/css">
.myform {
 /*  background:#e0ffff; */
   margin: 250px 100px;
   padding: 40px 340px;
 }
.mycontainer{
   background-image: url('/images/bkg.jpg');
   background-size:100% 100%;
}
</style>
</head>
<body style=" background-color:#28F8F8">
<div class=" mycontainer container">
		<div class="col-md-12 column">
			<form role="form" class="myform" th:action="@{/login}" method="POST">
				<div class="form-group">
					 <label for="exampleInputEmail1">用户名</label><input class="form-control" name="username" id="exampleInputEmail1" type="text" />
				</div>
				<div class="form-group">
					 <label for="exampleInputPassword1">密码</label><input class="form-control" name="password" id="exampleInputPassword1" type="password" />
				</div>

				<div class="form-group" style="float:none;">
				  <button class="btn btn-default" type="submit">提交</button>
				</div>
			</form>
		</div>
</div>
</body>
</html>
main.html
<!DOCTYPE html>
<html xmlns:th="http://www.thymeleaf.org"
	xmlns="http://www.w3.org/1999/xhtml"
	xmlns:layout="http://www.ultraq.net.nz/web/thymeleaf/layout">
<head>
<body>
   <span th:text="欢迎    +${session.user_session.username}+  登录"></span>
   <a th:href="@{/logout}">退出登录</a>
</body>
</html>
(6)测试
在浏览器中输入http://localhost:9999/main,则会自动引导到 login.html页面,当在login.html页面中输入姓名zhangsan和密码123后正确跳转到main.html页面。
代码链接地址:https://pan.baidu.com/s/1cfb1jwPun2Yzi_Ac58maDA 提取码: zc6r


 1431
1431


 被折叠的 条评论
为什么被折叠?
被折叠的 条评论
为什么被折叠?
 到【灌水乐园】发言


