社区版hiveserver2集成ldap

引言
HiveServer2支持多种认证方式,通过hive.server2.authentication参数来设置,包括nosasl, none, ldap, kerberos, pam, custom。

如果是阿里云EMR的话参考:HiveServer2集成LDAP做用户认证-阿里云开发者社区

我这里是社区版本。

配置

配置 值 备注
hive.server2.authentication LDAP 这里如果是可以是kerberos、ldap、null等等。如果是kerberos的话就是连接jdbc的时候需要使用到对应的principal。
hive.server2.authentication.ldap.url ldap://http://xxx.xx.xx.xxx:389 ldap的url。可以填写ip或者是host。或者使用ldaps。
hive.server2.authentication.ldap.baseDN ou=People,dc=dtsatck,dc=com 绑定的用户的ou,这里解释可能不太准确。LDAP base DN (distinguished name).
hive.server2.authentication.ldap.userDNPattern cn=%s,ou=People,dc=dtstack,dc=com 匹配下面的所有用户。A COLON-separated list of string patterns to represent the base DNs for LDAP Users. Use “%s” where the actual username is to be plugged in. See User Search List for details.

配置示例:

#新增/修改下列参数
<property>
    <name>hive.server2.authentication</name>
    <value>LDAP</value>
</property>
<property>
    <name>hive.server2.authentication.ldap.baseDN</name>
    <value>ou=People,dc=dtstack,dc=com</value>
</property>
<property>
    <name>hive.server2.authentication.ldap.url</name>
    <value>ldap://172.16.84.xx:389</value>
</property>
<property>
    <name>hive.server2.authentication.ldap.userDNPattern</name>
    <value>cn=%s,ou=People,dc=dtstack,dc=com</value>
</property>

修改完hive-site.xml配置后,重启一下HiveServer2,即可以生效。

PS:如果个人还有更多的配置需求,甚至group相关配置,可以参考官网配置:https://cwiki.apache.org/confluence/display/Hive/Configuration+Properties

LDAP中添加账号
在这里插入图片描述

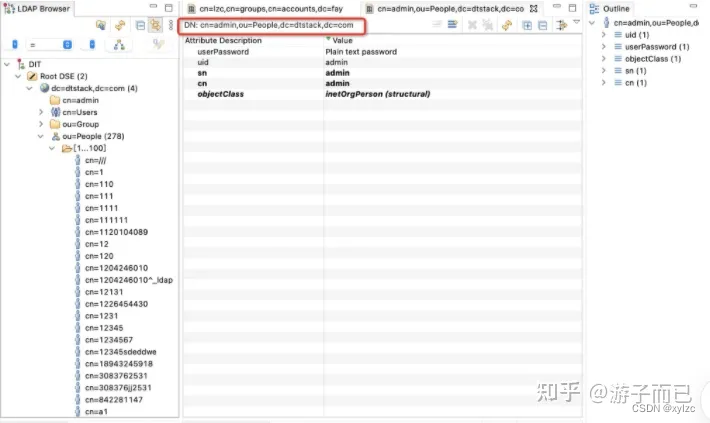
我这里是使用apacheds添加和修改用户的。地址:Downloads - Apache Directory

当然也可以使用命令写ldap的ldif文件去创建用户。两者都是可以的。

测试
在这里插入图片描述

成功。

如上可以正常连接。

如果使用的密码不正确,则会抛如下异常:
Error: Could not open client transport with JDBC Uri: jdbc:hive2://xxxx:10004/: Peer indicated failure: Error validating the login (state=08S01,code=0)

PS:这里端口不要care,这里我这边是修改了hiveserver2的默认端口,改成了10004而已。默认应该是10000。

  • 0
    点赞
  • 0
    收藏
    觉得还不错? 一键收藏
  • 0
    评论
在 Spring Boot 中,可以使用 Spring LDAP 来实现 LDAP 认证。具体步骤如下: 1. 配置 pom.xml,引入 Spring LDAP 相关依赖: ```xml <dependency> <groupId>org.springframework.ldap</groupId> <artifactId>spring-ldap-core</artifactId> <version>${spring-ldap.version}</version> </dependency> ``` 2. 配置 application.yml,设置 LDAP 连接信息: ```yaml spring: ldap: urls: ldap://localhost:389 base: dc=my-domain,dc=com username: cn=Manager,dc=my-domain,dc=com password: password ``` 3. 实现 LdapUserDetailsMapper,将 LDAP 用户信息映射为 Spring Security User 对象: ```java @Component public class LdapUserDetailsMapper implements UserDetailsContextMapper { @Override public UserDetails mapUserFromContext(DirContextOperations ctx, String username, Collection<? extends GrantedAuthority> authorities) { String password = (String) ctx.getObjectAttribute("userPassword"); List<GrantedAuthority> grantedAuthorities = new ArrayList<>(); for (GrantedAuthority authority : authorities) { grantedAuthorities.add(new SimpleGrantedAuthority(authority.getAuthority())); } return new User(username, password, grantedAuthorities); } @Override public void mapUserToContext(UserDetails user, DirContextAdapter ctx) { throw new UnsupportedOperationException("Not supported yet."); } } ``` 这里将 LDAP 中的 "userPassword" 属性作为密码,LDAP 中的权限信息作为 Spring Security 的 GrantedAuthority 对象,最终将它们封装为一个 User 对象。 4. 配置 WebSecurityConfigurerAdapter,实现 LDAP 认证: ```java @Configuration @EnableWebSecurity public class WebSecurityConfig extends WebSecurityConfigurerAdapter { @Autowired private LdapUserDetailsMapper ldapUserDetailsMapper; @Autowired private Environment env; @Override protected void configure(HttpSecurity http) throws Exception { http.authorizeRequests() .antMatchers("/admin/**").hasRole("ADMIN") .antMatchers("/user/**").hasRole("USER") .anyRequest().authenticated() .and() .formLogin() .and() .logout(); http.csrf().disable(); } @Override protected void configure(AuthenticationManagerBuilder auth) throws Exception { auth.ldapAuthentication() .userSearchBase(env.getProperty("spring.ldap.user-search-base")) .userSearchFilter(env.getProperty("spring.ldap.user-search-filter")) .groupSearchBase(env.getProperty("spring.ldap.group-search-base")) .groupSearchFilter(env.getProperty("spring.ldap.group-search-filter")) .contextSource() .url(env.getProperty("spring.ldap.urls")) .managerDn(env.getProperty("spring.ldap.username")) .managerPassword(env.getProperty("spring.ldap.password")) .and() .userDetailsContextMapper(ldapUserDetailsMapper); } } ``` 这样就可以通过 LDAP 认证来控制访问权限了。在这个例子中,请求 "/admin/**" 的用户需要拥有 ADMIN 角色,请求 "/user/**" 的用户需要拥有 USER 角色,其他请求需要认证通过即可访问。

“相关推荐”对你有帮助么?

  • 非常没帮助
  • 没帮助
  • 一般
  • 有帮助
  • 非常有帮助
提交
评论
添加红包

请填写红包祝福语或标题

红包个数最小为10个

红包金额最低5元

当前余额3.43前往充值 >
需支付:10.00
成就一亿技术人!
领取后你会自动成为博主和红包主的粉丝 规则
hope_wisdom
发出的红包
实付
使用余额支付
点击重新获取
扫码支付
钱包余额 0

抵扣说明:

1.余额是钱包充值的虚拟货币,按照1:1的比例进行支付金额的抵扣。
2.余额无法直接购买下载,可以购买VIP、付费专栏及课程。

余额充值