


 本文详细介绍了如何实现一个类似饿了么首页的导航栏,包括需求分析、实现思路、布局编写和代码实现。使用ViewPager创建可左右滑动的页面,每页展示两行四列的图标矩阵,底部有导航点,单选图标时会改变颜色。通过自定义布局和适配器,实现了图标数量不足时只显示一行的功能。
1、需求分析
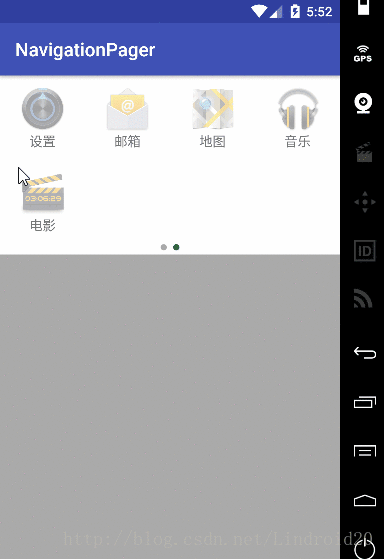
在饿了么首页中我们能看到这样的布局(如下图)。红框内是一个可以左右滑动的页面,每一个页面类似于九宫格,都有可供点击图标。对于这样的布局,我在网上找了很久都没有找到相关的名称,所以我这里暂时叫它导航页吧。

最近公司的项目就要求我实现一个这样的布局,但是我们的图标并不是想饿了么这样是固定的,所以在饿了么的布局上还要加一个效果:在图标数目无法排满两行时,就只显示一行。比如说,我们每一页最多可以显示两行和四列,当图标的总数目小于或等于4个时就只显示出一行,第二行就不要了。这样页面就不至于留出太多的空白。
先梳理一下我们要实现的效果:
1. 大体的框架是一个可以左右滑动的页面;
2. 每一页为两行四列的矩阵;
3. 底部有和页面数目相等的导航点,且滑动到某个页面时,相应的导航点会改变颜色;
4. 单选事件:选中图标后,图标变为完全不透明。
明白需求之后,我们穿越时空看看最后实现后的布局:
图片资源大家可以在我源码中找到。
2、实现思路
我们已经分析了需求,现在就来分析一下怎么实现。
必须事先说明一下,我的实现方法比较暴力,也比较占资源,所以大家要是有更好的方法的话欢迎留言告诉我,我们互相学习。
首先,这是一个左右滑动的页面,所以我们可以考虑使用ViewPager我们每个页面有8个图标,也就是8个item。在图标的数目在4以下时就只显示第一行,所以布局上我们可以将四个item作为一行放置到横向的线性布局中,当第二行没有图标时就让它消失。
ViewPager中的每一页的布局都是一样,所以我们可以对其复用:将图标分组,每8个为一组(余下的不到八页也归为一组),每一组即为一页。每次滑动的页面时就加载布局,填充图标和文字。
下面的导航点就比较简单了,可以使用ViewPager的滑动监听事件进行监听,滑动到选中的页面时就改变导航点的颜色。
至于透明,我们只需要记录图标的选中状态,然后改变透明度即可。
3、编写布局
接下来就让我们创建项目,编写页面布局吧。
在Android Studio中创建一个NavigationPager项目,MainActivity的布局如下:
activity_main.xml
<?xml version="1.0" encoding="utf-8"?>
<LinearLayout xmlns:android="http://schemas.android.com/apk/res/android"
    xmlns:tools="http://schemas.android.com/tools"
    android:layout_width="match_parent"
    android:layout_height="match_parent"
    android:orientation="vertical"
    android:background="@android:color/darker_gray"
    tools:context="com.lindroid.navigationpager.MainActivity">

    <com.lindroid.navigationpager.CustomViewPager
        android:background="@android:color/white"
        android:id="@+id/vp_navigation"
        android:layout_width="match_parent"
        android:layout_height="wrap_content"
        >
    </com.lindroid.navigationpager.CustomViewPager>

    <LinearLayout
        android:background="@android:color/white"
        android:layout_gravity="center_horizontal"
        android:gravity="center"
        android:id="@+id/ll_dots"
        android:orientation="horizontal"
        android:layout_below="@+id/vp_navigation"
        android:layout_width="match_parent"
        android:layout_height="wrap_content">
    </LinearLayout>

</LinearLayout>
MainActivity的主布局是一个纵向的线性布局,上面一个ViewPager,下面一个横向的线性布局,用于放置导航点。这里得说一下ViewPager的特性,在不指定特定高度的情况下,ViewPager的高度是默认填充整个父布局的,我们显然不希望这样,毕竟我们还要分一行和两行两种情况呢。所以这里我在这里使用了一个可以自适应高度的自定义ViewPager:
CustomViewPager
/**
 * Created by Lindroid on 2017/3/20.
 * 自适应高度的ViewPager
 */

public class CustomViewPager extends ViewPager {

    public CustomViewPager(Context context) {
        super(context);
    }

    public CustomViewPager(Context context, AttributeSet attrs) {
        super(context, attrs);
    }

    @Override
    protected void onMeasure(int widthMeasureSpec, int heightMeasureSpec) {

        int height = 0;
        for (int i = 0; i < getChildCount(); i++) {
            View child = getChildAt(i);
            child.measure(widthMeasureSpec, MeasureSpec.makeMeasureSpec(0, MeasureSpec.UNSPECIFIED));
            int h = child.getMeasuredHeight();
            if (h > height)
                height = h;
        }

        heightMeasureSpec = MeasureSpec.makeMeasureSpec(height, MeasureSpec.EXACTLY);

        super.onMeasure(widthMeasureSpec, heightMeasureSpec);
    }
}
页面的布局(也就是ViewPager的子布局)可以拆分成两个横向排列的布局:
<?xml version="1.0" encoding="utf-8"?>
<LinearLayout xmlns:android="http://schemas.android.com/apk/res/android"
    android:orientation="vertical"
    android:layout_width="match_parent"
    android:layout_height="wrap_content">

    <LinearLayout
        android:orientation="vertical"
        android:layout_width="match_parent"
        android:layout_height="wrap_content">

        <include layout="@layout/layout_line1"/>
        <include layout="@layout/layout_line2"/>

    </LinearLayout>

</LinearLayout>
layout_line1.xml和layout_line2.xml分别为第一行和第二行的布局,下面是layout_line1.xml的布局。layout_line2.xml除了控件的id名不同之外,其他的都一样,这里就不贴出来了。
<?xml version="1.0" encoding="utf-8"?>
<LinearLayout xmlns:android="http://schemas.android.com/apk/res/android"
    android:orientation="horizontal"
    android:weightSum="4"
    android:layout_width="match_parent"
    android:layout_height="wrap_content">

    <LinearLayout

        android:id="@+id/ll_item1"
        android:gravity="center"
        android:padding="10dp"
        android:orientation="vertical"
        android:layout_width="0dp"
        android:layout_weight="1"
        android:layout_height="wrap_content">

        <ImageView

            android:id="@+id/iv_icon1&#
最低0.47元/天 解锁文章


 945
945

 被折叠的 条评论
为什么被折叠?
被折叠的 条评论
为什么被折叠?
 到【灌水乐园】发言


