


setContentView的实现位于Activity类中,
public void setContentView(int layoutResID) {
getWindow().setContentView(layoutResID);
initWindowDecorActionBar();
}
public void setContentView(View view) {
getWindow().setContentView(view);
initWindowDecorActionBar();
}
public void setContentView(View view, ViewGroup.LayoutParams params) {
getWindow().setContentView(view, params);
initWindowDecorActionBar();
}
利用布局文件时调用第一个实现方式,我们以第一个为例进行分析。
1.getWindow().setContentView(layoutResID)
public Window getWindow() {
return mWindow;
}
mWindow是Activity类的私有变量,类型为Window
private Window mWindow;
Window是一个抽象类,具体实现为PhoneWindow,所以setContentView()是有PhoneWindow执行的。
我们进入PhoneWindow查看setContentView的实现。
public void setContentView(int layoutResID) {
if (mContentParent == null) {
installDecor();
} else if (!hasFeature(FEATURE_CONTENT_TRANSITIONS)) {
mContentParent.removeAllViews();
}
if (hasFeature(FEATURE_CONTENT_TRANSITIONS)) {
final Scene newScene = Scene.getSceneForLayout(mContentParent, layoutResID,
getContext());
transitionTo(newScene);
} else {
mLayoutInflater.inflate(layoutResID, mContentParent);
}
final Callback cb = getCallback();
if (cb != null && !isDestroyed()) {
cb.onContentChanged();
}
}
@Override
public void setContentView(View view) {
setContentView(view, new ViewGroup.LayoutParams(MATCH_PARENT, MATCH_PARENT));
}
@Override
public void setContentView(View view, ViewGroup.LayoutParams params) {
if (mContentParent == null) {
installDecor();
} else if (!hasFeature(FEATURE_CONTENT_TRANSITIONS)) {
mContentParent.removeAllViews();
}
if (hasFeature(FEATURE_CONTENT_TRANSITIONS)) {
view.setLayoutParams(params);
final Scene newScene = new Scene(mContentParent, view);
transitionTo(newScene);
} else {
mContentParent.addView(view, params);
}
final Callback cb = getCallback();
if (cb != null && !isDestroyed()) {
cb.onContentChanged();
}
}
首先判断mContentParent是否为空,如果为空则调用installDecor();
private void installDecor() {
if (mDecor == null) {
mDecor = generateDecor();//生成DecorView
}
if (mContentParent == null) {
mContentParent = generateLayout(mDecor);
}
protected DecorView generateDecor() {
return new DecorView(getContext(), -1);
}
DecorView继承于FrameLayout,它有一个子view即LinearLayout,方向为竖直方向,其内有两个FrameLayout,上面的FrameLayout即为TitleBar之类的,下面的FrameLayout即为我们的ContentView,所谓的setContentView就是往这个FrameLayout里面添加我们的布局View的!
protected ViewGroup generateLayout(DecorView decor) {
//...
//省略一些设置Window样式的代码,直接来看我们最关心的代码!
ViewGroup contentParent =(ViewGroup)findViewById(ID_ANDROID_CONTENT);//此即为mContentParent,为frameLayout
//...
return contentParent;
}
}
简单总结,setContentView使用mLayoutInflater.inflate(),将应用程序界面内容保存到PhoneWindow的mContentParent(FrameLayout类型)中作为子控件。其中inflater 是用来找 res/layout 下的 xml 布局文件,并且实例化。
2.initWindowDecorActionBar()
ACTIONBar的设置。
至此,Activity调用到onCreate函数时,利用setContentView()函数,我们的Layout.xml布局文件已经保存到PhoneWindow类中的mContentParent变量当中,UI控件内容如何显示到屏幕上,则是phoneWindow负责。
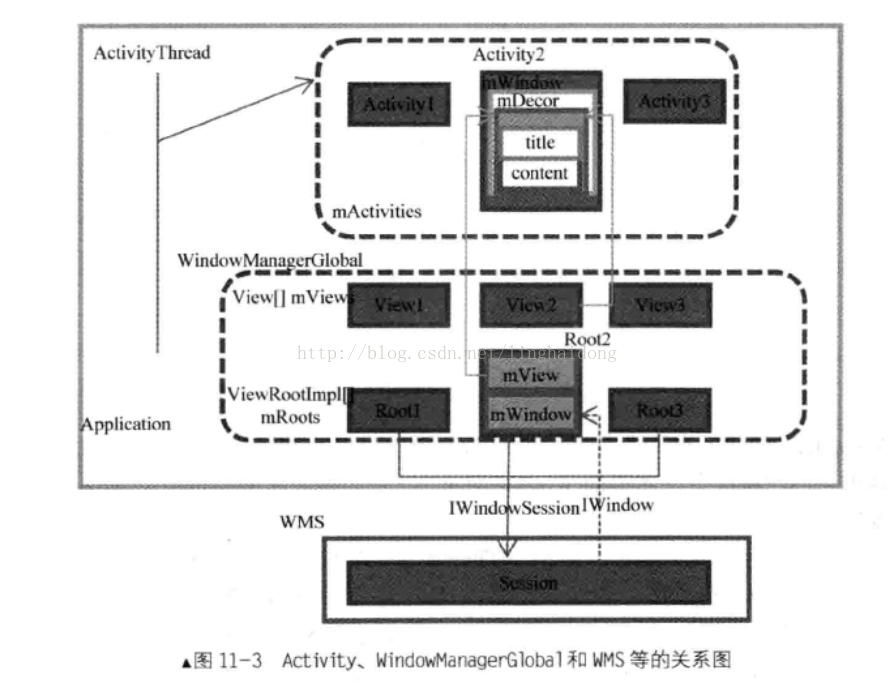
那么Window(PhoneWindow的父类)在GUI系统中UI显示过程中起到什么作用,UI内容如何传给SurfaceFlinger显示?我们先从Activity的创建,Activity的onCreate()函数调用,PhoneWindow的创建开始分析。(图片引用自android内核设计思想)

ActivityThread执行handleResumeActivity时,将会调用WindowManager类的addview,WindowManager是一个接口,实现为WindowManagerImpl类。
WindowManagerImpl类的addView直接调用WindowManagerGlobal类的addView。WindowManagerGlobal的addView函数执行过程中将会创建ViewRootImpl对象,ViewRootImpl是用来管理View以及和WMS通信。ViewRootImpl构造函数中会创建IwindowSession对象用于和WMS通信,同时也会创建IWindow对象保存到wms中,用于WMS和ViewRootImpl通信使用。
WindowManagerGlobal的addView执行过程中将会保存 mViews.add(view); mRoots.add(root); mParams.add(wparams);
此时view的信息都保存到了本地WindowManagerGlobal当中。随后调用setView,利用ViewRootImpl添加view到WMS中。
此过程如下图所示。
WMS中保存的只是窗口状态信息,而没有保存窗口数据内容。
ViewRootImpl类当中,有一个Surface mSurface对象负责窗口数据内容的存储绘制。
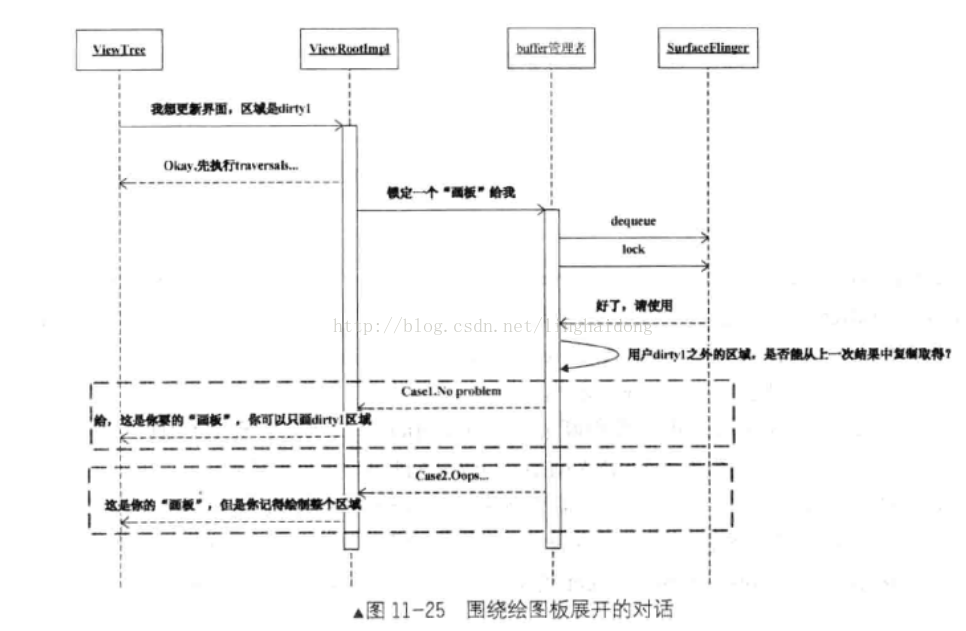
Buffer管理者-BufferQueue负责Buffer的分配,每一个ViewRootImpl即每一个ViewTree对应一个Buffer。ViewTree作为数据生产者SurfaceFlinger作为数据消费者。
SurfaceFlinger从BufferQueue中拿到数据进行渲染合成,放入显示器缓存,最终显示到显示器上。


 1704
1704


 被折叠的 条评论
为什么被折叠?
被折叠的 条评论
为什么被折叠?
 到【灌水乐园】发言


