


约定大于配置!
一、SpringBoot简介及快速搭建
1. 简介
SpringBoot基于Spring开发,继承了Spring框架原有的优秀特性,但并不是来替代Spring的解决方案,而和Spring框架紧密结合进一步简化了Spring应用的整个搭建和开发过程。其设计目的是用来简化Spring应用的初始搭建一级开发过程,主要是通过提供默认配置等方式让我们更容易使用。
关于SpringBoot有一句很出名的话就是约定大于配置。采用SpringBoot可以大大简化开发模式,它集成了大量常用的第三方配置,所有想集成的常用框架,都有对应的组件支持,例如Redis、MongoDB、Dubbo、kafka、ES等。Springboot应用中这些第三方库几乎可以零配置地开箱即用,大部分的SpringBoot应用都只需要非常少量的配置代码,开发者能够更加专注于业务逻辑。另外SpringBoot通过集成大量的框架,使得依赖包的版本冲突以及引用的不稳定性等问题得到了很好的解决。
简化Spring应用开发的一个框架;
对整个企业级开发技术栈的一个大整合;
J2EE开发的一站式解决方案。
优点:
- 快速构建一个独立的Spring应用程序;
- 嵌入的Tomcat、Jetty或者Undertow,无需部署WAR文件(install成一个jar包,通过【java -jar 打包的jar包】 命令即可执行);
- 提供Starter POMs来简化Maven配置和减少版本冲突所带来的问题;
- 提供生产就绪型功能,如指标、健康检查和外部配置;
- 无需配置XML(通过JavaConfig代替了)、无代码生成,开箱即用;
2. 微服务
SpringBoot简化了基于Spring开发,这只是最直观的一方面,还有一个方面,也是得力于各微服务组件的支持,这也是谈SpringBoot必谈微服务的原因。(起初是Netfix移植到Spring)可以说是SpringCloud带动了SpringBoot,SpirngBoot成就了SpringCloud。
传统的web开发架构模式的测试部署比较简单,因为不涉及到多个服务的互联互调,只需要把一个包上传到服务器就行了,同样也不会给运维带来麻烦,方便水平扩展,只需要把相同的应用复制多份放到不同的服务器中就达到了扩展的目的。单体应用的缺点也显而易见,容易牵一发而动全身,比如要更改一个小小的功能,就可能需要重新部署整个应用。当然,更大的挑战就是日益增长的用户需求。
3. SpringBoot Hello World
jdk需要17版本


@RestController
public class TestController {
    @RequestMapping("test")
    public String test() {
        return "hello springboot";
    }
}
启动主启动类后,访问:localhost:8080/test 可以看到以下结果:

以上是在本地IDE中启动访问,还可以将程序打成jar包,放到服务器执行,模拟操作步骤如下:

第一步:打包:install或者package都可以
第二部:打开控制台,或者win+R输入cmd打开运行对话框
第三步:在IDE的控制台或者运行的对话框中输入【java -jar 生成的包名】--> 【回车】,即开启了服务

或

经过以上操作,再去浏览器访问,即可看到返回的结果。
通过命令方式启动程序后,终止程序运行的快捷键:Ctrl + C
4. 代码说明
SpringBoot提供了很多场景启动器starter。
所有的springboot都必须要继承spring-boot-starter-parent,它通过spring-boot-dependencies帮助管理了所有springboot内置的依赖的版本,避免了jar包跟jar包之间的依赖冲突。尚未内置的依赖,导入时依旧需要版本信息。该配置生成项目时就有,2.7.17目前(2025年1月)看来最稳定。
<parent>
	<groupId>org.springframework.boot</groupId>
	<artifactId>spring-boot-starter-parent</artifactId>
	<version>2.7.17</version>
	<relativePath/> <!-- lookup parent from repository -->
</parent>
打包springboot项目为一个jar包:
<build>
	<plugins>
		<plugin>
			<groupId>org.springframework.boot</groupId>
			<artifactId>spring-boot-maven-plugin</artifactId>
		</plugin>
	</plugins>
</build>
jar包可以运行的原理:生成的jar包下有一个叫BOOT-INF的文件夹,里面的lib文件夹中放了很多的jar包;META-INF文件夹中的MANIFEST.MF文件:

① 是运行java -jar后会执行的代码,是自定义的类加载器去加载BOOT-INF中lib里的所有jar包;
② 是我们开发的代码项目的主启动类。
综上所述:spring-boot-maven-plugin帮我们把所有依赖的jar统统放在生成的jar文件里面的BOOT-INF\lib。并且在文件MANIFEST.MF中设置了启动类—JarLauncher,自定义加载器去加载所有的jar;和调用start-class. SpringBoot内嵌Tomcat。
在application.properties中设置懒加载:
spring.main.lazy-initialization=true作用:在使用/访问的时候才创建bean,而不是在Srpingboot加载的时候创建。
自定义SpringApplication主启动类:
public static void main(String[] args) {
	SpringApplication app = new SpringApplication(Springboot2025Application.class);
	app.setBannerMode(Banner.Mode.OFF);  // 可以关闭springboot启动横幅
	app.run(args);
}
可以通过自定义主启动类的方式填加监听器、加载外部配置文件等。
二、SpringBoot配置文件和自动配置原理
配置文件的使用
SpringBoot使用一个全局的配置文件:核心配置文件,配置文件名在约定的情况下名字是固定的;
配置文件的作用:修改SpringBoot自动配置的默认值;SpringBoot在底层给我们自动配置好。
application.properties
application.yml
YAML :Ain't Markup Language,是一个标记语言,
1. 两种配置文件的格式
(属性和值都是大小写敏感的)
在springboot框架中,resource文件夹里可以存放配置的文件有两种:properties和yml
① application.properties的用法:扁平的k/v格式
server.port=8099② application.yml的用法:树形结构(冒号和属性值之间有空格)
server:
  port: 8080
以空格的缩进来控制层级关系;只要是左对齐的一列数据,都是同一个层级的。
如果有特殊字符%&,要用单引号包起来
2. 配置文件的加载顺序
<includes>
    <include>**/application*.yml</include>
    <include>**/application*.yaml</include>
    <include>**/application*.properties</include>
</includes>
如果同时存在不同后缀的文件按照这个顺序加载主配置文件,互补配置。
3. 外部约定配置文件加载顺序
springboot启动还会扫描以下位置的application.properties或者application.yml文件作为SpringBoot的默认配置文件
- classpath类根路径下的
- classpath类路径/config包下的
- 项目根目录:如果当前项目是继承/耦合关系maven项目的话,项目根目录=父maven项目的根目录
- 项目根目录/config
- 直接子目录/config的子目录:java -jar 打包的jar包 --server.port=8098
优先级由低到高,高优先级的配置会覆盖低优先级的配置。3和4一般不用,打jar的时候,这两个位置的配置文件也不会打到包里,5的方式是在运行jar包的时候,以【--】开始写上配置信息,该配置信息的优先级最高。第5个优先级还可以指定外部配置文件的位置,如果是文件夹,最后需要以“/”结尾:

4. Profile文件的加载
Profile的意思是配置,对于应用程序来说,不同的环境需要不同的配置,SpringBoot框架提供了profile的管理功能,可以使用profile功能来区分不同环境的配置。
① 多Profile文件
Spring官方给出的语法规则是application-(profile).properties (.yaml / .yml)。
② 如果需要创建自定义的properties文件时,可以用application-xxx.properties的命名方式,根据实际情况,公司一般会创建开发环境下使用的properties文件和一个生产环境下使用的properties文件,其中只对端口进行了配置,例如

dev为开发环境,prod为生产环境,默认识别的是application.yml配置文件,三个文件具体的配置如下:
application-dev.yml
server:
  port: 8080
#开发环境的数据库信息等
application-prod.yml
server:
  port: 8081
#生产环境的数据库信息等
application.yml (意为使用生产环境application-prod.yml的配置)
spring:
  profiles:
    active: prod
经上操作,运行时启动的是生产环境的端口:

5. 配置文件值注入
将yaml映射到属性
① 字面量:普通的值(数字、字符串、布尔)
| k: v | 字面直接来写;字符串默认不用加上单引号或者双引号; | |
| "" | 双引号:不会转义字符串里面的特殊字符;特殊字符会作为本身想表示的意思 | name: "zhangsan \n lisi" 输出:zhangsan 换行 lsi |
| '' | 单引号:会转义特殊字符,特殊字符最终只是一个普通的字符串数据 | name: 'zhangsan \n lisi' 输出:zhangsan \n lisi |
② 对象、Map(属性和值)(键值对):
k: v :在下一行来写对象的属性和值的关系;注意缩进;对象还是k: v的方式
friend:
  userName: pattie
  age: 20
行内写法:
info: {userName: pattie, age: 20}数组:(或List、Set)
用 “-值” 表示数组中的一个元素
pets:
  - cat
  - dog
行内写法:
pets: [cat,dog]在配置文件中赋值之后,在java文件中如果想用这些值,可以通过以下方式:
① @Value + SPEL 的方式直接绑定springboot配置文件中的值。
public class Friend {
    @Value("${friend.userName}")
    String userName;
    @Value("${friend.age}")
    int age;
}
② 在实体类上加注解:@ConfigurationProperties(prefix = "friend") ,其中前缀是配置文件中设置的属性的第一层的名称。该注解常用于bean属性和yml配置文件的绑定,prefix可以指定配置文件中某一个节点,该节点的子节点将自动和属性进行绑定。
@ConfigurationProperties(prefix = "friend")
@Component
@Data
public class Friend {
    String userName;
    int age;
}
friend:
age: 20
userName: pattie测试类:
@SpringBootTest
class ConfigfileApplicationTests {
    @Autowired
    private Friend friend;
    @Test
    void contextLoads() {
        System.out.println(friend);
    }
}
运行结果:

prefix指定的配置文件中某一个节点的子节点可以自动和属性进行绑定,且支持松散绑定,例如配置文件中friend的子节点有四种写法均可支持与属性值userName进行绑定,分别为:USERNAME、userName、user_name、user-name。
@Value 获取值和 @ConfigurationProperties(prefix = "friend") 获取值的比较:
| @ConfigurationProperties | @Value | |
| 绑定 | 批量注入配置文件中的属性 | 一个个指定 |
| 松散绑定 | 支持 | 有限支持 |
| SpEL | 不支持 | 支持 |
| 自动提示 | 支持 | 不支持 |
| JSR303数据校验 | 支持 | 支持 |
@ConfigurationProperties 支持自动提示需要加入依赖:(2024版的IDE不用,其他版本不清楚)
<dependency>
	<!-- 会生成META-INF元数据,用于提供idea自动提示配置文件属性-->
	<groupId>org.springframework.boot</groupId>
	<artifactId>spring-boot-configuration-processor</artifactId>
	<!--以来不会传播-->
	<optional>true</optional>
</dependency>
并且在settings中开启一下配置:

③ @PropertySource注解
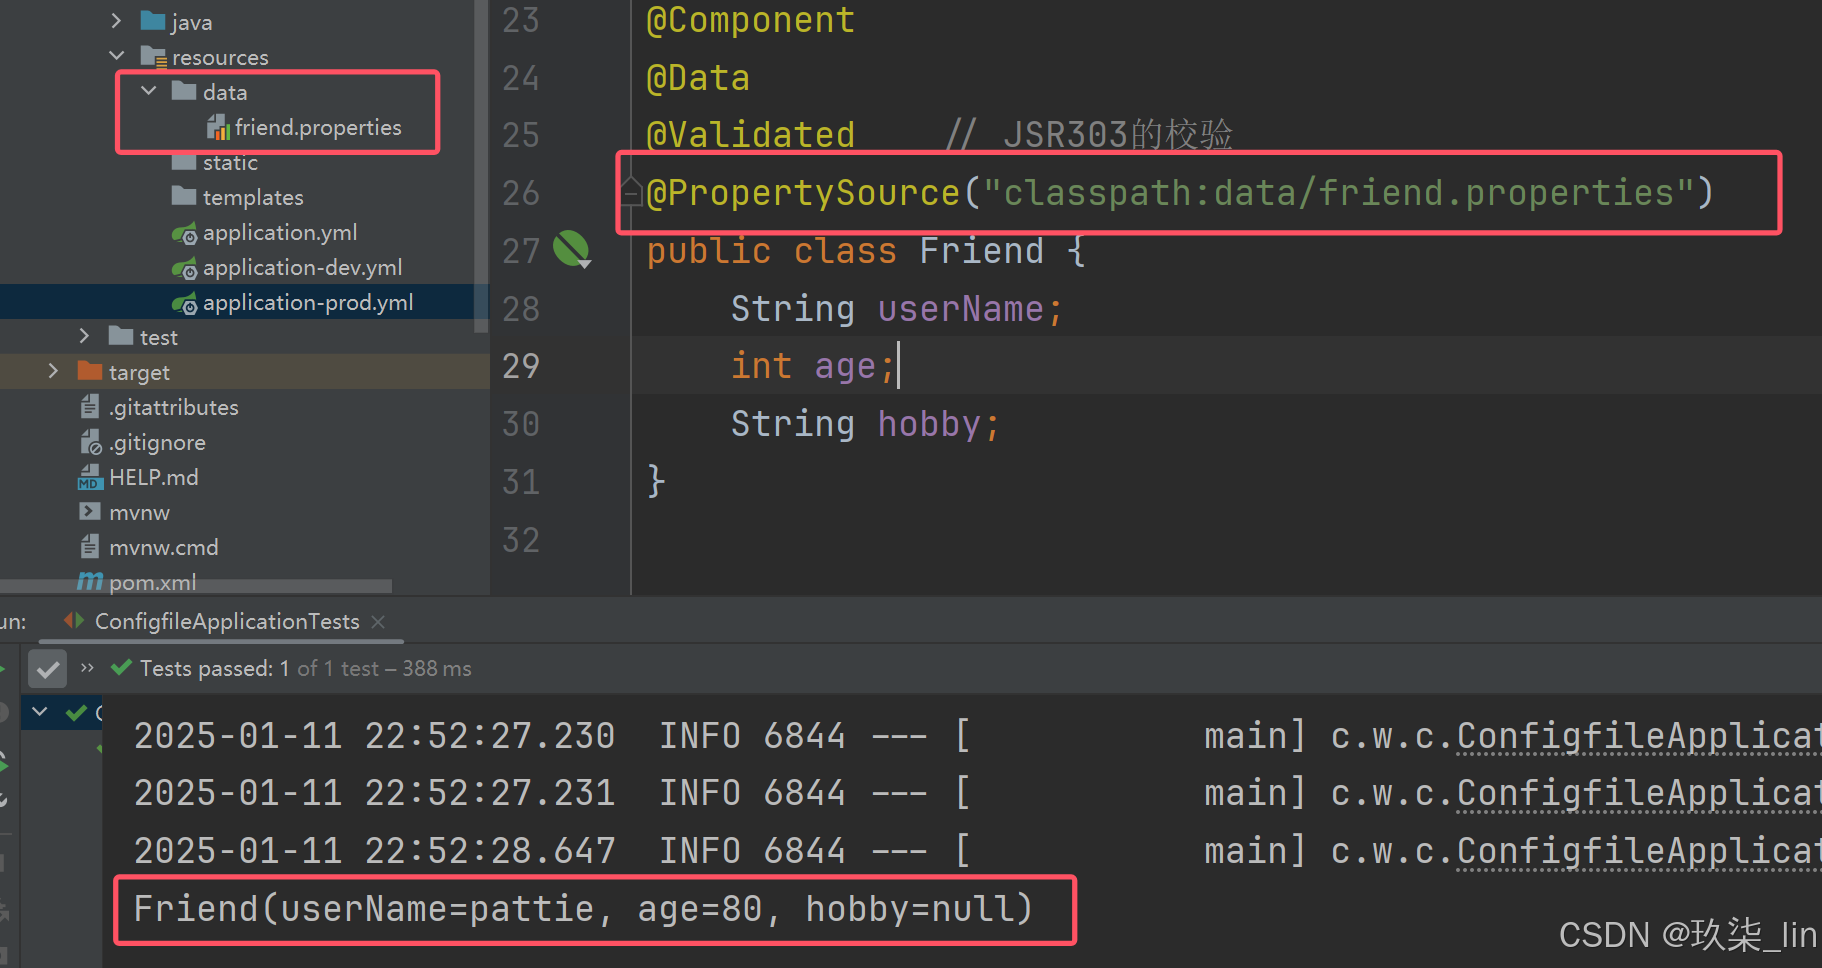
friend.properties文件
friend.age= ${random.int(99)}
friend.userName: pattie
6. 属性占位符
支持对其他属性的引用,以及设置随机值
@ConfigurationProperties(prefix = "friend")
@Component
@Data
public class Friend {
    String userName;
    int age;
    String hobby;
}
friend:
age: ${random.int(99)}
userName: pattie
hobby: ${friend.userName}的兴趣爱好是睡觉运行结果:

其他例子如下所示:

JSR303的校验:@Validated (注意:只对@ConfigurationProperties起作用)
包括@NotNull (javax.validation下的注解) @Nullable @Email等等
@ConfigurationProperties(prefix = "friend")
@Component
@Data
@Validated    // JSR303的校验
public class Friend {
    String userName;
    int age;
    String hobby;
}
需要导入校验的依赖:
<dependency>
	<groupId>org.springframework.boot</groupId>
	<artifactId>spring-boot-starter-validation</artifactId>
</dependency>
<dependency>
	<groupId>javax.validation</groupId>
	<artifactId>validation-api</artifactId>
</dependency>
7. SpringBoot的配置和自动配置原理
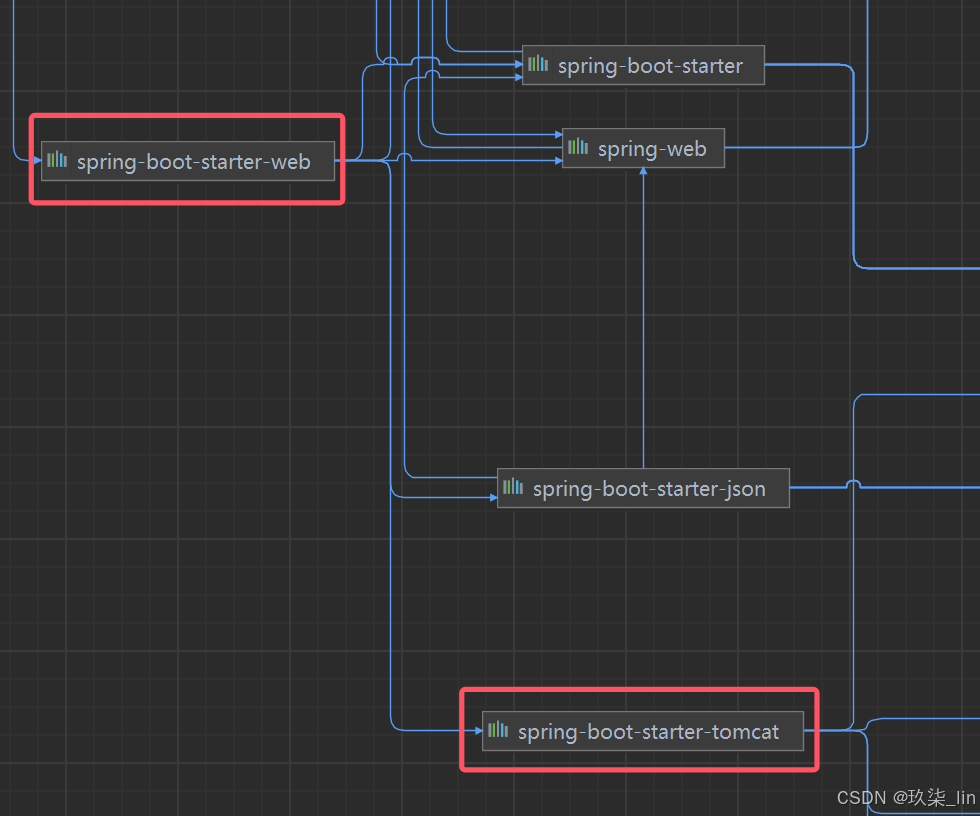
spring-boot-starter-web依赖整合了springMVC和内嵌的Tomcat。
@SpringBootApplication
// 由↑↑↑进入↓↓↓
@Target({ElementType.TYPE})   // TYPE意为类,也就是该注解只能用在类上,如果要用在方法上,需要改为METHOD,多个地方时可以配置为数组
@Retention(RetentionPolicy.RUNTIME) // 意为:注解标注的类编译以什么方式保留。 RetentionPolicy有三个属性值:SOURCE,CLASS,RUNTIME。SOURCE为只保留java类,不保留注解;CLASS为会保留注解在类文件中,但是不会被java虚拟机加载到,通过反射的方式是找不到的。RUNTIME既会被保留在原文件,也会被加载到JVM中。
@Documented    // java doc 会生成注解信息
@Inherited     // 是否会被继承
@SpringBootConfiguration
@EnableAutoConfiguration
@ComponentScan(
    excludeFilters = {@Filter(
    type = FilterType.CUSTOM,
    classes = {TypeExcludeFilter.class}
), @Filter(
    type = FilterType.CUSTOM,
    classes = {AutoConfigurationExcludeFilter.class}
)}
)@SpringBootConfiguration:SpringBoot的配置类;标注在某个类上,表示这是一个SpringBoot的配置类。
- @Configuration:配置类上来标注这个注解;配置类——配置文件;配置类也是容器中的一个组件@Component
@ComponentScan:扫描包,相当于spring.xml配置中的<context:component-scan>,但是并没有指定basepackage,如果没有指定,spring底层会自动扫描当前配置类所有在的包
- TypeExcludeFilter:SpringBoot对外提供的扩展类,可以供我们去按照自己的方式进行排出。
- AutoConfigurationExcludeFilter:排除所有配置类并且是自动配置类里面的其中一个。
@EnableAutoConfiguration:开启自动配置功能;以前需要配置的东西,SpringBoot帮我们自动配置;@EnableAutoConfiguration告诉SpringBoot开启自动配置功能,自动加载配置类,这样自动配置才能生效。
未完待续……
三、SpringBoot日志
1. SpringBoot中的devtools热部署
为了进一步提高开发效率,springboot为我们提供了全局项目热部署,日后在开发过程中修改了部分代码以及相关配置文件后,不需要每次重启使修改生效,在项目中开启了springboot全局热部署之后只需要在修改之后等待几秒即可是修改生效
2. 开启热部署
(1)引入依赖
<dependency>
	<groupId>org.springframework.boot</groupId>
	<artifactId>spring-boot-devtools</artifactId>
</dependency>
(2)IEDA中配置
当修改了类文件后,IDEA不会自动编译,得修改idea设置
① File-Settings-Compiler-勾选Build Project automatically-----
② ctrl+shift+alt+/,选择Registry,勾上Compiler autoMake allow when app running(2024版的IDEA没有这个选项)
(3)启动项目检测热部署是否生效
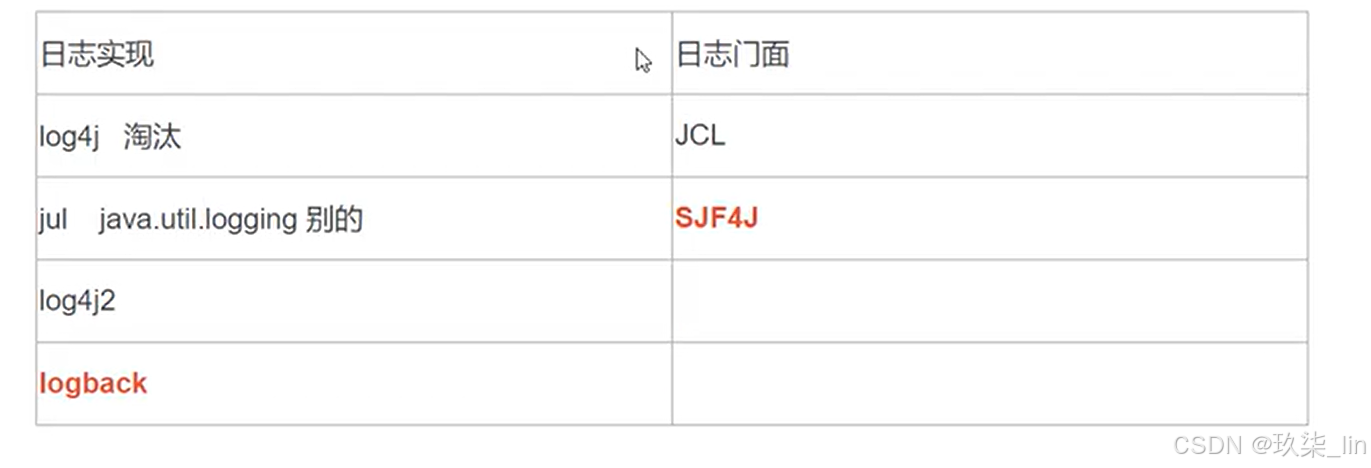
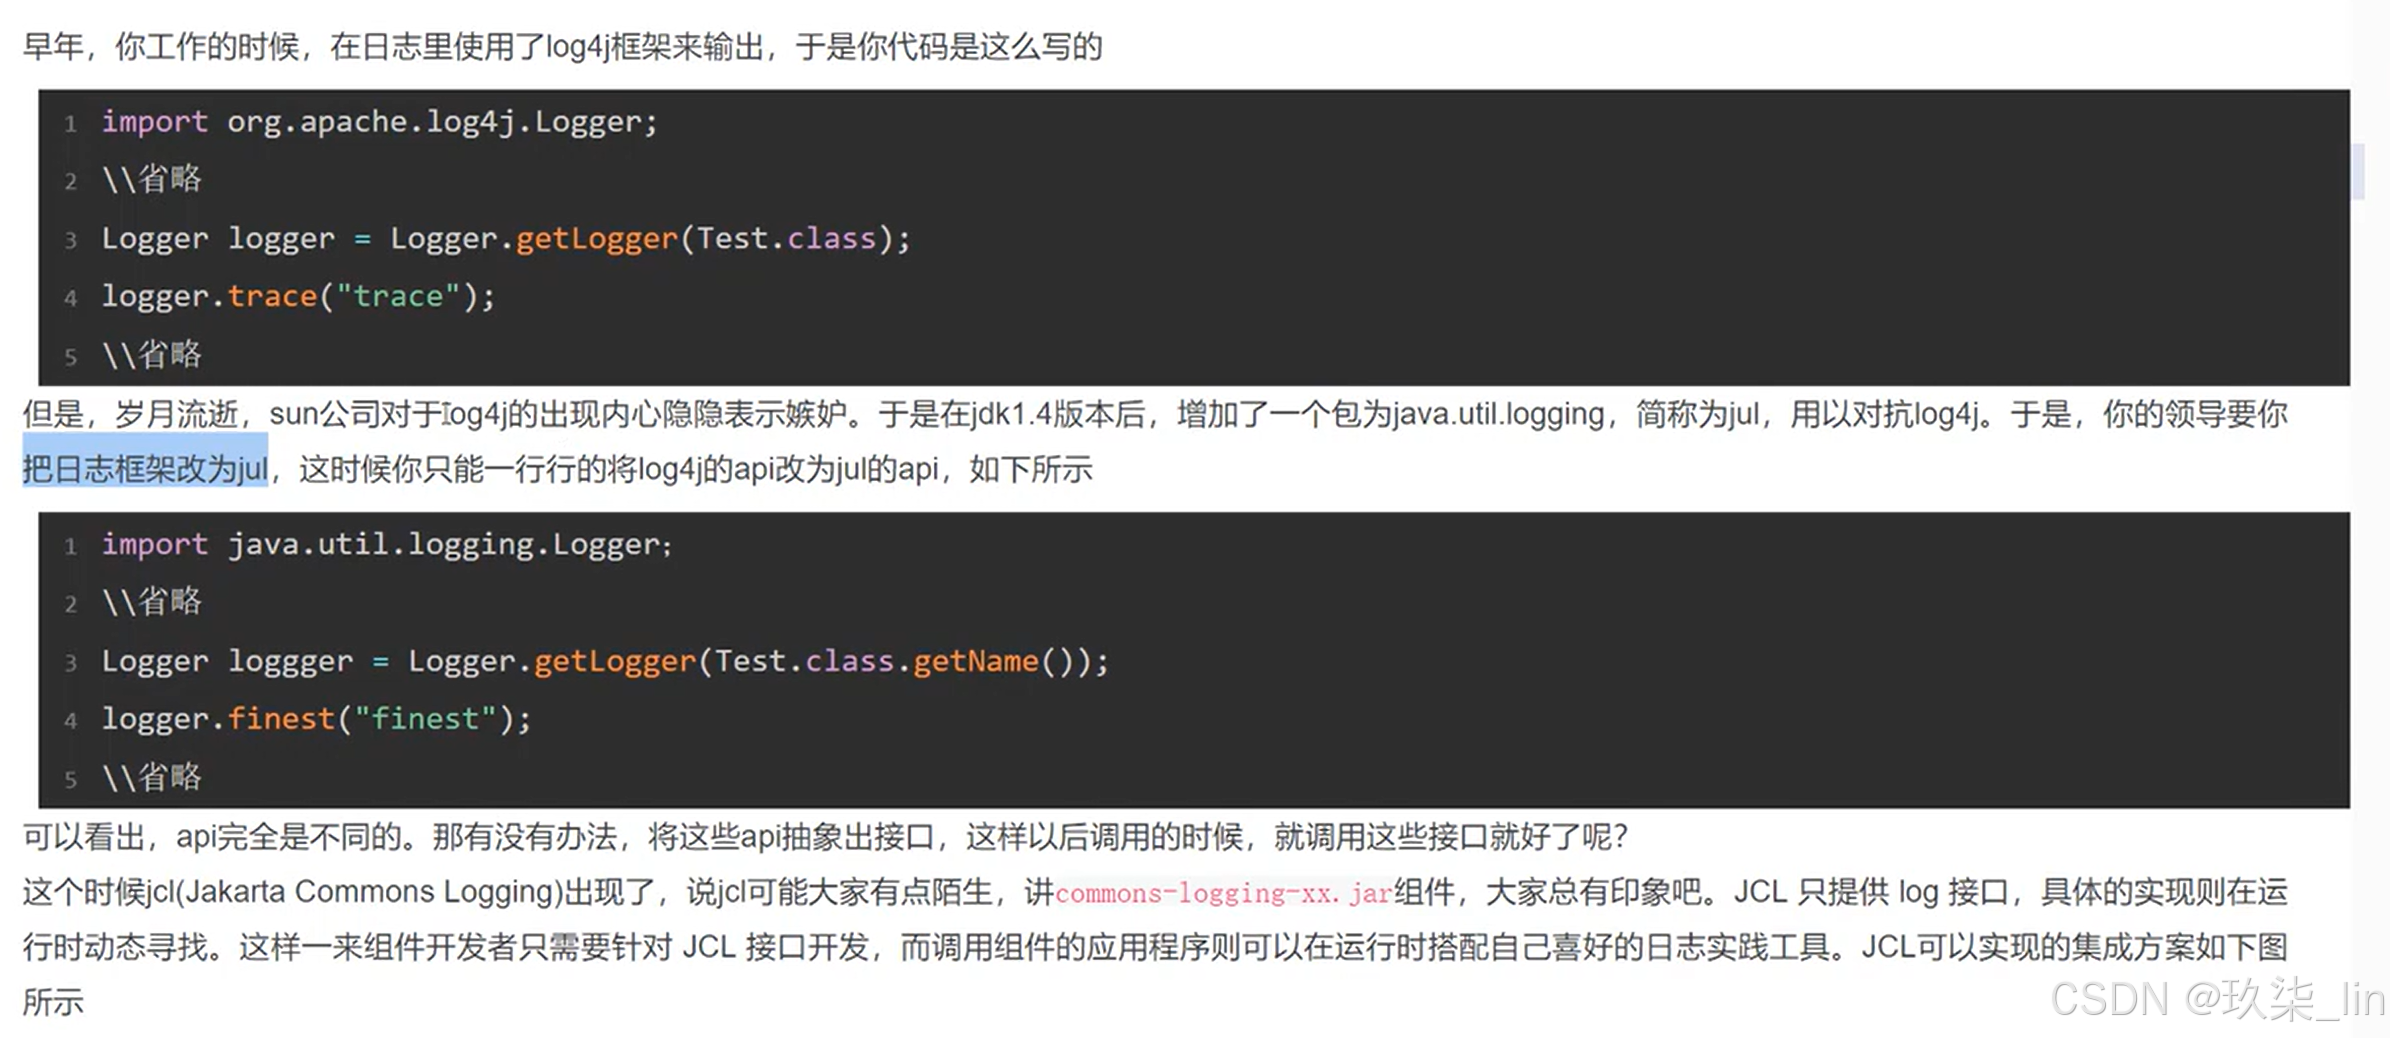
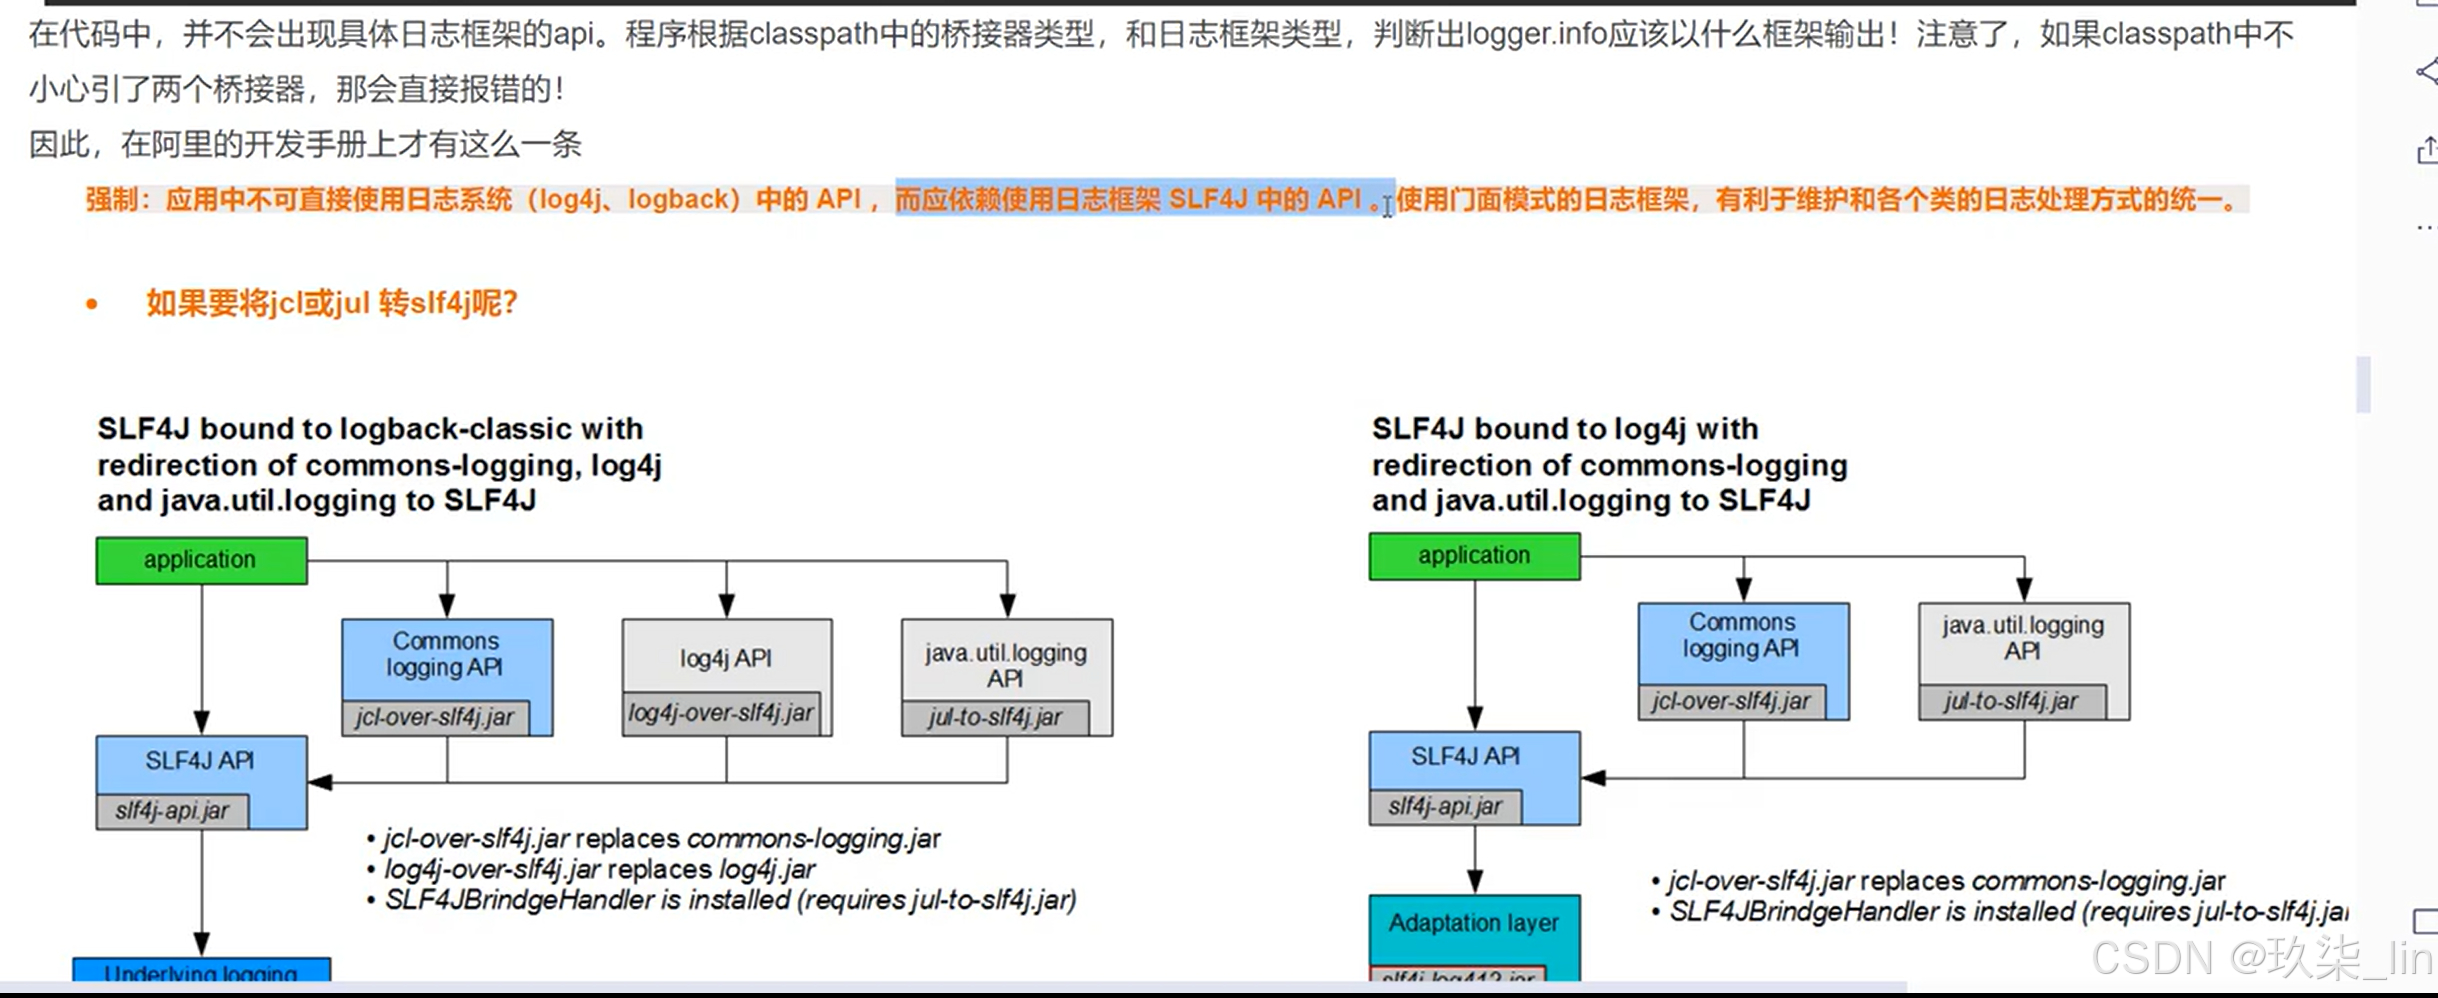
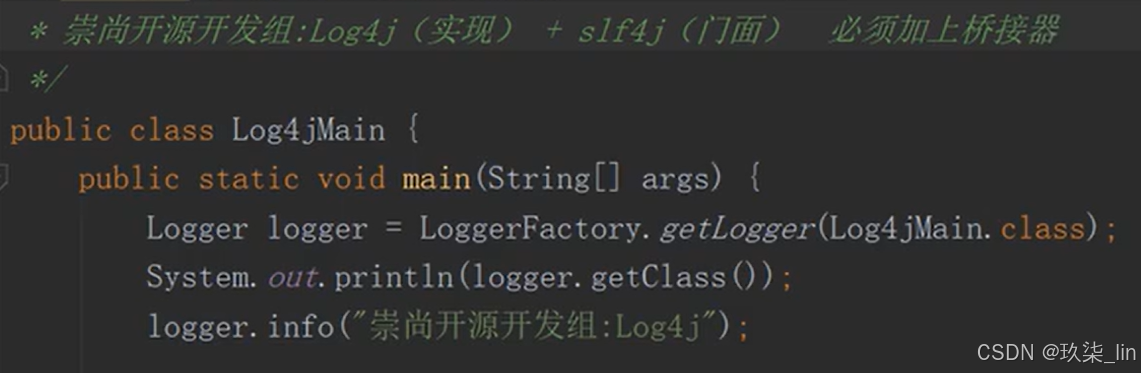
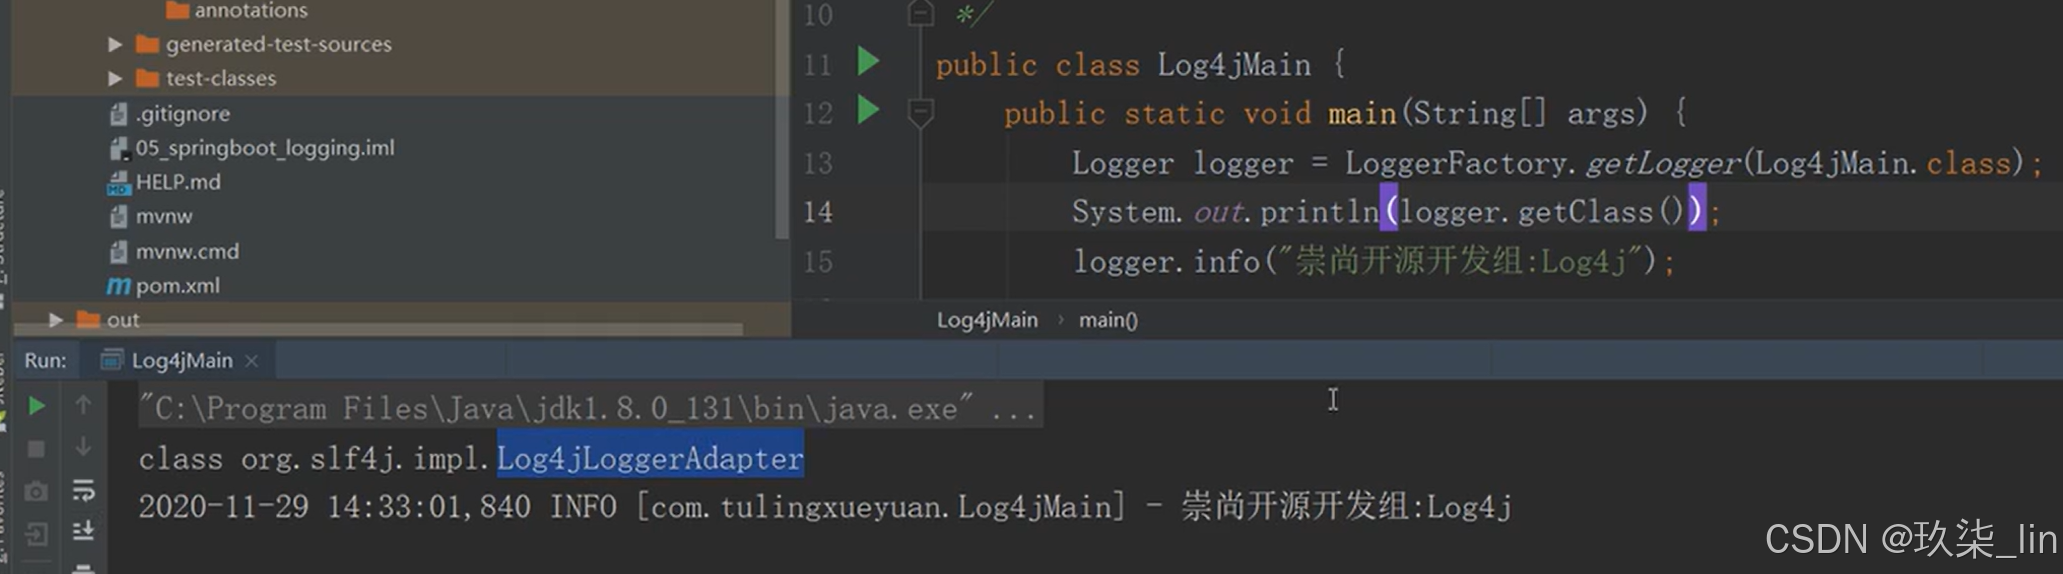
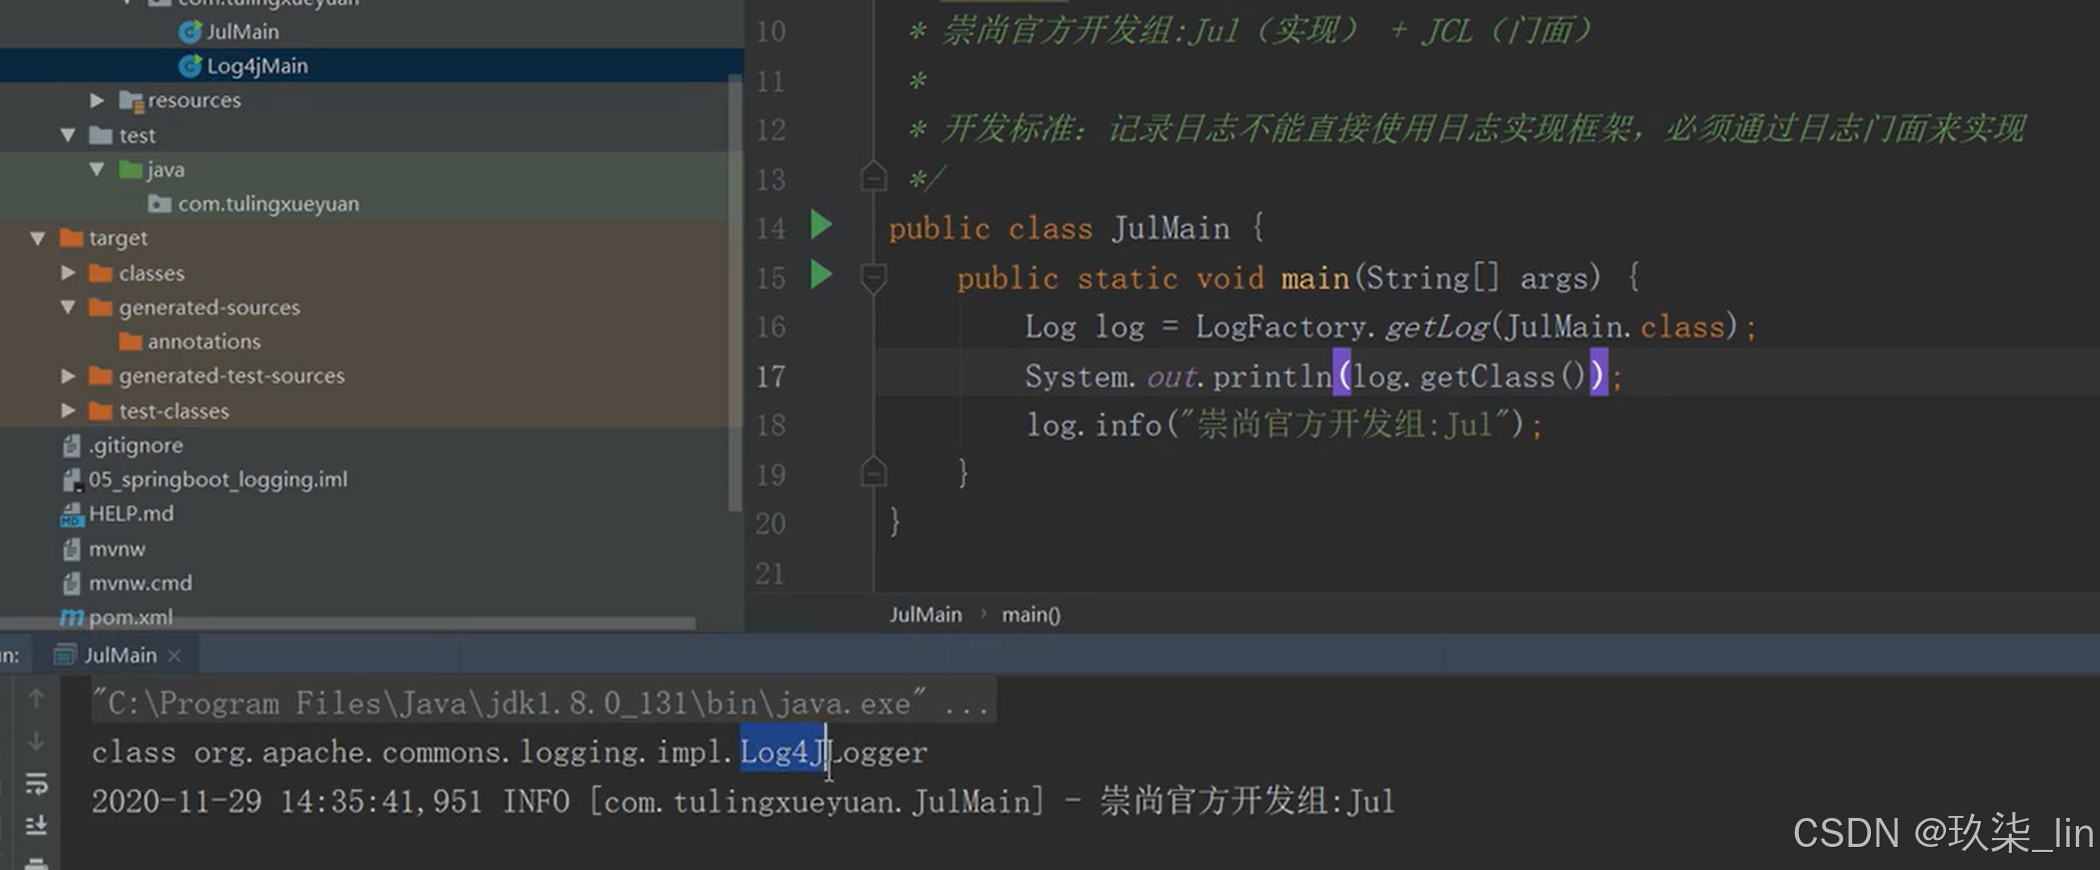
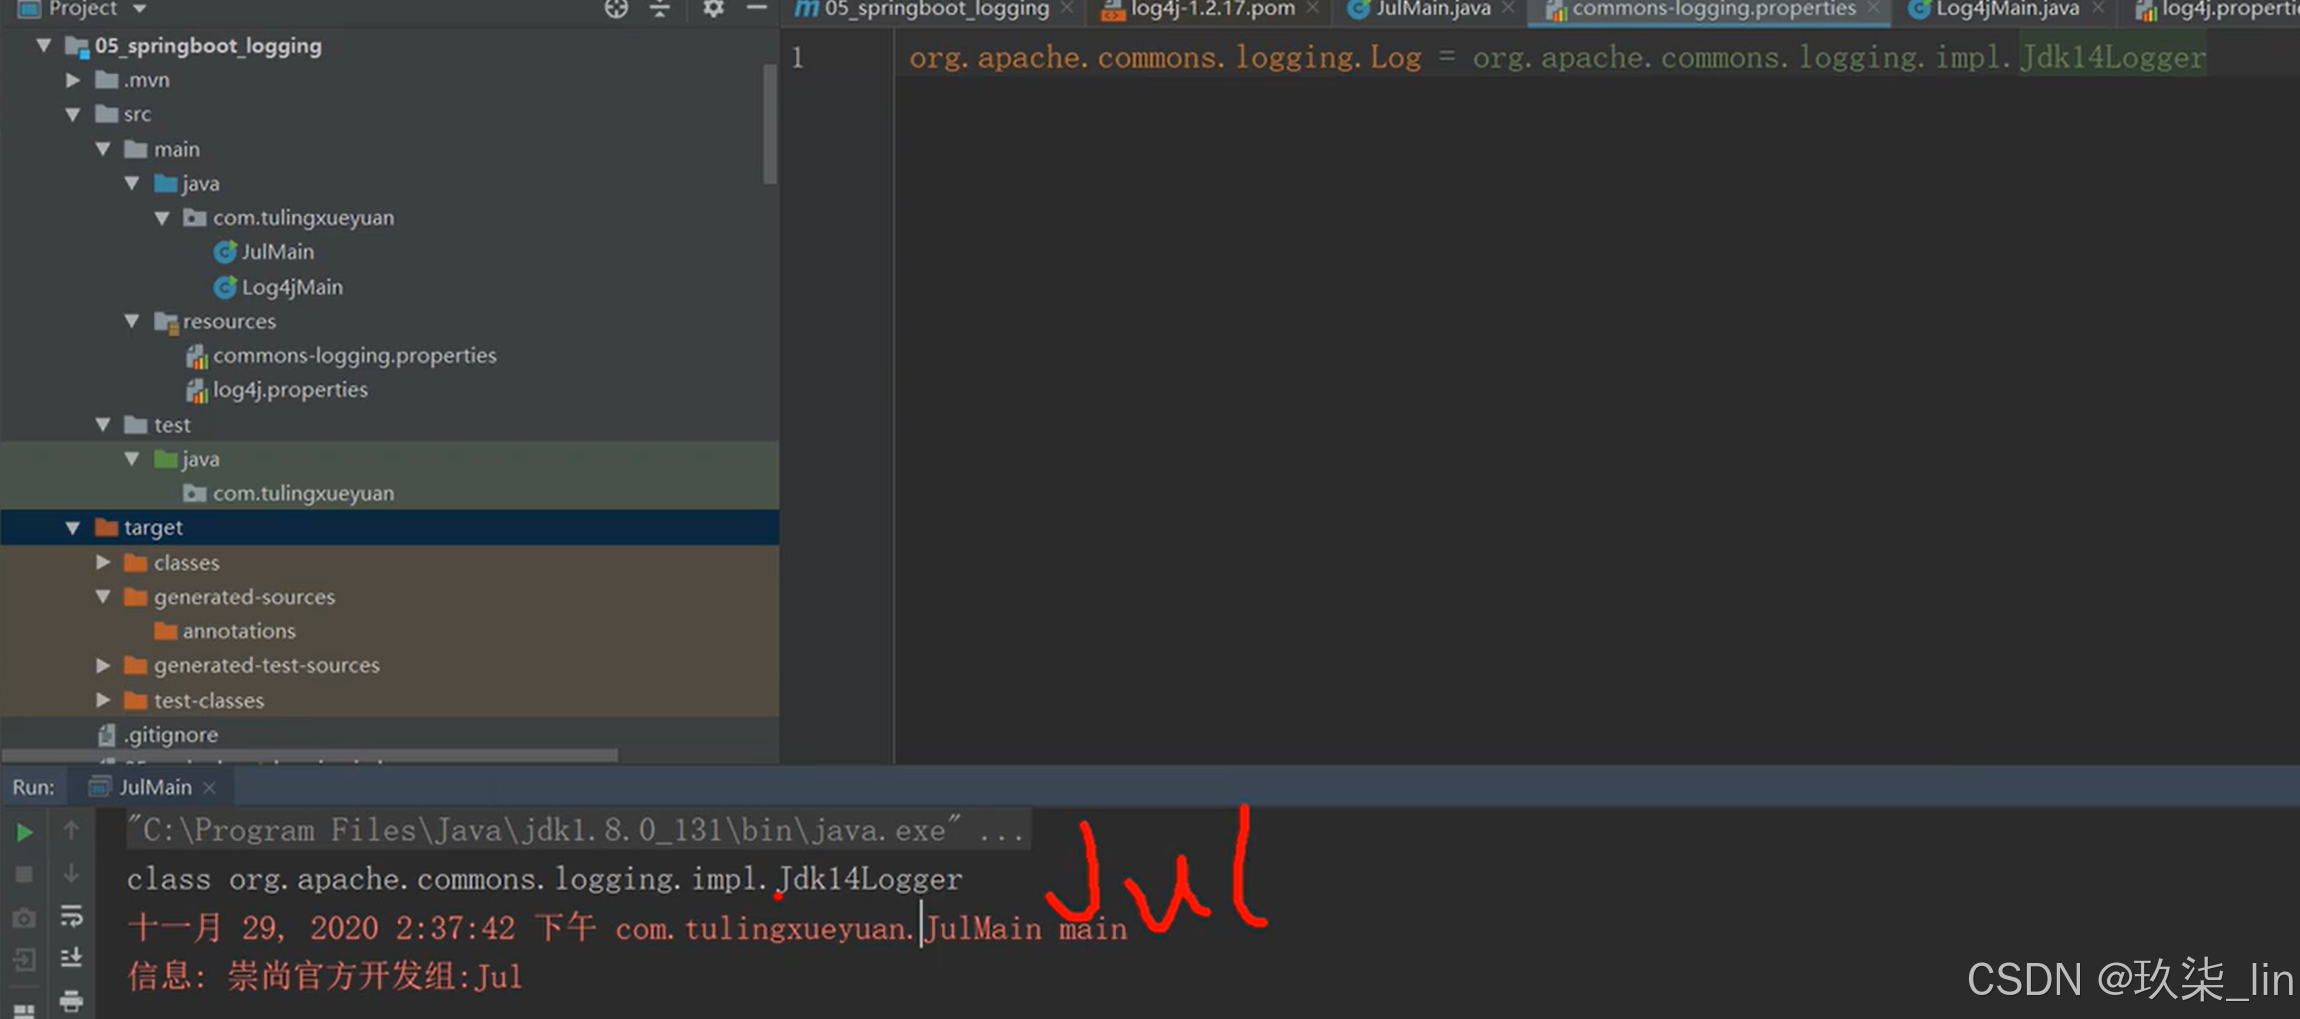
3. 混乱的日志系统
<!--log4j的核心依赖-->
<dependency>
	<groupId>log4j</groupId>
	<artifactId>log4j</artifactId>
	<version>1.2.17</version>
</dependency>
<!--slf4j的核心依赖-->
<dependency>
	<groupId>org.slf4j</groupId>
	<artifactId>slf4j-api</artifactId>
	<version>1.7.36</version>
</dependency>
<!--添加slf4j-log4j桥接器-->
<dependency>
	<groupId>org.slf4j</groupId>
	<artifactId>slf4j-log4j12</artifactId>
</dependency>
<!--引入JCL门面依赖-->
<dependency>
	<groupId>commons-logging</groupId>
	<artifactId>commons-logging</artifactId>
	<version>1.2</version>
</dependency>
<!--为了日志统一实现,将JCL转化到SLF4J,添加JCL-SLF4J的适配器-->
<dependency>
	<groupId>org.slf4j</groupId>
	<artifactId>jcl-over-slf4j</artifactId>
	<version>1.7.30</version>
</dependency>
4. SpringBoot的默认日志框架
logback

总结:
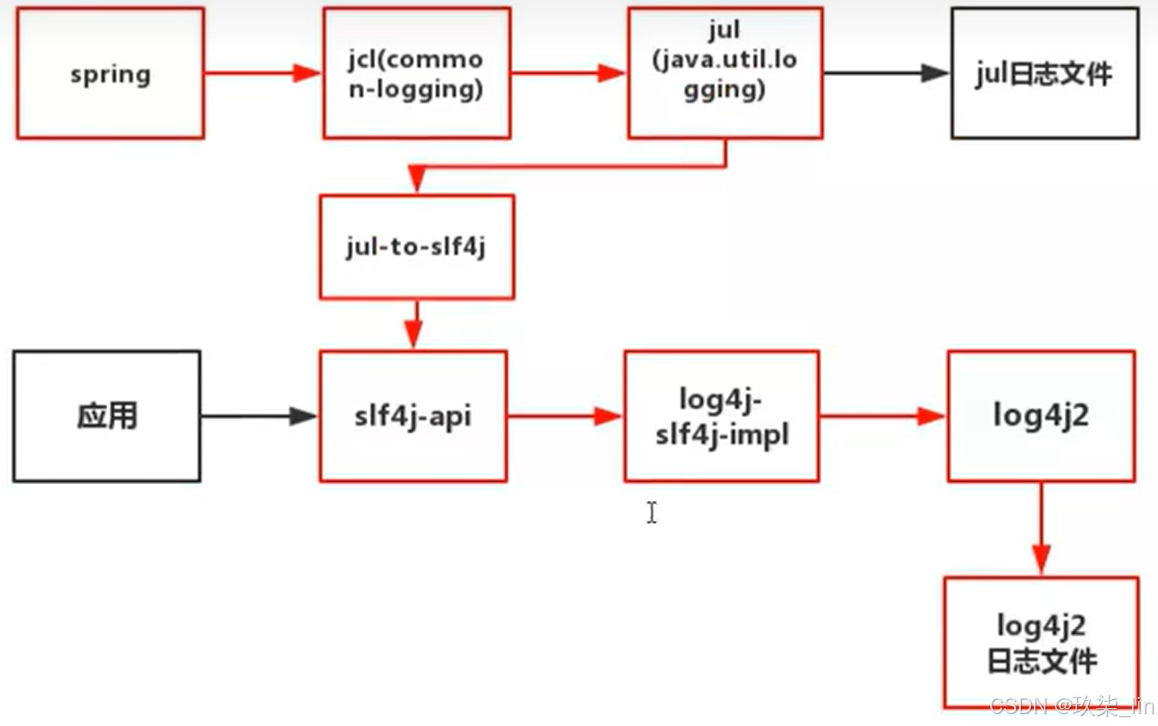
(1)SpringBoot底层也是使用slf4j + logback的方式进行日志记录
- logback桥接:logback + classic
(2)SpringBoot也把其他的日志都替换成了slf4j;
- log4j适配:log4j-over-slf4j
- jul适配:jul-to-slf4j
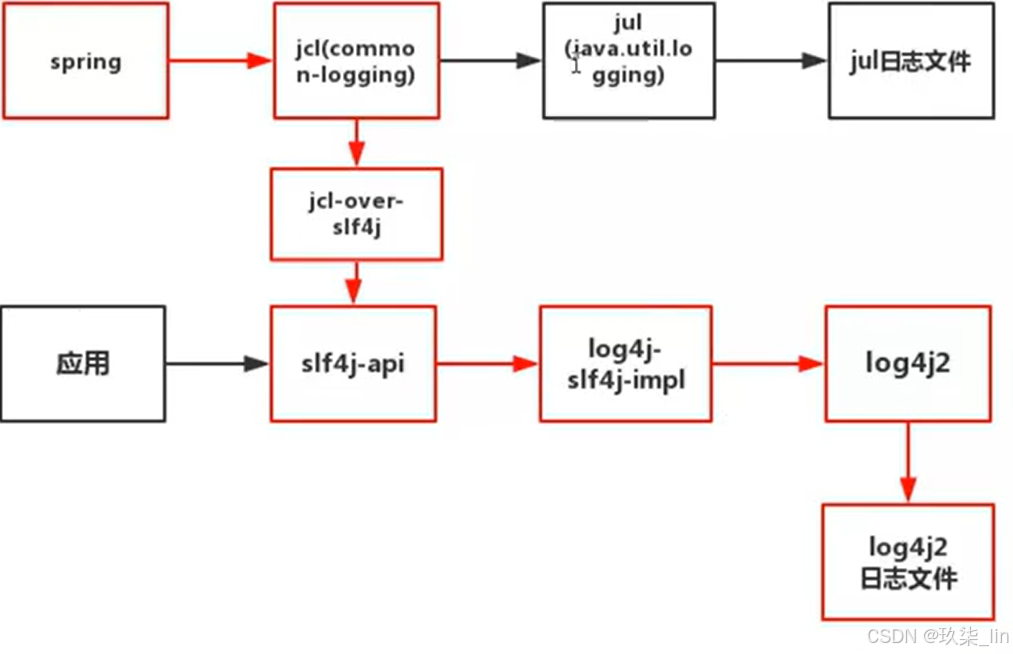
- jcl-over-slf4j
- 这两个适配器都是为了适配Spring的默认日志:jcl
@Log4j注解依赖于Lombok插件。
控制权限范围:该范围还可以自定义自己创建的路径的权限,在level下层级接自己的包路径即可。
logging:
  level:
    root: debug
日志格式:

详细介绍:
- 日期和时间:毫秒精度,易于排序。
- 日志级别:ERROR WARN INFO DEBUG TRACE
- 进程ID
- 一个---分离器来区分实际日志消息的开始
- 线程名称:用方括号括起来(对于控制台输出可能会被截断)。
- 记录器名称:这通常是源类名称(通常缩写)。
- 日志消息。
可以使用以下配置来更改默认的控制台的日志的格式:
logging:
  pattern:
    console:
5. 日志文件输出
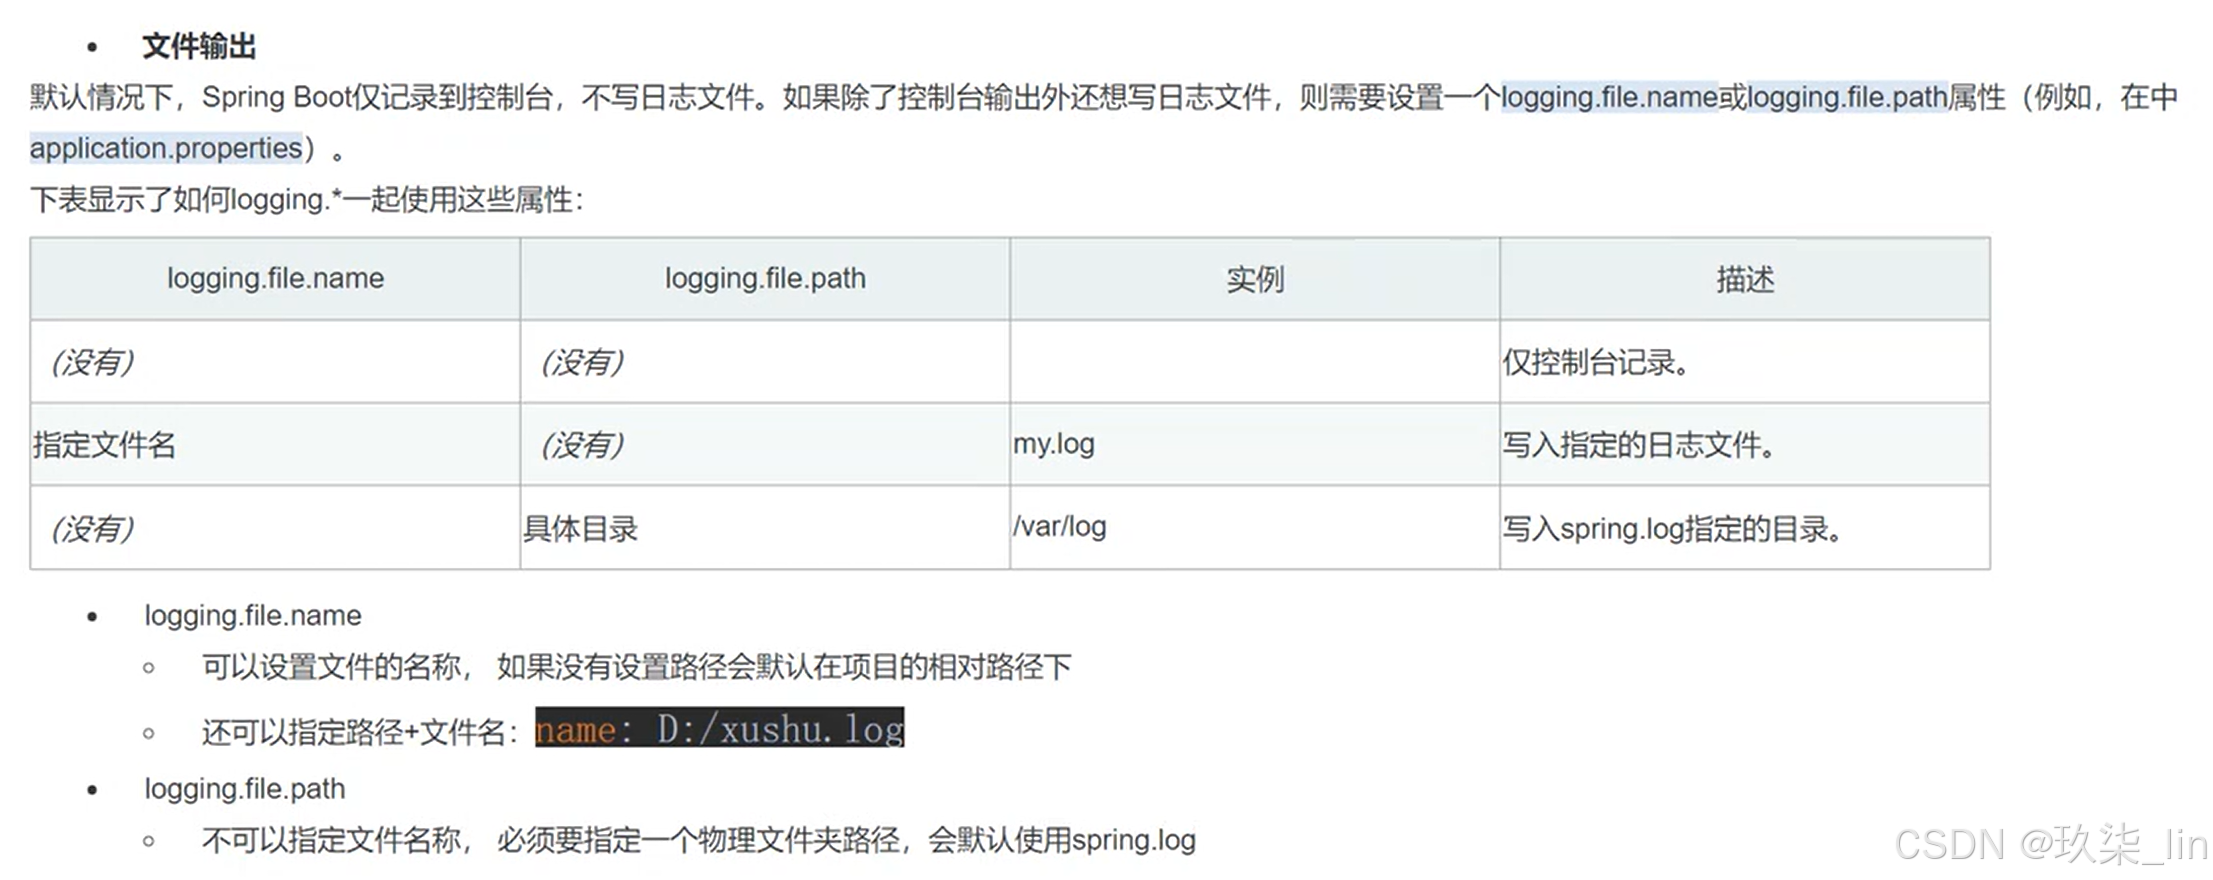
默认情况下,SpringBoot仅记录到控制台,不写日志文件,如果除了控制台输出外还想写日志文件,则需要设置一个logging.file.name或者logging.file.path属性。
logging.file.name
- 可以设置文件的名称,如果没有设置路径会默认在项目的相对根路径下
- 还可以指定路径+文件名:name: D:/wlp.log
logging.file.path
- 不可以指定文件名称,必须要指定一个物理文件夹路径,会默认使用spring.log
6. 日志迭代
(基于logback生效)
logging:
  logback:
    rollingpolicy:
      clean-history-on-start:   # 如果应在应用程序启动时进行日志归档清理
      file-name-pattern:  #归档的文件名
      max-file-size:    #归档前日志文件的最大大小
      max-history:      #保留日志存档的天数(默认为7)
      total-size-cap:   #删除日志档案之前可以使用的最大大小
7. 自定义日志配置文件
可以通过在类路径中包含日志配置文件来激活各种日志记录系统。

如果使用自定义日志配置文件,会使用SpringBoot中全局配置文件application.yml或application.properties的logging相关配置失效。
结合SpringBoot提供Profile来控制日志的生效:注意一定要将日志配置文件的名字改为logback-spring.xml,因为logback.xml会在SpringBoot容器加载前先被logback给加载到,那么由于logback无法解析SpringProfile将会报错。
8. 切换日志框架
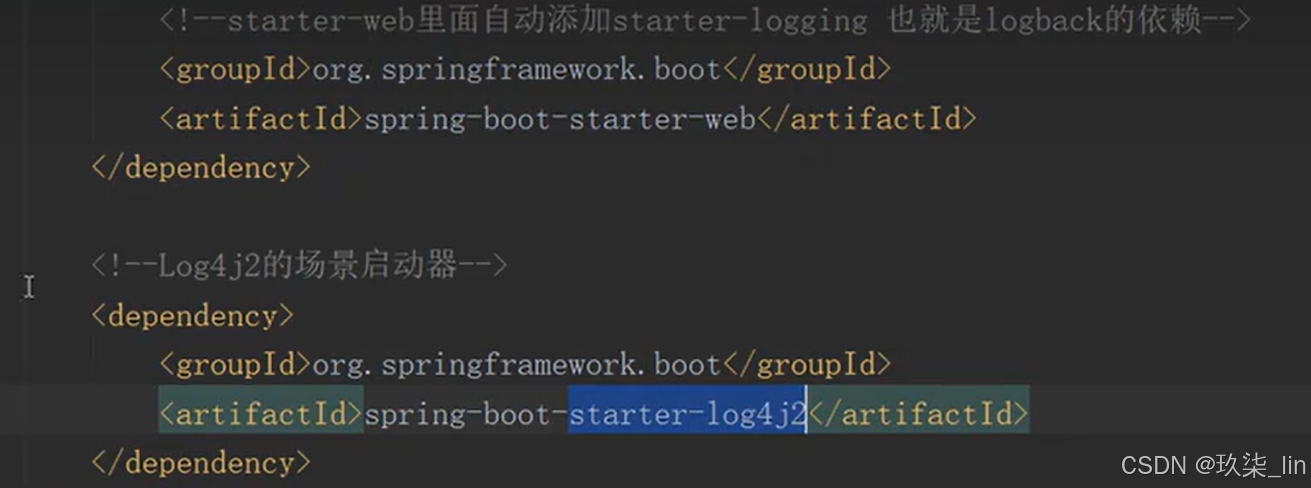
(1)logback切换成log4j2
- 将logback的场景启动器排除(slf4j只能运行有一个桥接器)
- 添加log4j2的场景启动器
- 添加log4j2的配置文件
(2)logback切换成log4j
- 将要logback的桥接器排除
- 添加log4j的桥接器
- 添加log4j的配置文件
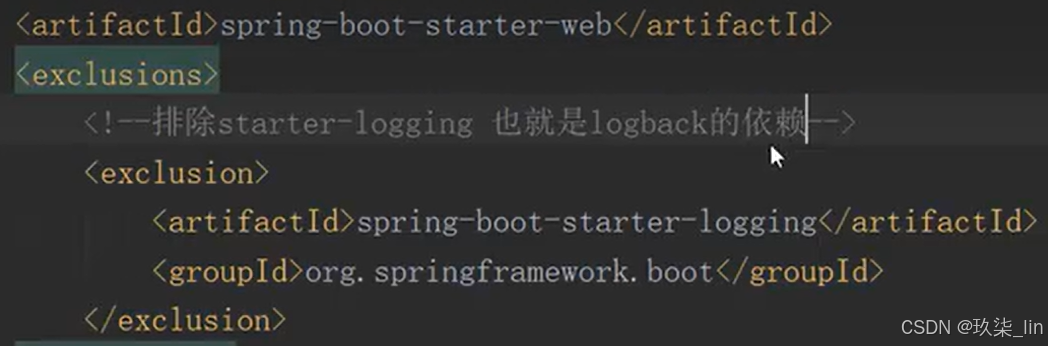
<dependency>
<groupId>org.springframework.boot</groupId>
<artifactId>spring-boot-starter-web</artifactId>
<exclusions>
<exclusion>
<groupId>ch.qos.logback</groupId>
<artifactId>logback-classic</artifactId>
</exclusion>
</exclusions>
</dependency>
<dependency>
<groupId>org.slf4j</groupId>
<artifactId>slf4j-log4j12</artifactId>
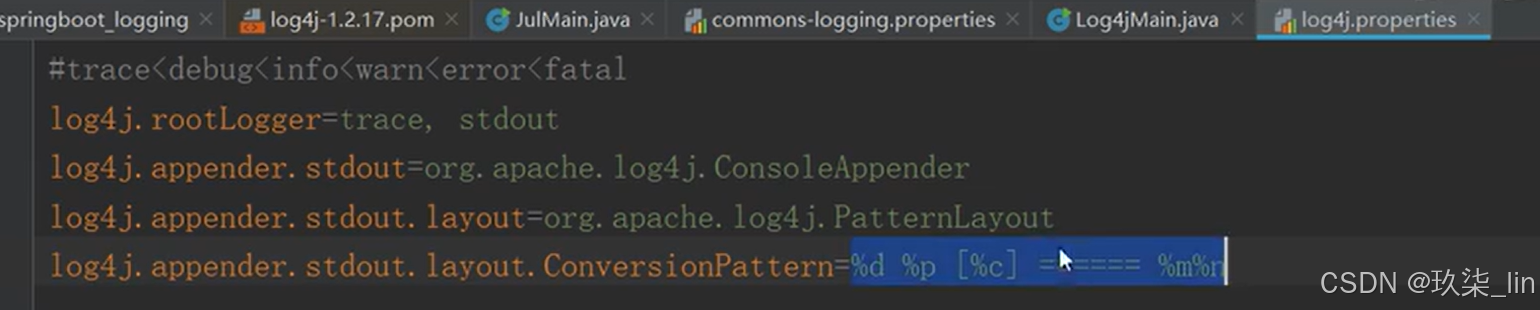
</dependency>log4j.properties配置文件

四、SpringBoot与web开发
前后端分离:
1. RestTemplate
适用于微服务架构下,服务之间的远程调用。
调用http接口(调用远程服务):通过RestTemplete调用
RestTemplate类(属于Spring Framework)可以用于在应用中调用远程Rest服务,简化了与http服务的通信方式,统一了RESTful的标准,封装了http链接,只需要传入url及返回值类型即可。RestTemplate是Spring提供的用于访问Rest服务的,提供了多种便捷访问远程Http服务的方法,传统情况下载java代码里访问restful服务,一般使用Apache的HttpClient,不过此种方法使用起来太过繁琐。Sring提供了一种简单编写的模板类来进行操作,这就是RestTemplate。由于RestTemplate实例在使用前通常需要自定义,因此SpringBoot不提供任何单个自动配置的RestTemplate bean。但是,他会自动配置一个RestTemplateBuilder,可以在需要时创建实例,自动配置RestTemplate可以确保HttpMessageConverters也应用于RestTemplate实例。
| DELETE | delete |
| GET | getForObject:按照指定Class返回对象 |
| GET | getForEntity:返回对象为ResponseEntity对象,包含了响应中的一些重要信息,比如响应头,响应状态码,响应体等 |
| POST | postForObject |
| POST | postForLocation |
| PUT | put |
| HEAD | headForHeaders |
| OPTIONS | optionsForAllow |
| any | exchange 或者 execute |
例如:用户模块
实体类:
@Data
@AllArgsConstructor
@NoArgsConstructor
public class User {
    private int id;
    private String name;
    private String address;
//    private int age;

    public User(String name, String address) {
        this.name = name;
        this.address = address;
    }
}
结果映射类:
@Data
@AllArgsConstructor
@NoArgsConstructor
public class Result<T> {
    private Integer code;
    private String message;
    private T data;

    public Result(Integer code, String message) {
        this.code = code;
        this.message = message;
    }
}
Service:
@Service
public class UserService {
    private static Map<Integer, User> users = new HashMap<Integer, User>();
    static {
        users.put(1, new User(1, "zhangsan", "北京"));
        users.put(2, new User(2, "lisi", "上海"));
        users.put(3, new User(3, "wangwu", "天津"));
        users.put(4, new User(4, "liuliu", "长沙"));
        users.put(5, new User(5, "qian", "河北"));
    }
    public User getUserById(Integer id){
        return users.get(id);
    }

    public List<User> getAllUser(){
        return new ArrayList<User>(users.values());
    }

    public void addUser(User user){
        Integer newId = users.size() + 1;
        user.setId(newId);
        users.put(newId, user);
    }

    public void updateUser(User user){
        users.replace(user.getId(), user);
    }

    public void deleteUser(Integer id){
        users.keySet().removeIf(key -> key == id);
    }
}
Controller:
@RestController
@RequestMapping("/user")
public class UserController {
    @Autowired
    UserService userService;

    @GetMapping("/{id}")
    public Result getUser(@PathVariable int id) {
        User user = userService.getUserById(id);
        return new Result(200, "查询成功", user);
    }

    // 新增
    @PostMapping("/add")
    public Result addUser(@RequestBody User user) {
        userService.addUser(user);
        List<User> allUser = userService.getAllUser();
        return new Result(200, "添加成功", allUser);
    }

    // 修改
    @PutMapping("/update")
    public Result updateUser(@RequestBody User user) {
        userService.updateUser(user);
        List<User> allUser = userService.getAllUser();
        return new Result(200, "修改成功", allUser);
    }

    // 删除
    @DeleteMapping("/delete/{id}")
    public Result deleteUser(@PathVariable int id) {
        userService.deleteUser(id);
        List<User> allUser = userService.getAllUser();
        return new Result(200, "删除成功", allUser);
    }

    @GetMapping("/allUser")
    public Result getAllUser() {
        List<User> allUser = userService.getAllUser();
        return new Result(200, "查询全部用户成功", allUser);
    }

}
Rest服务调用模块:
Controller:
@RestController
public class resttestcontroller {
    // 声明了RestTemplate
    private final RestTemplate restTemplate;

    // 当bean没有无参构造函数的时候,spring将自动拿到有参的构造函数,参数进行自动注入
    @Autowired
    public resttestcontroller(RestTemplateBuilder restTemplateBuilder) {
        this.restTemplate = restTemplateBuilder.build();
    }


    @RequestMapping("order")
    public String order(){
        // 远程访问rest服务

        // 基于restTemplate调用查询
//        Result res = restTemplate.getForObject("http://localhost:8080/user/{id}", Result.class, 3);
//        return res.toString();

        // 基于restTemplate调用新增
//        User user = new User("wlp", "上海");
//        // url:请求的远程rest url
//        // object:post请求的参数
//        // Class<T>: 返回的类型
//        // ...Object: 是@PathVariable 占位符的参数
//        ResponseEntity<Result> res = restTemplate.postForEntity("http://localhost:8080/user/add", user, Result.class);
//        return res.getBody().toString();

//        // 基于restTemplate调用修改
//        User user = new User(1, "wlp", "北京");
//        restTemplate.put("http://localhost:8080/user/update", user, Result.class);
//        Result res = restTemplate.getForObject("http://localhost:8080/user/allUser", Result.class, 3);
//        return res.toString();

        // 基于restTemplate调用删除
        restTemplate.delete("http://localhost:8080/user/delete/{id}", 2);
        Result res = restTemplate.getForObject("http://localhost:8080/user/allUser", Result.class, 3);
        return res.toString();

    }

}访问:http://localhost:9090/order0113/order得到结果如下:
get请求:(查询)

post请求:(新增)
 put请求:(修改)
 delete请求:(删除)

其中“order0113”路径在yml / properties文件中进行了设置:
server.servlet.context-path=/order0113因为put和delete没有返回值,所以上面借助了获取用户列表的请求。可以通过exchange 或者 execute来实现put和delete方法有返回值。
put 和 delete请求的代码改为:
User user = new User(1, "wlp", "Paris");
HttpEntity<User> userHttpEntity = new HttpEntity<>(user);
ResponseEntity<Result> exchange = restTemplate.exchange("http://localhost:8080/user/update", HttpMethod.PUT, userHttpEntity, Result.class);
// ResponseEntity<Result> exchange = restTemplate.exchange("http://localhost:8080/user/delete/{id}", HttpMethod.DELETE, null, Result.class, 2);
return exchange.getBody().toString();
put结果:

delete结果:

在测试类中可以用TestRestTemplate。
WebClient 都可以调用远程服务,区别:webclient依赖webflux(需要单独开发),webclient请求远程服务式无阻塞的,响应的。RestTemplate是阻塞的,需要等待请求响应后才能执行下一句代码。
2. Postman
3. MockMVC
MockMVC是由spring-test包(spring-boot-starter-test依赖)提供,实现了对Http请求的模拟,能够直接使用网络的形式,转换到Controller的调用,使得测试速度快、不依赖网络环境。同时提供了一套验证的工具,结果的验证十分方便。
SpringBoot中使用:
编写测试类。实例化MockMVC有两种形式,一种是使用StandaloneMockMvcBuilder,另一种是使用DefaultMockMvcBuilder。
测试get请求:
@SpringBootTest
@AutoConfigureMockMvc // 专门用于做mockmvc的,由spring-test提供,依赖Junit5
public class MockMvcTest {
@Autowired
MockMvc mockMvc;
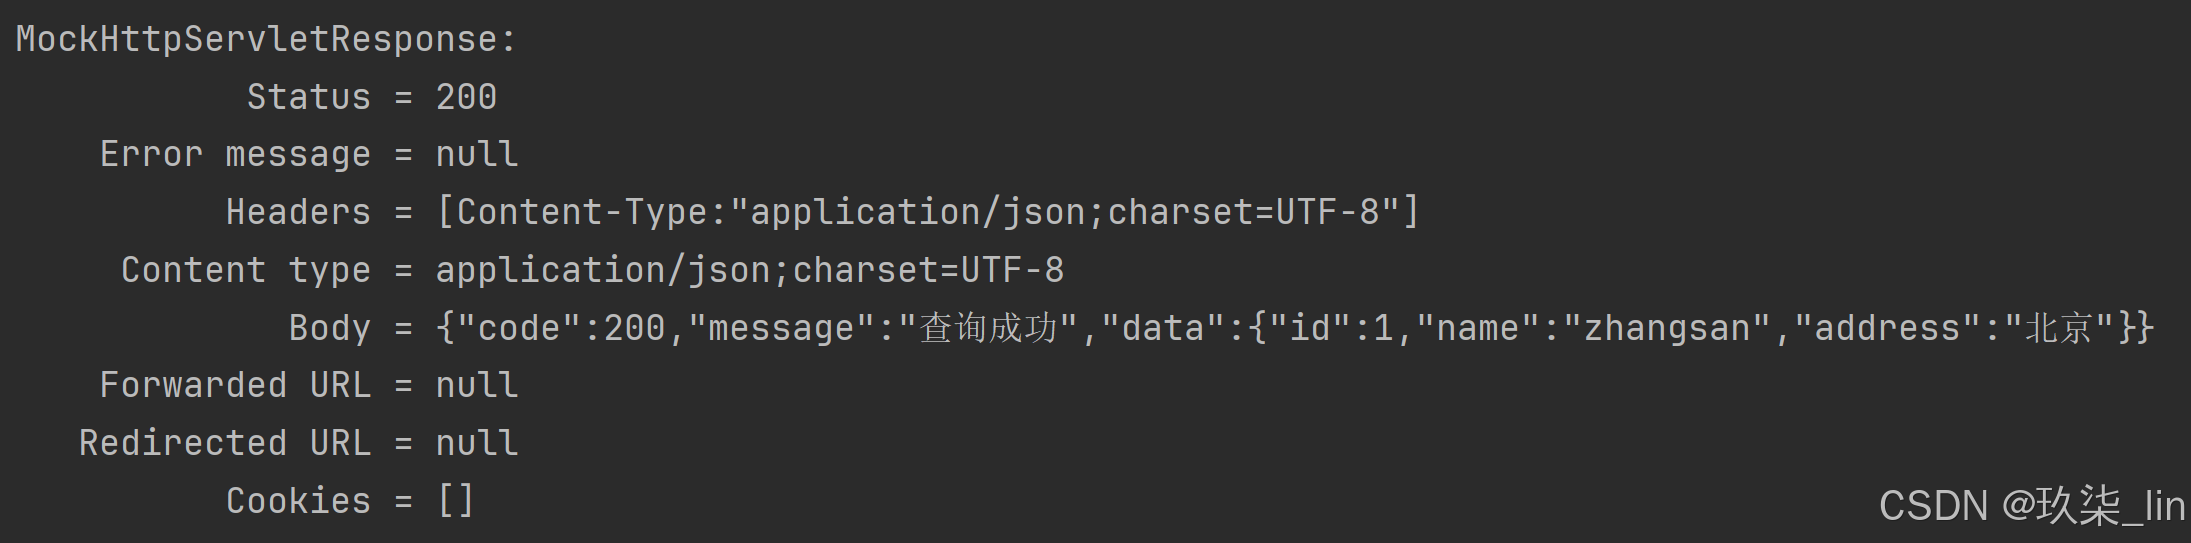
@Test
public void testMockMvc() throws Exception {
// 发起一个模拟请求,不依赖网络,不依赖web服务,不需要启动web应用
mockMvc.perform(
MockMvcRequestBuilders.get("/user/{id}", 1) // 发送了get请求
.accept(MediaType.APPLICATION_JSON_UTF8) // 设置响应的文本类型
// .param(name, value) // ?name=xx&age=xx
)
// 响应断言
.andExpect(MockMvcResultMatchers.status().isOk()) // 断言状态码为200
.andExpect(MockMvcResultMatchers.jsonPath("$.data.name").value("zhangsan")) // 断言成功不报错,断言失败报错
.andDo(MockMvcResultHandlers.print());
}
}注意@Test使用的是Junit5的jupiter的注解: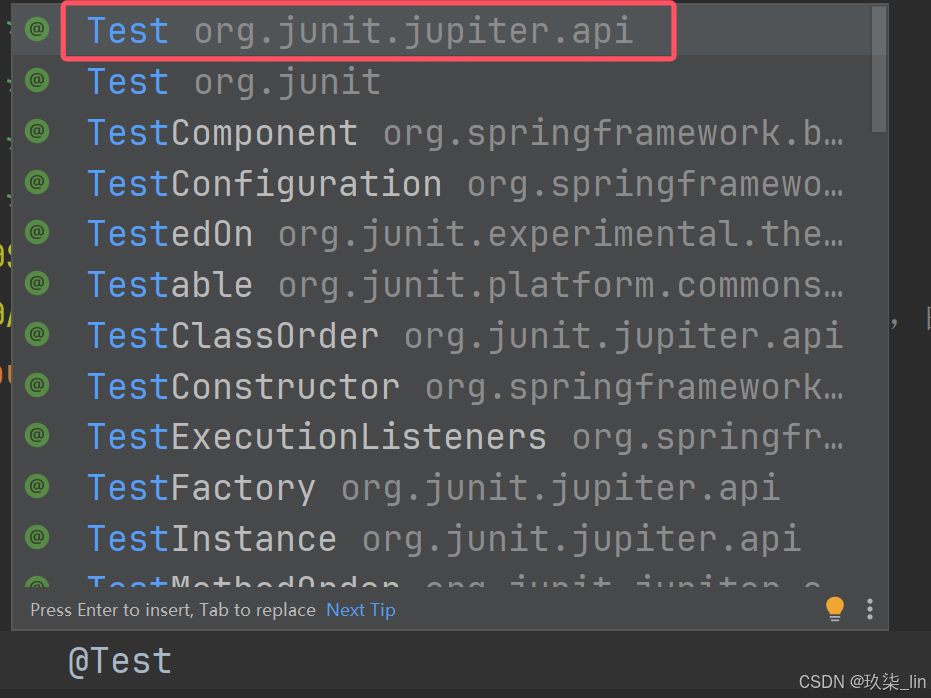
美元符$代表JSON对象,可以点出来对象的属性
不开启服务来发起请求:
运行结果:
测试post请求:
    @Test
    public void testMockMvc2() throws Exception {
        String userJson = "{\"name\":\"wyp\",\"age\":25}";   // Alt + Enter 调用输入JSON的面板
        // 发起一个模拟请求,不依赖网络,不依赖web服务,不需要启动web应用
        mockMvc.perform(
                        MockMvcRequestBuilders.post("/user/add")  // 发送了get请求
                                .accept(MediaType.APPLICATION_JSON_UTF8) // 设置响应的文本类型
                                .contentType(MediaType.APPLICATION_JSON_UTF8)  // 设置请求的文本类型
                                .content(userJson)
                        // .param(name, value)  // ?name=xx&age=xx

                )
                // 响应断言
                .andExpect(MockMvcResultMatchers.status().isOk())  // 断言状态码为200
                .andDo(MockMvcResultHandlers.print());
    }
运行结果:
MockHttpServletResponse:
           Status = 200
    Error message = null
          Headers = [Content-Type:"application/json;charset=UTF-8"]
     Content type = application/json;charset=UTF-8
             Body = {"code":200,"message":"添加成功","data":[{"id":1,"name":"zhangsan","address":"北京"},{"id":2,"name":"lisi","address":"上海"},{"id":3,"name":"wangwu","address":"天津"},{"id":4,"name":"liuliu","address":"长沙"},{"id":5,"name":"qian","address":"河北"},{"id":6,"name":"wyp","address":null}]}
    Forwarded URL = null
   Redirected URL = null
          Cookies = []
4. Swagger
根据注解返回页面,简化了前后端接口联调的工作量。
注入swagger依赖:
<dependency>
	<groupId>io.springfox</groupId>
	<artifactId>springfox-swagger2</artifactId>
	<version>3.9.2</version>
</dependency>
<dependency>
	<groupId>io.springfox</groupId>
	<artifactId>springfox-swagger-ui</artifactId>
	<version>3.9.2</version>
</dependency>
swagger是一系列对REST接口的描述和UI展示的规范(JSON)
springfox 整合了 springmvc和swagger,将代码中的注解转换为符合swagger的规范的JSON文件。
Swagger配置类:
@Configuration
@EnableSwagger2
public class SwaggerConfig {
// 用来告诉Springfox如何去生成swagger所需要的规范数据
@Bean
public Docket createRestApi() {
return new Docket(DocumentationType.SWAGGER_2) // 生成swagger2规范的文档
.pathMapping("/") // 设置哪些接口会映射到swagger文档中
.select() // 接口选择器
// 告诉springfox哪些接口要生成swagger文档
.apis(RequestHandlerSelectors.basePackage("com.wlp.webtest.controller"))
// 设置哪些接口生成在swagger文档上
.paths(PathSelectors.any())
// 描述文档的主题信息
.build().apiInfo(new ApiInfoBuilder()
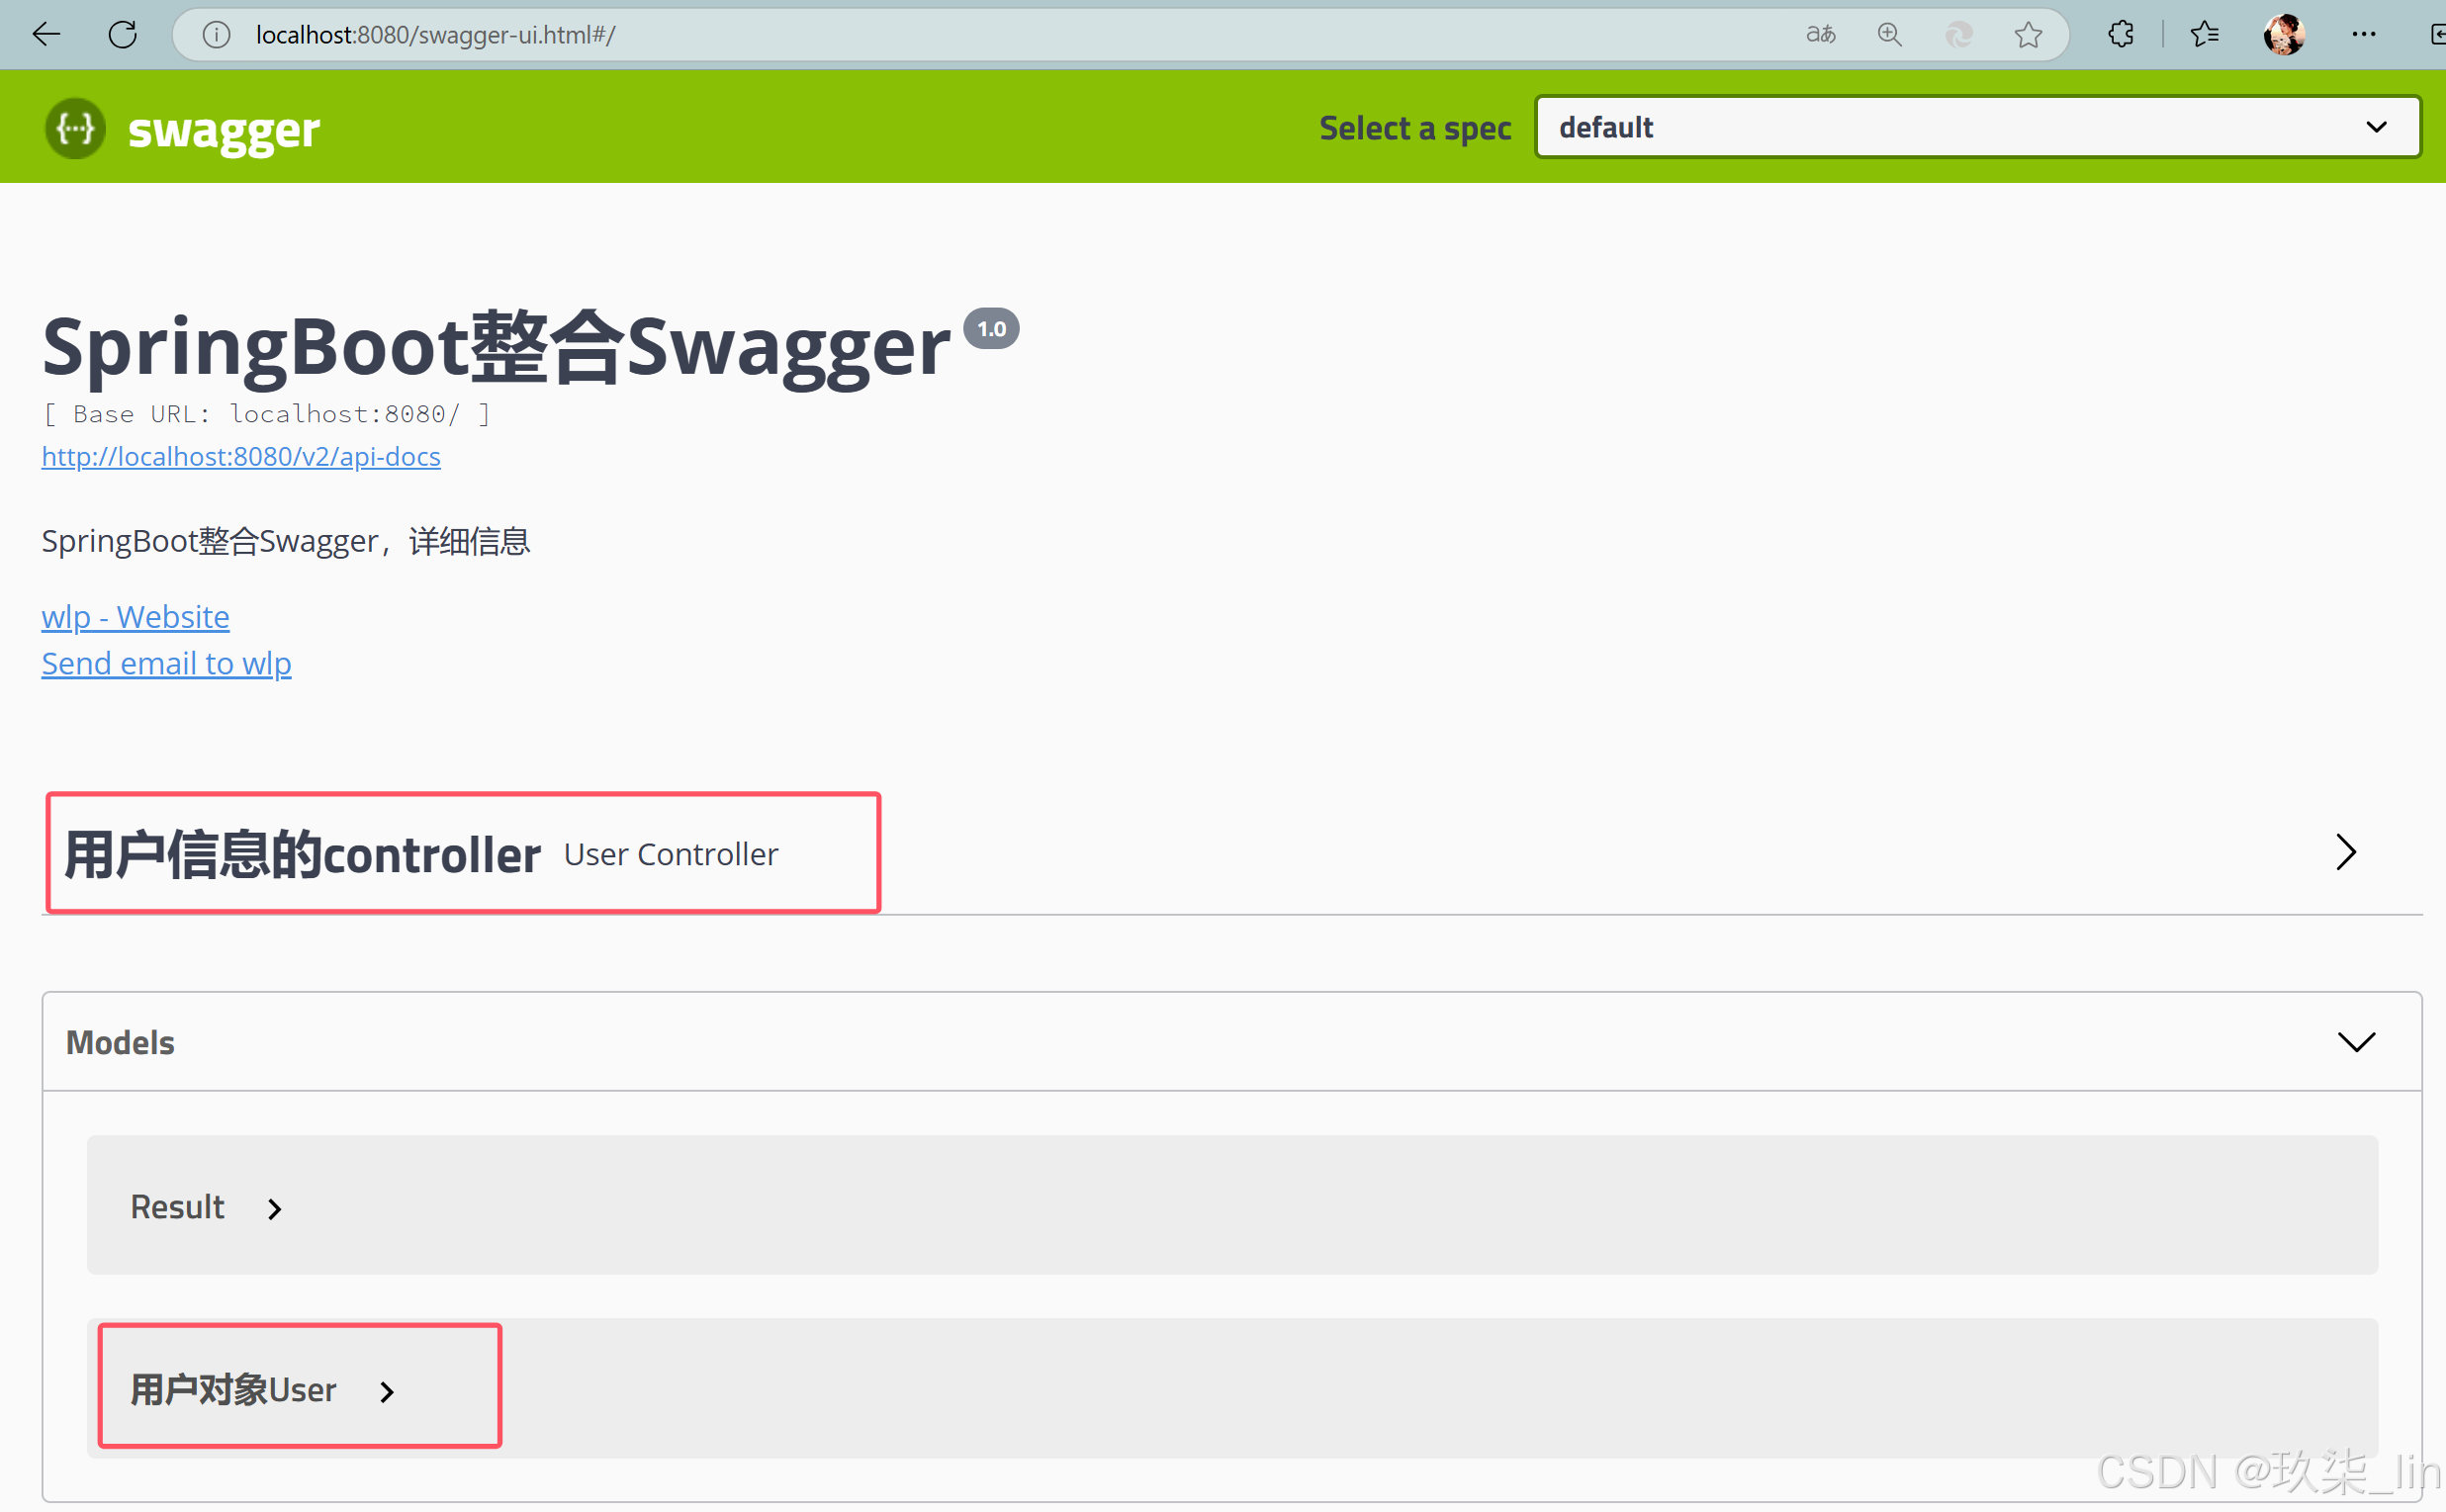
.title("SpringBoot整合Swagger")
.description("SpringBoot整合Swagger,详细信息")
.version("1.0")
.contact(new Contact("wlp", "url", "wlp@163.com"))
.build()
);
}
}访问:localhost:8080/swagger-ui.html Swagger UI
如果不能访问,则配置资源过滤配置类:
@Configuration
public class WebConfig extends WebMvcConfigurationSupport {
    @Override
    public void addResourceHandlers(ResourceHandlerRegistry registry){
        registry.addResourceHandler("/**")
                .addResourceLocations("classpath:/resources/")
                .addResourceLocations("classpath:/static/")
                .addResourceLocations("classpath:/pages/")
        ;
        registry.addResourceHandler("swagger-ui.html")
                .addResourceLocations("classpath:/META-INF/resources/");
        registry.addResourceHandler("/webjars/**")
                .addResourceLocations("classpath:/META-INF/resources/webjars/");
        super.addResourceHandlers(registry);
    }

}
controller类上使用:
// 写在Controller类上
@Api(tags = "用户信息的controller")
@RestController
@RequestMapping("/user")
public class UserController {
@Autowired
UserService userService;
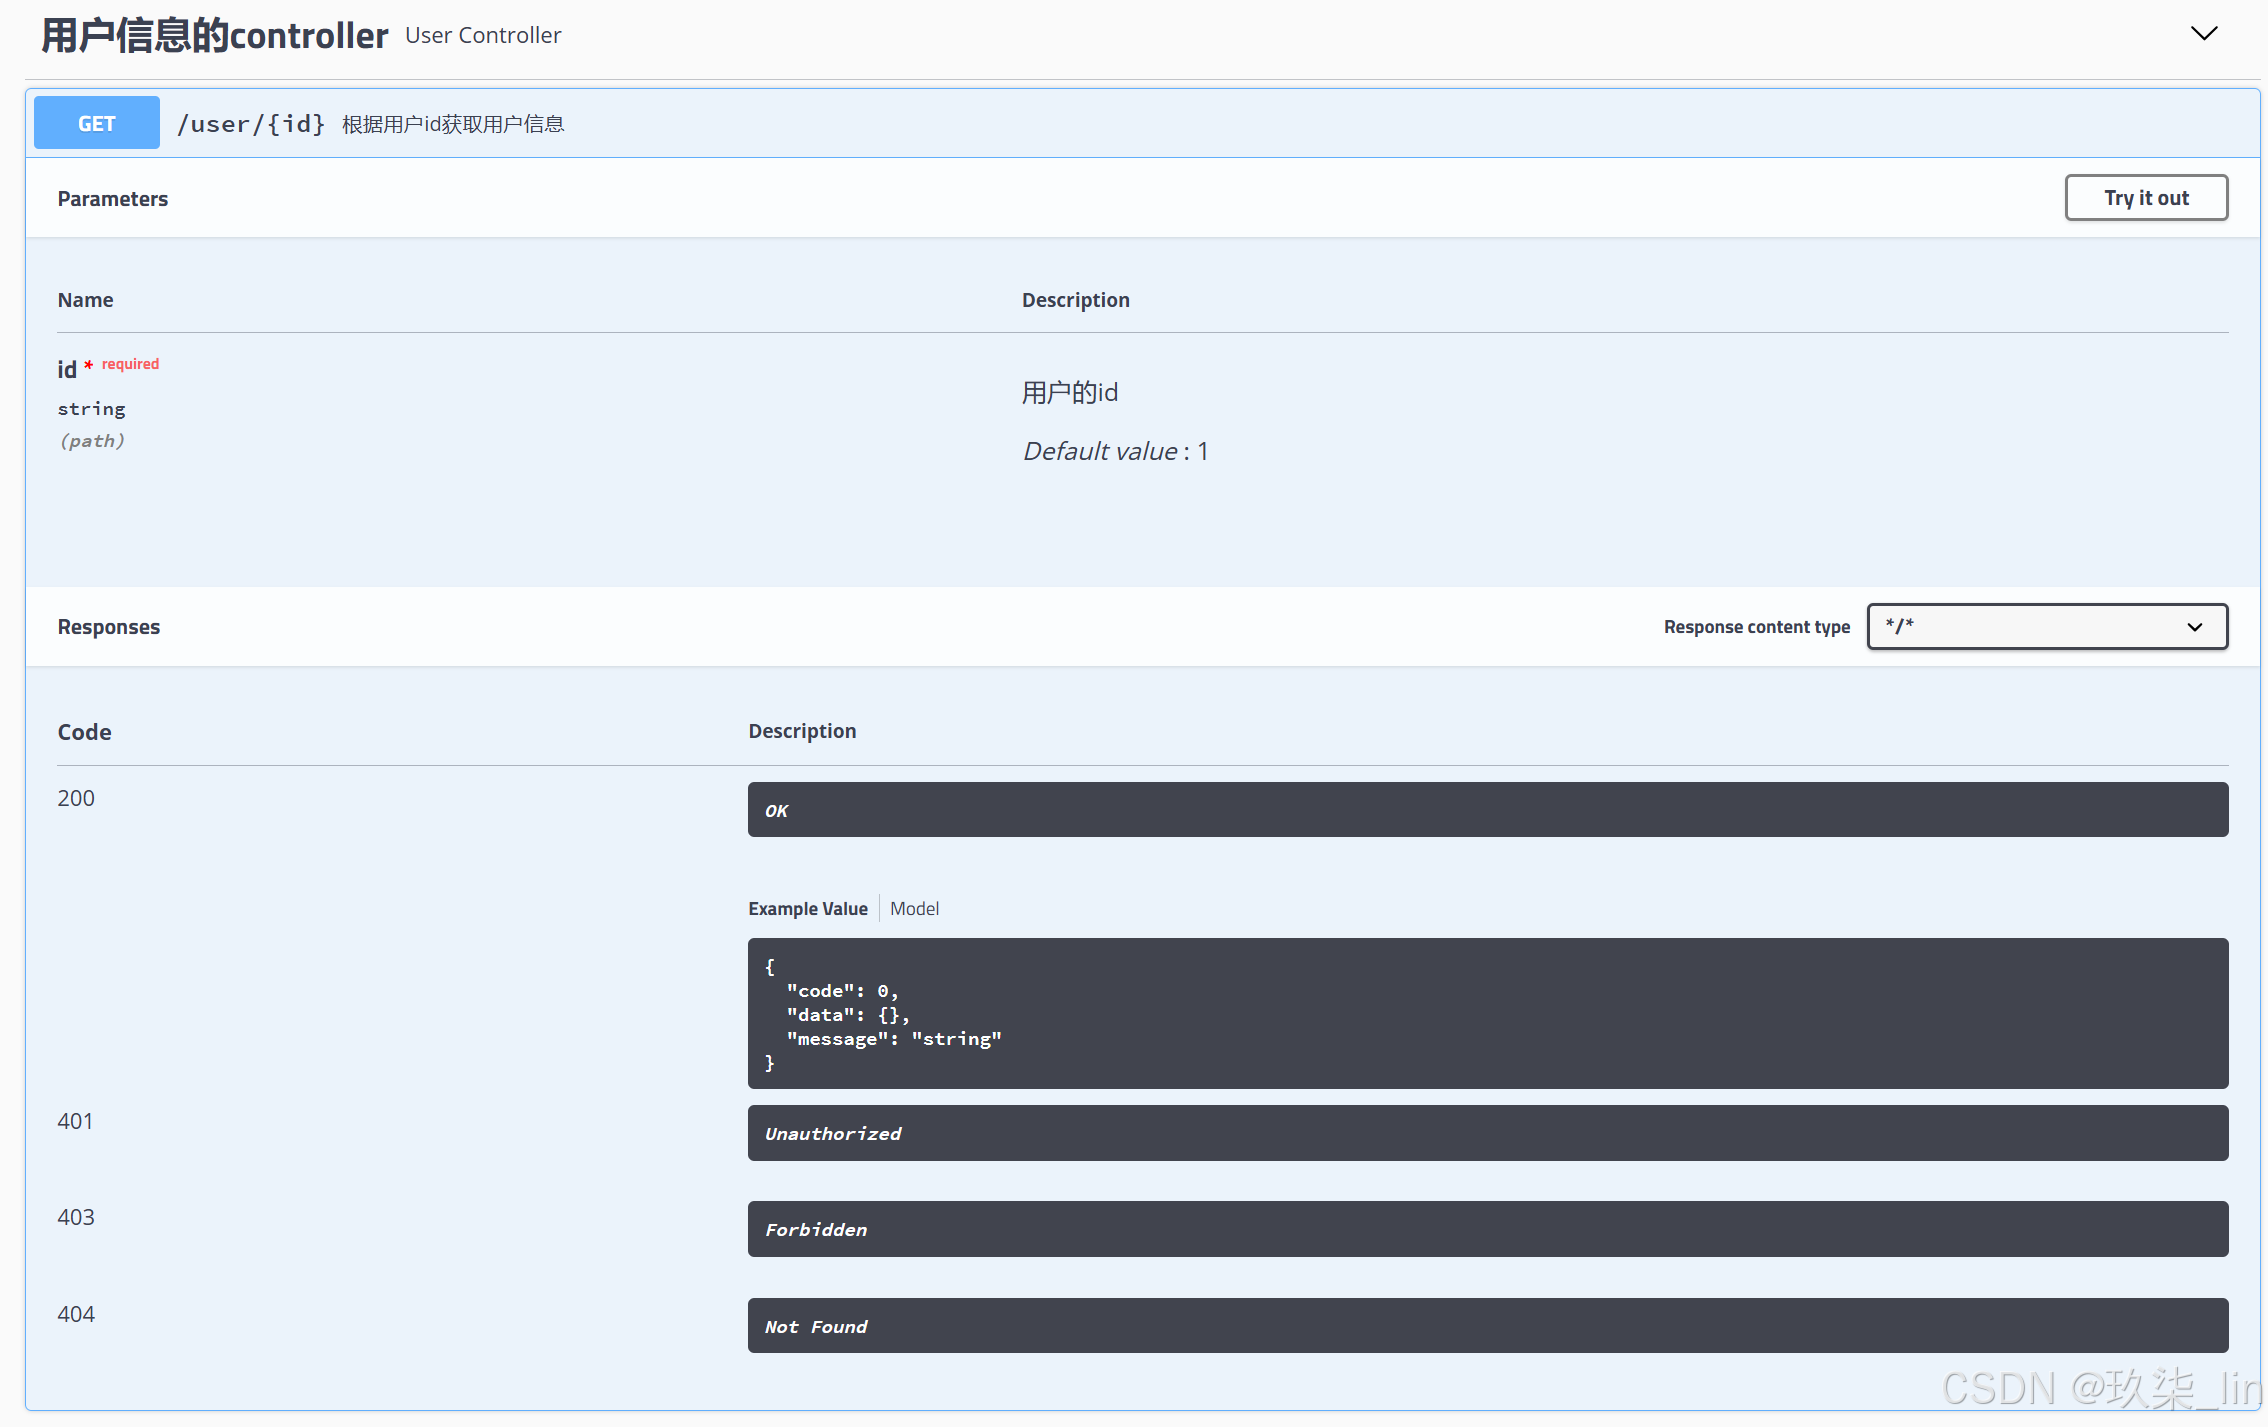
@GetMapping("/{id}")
@ApiOperation("根据用户id获取用户信息")
@ApiImplicitParam(name = "id", value = "用户的id", defaultValue = "1", required = true)
public Result getUser(@PathVariable int id) {
User user = userService.getUserById(id);
return new Result(200, "查询成功", user);
}
}
实体类上使用:
@Data
@AllArgsConstructor
@NoArgsConstructor
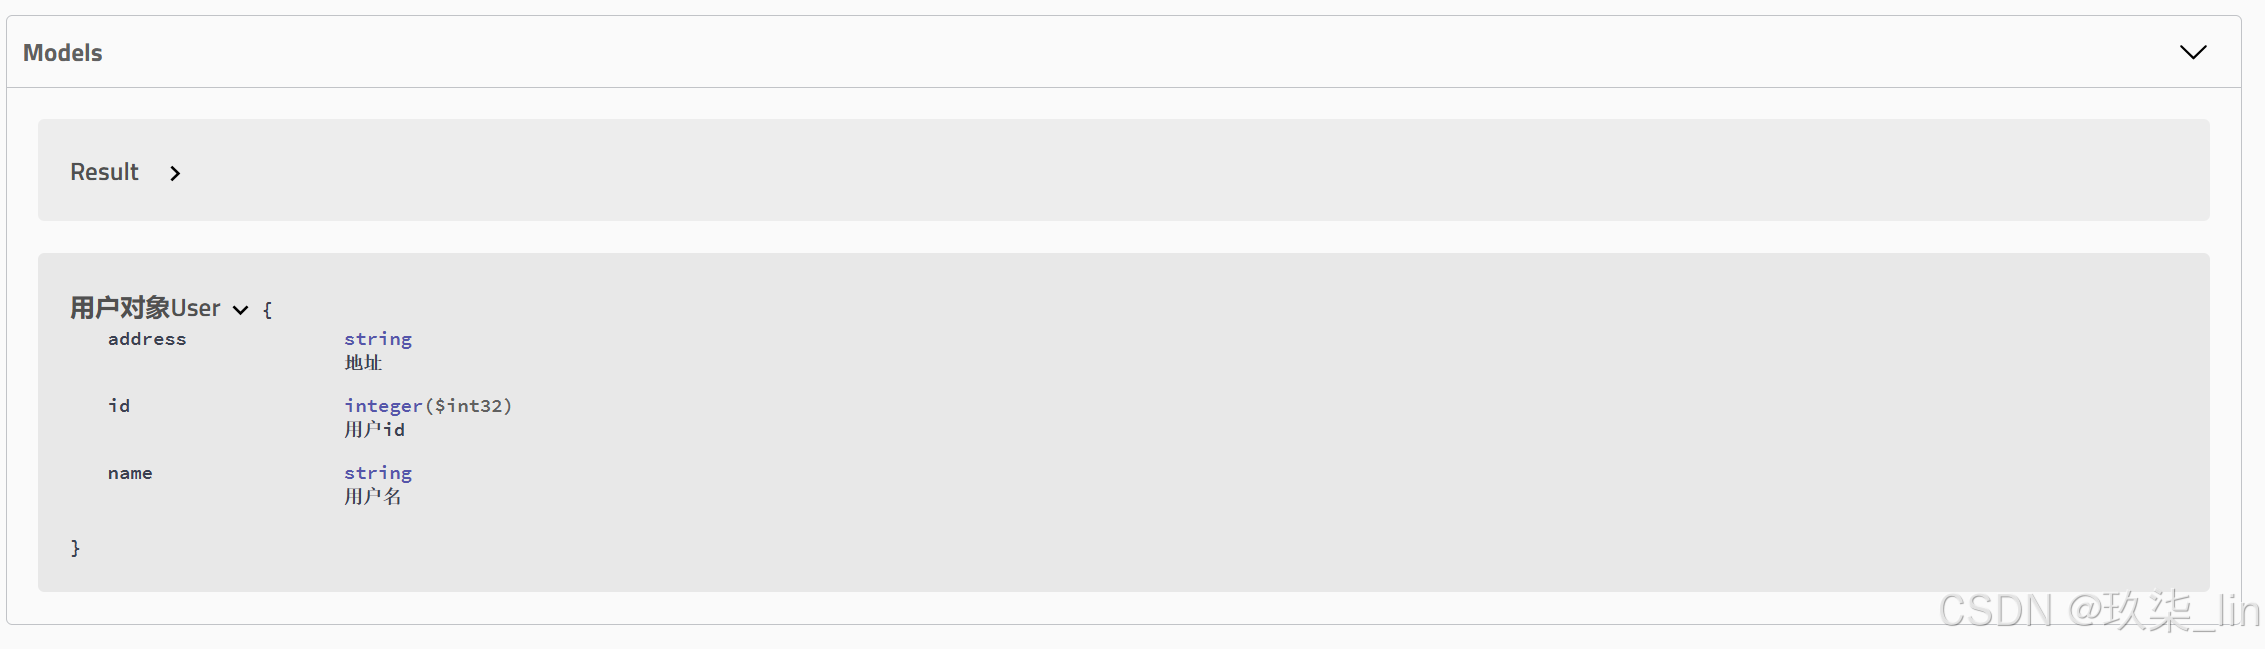
@ApiModel("用户对象User")
public class User {
@ApiModelProperty("用户id")
private int id;
@ApiModelProperty("用户名")
private String name;
@ApiModelProperty("地址")
private String address;
// private int age;
}swagger界面:
Swagger注解整体说明:
用于controller类上:
| 注解 | 作用于 | 说明 |
| @Api | controller类上 | 对请求类的说明 |
| @ApiOperation | 方法上 说明参数的含义 | 方法的说明 |
| @ApiImplicitParams、@ApiImplicitParam | 方法上 说明参数的含义 | 方法的参数的说明: @ApiImplicitParams用于指定单个参数的说明 |
| @ApiResponses、@ApiResponse | 方法上 返回参数或对象的说明 | 方法返回值的说明: @ApiResponses用于指定单个参数的说明 |
| @ApiModel | 对象类 | 用在JavaBean类上,说明JavaBean的用途 |
| @ApiModelProperty | 对象类 | 用在JavaBean类的属性上面,说明此属性的含义 |
五、SpringBoot与springmvc
1. SpringBoot 的 springmvc自动配置
(源码解析……未完待续)
SpringBoot为springmvc提供了自动配置,可与大多数应用程序完美配合。自动配置在Spring的默认值之上添加了以下功能:
- 包含ContentNegotiatingViewResolver和BeanNameViewResolver。
- ViewResolver都是SpringMVC内置的视图解析器
- ContentNegotiatingViewResolver:并不会解析试图,而是委派给其他视图解析器进行解析。
- ViewResolver都是SpringMVC内置的视图解析器
- 支持提供静态资源,包括对WebJars的支持
- 自动注册Converter,GenericConverter和Formatter Bean类
- 支持HttpMessageConverters
- 自动注册MessageCodesResolver
- 静态index.html支持
- 自动使用ConfigurableWebBindingInitializer Bean
2. 定制springmvc-ViewController
SpringMVC的自动配置类:WebMvcAutoConfiguration
在大多数情况下,SpringBoot在自动配置中标记了很多@ConditionalOnMissingBean(xxxxxx.class); 意为如果容器中没有,当前的@bean才会生效,只需要在自己的配置类中配置对应的一个@Bean就可以覆盖。
3. 定制springmvc-PathMatchConfigure
(源码……)
4. 定制springmvc-拦截器Interceptor
5. 定制springmvc-CORS配置
6. 定制springmvc-WebMvcConfigureration
7. 定制springmvc-JSON
8. 定制springmvc-JSON-国际化
9. 定制springmvc-JSON-异常处理
六、Servlet容器
Spring默认的Servlet容器是:Tomcat
1. 嵌入式Servlet容器配置修改
(1)通过全局配置文件修改
可以通过server.xxx 来进行web服务配置,没有带服务器名称的则是通用配置
通过带了具体的服务器名称则是单独对该服务器进行设置,比如server.tomcat.xxx 就是专门针对Tomcat的配置。
spring.application.name=servlet
server.port=8090
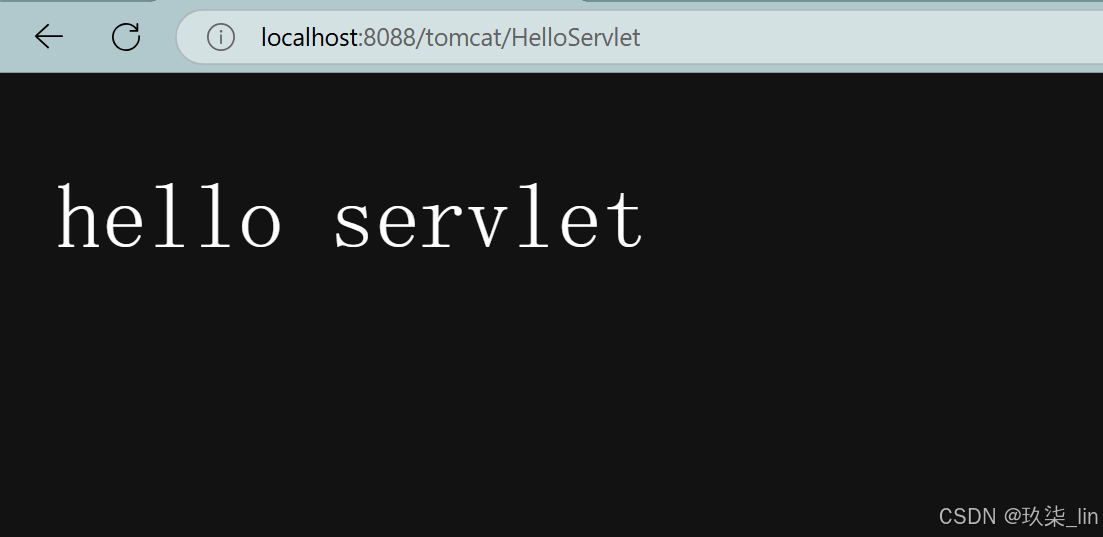
server.servlet.context-path=/tomcat
(2)通过WebServerFactoryCustomizer接口的bean修改
自定义配置类:
@Configuration
public class CustomizationBean implements WebServerFactoryCustomizer<ConfigurableWebServerFactory> {

    @Override
    public void customize(ConfigurableWebServerFactory server) {
        server.setPort(8088);
    }
}
运行结果:以定制的servletweb服务配置为准,全局配置文件的配置就会失效。

2. 注册Servlet三大组件
servlet、listener、filter
(1)servlet3.0规范提供的注解方式注册:
@WebServlet @WebListener @WebFilter
① 声明servlet及映射
@WebServlet(name = "HelloServlet", urlPatterns = "/HelloServlet")
public class HelloServlet extends HttpServlet {
    @Override
    protected void doGet(HttpServletRequest req, HttpServletResponse resp) throws ServletException, IOException {
        PrintWriter writer = resp.getWriter();
        writer.println("hello servlet");
    }
}
② 启动类上加上@ServletComponentScan注解,才会扫描以上三个注解,才会生效
@SpringBootApplication
@ServletComponentScan
public class ServletApplication {

    public static void main(String[] args) {
        SpringApplication.run(ServletApplication.class, args);
    }

}
运行结果:
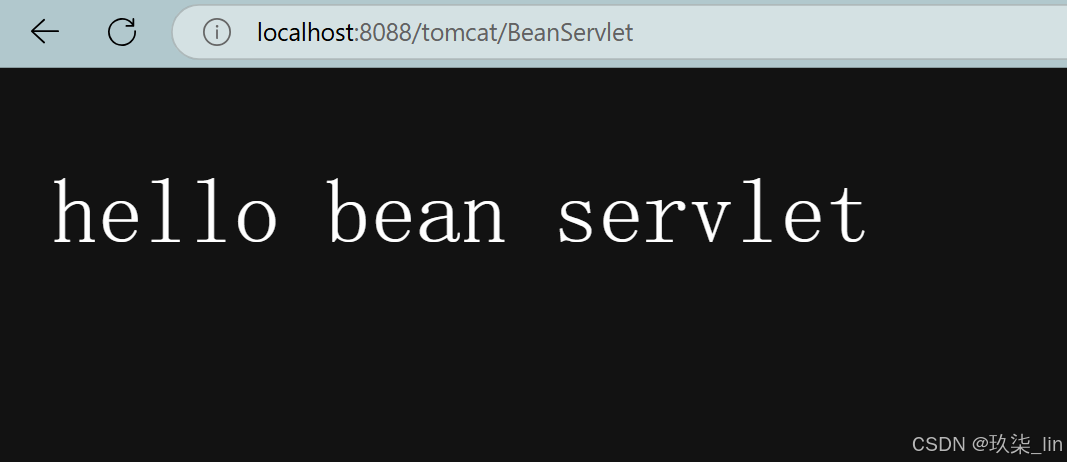
(2)SpringBoot提供的注册
使用ServletRegistrationBean、FilterRegistrationBean、ServletListenerRegistrationBean
public class BeanServlet extends HttpServlet {
    @Override
    protected void doGet(HttpServletRequest req, HttpServletResponse resp) throws ServletException, IOException {
        PrintWriter writer = resp.getWriter();
        writer.println("hello bean servlet");
    }
}
@Configuration
public class MyWebMvcConfiguration {
@Bean
public ServletRegistrationBean servletRegistrationBean() {
// 声明一个servlet注册器bean
ServletRegistrationBean servletRegistrationBean = new ServletRegistrationBean(new BeanServlet());
// 设置相应的servlet
servletRegistrationBean.setServlet(new BeanServlet());
// 设置名字
servletRegistrationBean.setName("BeanServlet");
// 添加映射规则
servletRegistrationBean.addUrlMappings("/BeanServlet");
return servletRegistrationBean;
}
}运行结果:
3. 切换其他嵌入式Servlet容器
SpringBoot包含对嵌入式Tomcat、Jetty和Undertow服务器的支持
Tomcat(默认)
Jetty(socket)
Unsertow(响应式)
三者之间的切换:把Tomcat右键exclude,排除了内嵌的Tomcat,再加入其他的依赖
<dependency>
	<groupId>org.springframework.boot</groupId>
	<artifactId>spring-boot-starter-web</artifactId>
	<exclusions>
		<exclusion>
			<groupId>org.springframework.boot</groupId>
			<artifactId>spring-boot-starter-tomcat</artifactId>
		</exclusion>
	</exclusions>
</dependency>
<dependency>
	<groupId>org.springframework.boot</groupId>
	<artifactId>spring-boot-starter-undertow</artifactId> <!--或spring-boot-starter-jetty-->
</dependency>
4. 嵌入式Servlet容器自动配置原理
(1)为什么可以根据配置的依赖自动使用对应的servlet容器?
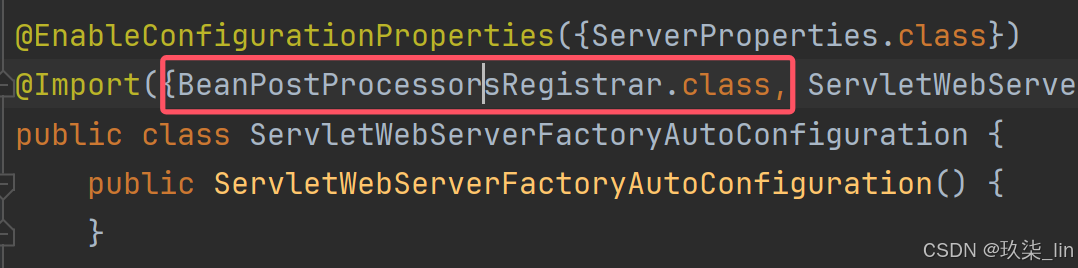
ServletWebServerFactoryAutoConfiguration servlet容器自动配置类
@AutoConfiguration(
    after = {SslAutoConfiguration.class}
)
@AutoConfigureOrder(Integer.MIN_VALUE)
// 只要依赖任意一个servlet容器都会存在该ServletRequest
@ConditionalOnClass({ServletRequest.class})
@ConditionalOnWebApplication(
    type = Type.SERVLET
)
// 启用servlet.xxx的所有配置信息绑定到ServerProperties
@EnableConfigurationProperties({ServerProperties.class})
@Import({BeanPostProcessorsRegistrar.class, ServletWebServerFactoryConfiguration.EmbeddedTomcat.class, ServletWebServerFactoryConfiguration.EmbeddedJetty.class, ServletWebServerFactoryConfiguration.EmbeddedUndertow.class})
public class ServletWebServerFactoryAutoConfiguration {}
① 为什么可以根据配置的依赖自动使用对应的servlet容器?
通过@Import导入Embeddedxxx
@Import({BeanPostProcessorsRegistrar.class,
ServletWebServerFactoryConfiguration.EmbeddedTomcat.class,
ServletWebServerFactoryConfiguration.EmbeddedJetty.class,
ServletWebServerFactoryConfiguration.EmbeddedUndertow.class})
public class ServletWebServerFactoryAutoConfiguration {}
每个Emabeddedxxx中都配置了相应的@ConditionalOnClass,会根据当前servlet容器start依赖判断classpath是否存在对应的类,如果存在就使用对应的servlet容器,比如EmbeddedTomcat:
@Configuration(proxyBeanMethods = false)
// 只有添加了Tomcat的场景启动器,该注解才会生效
@ConditionalOnClass({Servlet.class, Undertow.class, SslClientAuthMode.class})
@ConditionalOnMissingBean(value = {ServletWebServerFactory.class},	search = SearchStrategy.CURRENT)
如果没有对应的Tomcat启动器,该注解就不会生效。
(2)怎么根据配置文件中servlet.xxx 以及 WebServerFactoryCustomizer去设置servlet容器?
ServletWebServerFactoryCustomizer 也实现了WebServerFactoryCustomizer,说明它也是可以定制servlet容器的。
@Bean
public ServletWebServerFactoryCustomizer servletWebServerFactoryCustomizer(ServerProperties serverProperties, ObjectProvider<WebListenerRegistrar> webListenerRegistrars, ObjectProvider<CookieSameSiteSupplier> cookieSameSiteSuppliers, ObjectProvider<SslBundles> sslBundles) {
	return new ServletWebServerFactoryCustomizer(serverProperties, webListenerRegistrars.orderedStream().toList(), cookieSameSiteSuppliers.orderedStream().toList(), (SslBundles)sslBundles.getIfAvailable());
}

根据配置文件中server.xxx来进行定制servlet容器:
public void customize(ConfigurableServletWebServerFactory factory) {
	PropertyMapper map = PropertyMapper.get().alwaysApplyingWhenNonNull();
	ServerProperties var10001 = this.serverProperties;
	var10001.getClass();
	map.from(var10001::getPort).to(factory::setPort);
	var10001 = this.serverProperties;
	var10001.getClass();
	map.from(var10001::getAddress).to(factory::setAddress);
	ServerProperties.Servlet var5 = this.serverProperties.getServlet();
	var5.getClass();
	map.from(var5::getContextPath).to(factory::setContextPath);
	var5 = this.serverProperties.getServlet();
	var5.getClass();
	map.from(var5::getApplicationDisplayName).to(factory::setDisplayName);
	var5 = this.serverProperties.getServlet();
	var5.getClass();
	map.from(var5::isRegisterDefaultServlet).to(factory::setRegisterDefaultServlet);
	var5 = this.serverProperties.getServlet();
	var5.getClass();
	map.from(var5::getSession).to(factory::setSession);
	var10001 = this.serverProperties;
	var10001.getClass();
	map.from(var10001::getSsl).to(factory::setSsl);
	var5 = this.serverProperties.getServlet();
	var5.getClass();
	map.from(var5::getJsp).to(factory::setJsp);
	var10001 = this.serverProperties;
	var10001.getClass();
	map.from(var10001::getCompression).to(factory::setCompression);
	var10001 = this.serverProperties;
	var10001.getClass();
	map.from(var10001::getHttp2).to(factory::setHttp2);
	var10001 = this.serverProperties;
	var10001.getClass();
	map.from(var10001::getServerHeader).to(factory::setServerHeader);
	var5 = this.serverProperties.getServlet();
	var5.getClass();
	map.from(var5::getContextParameters).to(factory::setInitParameters);
	map.from(this.serverProperties.getShutdown()).to(factory::setShutdown);
	Iterator var3 = this.webListenerRegistrars.iterator();

	while(var3.hasNext()) {
		WebListenerRegistrar registrar = (WebListenerRegistrar)var3.next();
		registrar.register(factory);
	}

	if (!CollectionUtils.isEmpty(this.cookieSameSiteSuppliers)) {
		factory.setCookieSameSiteSuppliers(this.cookieSameSiteSuppliers);
	}

}
TomcatServletWebServerFactoryCustomizer:根据配置文件中server.tomcat.xxxx定制servlet容器。
@Bean
@ConditionalOnClass(name = {"org.apache.catalina.startup.Tomcat"})
public TomcatServletWebServerFactoryCustomizer tomcatServletWebServerFactoryCustomizer(ServerProperties serverProperties) {
	return new TomcatServletWebServerFactoryCustomizer(serverProperties);
}
怎么让所有的WebServerFactoryCustomizer Bean一一调用的:
BeanPostProcessorsRegistrar 实现了 ImportBeanDefinitionRegistrar
BeanPostProcessorsRegistrar 会提供一个方法,并且提供BeanDefinitionRegistar让我们去注册bean。
public void registerBeanDefinitions(AnnotationMetadata importingClassMetadata, BeanDefinitionRegistry registry) {
	if (this.beanFactory != null) {
		this.registerSyntheticBeanIfMissing(registry, "webServerFactoryCustomizerBeanPostProcessor", WebServerFactoryCustomizerBeanPostProcessor.class);
		this.registerSyntheticBeanIfMissing(registry, "errorPageRegistrarBeanPostProcessor", ErrorPageRegistrarBeanPostProcessor.class);
	}
}
注册了:WebServerFactoryCustomizerBeanPostProcessor
public class WebServerFactoryCustomizerBeanPostProcessor implements BeanPostProcessor, BeanFactoryAware {
public Object postProcessBeforeInitialization(Object bean, String beanName) throws BeansException {
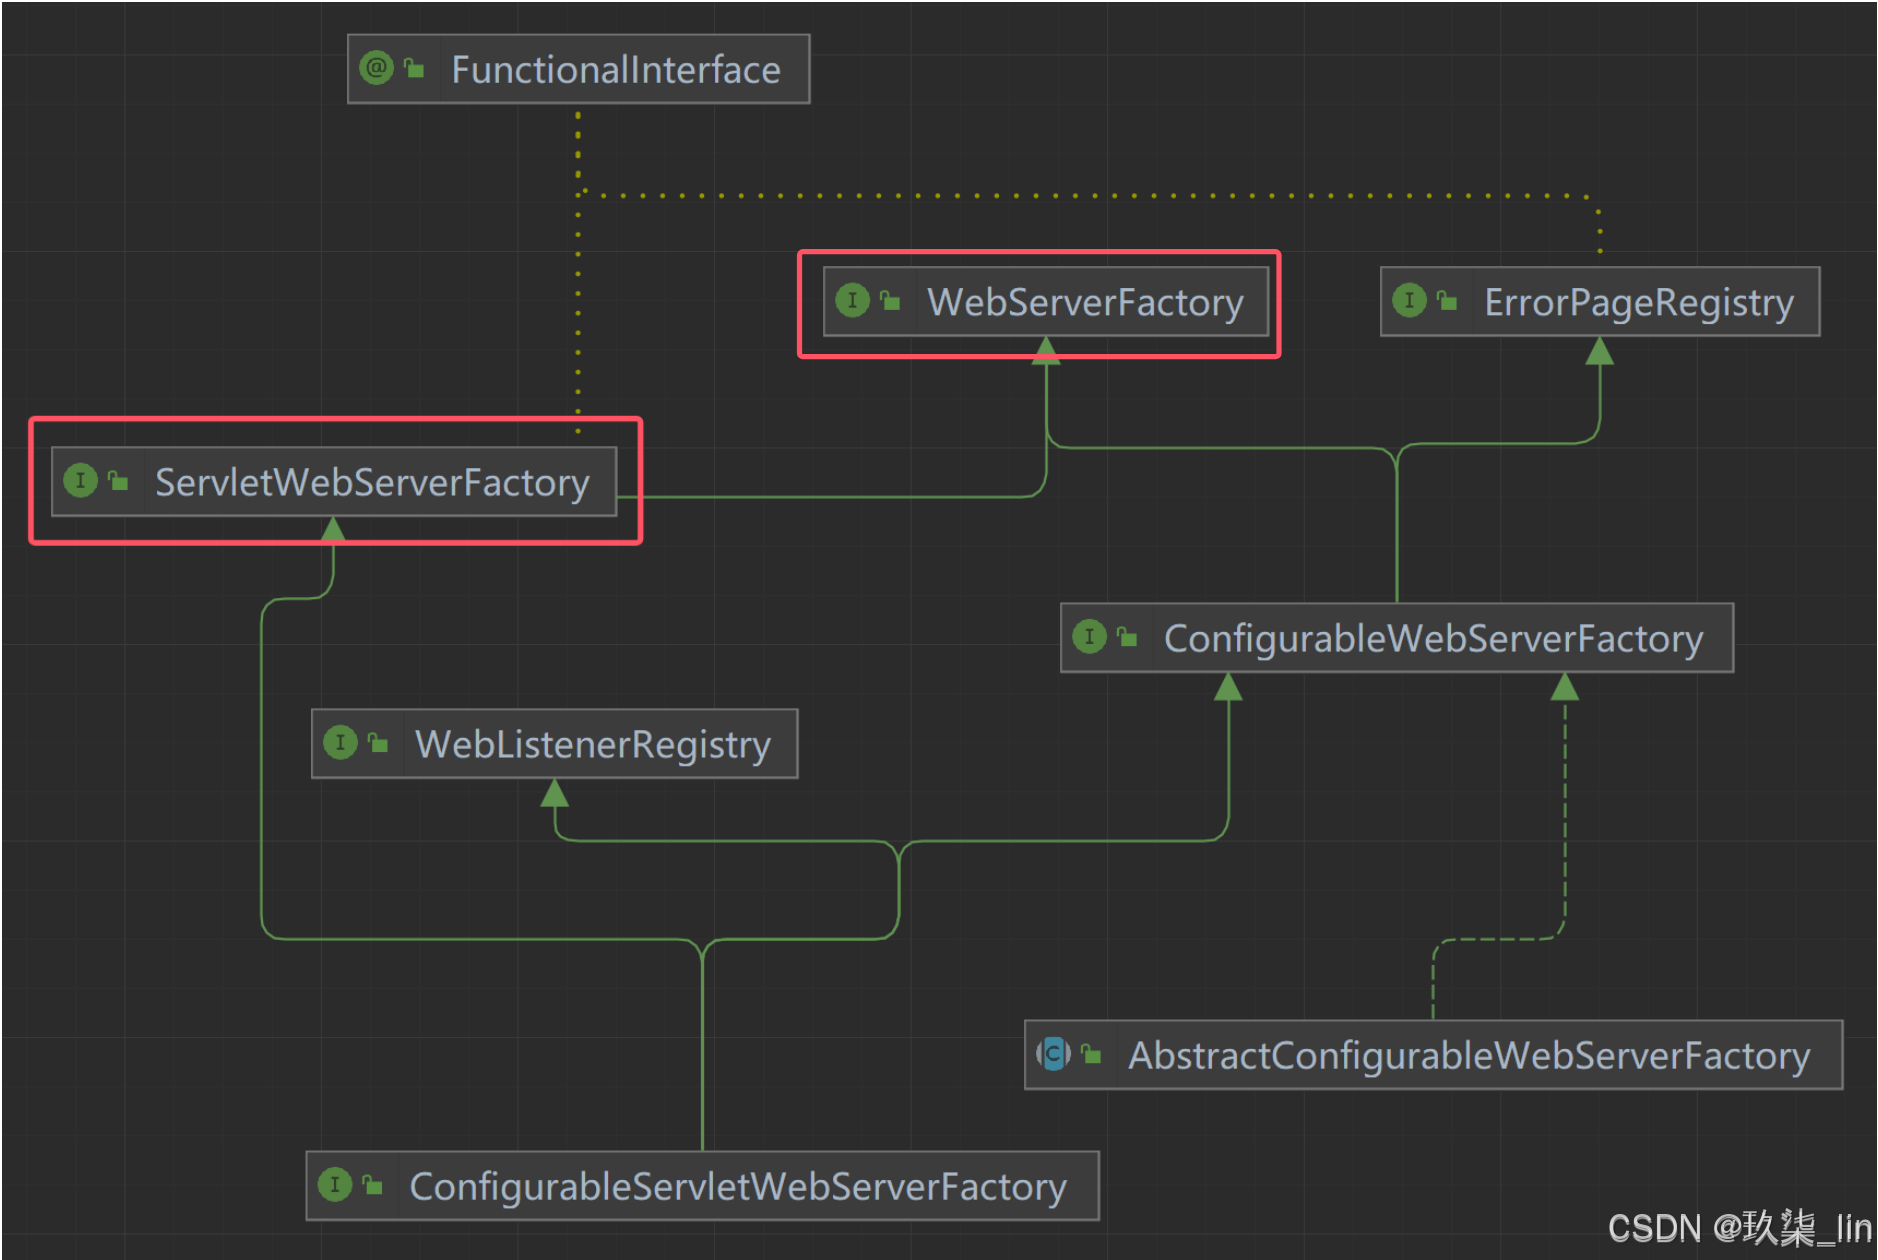
// 判断当前创建的bean是不是WebServerFactory
if (bean instanceof WebServerFactory) {
this.postProcessBeforeInitialization((WebServerFactory)bean);
}
return bean;
}当对应Embeddedxxx启用时,就会在里面配置一个WebServerFactory类型的一个bean
(1)调用getCustomizers()
(2)getWebServerFactoryCustomizerBeans() 就获取了所有实现了WebServerFactoryCustomizer接口的Bean:获取自定义的和ServletWebServerFacgtoryCustomizer、TomcatServaletWebServerFactoryCustomizer
(3)在invoke方法中循环调用所有实现了WebServerFactoryCustomizer接口的Bean的customize方法进行一一定制。
private void postProcessBeforeInitialization(WebServerFactory webServerFactory) {
	((LambdaSafe.Callbacks)LambdaSafe.callbacks(WebServerFactoryCustomizer.class, this.getCustomizers(), webServerFactory, new Object[0]).withLogger(WebServerFactoryCustomizerBeanPostProcessor.class)).invoke((customizer) -> {
		customizer.customize(webServerFactory);
	});
}
private Collection<WebServerFactoryCustomizer<?>> getCustomizers() {
	if (this.customizers == null) {
		this.customizers = new ArrayList(this.getWebServerFactoryCustomizerBeans());
		this.customizers.sort(AnnotationAwareOrderComparator.INSTANCE);
		this.customizers = Collections.unmodifiableList(this.customizers);
	}

	return this.customizers;
}

private Collection<WebServerFactoryCustomizer<?>> getWebServerFactoryCustomizerBeans() {
	return this.beanFactory.getBeansOfType(WebServerFactoryCustomizer.class, false, false).values();
}
(3)嵌入式servlet容器是怎么启动的?
在自动配置中根据不同的依赖,启动对应一个Embeddedxxxx,然后配置一个对应的servlet容器工厂类,比如Tomcat:TomcatServletWebServerFactory
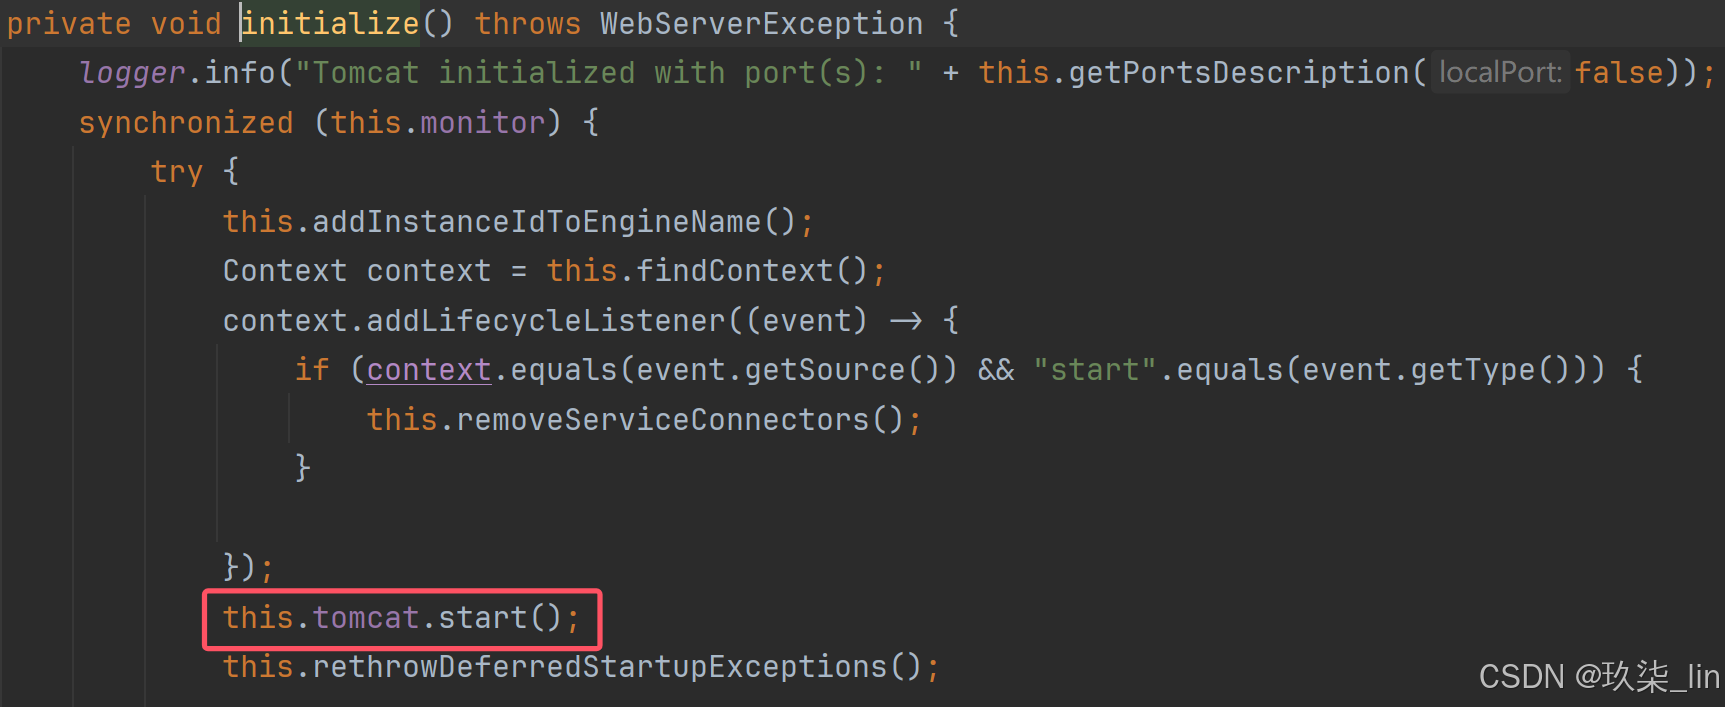
在springboot应用启动的时候,就会调用容器refresh方法,在该方法中调用onRefresh方法,在里面调用getWebServer,创建servlet及启动return this.getTomcatWebServer(tomcat); --> TomcatWebServer --> this.initialize() -->
public WebServer getWebServer(ServletContextInitializer... initializers) {
	if (this.disableMBeanRegistry) {
		Registry.disableRegistry();
	}

	Tomcat tomcat = new Tomcat();
	File baseDir = this.baseDirectory != null ? this.baseDirectory : this.createTempDir("tomcat");
	tomcat.setBaseDir(baseDir.getAbsolutePath());
	Iterator var4 = this.serverLifecycleListeners.iterator();

	while(var4.hasNext()) {
		LifecycleListener listener = (LifecycleListener)var4.next();
		tomcat.getServer().addLifecycleListener(listener);
	}

	Connector connector = new Connector(this.protocol);
	connector.setThrowOnFailure(true);
	tomcat.getService().addConnector(connector);
	this.customizeConnector(connector);
	tomcat.setConnector(connector);
	this.registerConnectorExecutor(tomcat, connector);
	tomcat.getHost().setAutoDeploy(false);
	this.configureEngine(tomcat.getEngine());
	Iterator var8 = this.additionalTomcatConnectors.iterator();

	while(var8.hasNext()) {
		Connector additionalConnector = (Connector)var8.next();
		tomcat.getService().addConnector(additionalConnector);
		this.registerConnectorExecutor(tomcat, additionalConnector);
	}

	this.prepareContext(tomcat.getHost(), initializers);
	return this.getTomcatWebServer(tomcat);
}
this.initialize():
5. 使用外部Servlet容器
6. 外部Servlet容器启动SpringBoot应用原理
7. SpringBoot使用Freemaker
2.
2. 测试
。
八、总结
1. 谈谈对SpringBoot的理解,有哪些特性?
快速开发Spring应用的脚手架,其设计的目的主要是用来简化新Spring应用的初始搭建以及开发过程。
(1)SpringBoot提供了很多内置的Starter启动器结合自动配置,对主流框架无配置集成,开箱即用。
(2)SpringBoot简化了开发,采用JavaConfig的方式可以使用零xml的方式进行开发;
(3)SpringBoot内置了web容器,无需依赖外部web服务器,省略了web.xml,直接运行jar文件就可以启动web应用;
(4)SpringBoot帮我们管理了常用的第三方依赖的版本,减少出现版本冲突的问题。
(5)SpringBoot自带了监控功能,可以监控应用程序的运行情况,或者内存、线程池、Http请求统计等,同时还提供了优雅关闭应用程序等功能。
2. SpringBoot和Spring的关系和区别?
SpringBoot是Spring生态的产品。
Spring Framework是一个容器框架。
SpringBoot不是一个框架,是一个可以快速构建基于Spring的脚手架(里面包含了Spring和各种框架),为Spring生态其他框架铺平道路。
两者不是一个层面的东西,没有可比性。
3. SpringBoot的核心注解
@ SpringBootApplication注解:标识了一个SpringBoot工程,实际上是另外三个注解的组合,这三个注解分别是:


 4092
4092

 被折叠的 条评论
为什么被折叠?
被折叠的 条评论
为什么被折叠?
 到【灌水乐园】发言


