


EventBus是一款针对Android优化的 发布/订阅 事件总线,用于Andriod组件间通信。这里说的是组件主要是Activity、Service、Fragment,通信则主要有Intent,Handler,BroadCast。EventBus能够代替这些通信方式的原因在于:
1.在发送者和接收者间解耦
2.代码更优雅
3.更为稳定,避免了错误依赖关系
它的使用方式极其简单,用一张官网的图来说明就是:
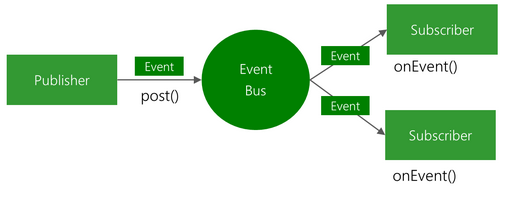
Publisher(发布者)post一个Event,经过EventBus的维护和传递这个Event,分发到Subscriber(订阅者),在onEvent方法中对这个Event进行处理。
下面通过一个例子来说明:
先是定义一个实体类对象
package com.harvic.other;

public class SimpleEvent {

    private String mMsg;

    public SimpleEvent(String msg) {
        // TODO Auto-generated constructor stub
        mMsg = msg;
    }
    public String getMsg(){
        return mMsg;
    }
}
第一个Activity:
package com.example.eventbus_simple;

import com.harvic.other.SimpleEvent;

import de.greenrobot.event.EventBus;
import android.app.Activity;
import android.content.Intent;
import android.os.Bundle;
import android.util.Log;
import android.view.View;
import android.widget.Button;
import android.widget.TextView;
import android.widget.Toast;

public class FirstActivity extends Activity {

    Button btn;
    TextView tv;

    @Override
    protected void onCreate(Bundle savedInstanceState) {
        super.onCreate(savedInstanceState);
        setContentView(R.layout.activity_main);

  // 接收者在这里进行注册
        EventBus.getDefault().register(this);

        btn = (Button) findViewById(R.id.btn_try);
        tv = (TextView)findViewById(R.id.tv);

        btn.setOnClickListener(new View.OnClickListener() {

            @Override
            public void onClick(View v) {
                // TODO Auto-generated method stub
                Intent intent = new Intent(getApplicationContext(),
                        SecondActivity.class);
                startActivity(intent);
            }
        });
    }

  // 接收者重写方法onEvent对传递过来的SimpleEvent进行接收处理
    public void onEvent(SimpleEvent event) {

        String msg = "onEvent收到了消息:" + event.getMsg();
        Log.d("harvic", msg);
        tv.setText(msg);
        Toast.makeText(this, msg, Toast.LENGTH_LONG).show();
    }

    @Override
    protected void onDestroy(){
        super.onDestroy();
        // 根据生命周期进行解除注册
        EventBus.getDefault().unregister(this);
    }
}
第二个Activity:
package com.example.eventbus_simple;

import com.harvic.other.SimpleEvent;

import de.greenrobot.event.EventBus;
import android.app.Activity;
import android.os.Bundle;
import android.view.View;
import android.widget.Button;

public class SecondActivity extends Activity {
    private Button btn_FirstEvent;

    @Override
    protected void onCreate(Bundle savedInstanceState) {
        super.onCreate(savedInstanceState);
        setContentView(R.layout.activity_second);
        btn_FirstEvent = (Button) findViewById(R.id.btn_first_event);

        btn_FirstEvent.setOnClickListener(new View.OnClickListener() {

            @Override
            public void onClick(View v) {
                // TODO Auto-generated method stub
                // 发布者在这里进行事件发布
                EventBus.getDefault().post(
                        new FirstEvent("SimpleEvent btn clicked"));
            }
        });
    }
}
接着返回第一个Activity接收者onEvent,还有几种方式可选:
1、onEvent 发布事件和接收事件线程在同一个线程
2、onEventMainThread 在主线程(UI线程)接收
3、onEventBackgroundThread 在子线程中接收,如果当前为子线程,则在当前线程中接收
4、onEventAsync 无论如何都在子线程中接收
根据不同的需求就可以进行使用了。


 396
396

 被折叠的 条评论
为什么被折叠?
被折叠的 条评论
为什么被折叠?
 到【灌水乐园】发言


