


看标题就知道这篇文章讲的主要是view滑动的相关内容。
ScrollTo && ScrollBy
先看下源码:
public void scrollTo(int x, int y) {
    if (mScrollX != x || mScrollY != y) {
        int oldX = mScrollX;
        int oldY = mScrollY;
        mScrollX = x;
        mScrollY = y;
        invalidateParentCaches();
        onScrollChanged(mScrollX, mScrollY, oldX, oldY);
        if (!awakenScrollBars()) {
            postInvalidateOnAnimation();
        }
    }
}

public void scrollBy(int x, int y) {
    scrollTo(mScrollX + x, mScrollY + y);
}
可以看到scrollBy其实也是调用了scrollTo,区别就是scrollBy是根据相对位置移动,而scrollTo是移动到指定的位置,与原来位置没什么关系。
不过这两个方法移动的是view中的内容,而不是view。举个例子,如果是textview的话,那么滑动的是控件中的文字,而textview本身并不会移动。scrollTo很简单,就不多说了。那来解释下scrollBy中的变量mScrollX和mScrollY。
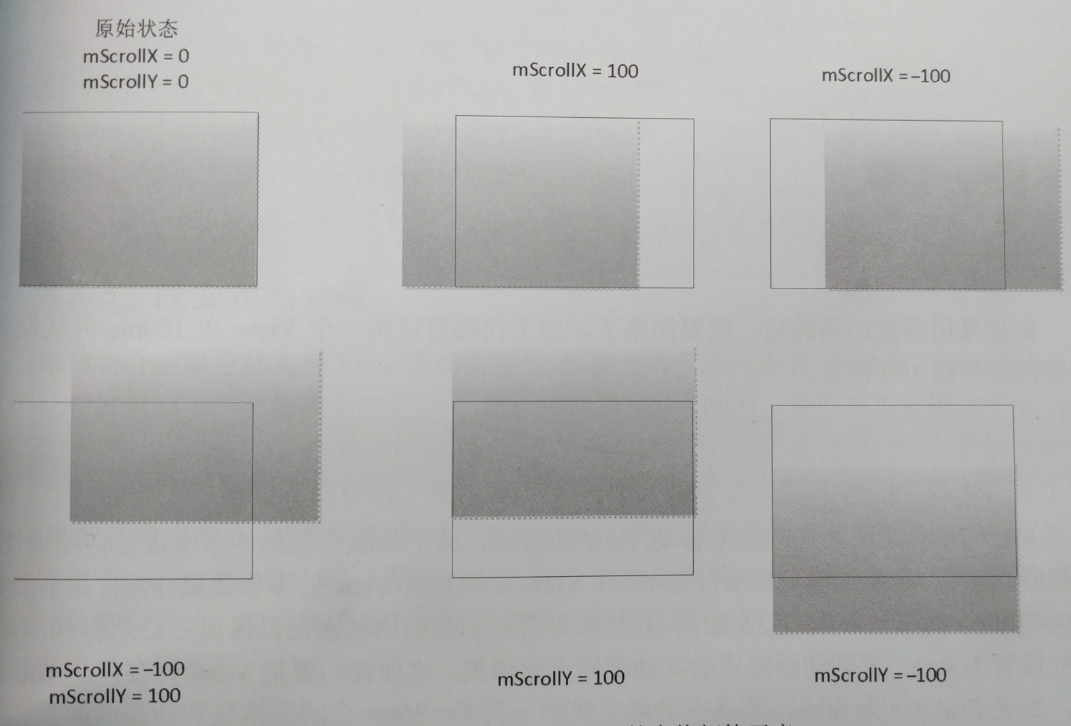
mScrollX和mScrollY记录的是当前view内容所处的位置(移动后所处的位置,一开始为0),这两个值分别有正值和负值。
mScrollX = view.left - viewcontent.left;
mScrollY = view.top - viewcontent.top;
这里的view.left指的是该view的左边框。viewcontent就指的是view内容的左边框。
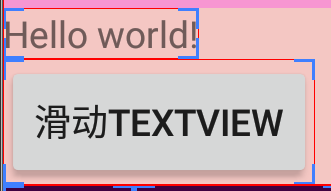
看个例子就是移动TextView中的内容:

看到这里应该明白scrollTo和scrollBy的用法了,不过这种方法有2个缺陷:
- 如果控件是使用wrap_content的话,如果移动内容会导致内容被遮住,看不见。
- 执行scrollTo和scrollBy函数的话,会瞬间移动,用户体验不好,如果滑动的距离比较大的话,用户可能更希望分多个小步滑动完,而不是一步就滑完。那这个时候Scroller就派上用场了,他就是来解决如何一步步滑动完你想要的距离。
Scroller
首先需要解释的是,Scroller并没有直接操作View的移动,看源代码就知道Scroller中并没有一个记录view的变量。Scroller中许多变量都是int变量,Scroller的工作就是根据你提供的数据(从哪个坐标开始移动,横向纵向各走多少停下,移动时间总共要花多久)来计算出每一步你应该走在哪个坐标,computeScrollOffset方法来计算你是否需要继续走,如果返回true,则view还需要继续滑动,你可以通过getCurrX和getCurrY方法来得到下一步应该移动到哪一步,然后你可以通过scrollTo和scrollBy来移动view;如果返回false,则说明已经走到终点。
现在结合Scroller和scrollTo来展示一个例子:
主要是利用TextView展示如何滑动文字,想要的效果是让Textview中的文字向右下方滑动50个像素。
首先需要自定义一个TextView。
public class ScrollTextView extends TextView {
    public ScrollTextView(Context context, AttributeSet attrs) {
        super(context, attrs);
    }

    private Scroller mScroller = new Scroller(getContext());

    public void startScroll() {
        mScroller.startScroll(0, 0, -50, -50, 1000);
        invalidate();
    }

    @Override
    public void computeScroll() {
        if (mScroller.computeScrollOffset()) {
            scrollTo(mScroller.getCurrX(), mScroller.getCurrY());
            invalidate();
        }
    }
}
上面代码中startScroll函数中,告诉scroller在1秒内开始从(0,0)开始向右向下移动50个像素。首先解释下为什么是-50,因为在前面介绍scrollTo中讲到过,mScrollX是等于view.left - viewcontent.left,所以如果你向右平移的话,mScrollX的值为负数(view的左边框在viewcontent的左边,减一减当然为负数啦)。
刚才讲到scroller其实是把一步ScrollTo分成好多步来走,对于每一步的话都是调用onDraw来重新绘制,所以看起来是在滑动的。每次Draw的时候都会调用computeScroll函数,可以在该函数中,去获取每一步的坐标,然后调用scrollTo函数,然后去刷新(invalidate函数)。
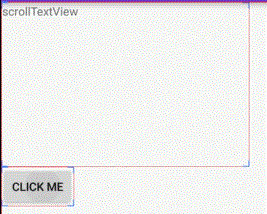
接下来就是在xml中定义一个ScrollTextView了,需要注意的是,要把大小弄得大一点:
<com.example.viewdraghelpersample.ScrollTextView
        android:id="@+id/stv"
        android:layout_width="300dp"
        android:layout_height="200dp"
        android:text="scrollTextView" />

<Button
        android:layout_width="wrap_content"
        android:layout_height="wrap_content"
        android:onClick="onClick"
        android:text="click me" />
public class MainActivity extends AppCompatActivity {
private ScrollTextView tview;
@Override
protected void onCreate(Bundle savedInstanceState) {
super.onCreate(savedInstanceState);
setContentView(R.layout.activity_main);
tview = (ScrollTextView) findViewById(R.id.stv);
}
public void onClick(View view) {
tview.startScroll();
}
}为什么要把ScrollTextView的大小写的大点?如果你layout_width和layout_height是wrap_content的话,那你滑动content的话,就看不见了,这就是scrollto的缺点,滑动到view的区域外就看不见了!!!ViewDragHelper就是解决这个的。
Scroller还有一个要说的就是fling,fling的意思是急冲的意思。在Scroller中有两种模式,一种是SCROLL_MODE,另一个是FLING_MODE。
- scroll用于已知目标位置的情况(例如:Viewpager中向左滑动,就是要展示右边的一页,那么我们就可以准确计算出滑动的目标位置,此时就可以使用Scroller.startScroll()方法)
- fling用于不能准确得知目标位置的情况(例如:ListView,每一次的滑动,我们事先都不知道滑动距离,而是根据手指抬起是的速度来判断是滑远一点还是近一点,这时就可以使用Scroller.fling()方法)
fling的效果就是那种我们在浏览网页,然后点击一键返回顶部,然后页面快速滚动回到顶部的效果。fling执行的时间往往比较短,比较快。用的比较少,这里暂不介绍,具体看API就好了。
ViewDragHelper
这是一个工具类,主要是方便我们自定义ViewGroup,他提供一些有用的操作并且跟踪状态,允许用户在父viewgroup中去drag(拖)和reposition(重定位)一些child views。
Android ViewDragHelper完全解析 自定义ViewGroup神器这篇文章讲解了ViewDragHelper中是怎么用的以及API,这里就不详述了。
那ViewDragHelper实现的原理是怎么样的呢?
在刚刚提供的那篇文章中,有一个demo,我运行了下,给大家看下效果:
我触碰第一个TextView并将其拖拽至其他地方。但是在上述效果中看到,移动的只有文字,TextView的边界并没有移动,还是在原来的左上方位置。
ViewDragHelper是用在ViewGroup中,而不是用在View中的,他的作用是移动ViewGroup中的child view。这里你需要知道ViewGroup事件传递的相关知识,可以看该篇文章View的事件分发。ViewDragHelper主要是拦截ViewGroup的触摸事件,根据手势滑动的轨迹来滑动View。ViewDragHelper中也用到了Scroller,但是其绘制的时候,却不是通过scrollTo方法的,是通过ViewCompat.offsetLeftAndRight和ViewCompat.offsetTopAndBottom方法。ViewDragHelper中类似Scroller的computeScrollOffset的方法是continueSettling,可以通过这个方法来绘制View,看下源码:
    public boolean continueSettling(boolean deferCallbacks) {
        if (mDragState == STATE_SETTLING) {
            boolean keepGoing = mScroller.computeScrollOffset();
            final int x = mScroller.getCurrX();
            final int y = mScroller.getCurrY();
            final int dx = x - mCapturedView.getLeft();
            final int dy = y - mCapturedView.getTop();

            if (dx != 0) {
                ViewCompat.offsetLeftAndRight(mCapturedView, dx);
            }
            if (dy != 0) {
                ViewCompat.offsetTopAndBottom(mCapturedView, dy);
            }

            if (dx != 0 || dy != 0) {
                mCallback.onViewPositionChanged(mCapturedView, x, y, dx, dy);
            }

            if (keepGoing && x == mScroller.getFinalX() && y == mScroller.getFinalY()) {
                // Close enough. The interpolator/scroller might think we're still moving
                // but the user sure doesn't.
                mScroller.abortAnimation();
                keepGoing = false;
            }

            if (!keepGoing) {
                if (deferCallbacks) {
                    mParentView.post(mSetIdleRunnable);
                } else {
                    setDragState(STATE_IDLE);
                }
            }
        }

        return mDragState == STATE_SETTLING;
    }
使用ViewCompat中的两个方法就可以重新绘制View的content,而对于childView来说,他们什么代码都不用变。这种方法替代了ScrollTo,即使content超过了view的边界,也依旧可以显示。
这里需要注意的是ViewCompat中的两个函数传入的值,是针对全页面的绝对位置,而不是针对View边界的相对位置。
例如传进scrollTo(10,10)的话,是将content以view边界为中心,向左上方偏移10,10。如果传进ViewCompat.offsetLeftAndRight(view, 100)的话,则是将content往右偏移100像素,这与scrollTo是不一样的(主要是方向不一样!!!!)。
另外,如果你执行scrollTo(-10,0);这句代码两次,content只会向右平移10像素,但是你如果执行ViewCompat.offsetLeftAndRight(view, 10)两次,那么content会向右平移20像素,这个是非常重要的区别。因为scrollTo是将传入的值10赋值给mScrollX,所以无论你执行多少次,它的content都只会向右平移10,但是ViewCompat不同,他不管你当前位置在哪里,只要你传入的值不为0,他就会直接向右移动,所以你执行那个函数n次,那么就会向右移动10n像素。
那根据这个用法,我们修改刚刚scroller + scrollTo的例子,看下代码:
public class ScrollTextView extends TextView {
    public ScrollTextView(Context context, AttributeSet attrs) {
        super(context, attrs);
    }

    private Scroller mScroller = new Scroller(getContext());

    public void startScroll() {
        mScroller.startScroll(getLeft(), getTop(), 50, 50, 1000);
        invalidate();
    }

    @Override
    public void computeScroll() {
        if (mScroller.computeScrollOffset()) {
            Log.d("tag", "computeScroll : " + mScroller.getCurrX() + "," + mScroller.getCurrY() + "," + mScroller.getFinalX() + "," + mScroller.getFinalY());
            ViewCompat.offsetLeftAndRight(this, mScroller.getCurrX() - getLeft());
            ViewCompat.offsetTopAndBottom(this, mScroller.getCurrY() - getTop());
            invalidate();
        }
    }
}
看下修改的地方,第一个主要是调用startScroll传入的参数不同,这里传入的是getLeft、getTop、50,50。先讲下后面两个参数,因为刚刚说过ViewCompat若传入正值为向右,传入负值为向左,则按照需求来,这里应该传入整数。
在下面computeScroll函数中,调用ViewCompat的两个方法来进行偏移,接下来先看下打印出的tag日志。
D: computeScroll : 0,237,50,287
D: computeScroll : 1,238,50,287
D: computeScroll : 4,241,50,287
D: computeScroll : 7,244,50,287
D: computeScroll : 10,247,50,287
D: computeScroll : 14,251,50,287
D: computeScroll : 17,254,50,287
D: computeScroll : 22,259,50,287
D: computeScroll : 25,262,50,287
D: computeScroll : 28,265,50,287
D: computeScroll : 31,268,50,287
D: computeScroll : 33,270,50,287
D: computeScroll : 35,272,50,287
D: computeScroll : 37,274,50,287
D: computeScroll : 40,277,50,287
D: computeScroll : 43,280,50,287
D: computeScroll : 44,281,50,287
D: computeScroll : 45,282,50,287
D: computeScroll : 46,283,50,287
D: computeScroll : 47,284,50,287
D: computeScroll : 47,284,50,287
D: computeScroll : 47,284,50,287
D: computeScroll : 48,285,50,287
D: computeScroll : 48,285,50,287
D: computeScroll : 48,285,50,287
D: computeScroll : 48,285,50,287
D: computeScroll : 49,286,50,287
D: computeScroll : 49,286,50,287
D: computeScroll : 49,286,50,287
D: computeScroll : 49,286,50,287
D: computeScroll : 49,286,50,287
D: computeScroll : 49,286,50,287
D: computeScroll : 50,287,50,287
D: computeScroll : 50,287,50,287
D: computeScroll : 50,287,50,287
D: computeScroll : 50,287,50,287
从日志中我们可以看出有的时候scroller算出的每一步其实与上一步有重复,一开始getCurrX还是递增,但是到后面,就出现一些重复的getCurrX,getCurrY也是一样的规律,这是为什么呢,让我们看看代码computeOff的代码:
    public boolean computeScrollOffset() {
        if (mFinished) {
            return false;
        }

        int timePassed = (int)(AnimationUtils.currentAnimationTimeMillis() - mStartTime);

        if (timePassed < mDuration) {
            switch (mMode) {
            case SCROLL_MODE:
                final float x = mInterpolator.getInterpolation(timePassed * mDurationReciprocal);
                mCurrX = mStartX + Math.round(x * mDeltaX);
                mCurrY = mStartY + Math.round(x * mDeltaY);
                break;
            case FLING_MODE:
                final float t = (float) timePassed / mDuration;
                final int index = (int) (NB_SAMPLES * t);
                float distanceCoef = 1.f;
                float velocityCoef = 0.f;
                if (index < NB_SAMPLES) {
                    final float t_inf = (float) index / NB_SAMPLES;
                    final float t_sup = (float) (index + 1) / NB_SAMPLES;
                    final float d_inf = SPLINE_POSITION[index];
                    final float d_sup = SPLINE_POSITION[index + 1];
                    velocityCoef = (d_sup - d_inf) / (t_sup - t_inf);
                    distanceCoef = d_inf + (t - t_inf) * velocityCoef;
                }

                mCurrVelocity = velocityCoef * mDistance / mDuration * 1000.0f;

                mCurrX = mStartX + Math.round(distanceCoef * (mFinalX - mStartX));
                // Pin to mMinX <= mCurrX <= mMaxX
                mCurrX = Math.min(mCurrX, mMaxX);
                mCurrX = Math.max(mCurrX, mMinX);

                mCurrY = mStartY + Math.round(distanceCoef * (mFinalY - mStartY));
                // Pin to mMinY <= mCurrY <= mMaxY
                mCurrY = Math.min(mCurrY, mMaxY);
                mCurrY = Math.max(mCurrY, mMinY);

                if (mCurrX == mFinalX && mCurrY == mFinalY) {
                    mFinished = true;
                }

                break;
            }
        }
        else {
            mCurrX = mFinalX;
            mCurrY = mFinalY;
            mFinished = true;
        }
        return true;
    }
因为调用的是startScroll,所以处于SCROLL_MODE模式下。在我们调用startScroll的时候,传入的时间是1000ms,也就是一秒。看代码可以知道,在SCROLL_MODE模式下,此次滑动结束唯一的条件就是时间到,即使currX和currY已经到达终点也还得继续。
case SCROLL_MODE:
    final float x = mInterpolator.getInterpolation(timePassed * mDurationReciprocal);
    mCurrX = mStartX + Math.round(x * mDeltaX);
    mCurrY = mStartY + Math.round(x * mDeltaY);
    break;
看下这段代码,首先会根据当前已经流逝的时间算出占整个时间的百分比,然后乘上deltaX(就是我们传进去的50),来计算出我们当前在x轴方向上应该处于哪一个位置。然后使用math.round四舍五入,所以有的时候每走一步的时候,会发现四舍五入之后,和上一步的结果是一样,相当于这一步没动过。所以这解释了我们刚刚贴出来的日志中存在重复的坐标。但是对于FLING_MODE不同,他结束的条件有两种,第一种和SCROLL_MODE一样,时间到了也就会停止,第二种就是如果currX和currY已经到达终点,则也会停止,即使时间没到也会停止,这和SCROLL_MODE是不一样的。
好,现在为止应该能理解刚刚的代码了,那我现在再给出一份代码,看看大家能不能看出什么问题来!
public class ScrollTextView extends TextView {
    public ScrollTextView(Context context, AttributeSet attrs) {
        super(context, attrs);
    }

    private Scroller mScroller = new Scroller(getContext());

    public void startScroll() {
        mScroller.startScroll(0, 0, 50, 50, 1000);
        invalidate();
    }

    @Override
    public void computeScroll() {
        if (mScroller.computeScrollOffset()) {
            Log.d("tag", "computeScroll : " + mScroller.getCurrX() + "," + mScroller.getCurrY() + "," + mScroller.getFinalX() + "," + mScroller.getFinalY());
            ViewCompat.offsetLeftAndRight(this, mScroller.getCurrX());
            ViewCompat.offsetTopAndBottom(this, mScroller.getCurrY());
            invalidate();
        }
    }
}
读者可以思考下下面这段代码能不能达到我们想要的效果:将content向右下方移动50像素。
事实上这是达不到我们的效果的,实际上的效果是content向右下方不断移动,在我的手机上content一直平移至滑出屏幕了,那为什么会这样呢?
看下日志就知道了
D: computeScroll : 0,0,50,50
D: computeScroll : 1,1,50,50
D: computeScroll : 2,2,50,50
D: computeScroll : 4,4,50,50
D: computeScroll : 7,7,50,50
D: computeScroll : 10,10,50,50
D: computeScroll : 13,13,50,50
D: computeScroll : 17,17,50,50
D: computeScroll : 21,21,50,50
D: computeScroll : 25,25,50,50
D: computeScroll : 28,28,50,50
D: computeScroll : 31,31,50,50
D: computeScroll : 33,33,50,50
D: computeScroll : 35,35,50,50
D: computeScroll : 37,37,50,50
D: computeScroll : 39,39,50,50
D: computeScroll : 40,40,50,50
D: computeScroll : 41,41,50,50
D: computeScroll : 42,42,50,50
D: computeScroll : 43,43,50,50
D: computeScroll : 44,44,50,50
D: computeScroll : 45,45,50,50
D: computeScroll : 46,46,50,50
D: computeScroll : 46,46,50,50
D: computeScroll : 47,47,50,50
D: computeScroll : 47,47,50,50
D: computeScroll : 47,47,50,50
D: computeScroll : 48,48,50,50
D: computeScroll : 48,48,50,50
D: computeScroll : 49,49,50,50
D: computeScroll : 49,49,50,50
D: computeScroll : 49,49,50,50
D: computeScroll : 49,49,50,50
D: computeScroll : 49,49,50,50
D: computeScroll : 49,49,50,50
D: computeScroll : 50,50,50,50
D: computeScroll : 50,50,50,50
D: computeScroll : 50,50,50,50
D: computeScroll : 50,50,50,50
D: computeScroll : 50,50,50,50
D: computeScroll : 50,50,50,50
D: computeScroll : 50,50,50,50
D: computeScroll : 50,50,50,50
D: computeScroll : 50,50,50,50
看前面几行就知道了,在第二行执行时,content向右平移1像素,向下平移1像素,在执行第三行时,content向右平移2,向下平移2像素,到现在为止,content已经向下平移1+2 = 3像素了,向右平移1+2=3像素了,但是content在执行完第三行时,按照预想应该只向右平移2像素,向下平移2像素,但是现实却是多平移了,所以按照日志来看,当全部运行完,content应该是向右平移了1+2+4+7+10……是远远大于50像素的,所以这种方法失败。那为什么第一种方法成功了呢?
因为在每次content移动的时候,getLeft其实也是相应的改变了,随着content在移动,所以当getCurrX改变的时候,getLeft也在改变,所以两者一相减就是正确需要移动的值。
而且下面那种方法在调试的时候又是正确的,这是因为调试的话,每次执行到computeScrollOffset的话,时间不一样,打断点的时候,其实时间已经流逝了,所以在调试状态下,打印出来的日志就两行,第一行就是0,第二行就是正确移动的地点,很难调试出来发现其中的问题。
下次如果调试是正确的,但是正常运行是错误的话,很可能是跟时间有关,例如并发或者类似今天这种问题。


 2万+
2万+

 被折叠的 条评论
为什么被折叠?
被折叠的 条评论
为什么被折叠?
 到【灌水乐园】发言


