


上一小节讲了如何安装、创建项目,以及工程目录的一些基本概念。现在来看看代码。
首先来看下当前与React Native类似的框架与其的区别和优劣势:对比React Native、dcloud、LuaView三个框架技术(内部)
先看下app目录下的代码:
public class MainApplication extends Application implements ReactApplication {

    private final ReactNativeHost mReactNativeHost = new ReactNativeHost(this) {
        @Override
        protected boolean getUseDeveloperSupport() {
            return BuildConfig.DEBUG;
        }

        @Override
        protected List<ReactPackage> getPackages() {
            return Arrays.<ReactPackage>asList(
                    new MainReactPackage()
            );
        }
    };

    @Override
    public ReactNativeHost getReactNativeHost() {
        return mReactNativeHost;
    }
}<manifest xmlns:android="http://schemas.android.com/apk/res/android"
package="com.awesomeproject"
android:versionCode="1"
android:versionName="1.0">
<uses-permission android:name="android.permission.INTERNET" />
<uses-permission android:name="android.permission.SYSTEM_ALERT_WINDOW"/>
<uses-sdk
android:minSdkVersion="16"
android:targetSdkVersion="22" />
<application
android:name=".MainApplication"
android:allowBackup="true"
android:label="@string/app_name"
android:icon="@mipmap/ic_launcher"
android:theme="@style/AppTheme">
<activity
android:name=".LoginActivity"
android:label="@string/app_name"
android:configChanges="keyboard|keyboardHidden|orientation|screenSize">
<intent-filter>
<action android:name="android.intent.action.MAIN" />
<category android:name="android.intent.category.LAUNCHER" />
</intent-filter>
</activity>
<activity android:name="com.facebook.react.devsupport.DevSettingsActivity" />
<activity android:name=".MainActivity" />
</application>
</manifest>public class LoginActivity extends ReactActivity {
/**
* Returns the name of the main component registered from JavaScript.
* This is used to schedule rendering of the component.
*/
@Override
protected String getMainComponentName() {
return "LoginComponent";
}
}MyApplication继承了ReactApplication,我还没看这里面的源码,但我猜想应该主要是做客户端连接服务器的工作吧(如果 有读者知道,请留言告知)。
在AndroidManifest指定了初始启动页面是LoginActivity,那接下来看下LoginActivity代码,里面很简单,指定了显示该页面的component。每个页面都有一个对应的component去渲染,这个component是属于React native的,这个component需要注册在我们上节提到的index.android.js文件中。
那么大头来了,看下index.android.js文件。
/**
 * Sample React Native App
 * https://github.com/facebook/react-native
 * @flow
 */
import {
    AppRegistry,
} from 'react-native';
import LoginComponent from './component/login/LoginComponent';

AppRegistry.registerComponent('LoginComponent', () => LoginComponent);
在这个文件中,引入了与index.android.js同目录下的component文件下的login文件的LoginComponent.js文件
即目录文件是
—index.android.js
—component
——|___login
———-|___LoginComponent.js
先导入loginComponent.js里面代码,然后用AppRegistry.registerComponent来注册,看到了么,这里注册的component就是LoginActivity指定的component。
那看下LoginComponent.js代码:
import React, { Component } from 'react';
import {
    AppRegistry,
    StyleSheet,
    Text,
    View,
    Image,
    TextInput,
    TouchableHighlight,
    ToastAndroid,
} from 'react-native';

export default class LoginComponent extends Component {
    constructor(props){
        super(props);
        this.state={
            account:'',
            psw:''
        };
    }
    updateAccount(account) {
        this.setState({
          account: account,
        });
    }
    updatePsw(psw) {
        this.setState({
          psw: psw,
        });
    }
    goToNext(){
        ToastAndroid.show(this.state.account+'and'+this.state.psw, ToastAndroid.LONG);
    }
    render() {
        return (
            <View style={styles.out_container}>
                <Image
                    source={require('./icon_kf.png')}
                    style={styles.thumbnail}
                />
                <View style={styles.inner_container}>
                    <Text style={styles.text}>账号:</Text>
                    <TextInput style={styles.textInput}
                        autoFocus={true}
                        onChangeText={(text) => this.updateAccount(text)}/>
                </View>
                <View style={styles.inner_container}>
                    <Text style={styles.text}>密码:</Text>
                    <TextInput style={styles.textInput}
                        onChangeText={(text) => this.setState({psw:text})}/>
                </View>
                <TouchableHighlight style={styles.button}
                    onPress = {()=>this.goToNext()}>
                    <Text style={styles.btnText}>下一步</Text>
                </TouchableHighlight>
              </View>
        );
    }
}

const styles = StyleSheet.create({
    out_container:{
        flex: 1,
        justifyContent: 'center',
        alignItems: 'center',
    },
    inner_container: {
        flexDirection: 'row',
        justifyContent: 'space-around',
        alignItems: 'center',
        width:350,
        height:40,
    },
    text: {
        flex:1,
        fontSize: 20,
        marginRight: 10,
    },
    textInput: {
        flex:4,
        borderColor:'gray',
    },
    button: {
        width: 350,
        height: 40,
        marginTop:20,
        alignSelf: 'center',
        justifyContent:'center',
        backgroundColor: '#cab4af',
    },
    btnText: {
        fontSize: 18,
        alignSelf:'center',
        alignItems:'center'
    },
    thumbnail:{
          width:60,
          height:90,
          marginBottom:50,
    },
});
这段代码很长,运行起来的效果就是上节提到的页面:
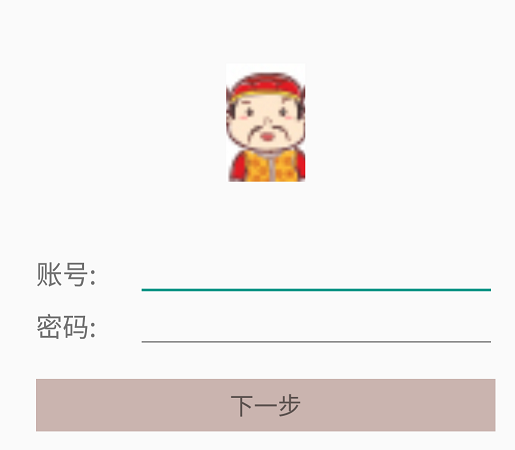
很简单,就是一个类似登录的页面,现在让我来慢慢解释这段代码。
在第最前面,要引入一些包,这和java是类似的,这里主要从两个地方引入,一个是‘react’和’react-native’。这两者有什么区别呢?且看网上的一些回答:
React是一种思想,Facebook对于Web Components的理解与实现。其中ReactJS是Web端,React Native是移动端。值得注意的是React Native写的应用是Native App,而不是Hybrid App。最后React其理念是“Learn once, write anywhere”。
从实现上看,主要是底层 renders 层不同,React 使用的是 Visual DOM,React Native 替换成了native 组件。
所以我的总结是如果是导入widget(和原生app有关)这些的话,是从react-native中导入,而React和Component这些则是从react中导入。
讲完了这些就是创建一个具体的component。
export default class LoginComponent extends Component {
}
代码很简单,component和Activity类似,也是有生命周期的。
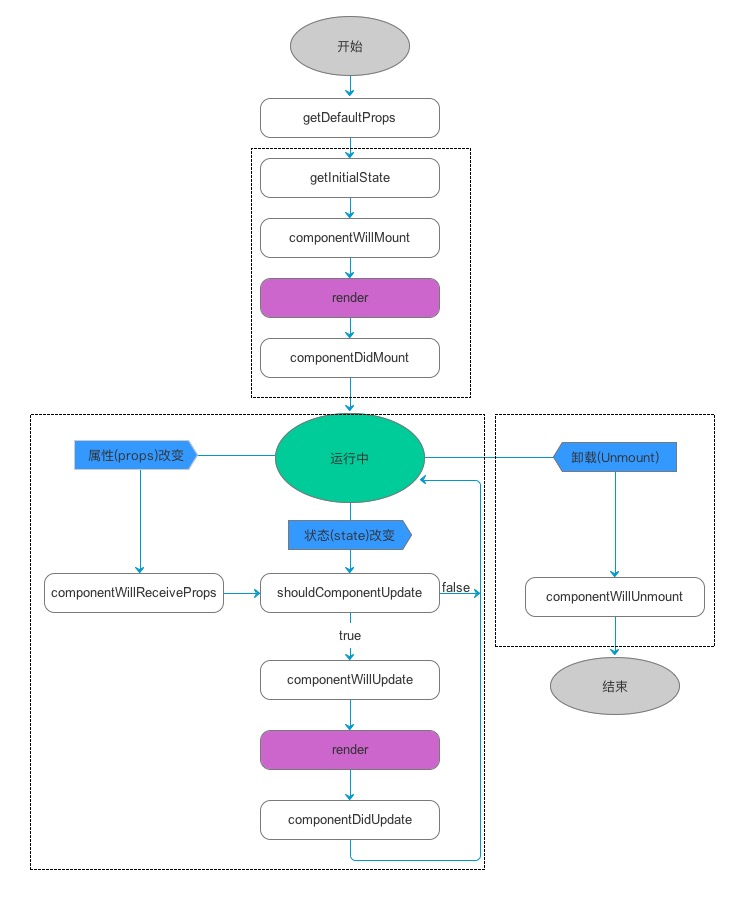
可以看到我们代码中主要是重写了render这个函数,主要是用来返回创建的view,和fragment.onCreateView很相似。
在render函数中,撰写UI和原来Android很不一样,不仅控件名字不一样,而且属性也不一样,这里的话,大家学着写好了。React-Native的基本控件属性方法。
UI这里还要介绍一个FLEX布局,这和原来的Android不一样。具体可以看下这篇文章:Flex 布局教程:语法篇 主要就是一个排版布局方向的东西,替换了以前gravity和layout_gravity等等类似的,用到的属性就是下面你们看到的StyleSheet中的’flex’、’justifyContent’、’alignItem’等这些属性。flex属性的话和layout_weight是类似的。点击这里看Flex属性大集
先讲下这个页面的功能,在点击下一步的时候,将两个输入框中的内容用toast来显示。这功能如果在Android中,那可是太简单了,只要给button(React Native中用TouchableHighlight来代替)增加点击事件,在点击事件中获取两个EditText(React Native中用TextInput来代替)输入框中的内容,但是在js中是无法获取这两个输入框,只能给输入框增加文本改变的事件,用两个变量来记录两个文本框中的内容。看下账号输入框的代码:
<TextInput style={styles.textInput}
           autoFocus={true}
onChangeText={(text) => this.updateAccount(text)}/>说到在一个Component中增加变量的话,就要用到state和props(状态和属性),可以看该篇文章:http://www.cnblogs.com/ZSG-DoBestMe/p/5293457.html
所以在代码中只要如下增加即可:
constructor(props){
        super(props);
        this.state={
            account:'',
            psw:''
        };
    }
这样我们就为LoginComponent增加了account和psw两个变量了,用这两个来记录输入框中的内容。那如何修改呢,只要用setState方法,虽然这个方法我们没有在LoginComponent中声明,但是却可以直接调用,就是用来修改state中的变量的。例如我们要修改psw,可以这么写:
this.setState({psw: newpsw});newpsw就是我们要设的值。所以如果同时修改多个值,你可以封装出一个方法,例如:
updateData(newAccount,newPsw) {
    this.setState({
        account: newAccount,
        psw:psw:newPsw
    });
}
接下来是讲讲Image,在代码中
<Image
    source={require('./icon_kf.png')}
    style={styles.thumbnail}
/>
加载的这张图片是与js目录同级的图片,而不是android中drawable目录下的。
—component
—|____login
———|___LoginComponent.js
———|___icon_kf.png
可以看React Native学习(一)
讲了这些应该对demo比较熟悉了。待博主继续学习后再分享。


 887
887


 被折叠的 条评论
为什么被折叠?
被折叠的 条评论
为什么被折叠?
 到【灌水乐园】发言


