


写在前面的话
本文主要分析MO(去电)的流程,研究的代码是Android 5.1的,目前只关注Framework层,以CDMA为例。
关于应用层的流程,请看《Android 5.1 Phone MO(去电)流程分析(应用层) 》
(如果图片看不清的话,可以右键选择在新标签中打开图片,或者把图片另存到自己电脑再查看。)
本文来自 http://blog.csdn.net/linyongan ,转载请务必注明出处。
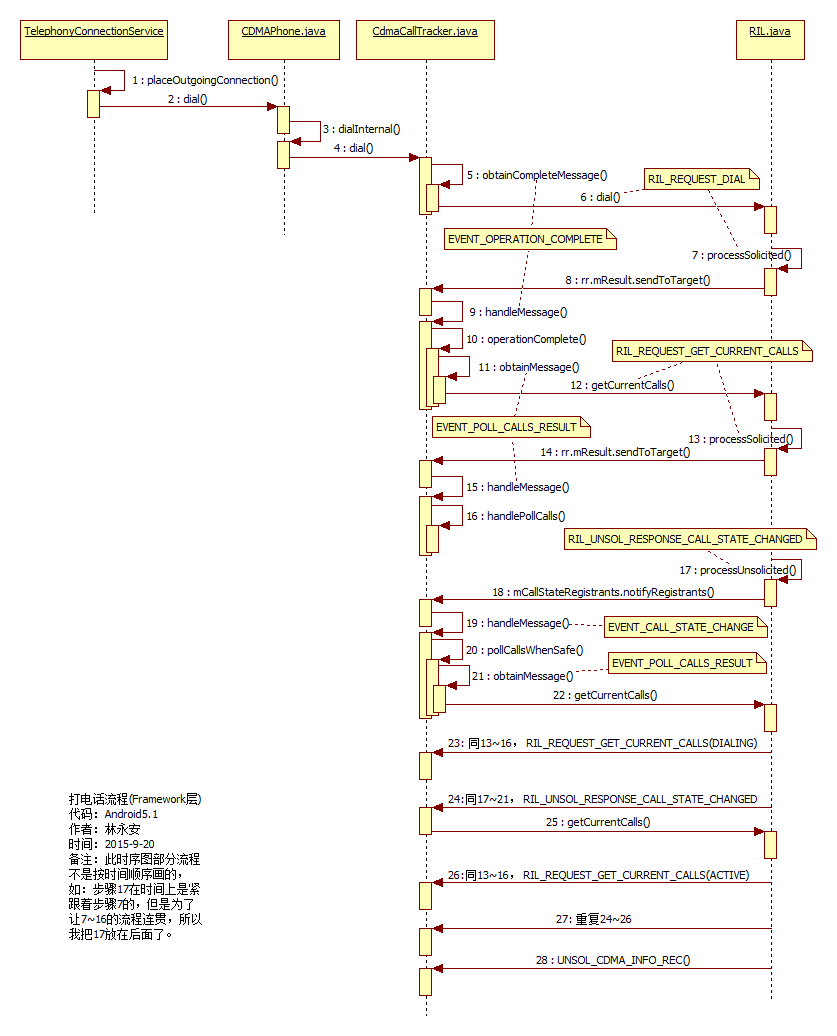
步骤1和2:紧接着应用层的流程,在 TelephonyConnectionService.java 的placeOutgoingConnection方法里调用了phone.dial(),我们这里研究的是CDMA,所以下面会进入 CDMAPhone.java 的dial方法:
public Connection dial (String dialString, int videoState, Bundle extras){
        ...
        return dialInternal(dialString, null, videoState);
}

protected Connection dialInternal (String dialString, UUSInfo uusInfo,int videoState) throws CallStateException {
        // Need to make sure dialString gets parsed properly
        String newDialString = PhoneNumberUtils.stripSeparators(dialString);
        return mCT.dial(newDialString);
}
步骤3和4: mCT是CdmaCallTracker类型的,所以我们进入 CdmaCallTracker.java 的dial方法里:
/**
 * clirMode is one of the CLIR_ constants
 */
Connection dial (String dialString, int clirMode) throws CallStateException {
        // note that this triggers call state changed notif
        clearDisconnected();

        if (!canDial()) {
            throw new CallStateException("cannot dial in current state");
        }

        String origNumber = dialString;
        String operatorIsoContry = mPhone.getSystemProperty(
                TelephonyProperties.PROPERTY_OPERATOR_ISO_COUNTRY, "");
        String simIsoContry = mPhone.getSystemProperty(
                TelephonyProperties.PROPERTY_ICC_OPERATOR_ISO_COUNTRY, "");
        boolean internationalRoaming = !TextUtils.isEmpty(operatorIsoContry)
                && !TextUtils.isEmpty(simIsoContry)
                && !simIsoContry.equals(operatorIsoContry);
        if (internationalRoaming) {
            if ("us".equals(simIsoContry)) {
                internationalRoaming = internationalRoaming && !"vi".equals(operatorIsoContry);
            } else if ("vi".equals(simIsoContry)) {
                internationalRoaming = internationalRoaming && !"us".equals(operatorIsoContry);
            }
        }
        if (internationalRoaming) {
            dialString = convertNumberIfNecessary(mPhone, dialString);
        }

        String inEcm=SystemProperties.get(TelephonyProperties.PROPERTY_INECM_MODE, "false");
        boolean isPhoneInEcmMode = inEcm.equals("true");
        boolean isEmergencyCall =
                PhoneNumberUtils.isLocalEmergencyNumber(mPhone.getContext(), dialString);

        // Cancel Ecm timer if a second emergency call is originating in Ecm mode
        if (isPhoneInEcmMode && isEmergencyCall) {
            handleEcmTimer(CDMAPhone.CANCEL_ECM_TIMER);
        }

        // We are initiating a call therefore even if we previously
        // didn't know the state (i.e. Generic was true) we now know
        // and therefore can set Generic to false.
        mForegroundCall.setGeneric(false);

        // The new call must be assigned to the foreground call.
        // That call must be idle, so place anything that's
        // there on hold
        if (mForegroundCall.getState() == CdmaCall.State.ACTIVE) {
            return dialThreeWay(dialString);
        }

        mPendingMO = new CdmaConnection(mPhone.getContext(), checkForTestEmergencyNumber(dialString),
                this, mForegroundCall);
        mHangupPendingMO = false;

        if ( mPendingMO.getAddress() == null || mPendingMO.getAddress().length() == 0
                || mPendingMO.getAddress().indexOf(PhoneNumberUtils.WILD) >= 0 ) {
            // Phone number is invalid
            mPendingMO.mCause = DisconnectCause.INVALID_NUMBER;

            // handlePollCalls() will notice this call not present
            // and will mark it as dropped.
            pollCallsWhenSafe();
        } else {
            // Always unmute when initiating a new call
            setMute(false);

            // Check data call
            disableDataCallInEmergencyCall(dialString);

            // In Ecm mode, if another emergency call is dialed, Ecm mode will not exit.
            if(!isPhoneInEcmMode || (isPhoneInEcmMode && isEmergencyCall)) {
                mCi.dial(mPendingMO.getAddress(), clirMode, obtainCompleteMessage());
            } else {
                mPhone.exitEmergencyCallbackMode();
                mPhone.setOnEcbModeExitResponse(this,EVENT_EXIT_ECM_RESPONSE_CDMA, null);
                mPendingCallClirMode=clirMode;
                mPendingCallInEcm=true;
            }
        }

        if (mNumberConverted) {
            mPendingMO.setConverted(origNumber);
            mNumberConverted = false;
        }

        //更新phone状态
        updatePhoneState();
        //发起phone状态变化通知
        mPhone.notifyPreciseCallStateChanged();
        //返回通话连接
        return mPendingMO;
 }

 /**
  * Obtain a message to use for signalling "invoke getCurrentCalls() when
  * this operation and all other pending operations are complete
  */
 private Message obtainCompleteMessage() {
        return obtainCompleteMessage(EVENT_OPERATION_COMPLETE);
 }

 /**
  * Obtain a message to use for signalling "invoke getCurrentCalls() when
  * this operation and all other pending operations are complete
  */
 private Message obtainCompleteMessage(int what) {
        mPendingOperations++;
        mLastRelevantPoll = null;
        mNeedsPoll = true;

        if (DBG_POLL) log("obtainCompleteMessage: pendingOperations=" +
                mPendingOperations + ", needsPoll=" + mNeedsPoll);

        return obtainMessage(what);
}步骤5:先看
obtainCompleteMessage
方法,这里调用obtainCompleteMessage带一个参数的方法创建了一个消息类型为EVENT_OPERATION_COMPLETE的Message,这个Message也会传入到mCi.dial方法里,在这里是CdmaCallTracker主动向RILJ(mCi是RILJ的实例对象,后面再解释为什么)发送消息,等RILJ处理完之后通过回调通知CdmaCallTracker,CdmaCallTracker就在handleMessage方法处理。
知识点解析:至于 mCi是什么? ,它是CommandsInterface类型的,在CdmaCallTracker的构造方法里通过mCi = phone.mCi;获取:
public CdmaCallTracker(CDMAPhone phone) {
        ...
        mCi = phone.mCi;
        ...
}
phone是CDMAPhone类型的,在CDMAPhone的构造方法里并没有关于mCi的定义和创建代码,只有super这一行有联系
public CDMAPhone(Context context, CommandsInterface ci, PhoneNotifier notifier,
            boolean unitTestMode) {
        super("CDMA", notifier, context, ci, unitTestMode);
        ...
}
我们再进入CDMAPhone的父类PhoneBase的构造方法里,
protected PhoneBase(String name, PhoneNotifier notifier, Context context,
                              CommandsInterface ci,boolean unitTestMode) {
        ...
        mCi = ci;
        ...
}
找到mCi的定义和初始化信息:mCi = ci;ci是在CDMAPhone的构造方法里的传递对象,因此,如果找到CDMAPhone创建phone对象的地方,也许可以找到ci的创建。
我们要找CDMAPhone被调用的地方,(在Source Insight这个编译器中,选中CDMAPhone,然后按快捷键Ctrl+/),我们找到
PhoneFactory.java
的makeDefaultPhone方法里:
 public static void makeDefaultPhone(Context context) {
        ...
        sCommandsInterface = new RIL(context, networkMode, cdmaSubscription);
        UiccController.make(context, sCommandsInterface);
        int phoneType = TelephonyManager.getPhoneType(networkMode);
        if (phoneType == PhoneConstants.PHONE_TYPE_GSM) {
        Rlog.i(LOG_TAG, "Creating GSMPhone");
        sProxyPhone = new PhoneProxy(
                      new GSMPhone(context,sCommandsInterface, sPhoneNotifier));
    }
}
在创建Phone对象时,传入RILJ类型的sCommandsInterface对象作为参数,因此,我们可以确定CdmaCallTracker.java中使用mCi.dial进行拨号,其实就是调用了 RIL.java 的dial方法。
步骤6: RIL.java 的dial方法
public void dial(String address, int clirMode, UUSInfo uusInfo, Message result) {
        RILRequest rr = RILRequest.obtain(RIL_REQUEST_DIAL, result);
        rr.mParcel.writeString(address);
        rr.mParcel.writeInt(clirMode);
        if (uusInfo == null) {
            rr.mParcel.writeInt(0); // UUS information is absent
        } else {
            rr.mParcel.writeInt(1); // UUS information is present
            rr.mParcel.writeInt(uusInfo.getType());
            rr.mParcel.writeInt(uusInfo.getDcs());
            rr.mParcel.writeByteArray(uusInfo.getUserData());
        }
        //打印日志
        if (RILJ_LOGD) riljLog(rr.serialString() + "> " +
                               requestToString(rr.mRequest));
        send(rr);
}
打印出来的log:
08-11 09:39:24.313 D/RILJ ( 2904): [5503]> DIAL在这里创建了RILRequest 对象rr,将CdmaCallTracker传递过来的消息类型为EVENT_OPERATION_COMPLETE的Message赋值给rr.mResult,然后RILJ向RILD发送了RIL_REQUEST_DIAL请求。
步骤7:等底层处理完之后,会发送RIL_REQUEST_DIAL消息给RILJ,在RILJ的
processSolicited
方法里接收并处理该消息:
private RILRequest processSolicited (Parcel p) {
        ...
        case RIL_REQUEST_DIAL:
        ret =  responseVoid(p); break;
        ...
        //打印log日志
        if (RILJ_LOGD) riljLog(rr.serialString() + "< " +
        requestToString(rr.mRequest)
                    + " " + retToString(rr.mRequest, ret));
        if (rr.mResult != null) {
            AsyncResult.forMessage(rr.mResult, null, tr);
            rr.mResult.sendToTarget();//发出handler消息通知
}
步骤8,9,10:
rr.mResult
就是在CdmaCallTracker中创建的消息类型为EVENT_OPERATION_COMPLETE的Message,所以调用sendToTarget方法,就会把消息发送给CdmaCallTracker,然后在
CdmaCallTracker.java
的handleMessage方法中有对EVENT_OPERATION_COMPLETE的逻辑处理:
public void
    handleMessage (Message msg) {
        ...
        switch (msg.what) {
           case EVENT_OPERATION_COMPLETE:
                operationComplete();
           break;
   ...
}

private void operationComplete() {
        mPendingOperations--;

        if (DBG_POLL) log("operationComplete: pendingOperations=" +
                mPendingOperations + ", needsPoll=" + mNeedsPoll);

        if (mPendingOperations == 0 && mNeedsPoll) {
            mLastRelevantPoll = obtainMessage(EVENT_POLL_CALLS_RESULT);
            mCi.getCurrentCalls(mLastRelevantPoll);
        } else if (mPendingOperations < 0) {
            // this should never happen
            Rlog.e(LOG_TAG,"CdmaCallTracker.pendingOperations < 0");
            mPendingOperations = 0;
        }
}步骤11和12:在这里通过
obtainMessage
方法生成一个消息类型为EVENT_POLL_CALLS_RESULT的Message并且作为getCurrentCalls方法的参数传递到mCi,mCi是RIL.java的实例对象,这也就回到了
RIL.java
的getCurrentCalls方法里,getCurrentCalls将RIL_REQUEST_GET_CURRENT_CALLS 消息封装成RILRequest 类型并发送。
public void getCurrentCalls (Message result) {
        //注意rr对象的消息类型,后面会用到
        RILRequest rr = RILRequest.obtain(
        RIL_REQUEST_GET_CURRENT_CALLS, result);
        //打印log日志
        if (RILJ_LOGD)
        riljLog(rr.serialString() + "> " + requestToString(rr.mRequest));
        send(rr);
}
打印出相应的log是
09-09 17:32:02.179 D/RILJ ( 2795): [5656]> GET_CURRENT_CALLS步骤13: RILJ向底层请求查询Call List状态列表,等底层处理完之后,就把结果返回给RILJ,向RILJ发送RIL_REQUEST_GET_CURRENT_CALLS消息,RILJ在
processSolicited
方法里处理它。
private RILRequest processSolicited (Parcel p) {
        ...
        case RIL_REQUEST_GET_CURRENT_CALLS:
        ret =  responseCallList(p); break;
        ...
        //打印log日志
        if (RILJ_LOGD) riljLog(rr.serialString() + "< " +
        requestToString(rr.mRequest)
                    + " " + retToString(rr.mRequest, ret));
        if (rr.mResult != null) {
            AsyncResult.forMessage(rr.mResult, null, tr);
            rr.mResult.sendToTarget();//发出handler消息通知
}步骤14和15:还是跟上面一样,
rr.mResult
就是刚刚在CdmaCallTracker中创建的那个消息类型为EVENT_POLL_CALLS_RESULT的Message,所以在
CdmaCallTracker.java
的handleMessage 方法中会有EVENT_POLL_CALLS_RESULT的逻辑处理
public void
    handleMessage (Message msg) {
        ...
        switch (msg.what) {
            case EVENT_POLL_CALLS_RESULT:{
                //打印log日志
                Rlog.d(LOG_TAG, "Event EVENT_POLL_CALLS_RESULT Received");
                ar = (AsyncResult)msg.obj;

                if(msg == mLastRelevantPoll) {
                    if(DBG_POLL) log(
                            "handle EVENT_POLL_CALL_RESULT: set needsPoll=F");
                    mNeedsPoll = false;
                    mLastRelevantPoll = null;
                    handlePollCalls((AsyncResult)msg.obj);
                }
            }
            break;
   ...
}步骤16:最后,会进入 handlePollCalls 方法,关于handlePollCalls方法,《 handlePollCalls方法详解 》这篇文章讲得比较详细,对于我们这里,是打电话流程中,第一次查询Call List列表,所以会进入这里:
//conn代表旧的通话连接的基本信息,dc代表新的。出现新的通话连接
if (conn == null && dc != null) {
    //主动发起拨号请求后,第一次查询到Call List后,进入这里
    // Connection appeared in CLCC response that we don't know about
    if (mPendingMO != null && mPendingMO.compareTo(dc)) {

        if (DBG_POLL) log("poll: pendingMO=" + mPendingMO);

        // It's our pending mobile originating call
        mConnections[i] = mPendingMO;
        //把i的值赋值给index
        mPendingMO.mIndex = i;
        mPendingMO.update(dc);
        mPendingMO = null;

        // Someone has already asked to hangup this call
        if (mHangupPendingMO) {
            mHangupPendingMO = false;
            // Re-start Ecm timer when an uncompleted emergency call ends
            if (mIsEcmTimerCanceled) {
                handleEcmTimer(CDMAPhone.RESTART_ECM_TIMER);
            }

            try {
                if (Phone.DEBUG_PHONE) log(
                        "poll: hangupPendingMO, hangup conn " + i);
                hangup(mConnections[i]);
            } catch (CallStateException ex) {
                Rlog.e(LOG_TAG, "unexpected error on hangup");
            }

            // Do not continue processing this poll
            // Wait for hangup and repoll
            return;
        }
}
好像也没有多大作用,就是把mPendingMO的值赋值给mConnections和把i的值赋值给mIndex 。
步骤17和18:接着,底层又会上报RIL_UNSOL_RESPONSE_CALL_STATE_CHANGED消息给RILJ,这是底层主动上报的消息,所以RILJ会在
processUnsolicited
方法里进行处理
private void processUnsolicited (Parcel p) {
    ...
    try {switch(response) {
    ...
    case RIL_UNSOL_RESPONSE_CALL_STATE_CHANGED:
    ret =  responseVoid(p); break;
    ...
    }
    switch(response) {
    ...
    case RIL_UNSOL_RESPONSE_CALL_STATE_CHANGED:
         if (RILJ_LOGD)
         unsljLog(response);//打印log日志
         //发出通知(RegistrantList消息处理机制)
         mCallStateRegistrants.notifyRegistrants(new
         AsyncResult(null, null, null));
    ...
    }
}
(在Source Insight这个编译器中,选中mCallStateRegistrants,然后按快捷键Ctrl+/),我们找到BaseCommands.java的registerForCallStateChanged方法,接着继续找它的调用者,最后我们来到CdmaCallTracker.java的构造方法里
public CdmaCallTracker(CDMAPhone phone) {
      ...
      mCi.registerForCallStateChanged(this, EVENT_CALL_STATE_CHANGE, null);
      ...
}发觉是CdmaCallTracker.java向RIL注册了一个EVENT_CALL_STATE_CHANGE类型的Handler消息。
步骤19,20,21:因此,我们在
CdmaCallTracker.java
的handleMessage方法里可以找到响应EVENT_CALL_STATE_CHANGE消息类型的处理逻辑,如下:
 public void
     handleMessage (Message msg) {
     ...
     case EVENT_CALL_STATE_CHANGE:
          //调用父类CallTracker查询Call List方法
          pollCallsWhenSafe();
     break;
     ...
}

protected void pollCallsWhenSafe() {
        ...
        if (checkNoOperationsPending()) {
        //注意mLastRelevantPoll对象的消息类型,后面会用到
            mLastRelevantPoll = obtainMessage(EVENT_POLL_CALLS_RESULT);
            mCi.getCurrentCalls(mLastRelevantPoll);
        }
}步骤22和23:又是RILJ请求查询Call List状态列表。。。老样子,查完还是交给 CdmaCallTracker去处理。这时候Call的状态还是DIALING。
步骤24~27:等Call的状态变成ACTIVE后,底层又会上报RIL_UNSOL_RESPONSE_CALL_STATE_CHANGED消息给RILJ,然后RILJ又请求查询查询Call List状态列表,CdmaCallTracker又处理。。。
到这里,电话已接通,打电话的流程就这么多了。
下面贴出打电话流程的log片段
09-09 17:32:01.730 D/RILJ    ( 2795): [5655]> DIAL
09-09 17:32:01.810 D/RILJ    ( 2795): [5655]< DIAL
09-09 17:32:01.935 D/RILJ    ( 2795): [UNSL]< UNSOL_RESPONSE_CALL_STATE_CHANGED
09-09 17:32:02.179 D/RILJ    ( 2795): [5656]> GET_CURRENT_CALLS
09-09 17:32:02.183 V/RILJ    ( 2795): Incoming UUS : NOT present!
09-09 17:32:02.183 D/RILJ    ( 2795): InCall VoicePrivacy is disabled
09-09 17:32:02.183 D/RILJ    ( 2795): [5656]< GET_CURRENT_CALLS
[id=1,DIALING,toa=129,norm,mo,0,voc,noevp,,cli=1,,0]
09-09 17:32:02.196 D/RILJ    ( 2795): [5657]> GET_CURRENT_CALLS
09-09 17:32:02.201 V/RILJ    ( 2795): Incoming UUS : NOT present!
09-09 17:32:02.201 D/RILJ    ( 2795): InCall VoicePrivacy is disabled
09-09 17:32:02.201 D/RILJ    ( 2795): [5657]< GET_CURRENT_CALLS
[id=1,DIALING,toa=129,norm,mo,0,voc,noevp,,cli=1,,0]
09-09 17:32:02.306 D/CdmaCallTracker( 2795): Event EVENT_POLL_CALLS_RESULT Received
09-09 17:32:02.306 D/CdmaCallTracker( 2795): Event EVENT_POLL_CALLS_RESULT Received
09-09 17:32:03.607 D/RILJ    ( 2795): [UNSL]< UNSOL_RESPONSE_CALL_STATE_CHANGED
09-09 17:32:03.686 D/RILJ    ( 2795): [5658]> GET_CURRENT_CALLS
09-09 17:32:03.688 D/RILJ    ( 2795): [5659]> GET_CURRENT_CALLS
09-09 17:32:03.691 D/RilRequest( 2795): [5659]< GET_CURRENT_CALLS
error: com.android.internal.telephony.CommandException: GENERIC_FAILURE ret=
09-09 17:32:03.696 D/RILJ    ( 2795): [5658]< GET_CURRENT_CALLS
[id=1,ACTIVE,toa=129,norm,mo,0,voc,noevp,,cli=1,,0]
09-09 17:32:03.745 D/CdmaCallTracker( 2795): Event EVENT_POLL_CALLS_RESULT Received
09-09 17:32:03.745 D/CdmaCallTracker( 2795): Event EVENT_POLL_CALLS_RESULT Received
09-09 17:32:03.995 D/RILJ    ( 2795): [5660]> GET_CURRENT_CALLS
09-09 17:32:04.002 D/RILJ    ( 2795): [5660]< GET_CURRENT_CALLS
[id=1,ACTIVE,toa=129,norm,mo,0,voc,noevp,,cli=1,,0]
09-09 17:32:04.002 D/CdmaCallTracker( 2795): Event EVENT_POLL_CALLS_RESULT Received
09-09 17:32:04.004 D/CallStateMonitor( 2795): handleMessage(10)
09-09 17:32:04.004 D/CallNotifier( 2795): PHONE_ENHANCED_VP_OFF...
09-09 17:32:04.005 D/CallStateMonitor( 2795): handleMessage(1)
补充:看到上面的log中出现了GET_CURRENT_CALLS
error,对于这种情况的后续处理,请查看《“RILJ多次发出GET_CURRENT_CALLS请求”问题分析 》


 1345
1345

 被折叠的 条评论
为什么被折叠?
被折叠的 条评论
为什么被折叠?
 到【灌水乐园】发言


