


tomcat同时部署springboot(idea)项目和vue项目(webstorm)
1 后台项目打包
1.1 打包后台springboot的项目 选择File->Project Structure 然后根据下图所示 选择 Artifacts 右键Add一个 Web Application Archive 然后应用 ok

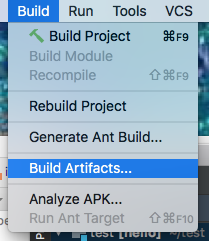
1.2 选择 Build --> build Artifacts 选择你刚才添加的项目 选择build打包一下
1.3 然后项目中会生成一个 out的文件夹 你的项目就在里面 是一个war包
2 前台vue项目webstrom的打包
2.1 首先配置一下项目的 config/index.js文件 以我的为例
dev: {
    // env: require('./dev.env'),
    // Paths
    assetsSubDirectory: 'static',
    assetsPublicPath: '/',
    proxyTable: {
      //为了匹配代理地址,在前面加一个  /api
      '/api': {
        target: 'http://localhost:8088/',
        changeOrigin: true,//是否跨域
        secure: false,   // 如果是https接口,需要配置这个参数为true
        pathRewrite: {
          '^/api': '/'
        }
      }
    },

    // Various Dev Server settings
    host: 'localhost', // can be overwritten by process.env.HOST
    port: 8082, // can be overwritten by process.env.PORT, if port is in use, a free one will be determined
    autoOpenBrowser: false,
    errorOverlay: true,
    notifyOnErrors: true,
    poll: false, // https://webpack.js.org/configuration/dev-server/#devserver-watchoptions-
    // Use Eslint Loader?
    // If true, your code will be linted during bundling and
    // linting errors and warnings will be shown in the console.
    useEslint: true,
    // If true, eslint errors and warnings will also be shown in the error overlay
    // in the browser.
    showEslintErrorsInOverlay: false,

    /**
     * Source Maps
     */
    https://webpack.js.org/configuration/devtool/#development
    devtool: 'cheap-module-eval-source-map',

    // If you have problems debugging vue-files in devtools,
    // set this to false - it *may* help
    // https://vue-loader.vuejs.org/en/options.html#cachebusting
    cacheBusting: true,

    cssSourceMap: true
  },
2.2 这边要注意下 assetsSubDirectory: ‘./static’,
assetsPublicPath: ‘./’,前面加 ‘./’ 为了可以访问静态资源 要不然打包后你要去打包好的项目里 手动添加./ (所以的js引入的css的引入链接地址)
build: {
    // Template for index.html
    index: path.resolve(__dirname, '../dist/index.html'),

    // Paths
    assetsRoot: path.resolve(__dirname, '../dist'),
    //设置如下打包就不需要手动改打包后的index.html
    //部署
    // assetsPublicPath: './',//方式一
    // assetsPublicPath: '/hot/',//hot项目上级包名 方式二

    assetsSubDirectory: './static',
    assetsPublicPath: './',

    /**
     * Source Maps
     */
    productionSourceMap: true,
    // https://webpack.js.org/configuration/devtool/#production
    devtool: '#source-map',

    // Gzip off by default as many popular static hosts such as
    // Surge or Netlify already gzip all static assets for you.
    // Before setting to `true`, make sure to:
    // npm install --save-dev compression-webpack-plugin
    productionGzip: false,
    productionGzipExtensions: ['js', 'css'],

    // Run the build command with an extra argument to
    // View the bundle analyzer report after build finishes:
    // `npm run build --report`
    // Set to `true` or `false` to always turn it on or off
    bundleAnalyzerReport: process.env.npm_config_report
 }
2.3 然后你就可以输入打包命令 npm run build 来进行打包了 打包完后项目中会出现 dist的文件夹 项目就在里面 到时候项目名就是这个 打包的包名 (默认是这个)
3 安装tomcat(1.8)
3.1 配置jdk jre的环境变量JAVA_HOME JAVA_JRE 这边一定要使用jdk1.8的版本 因为springboot的项目默认最低就是1.8的(访问不到 我是卡了很久 特别嘱咐一下)
3.2 把两个打包的项目放到tomcat的 webapps目录下
3.3 配置config/server.xml文件 端口号这边就不说了
3.3.1 先配置后台的项目 重点是增加一个Context 配置 docBase 是项目所在路径 可写相对地址 path是我写了/api是方便前台调用的 单独项目 可不写
```javascript
<!-- 后台接口项目api -->
<Service name="Catalina">
<Connector port="8088" protocol="HTTP/1.1"
connectionTimeout="20000"
redirectPort="8443" />
<Connector port="8009" protocol="AJP/1.3" redirectPort="8443" />
<Engine name="Catalina" defaultHost="localhost">
<Realm className="org.apache.catalina.realm.LockOutRealm">
<Realm className="org.apache.catalina.realm.UserDatabaseRealm"
resourceName="UserDatabase"/>
</Realm>
<Host name="localhost" appBase="webapps"
unpackWARs="true" autoDeploy="true">
<Context docBase="/Users/lisen/Downloads/2019-12-30/apache-tomcat-8.5 1.45/webapps/hello_war" path="/api" reloadable="true" />
<Valve className="org.apache.catalina.valves.AccessLogValve" directory="logs"
prefix="localhost_access_log" suffix=".txt"
pattern="%h %l %u %t "%r" %s %b" />
</Host>
</Engine>
</Service>
3.3.2 前台项目配置server.xml 就是再增加一个Service的配置 跟后台雷同 这边
``` 3.4 然后到bin目录下去 运行stratup文件 mac中stratup运行权限不足 可查看此目录下所有文件的权限ls -la *.sh
可在 命令行模式 给予权限
chmod -R u+x ./bin


 3029
3029


 被折叠的 条评论
为什么被折叠?
被折叠的 条评论
为什么被折叠?
 到【灌水乐园】发言


