


CSS样式学习宝典,关注点赞加收藏,防止迷路哦
1.css字体属性
字体属性
font-size 字体大小
font-family 字体种类
font-weight 字体粗细
font-style 字体正斜
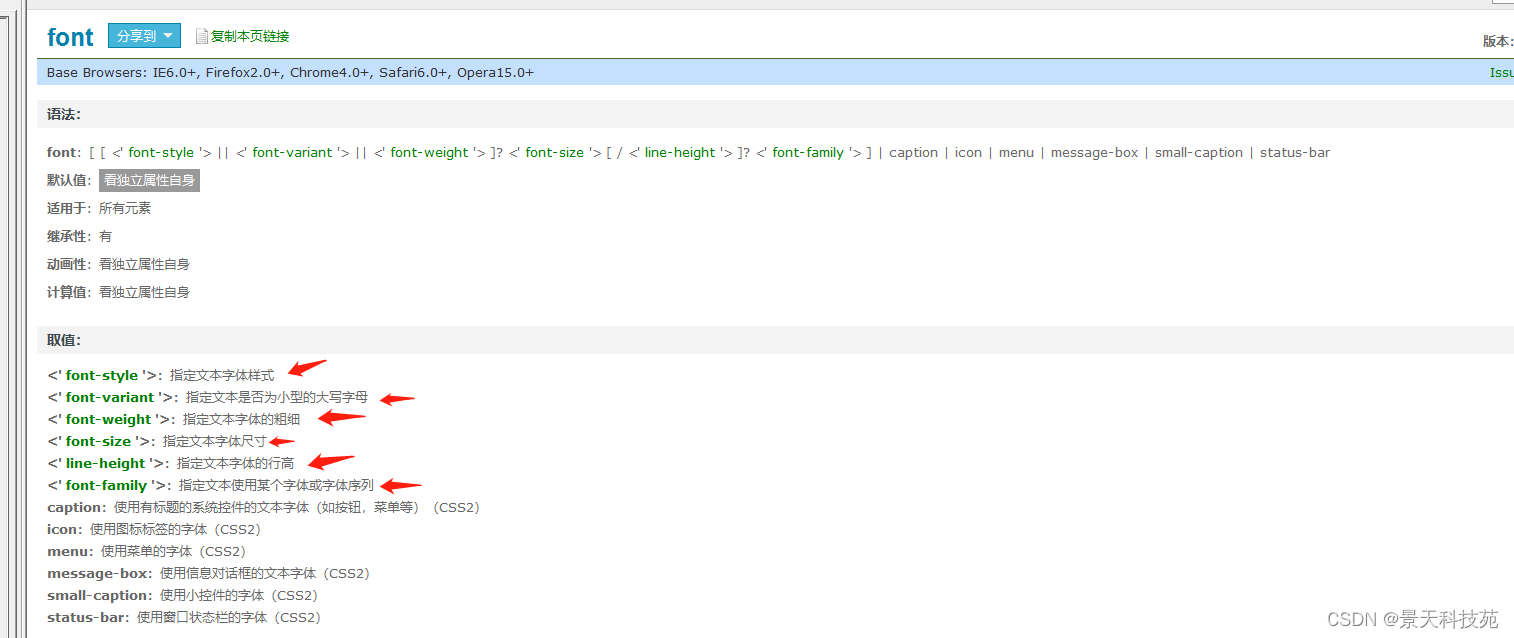
font 字体属性的缩写[包括上面接]
color 字体颜色
<!DOCTYPE html>
<html lang="en">
<head>
<meta charset="UTF-8">
<meta name="viewport" content="width=device-width, initial-scale=1.0">
<title>css的相关属性: 字体属性 </title>
<style>
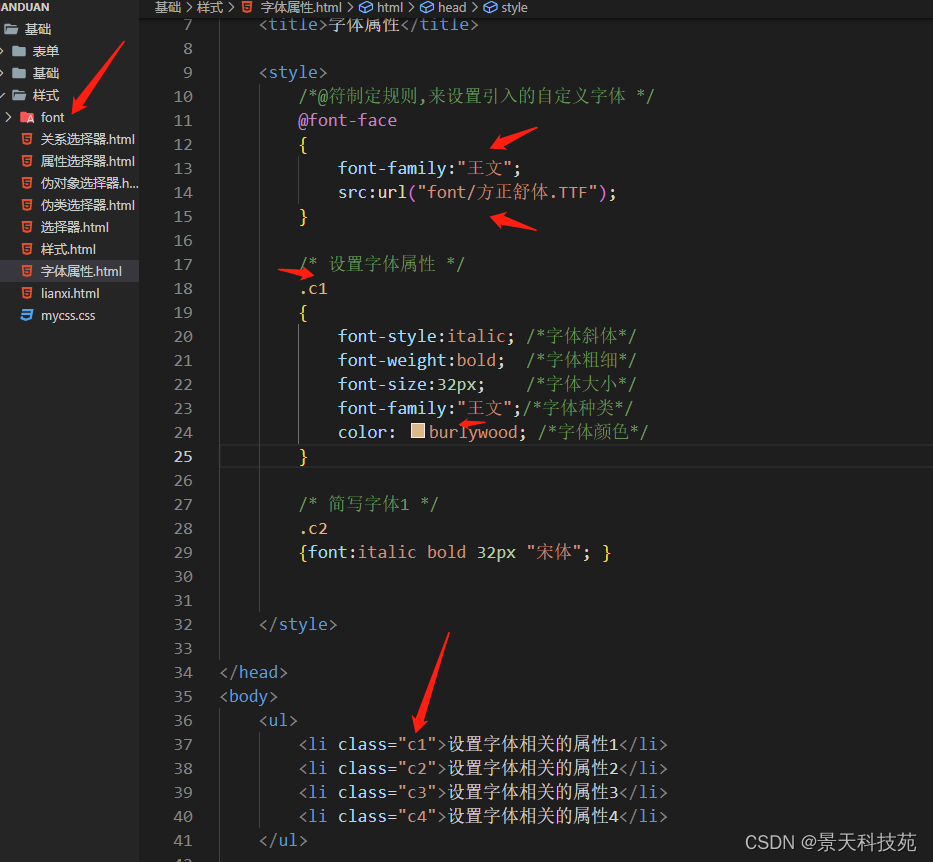
/*@符制定规则,来设置引入的自定义字体 */
@font-face
{
font-family:"王文";
src:url("font/方正舒体.TTF");
}
/* 设置字体属性 */
.c1
{
font-style:italic; /*字体斜体*/
font-weight:bold; /*字体粗细*/
font-size:32px; /*字体大小*/
font-family:"宋体";/*字体种类*/
}
    /* 简写字体1 */
    .c2
    {font:italic bold 32px "宋体"; }
简写顺序
/* 简写字体2 */
.c3
{
border:solid 1px red;
font:64px/2 "宋体"; /* 字体大小/行高比例 字体种类 */
background-color: yellow;
}
/* 自定义字体 */
.c4
{font:64px/2 "王文";}
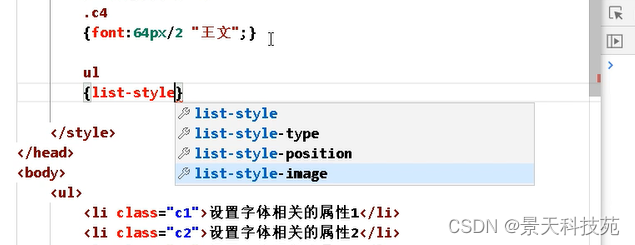
ul
{
/* 去掉前面的点. */
list-style:none;
/* 改变鼠标的形态 */
cursor:wait;
}
</style>
</head>
<body>
<ul>
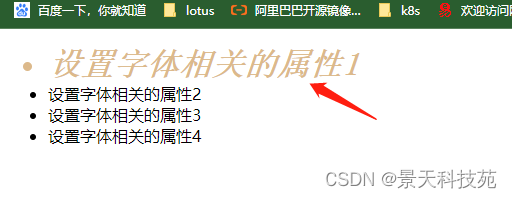
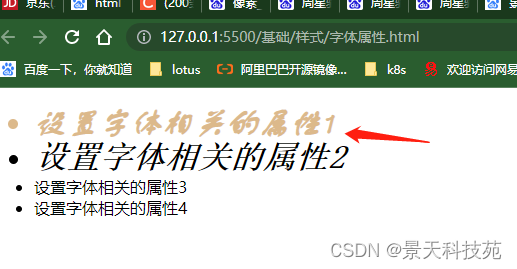
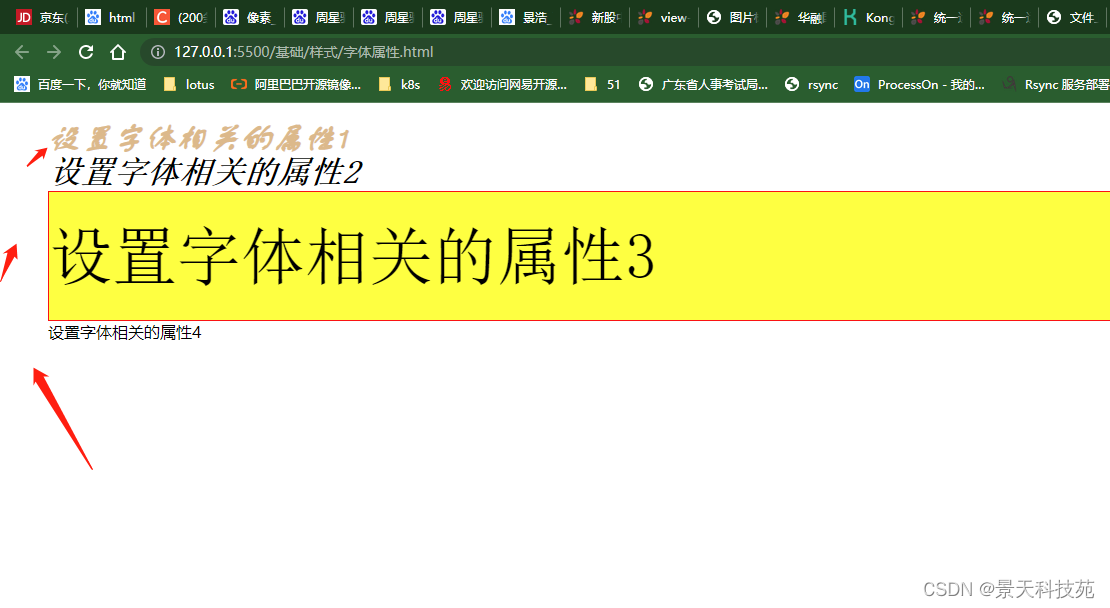
<li class="c1">设置字体相关的属性1</li>
<li class="c2">设置字体相关的属性2</li>
<li class="c3">设置字体相关的属性3</li>
<li class="c4">设置字体相关的属性4</li>
</ul>
</body>
</html>
可以使用自定义字体,自己电脑里要有这个字体才能显示
使用@font-face 来设置自定义字体
src:url(字体路径)
去掉ul前面的点

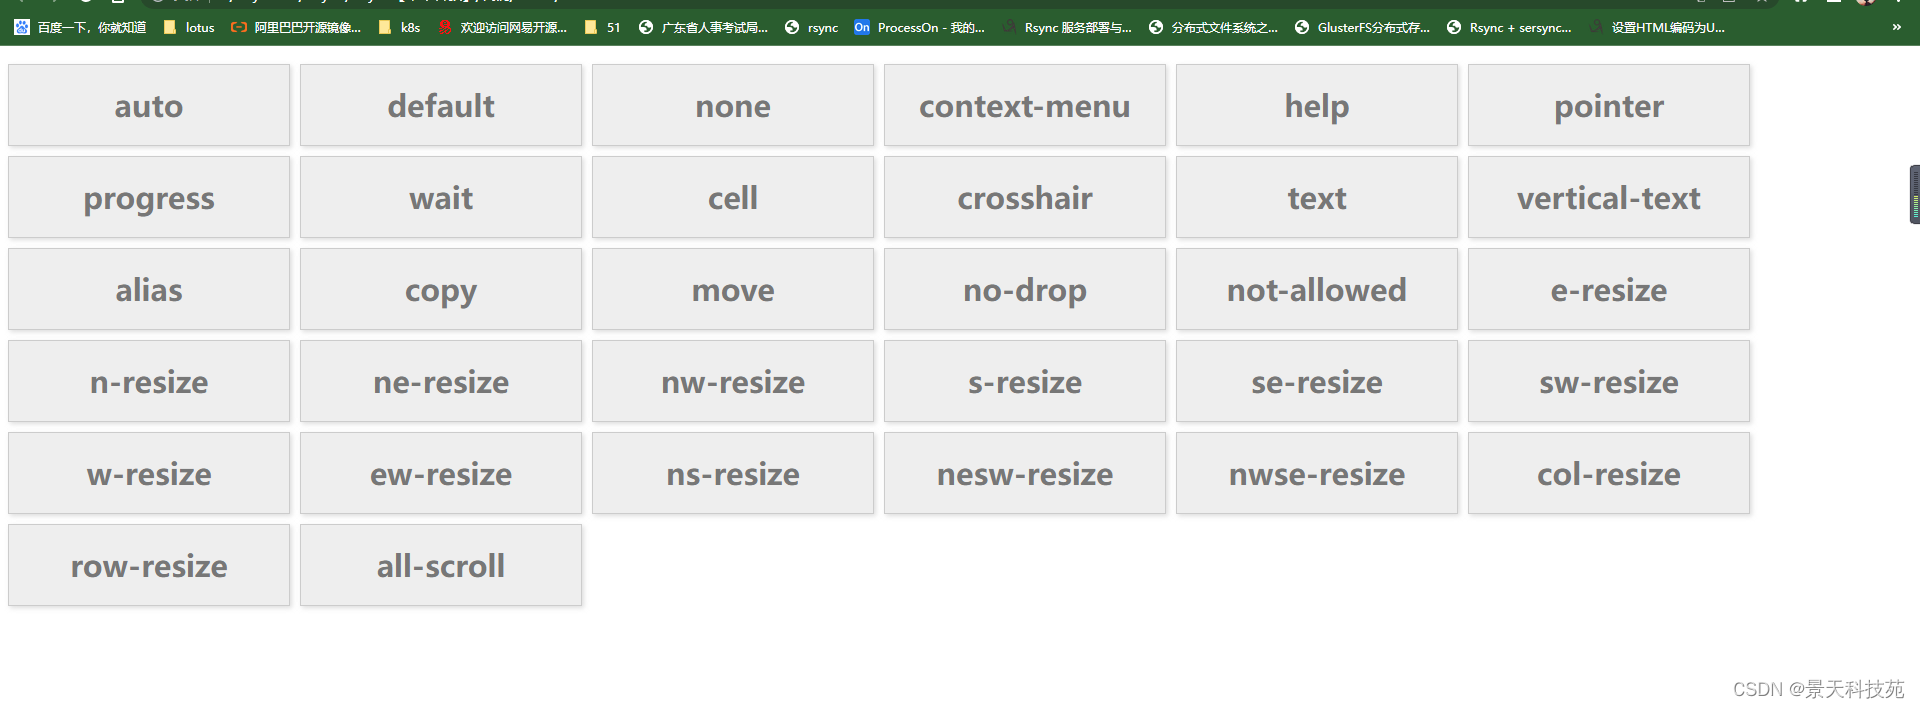
改变鼠标的形态的各种样式
<!doctype html>
<html lang="en">
<head>
    <meta charset="UTF-8">
    <title>cursor属性</title>
    <style>
        .cursor-item{
            width:240px;
            height:40px;
            padding:20px;
            font-size:30px;
            font-family: "Microsoft YaHei";
            background-color:#eee;
            margin-top:10px;
            border:1px solid #ccc;
            text-align:center;
            line-height:40px;
            font-weight: bolder;
            float:left;
            margin-right:10px;
            box-shadow:2px 2px 5px #ddd;
            color:#777;
        }
    </style>
</head>
<body>
        <div class="cursor-item" style="cursor:auto"> auto</div>
        <div class="cursor-item" style="cursor:default">default </div>
        <div class="cursor-item" style="cursor:none "> none</div>
        <div class="cursor-item" style="cursor:context-menu">context-menu </div>
        <div class="cursor-item" style="cursor:help "> help</div>
        <div class="cursor-item" style="cursor:pointer">pointer</div>
        <div class="cursor-item" style="cursor:progress "> progress</div>
        <div class="cursor-item" style="cursor:wait "> wait</div>
        <div class="cursor-item" style="cursor:cell "> cell</div>
        <div class="cursor-item" style="cursor:crosshair">crosshair </div>
        <div class="cursor-item" style="cursor:text "> text</div>
        <div class="cursor-item" style="cursor:vertical-text">vertical-text </div>
        <div class="cursor-item" style="cursor:alias ">alias </div>
        <div class="cursor-item" style="cursor:copy "> copy</div>
        <div class="cursor-item" style="cursor:move ">move </div>
        <div class="cursor-item" style="cursor:no-drop ">no-drop </div>
        <div class="cursor-item" style="cursor:not-allowed">not-allowed </div>
        <div class="cursor-item" style="cursor:e-resize ">e-resize </div>
        <div class="cursor-item" style="cursor:n-resize ">n-resize  </div>
        <div class="cursor-item" style="cursor:ne-resize ">ne-resize </div>
        <div class="cursor-item" style="cursor:nw-resize ">nw-resize </div>
        <div class="cursor-item" style="cursor:s-resize "> s-resize</div>
        <div class="cursor-item" style="cursor:se-resize ">se-resize </div>
        <div class="cursor-item" style="cursor:sw-resize ">sw-resize </div>
        <div class="cursor-item" style="cursor:w-resize ">w-resize </div>
        <div class="cursor-item" style="cursor:ew-resize ">ew-resize </div>
        <div class="cursor-item" style="cursor:ns-resize "> ns-resize</div>
        <div class="cursor-item" style="cursor:nesw-resize "> nesw-resize</div>
        <div class="cursor-item" style="cursor:nwse-resize ">nwse-resize</div>
        <div class="cursor-item" style="cursor:col-resize "> col-resize </div>
        <div class="cursor-item" style="cursor:row-resize ">row-resize </div>
        <div class="cursor-item" style="cursor:all-scroll">all-scroll </div>
</body>
</html>
2.文本属性
文本属性
text-align 文本水平对齐方式
text-indent 文本的首行缩进
letter-spacing 字符间距
vertical-align 文本垂直对齐方式[一般都是在图片排版的时候使用]
line-height 文本行高
text-decoration 文本的装饰线
<!DOCTYPE html>
<html lang="en">
<head>
<meta charset="UTF-8">
<meta name="viewport" content="width=device-width, initial-scale=1.0">
<title>css的相关属性: 文本属性 </title>
<style>
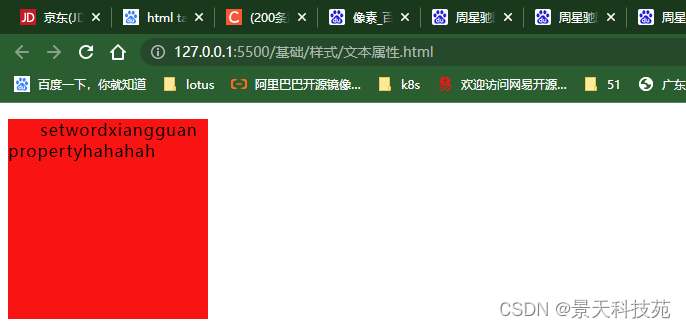
.p0
{
font-size:16px;
width:200px;height:200px;background-color: red;
/* 字符间距 */
letter-spacing:5px;
/* 文本的首行缩进 */
/* text-indent:32px; */ /* px代表像素*/
text-indent:2em; /* 1em = 1个元素的大小 按照字体比例缩进 */
}
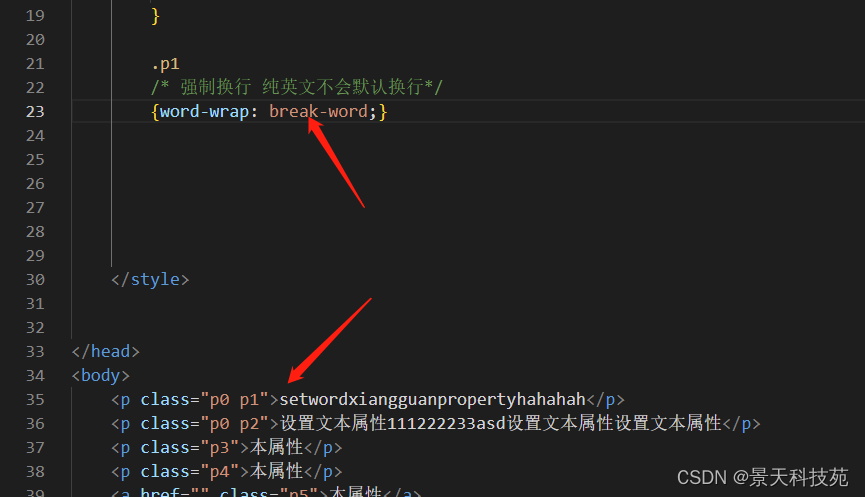
.p1
/* 强制换行 纯英文不会默认换行*/
{word-wrap: break-word;}
没有空格的纯英文默认不会换行
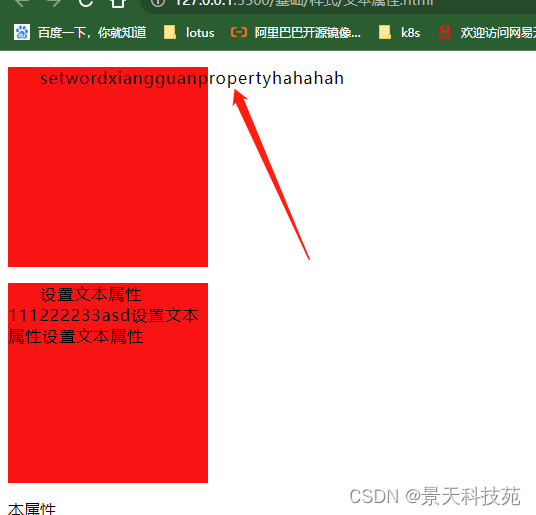
设置自动换行
.p2
/* 强制不换行 中文默认换行 */
{white-space:nowrap;}
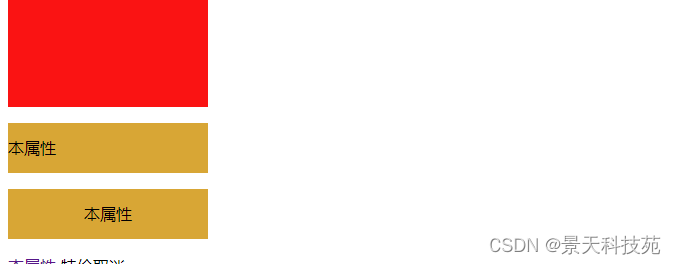
.p3
/* 设置height与line-height数值相同,可以让文字在垂直方向上居中 */
{font-size:16px;width: 200px;height:50px; line-height: 50px; background-color:goldenrod;}
.p4
/* text-align:left/center/right 文本水平对齐方式 ,默认向左对齐*/
{font-size:16px;width: 200px;height:50px; line-height: 50px; background-color:goldenrod;text-align:center;}
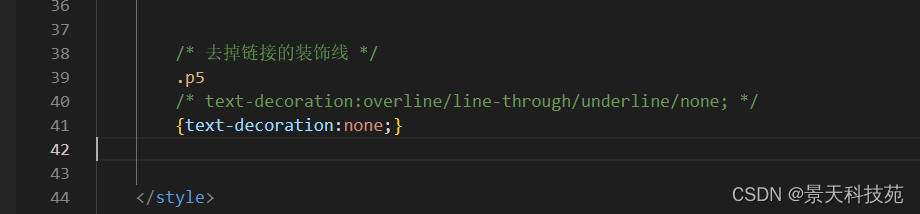
.p5  去掉链接的装饰线
/* text-decoration:overline/line-through/underline/none; */
{text-decoration:none;}
默认a链接下面会有个装饰线,underline是默认的形式 下划线
使用text-decoration:none;可以去掉装饰线

line-through 中间划线 上划线:overline

html的del标签也是 中划线
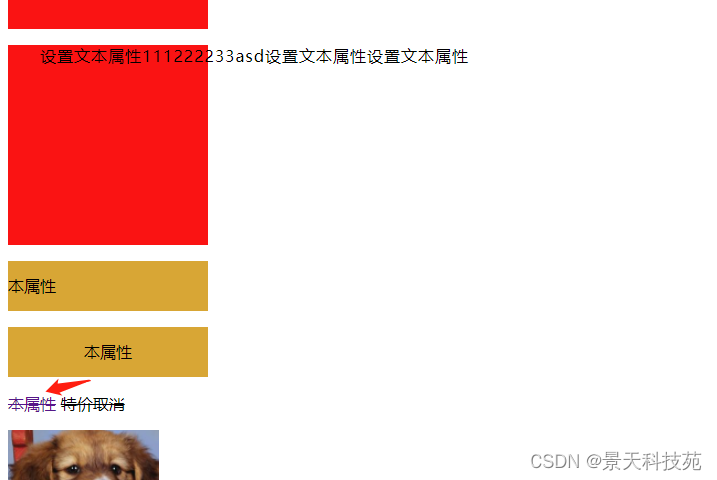
        .p6 img
        /* vertical-align:top/middle/bottom   文本垂直对齐方式[一般都是在图片排版的时候使用] */
        {vertical-align:-600%;}
可以通过百分比微调
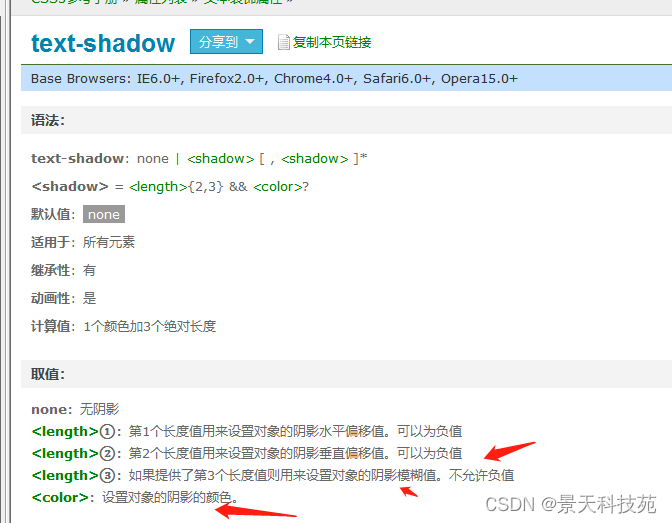
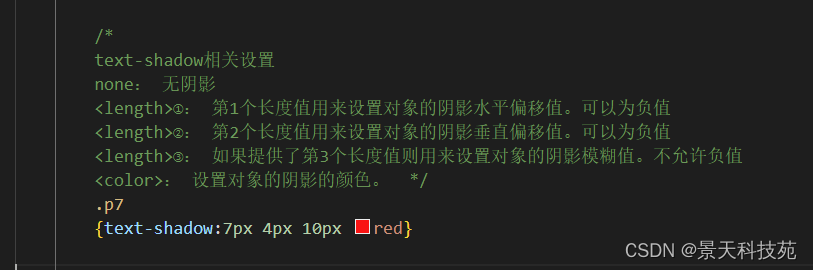
/*
text-shadow相关设置
none: 无阴影
<length>①: 第1个长度值用来设置对象的阴影水平偏移值。可以为负值
<length>②: 第2个长度值用来设置对象的阴影垂直偏移值。可以为负值
<length>③: 如果提供了第3个长度值则用来设置对象的阴影模糊值。不允许负值
<color>: 设置对象的阴影的颜色。  */
.p7
{text-shadow:7px 4px 10px gray;}

</style>
</head>
<body>
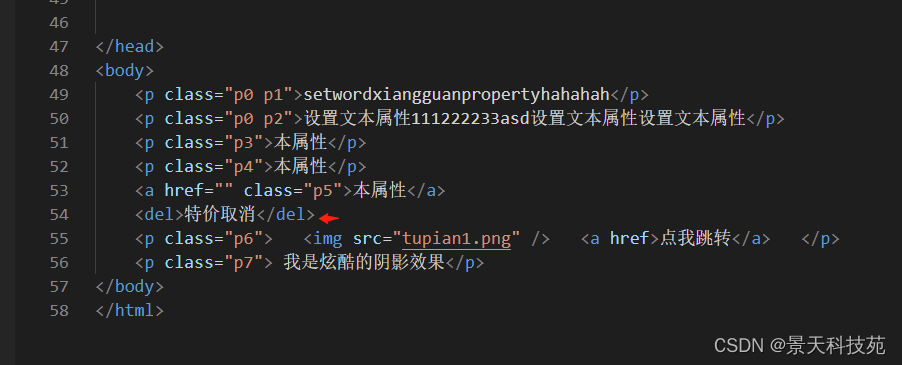
<p class="p0 p1">setwordxiangguanpropertyhahahah </p>
<p class="p0 p2">设置文本属性111222233asd设置文本属性设置文本属性</p>
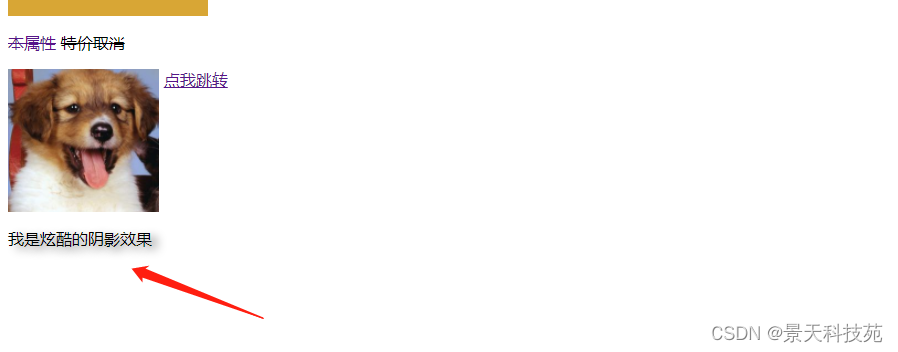
<p class="p3">本属性</p>
<p class="p4">本属性</p>
<a href="" class="p5">本属性</a>
<del>特价取消</del>
<p class="p6"> <img src="tupian1.png" /> <a href>点我跳转</a> </p>
<p class="p7"> 我是炫酷的阴影效果</p>
</body>
</html>
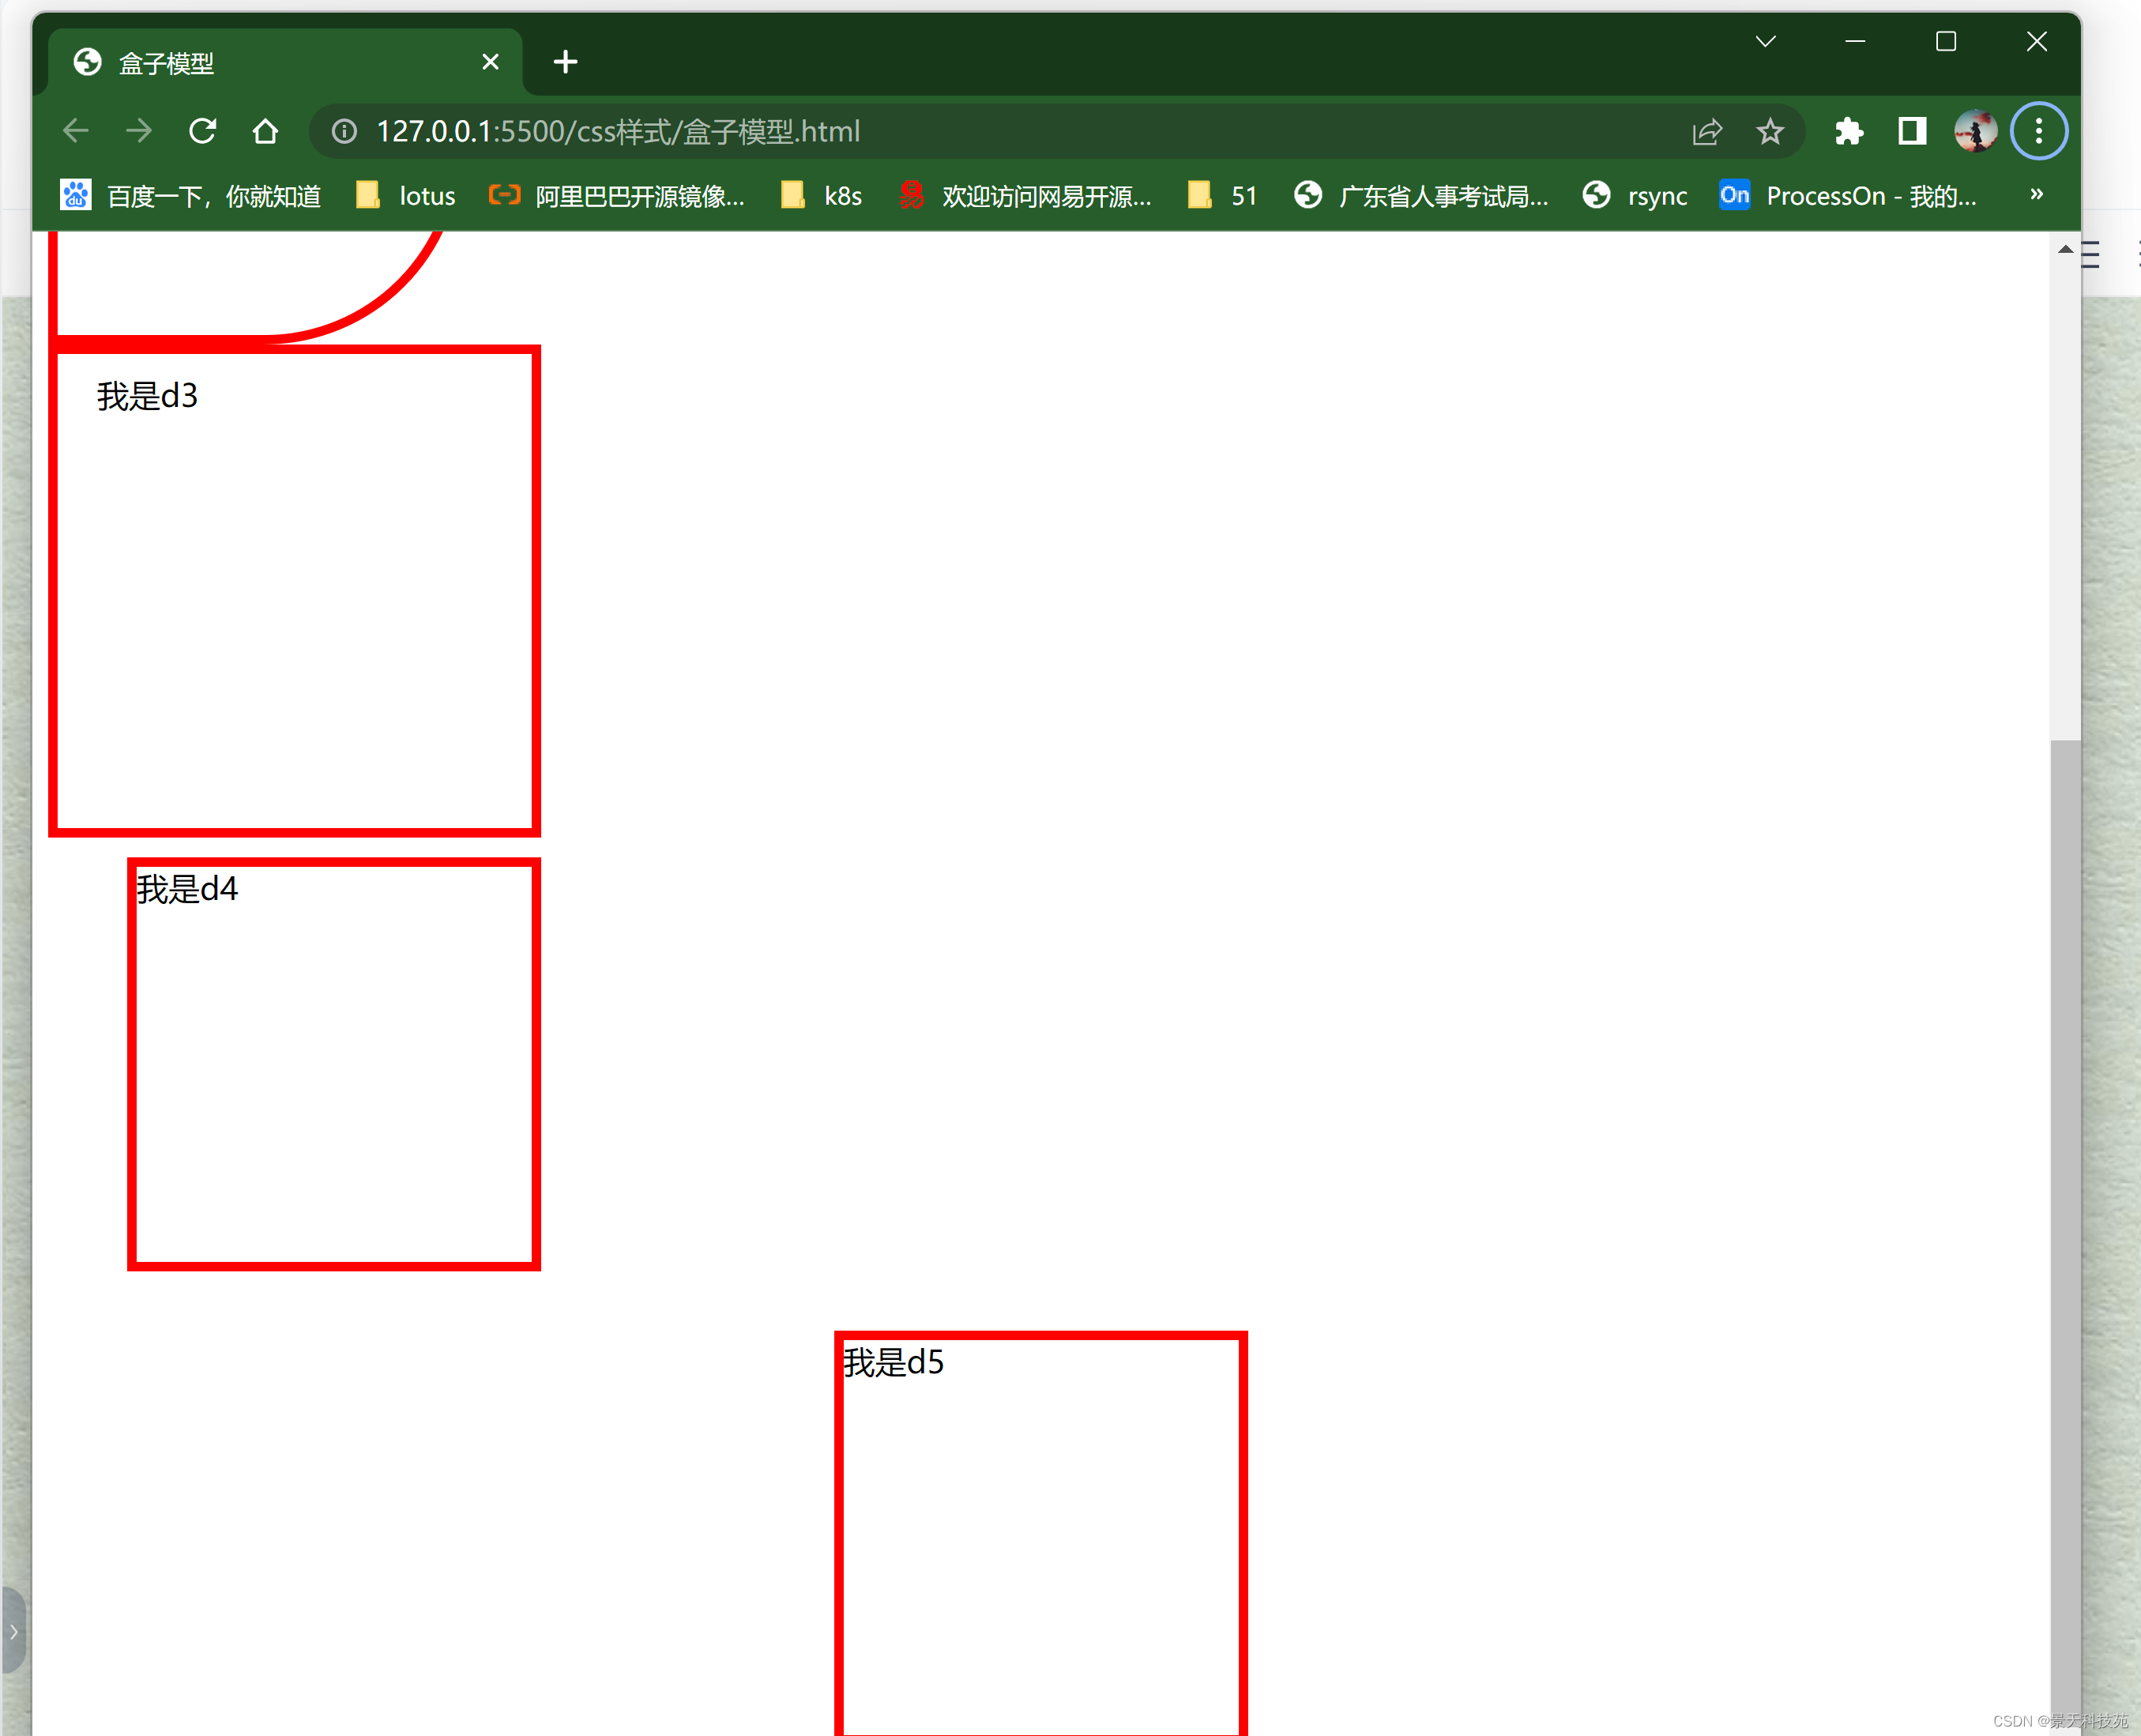
3.盒子模型
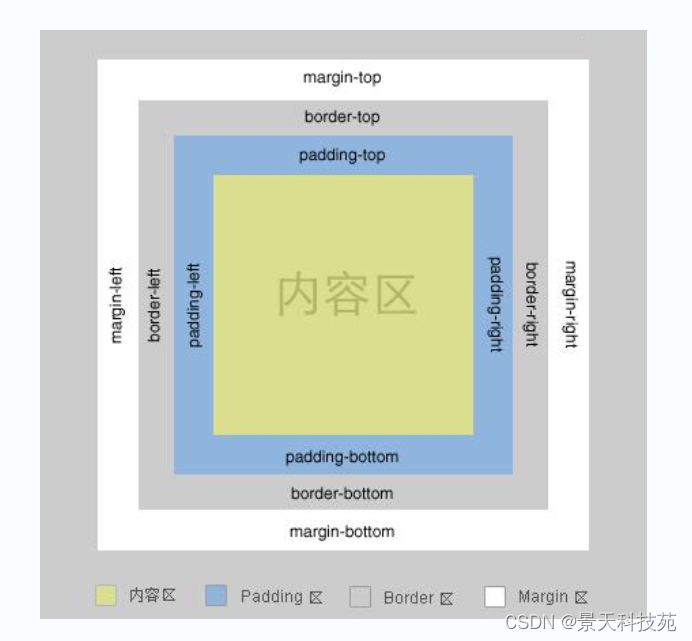
是块状元素就存在边距,padding 是内容和border之间的间距
调整div和div 盒子和盒子之间的间距用margin
<!DOCTYPE html>
<html lang="en">
<head>
<meta charset="UTF-8">
<meta name="viewport" content="width=device-width, initial-scale=1.0">
<title> 盒子模型 </title>
<style>
#d1
{
width: 200px;
height:200px;
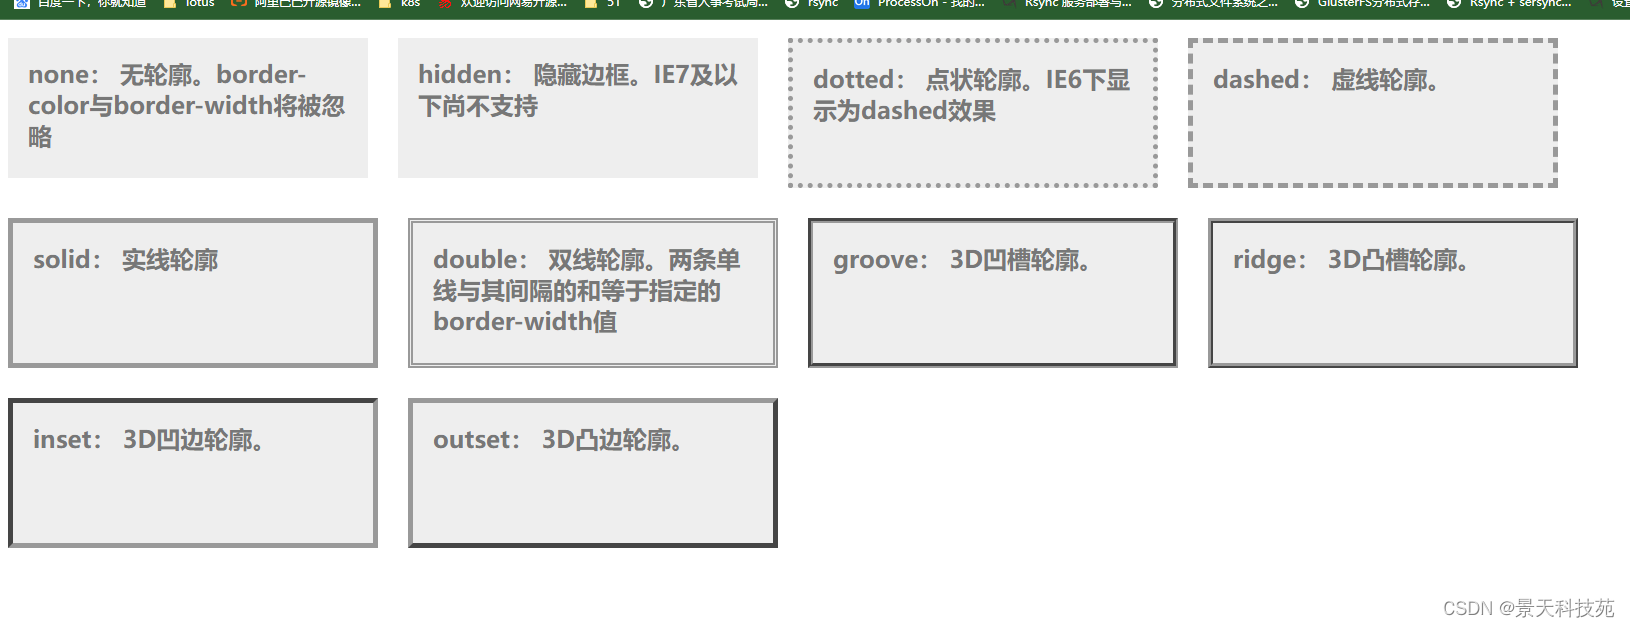
/* 上 右 下 左 top right bottom left*/
border:solid 10px green;
单独设某个边
border-top:dotted 3px red;
border-right:dashed 5px blue;
}
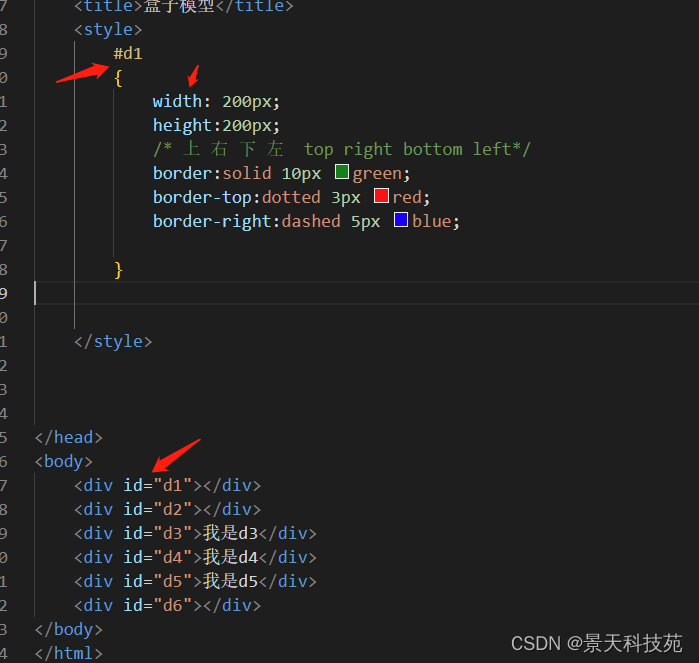
常见的边框格式
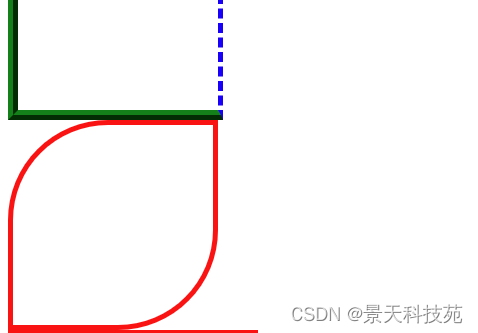
#d2
{
    width: 200px;
    height:200px;
    border:solid 5px red;
    /* border-radius: 100px; */
    设置边角曲率
    border-top-left-radius: 100px;
    border-bottom-right-radius: 100px;
}
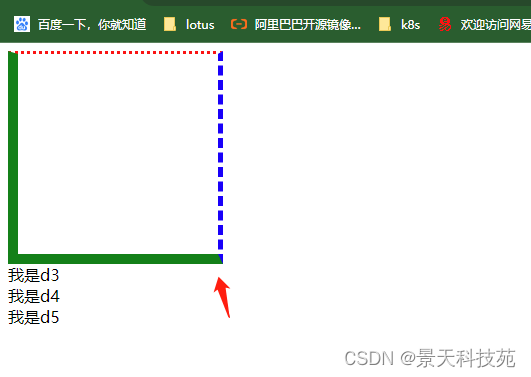
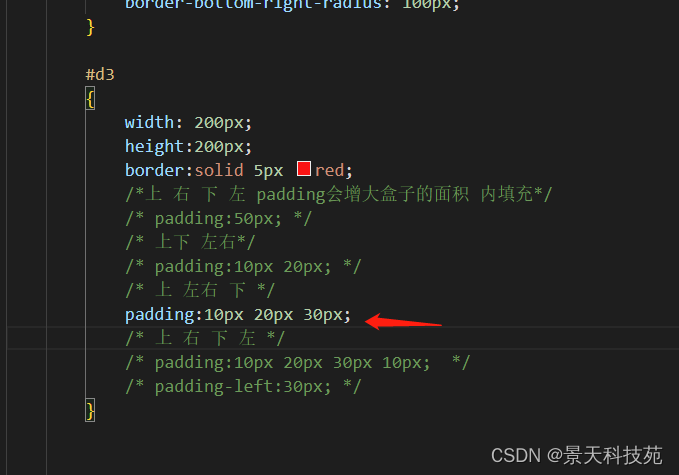
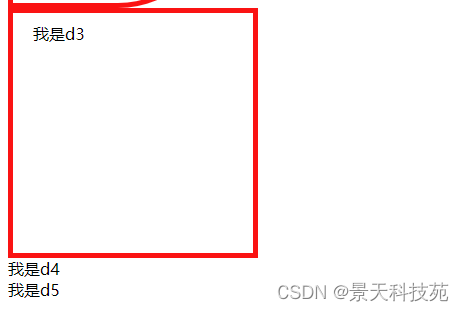
   #d3
    {
        width: 200px;
        height:200px;
        border:solid 5px red;
        /*上 右 下 左 padding会增大盒子的面积 内填充*/
        /* padding:50px; */
        /* 上下 左右*/
        /* padding:10px 20px; */
        /* 上 左右 下 */
        padding:10px 20px 30px;
        /* 上 右 下 左 */
        /* padding:10px 20px 30px 10px;  */
        /* padding-left:30px; */
    }
padding会增大盒子的面积,哪个方向设置padding,增大哪个方向
写三个,中间那个表示左右都设,上左右下
#d4
{
    width: 200px;
    height:200px;
    border:solid 5px red;
    /*上 右 下 左 盒子与盒子之间的间距 外边距*/
    /* margin:60px; */
    /* 上下 左右 */
    margin:10px 20px;
    /* 上 左右 下 */
    margin:10px 20px 30px;
    /* 上 右 下 左 */
    /* margin:10px 20px 30px 10px;  */
    /* margin-left:30px; */
}
#d5
{
    width: 200px;
    height:200px;
    border:solid 5px red;
    /*  上下0px 左右自动居中*/
    margin:0px auto;

}
margin:auto 水平居中,要想实现垂直居中需要借助position
/*
box-shadow:
<length>①: 第1个长度值用来设置对象的阴影水平偏移值。可以为负值
<length>②: 第2个长度值用来设置对象的阴影垂直偏移值。可以为负值
<length>③: 如果提供了第3个长度值则用来设置对象的阴影模糊值。不允许负值
<length>④: 如果提供了第4个长度值则用来设置对象的阴影外延值。可以为负值
<color>: 设置对象的阴影的颜色。 */
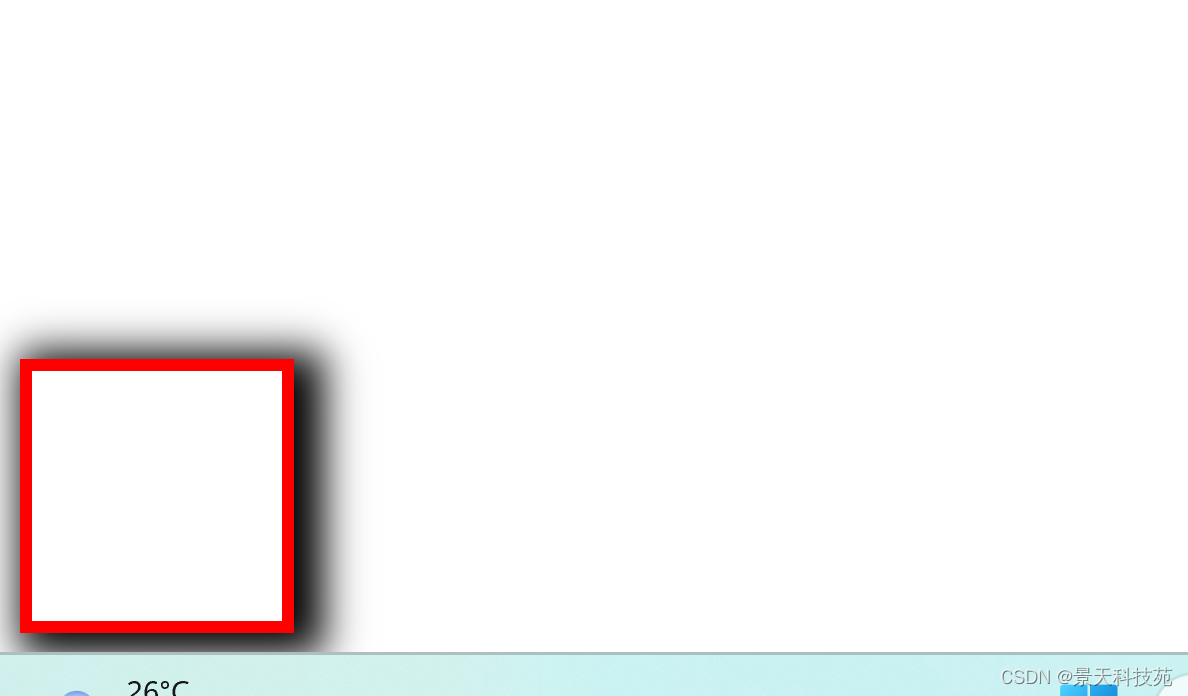
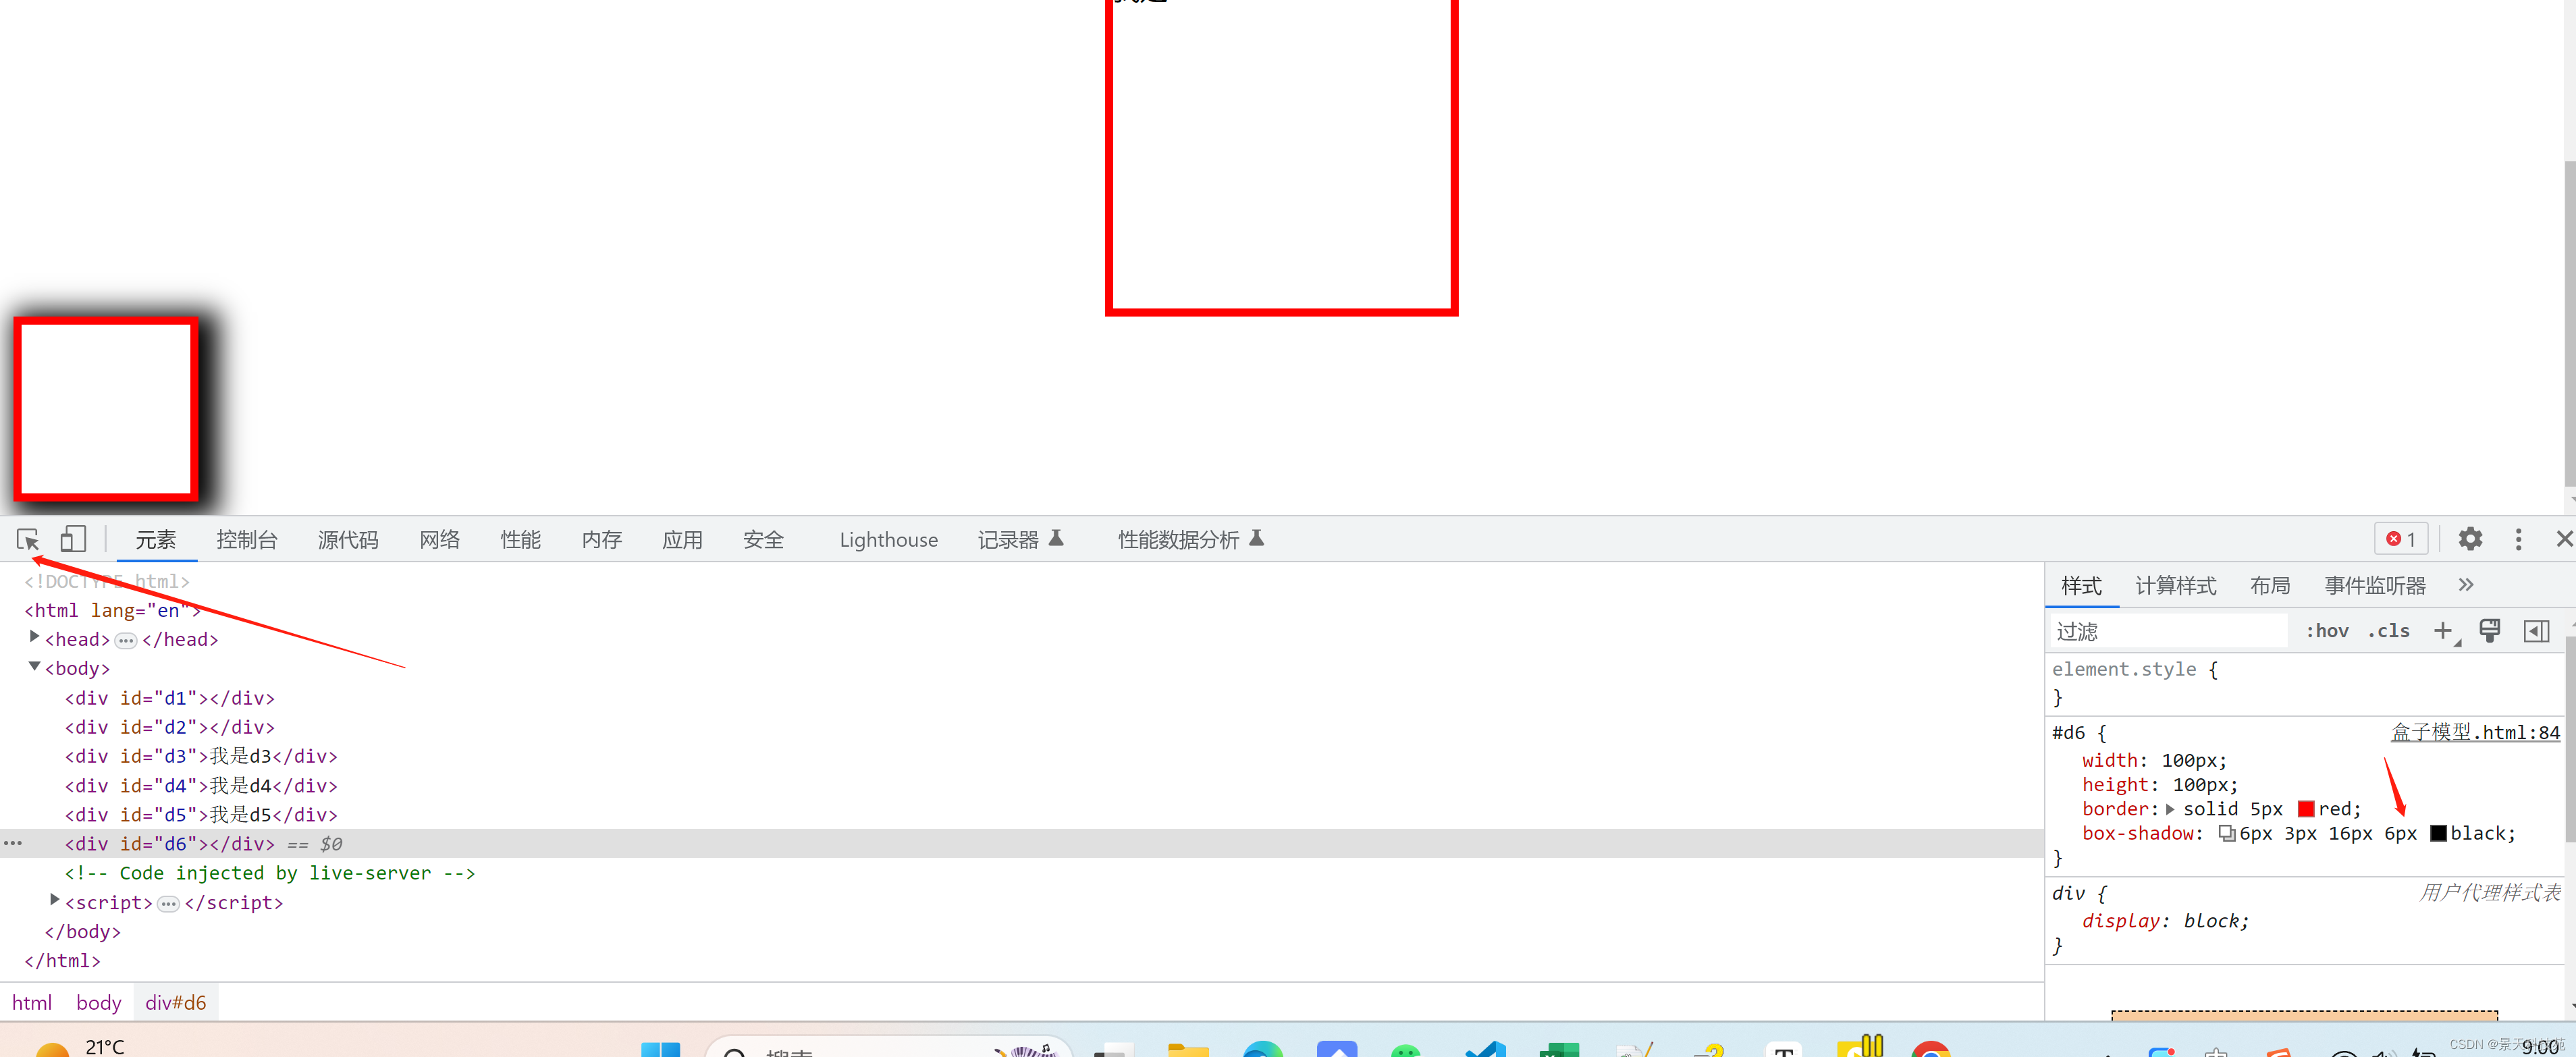
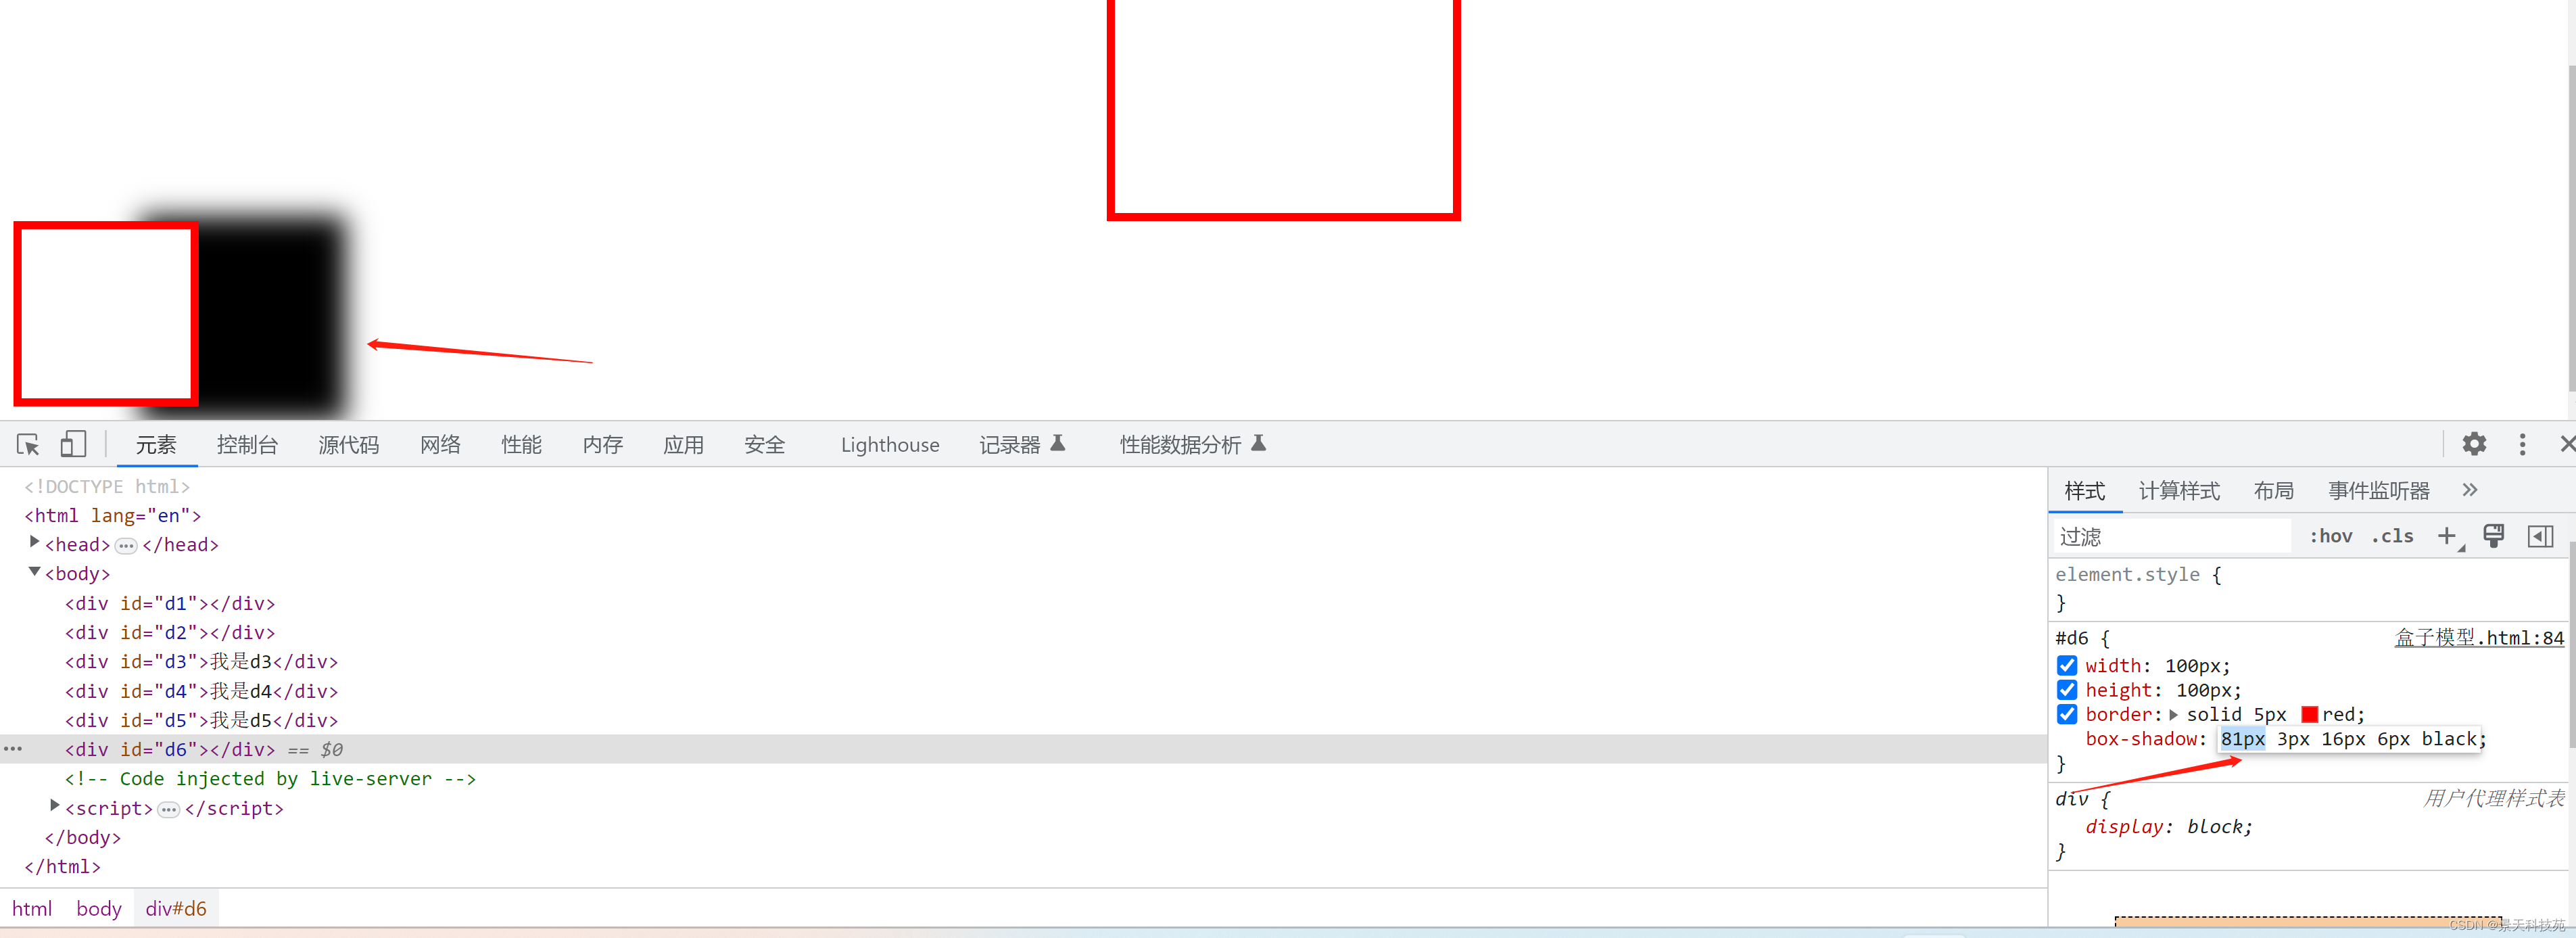
#d6
{width:100px;height:100px;border:solid 5px red;box-shadow:6px 3px 16px 6px black;}
设置盒子阴影
    </style>
</head>
<body>

    <div id="d1"></div>
    <div id="d2"></div>
    <div id="d3">我是d3</div>
    <div id="d4">我是d4</div>
    <div id="d5">我是d5</div>
    <div id="d6"></div>


</body>
</html>
动态调整样式
浏览器检查,选中索要编辑的图形,在样式窗口可以用上下键微调,在浏览器上看变化
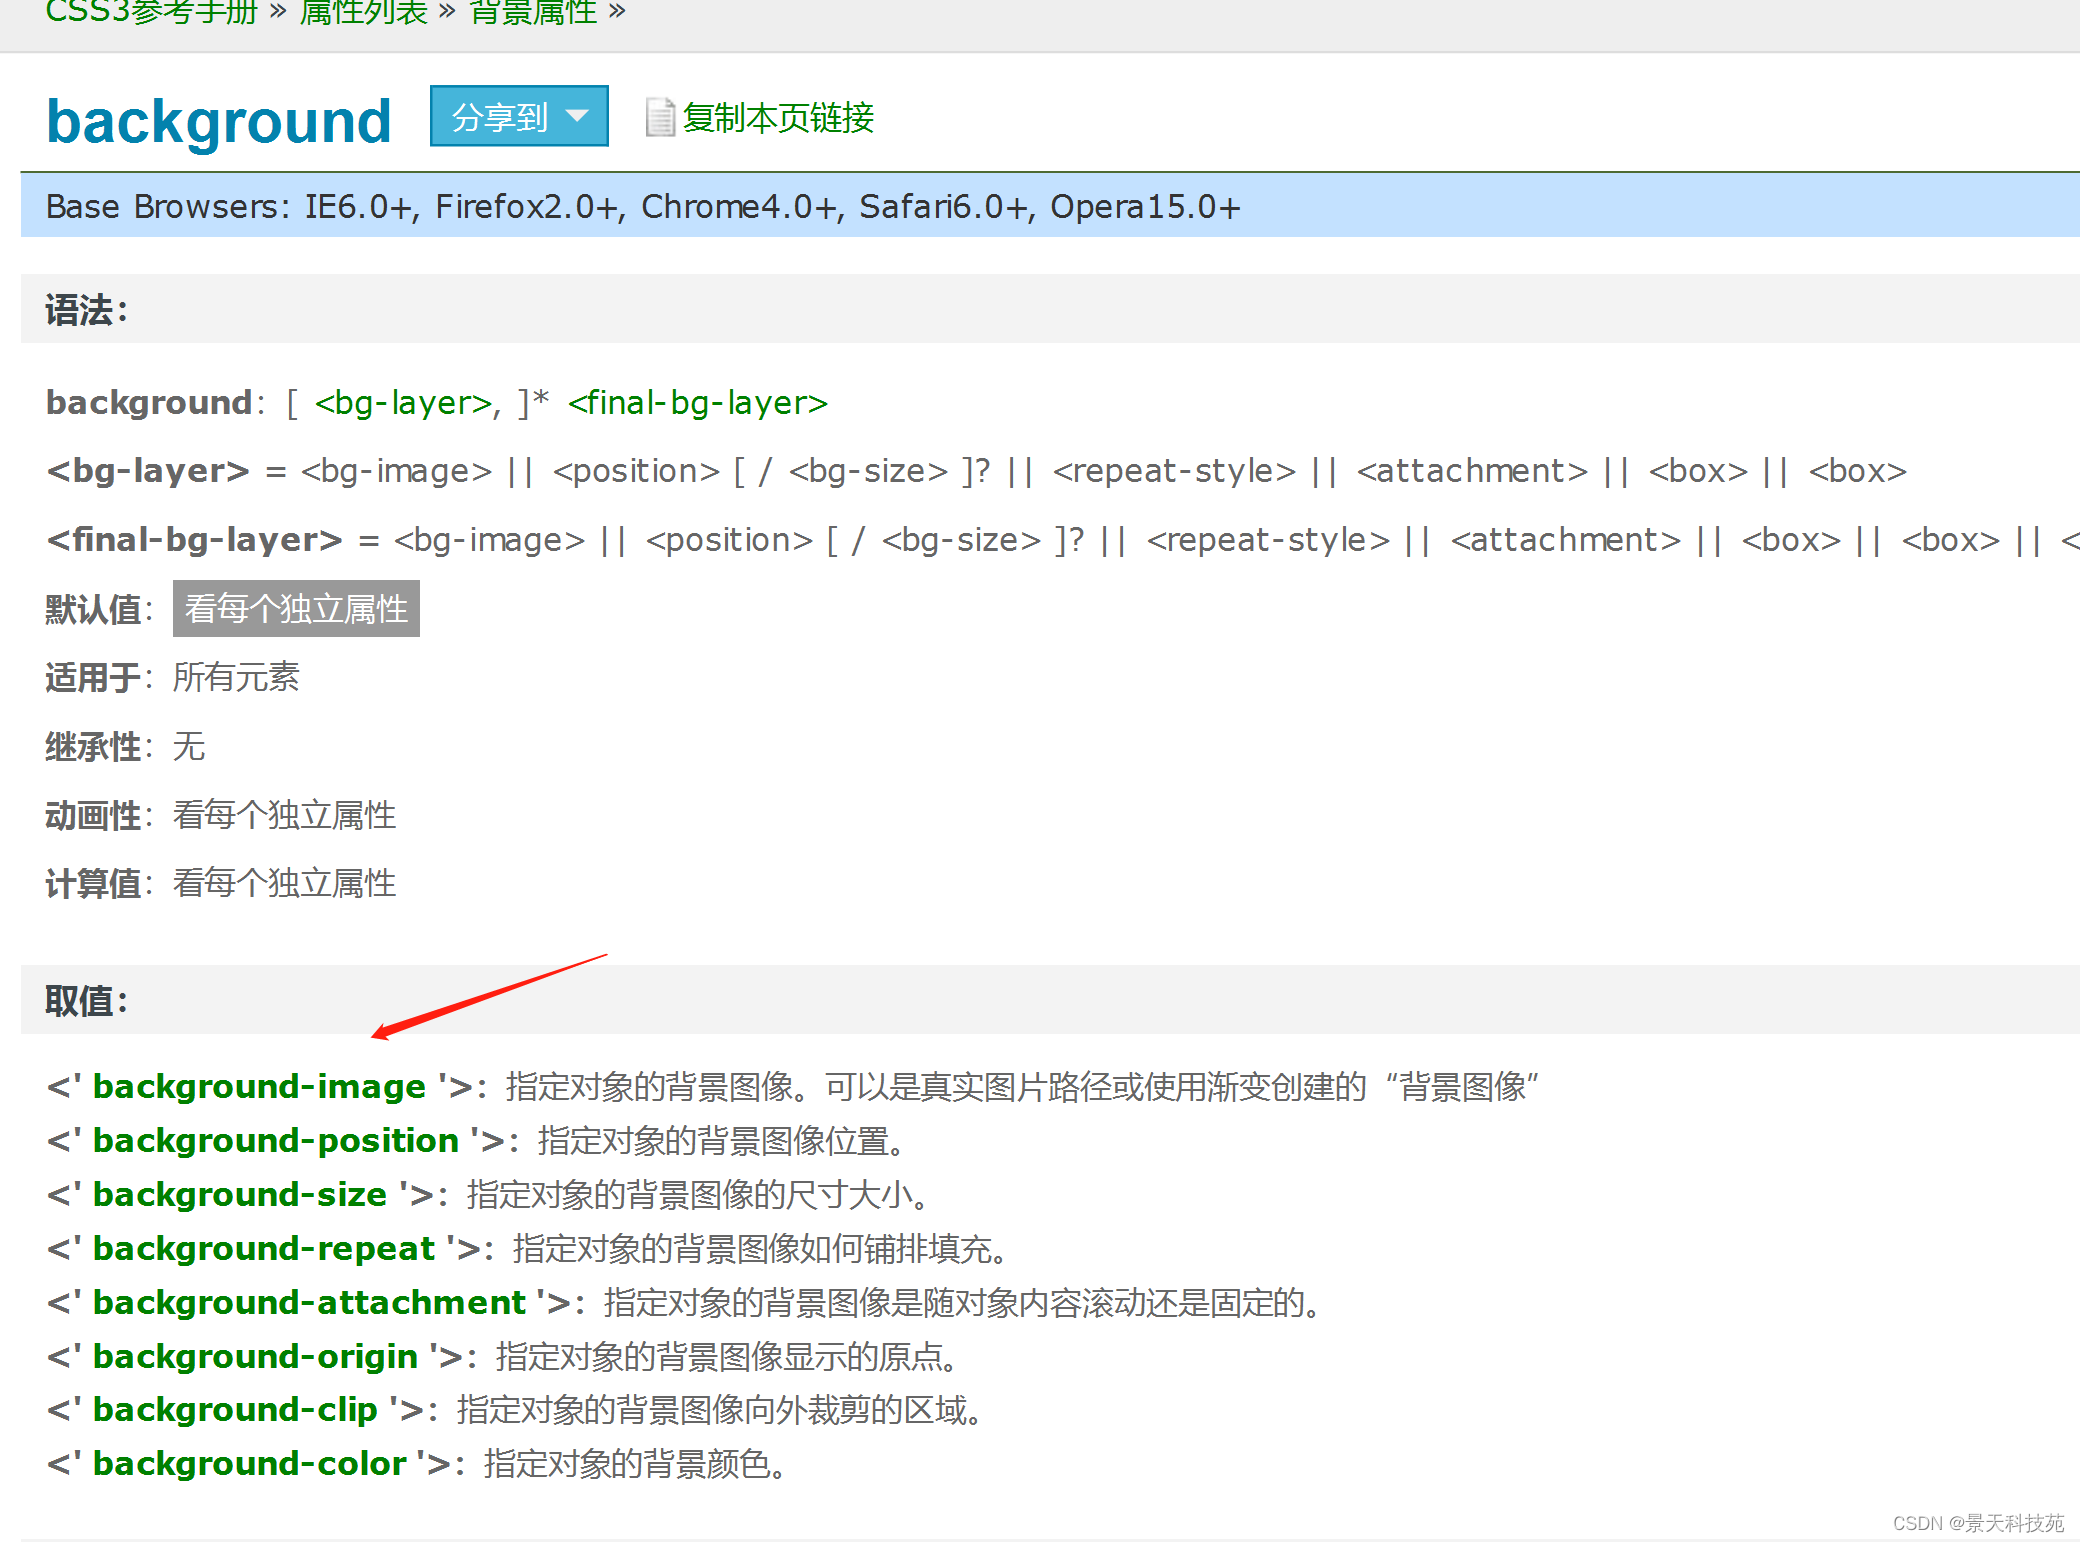
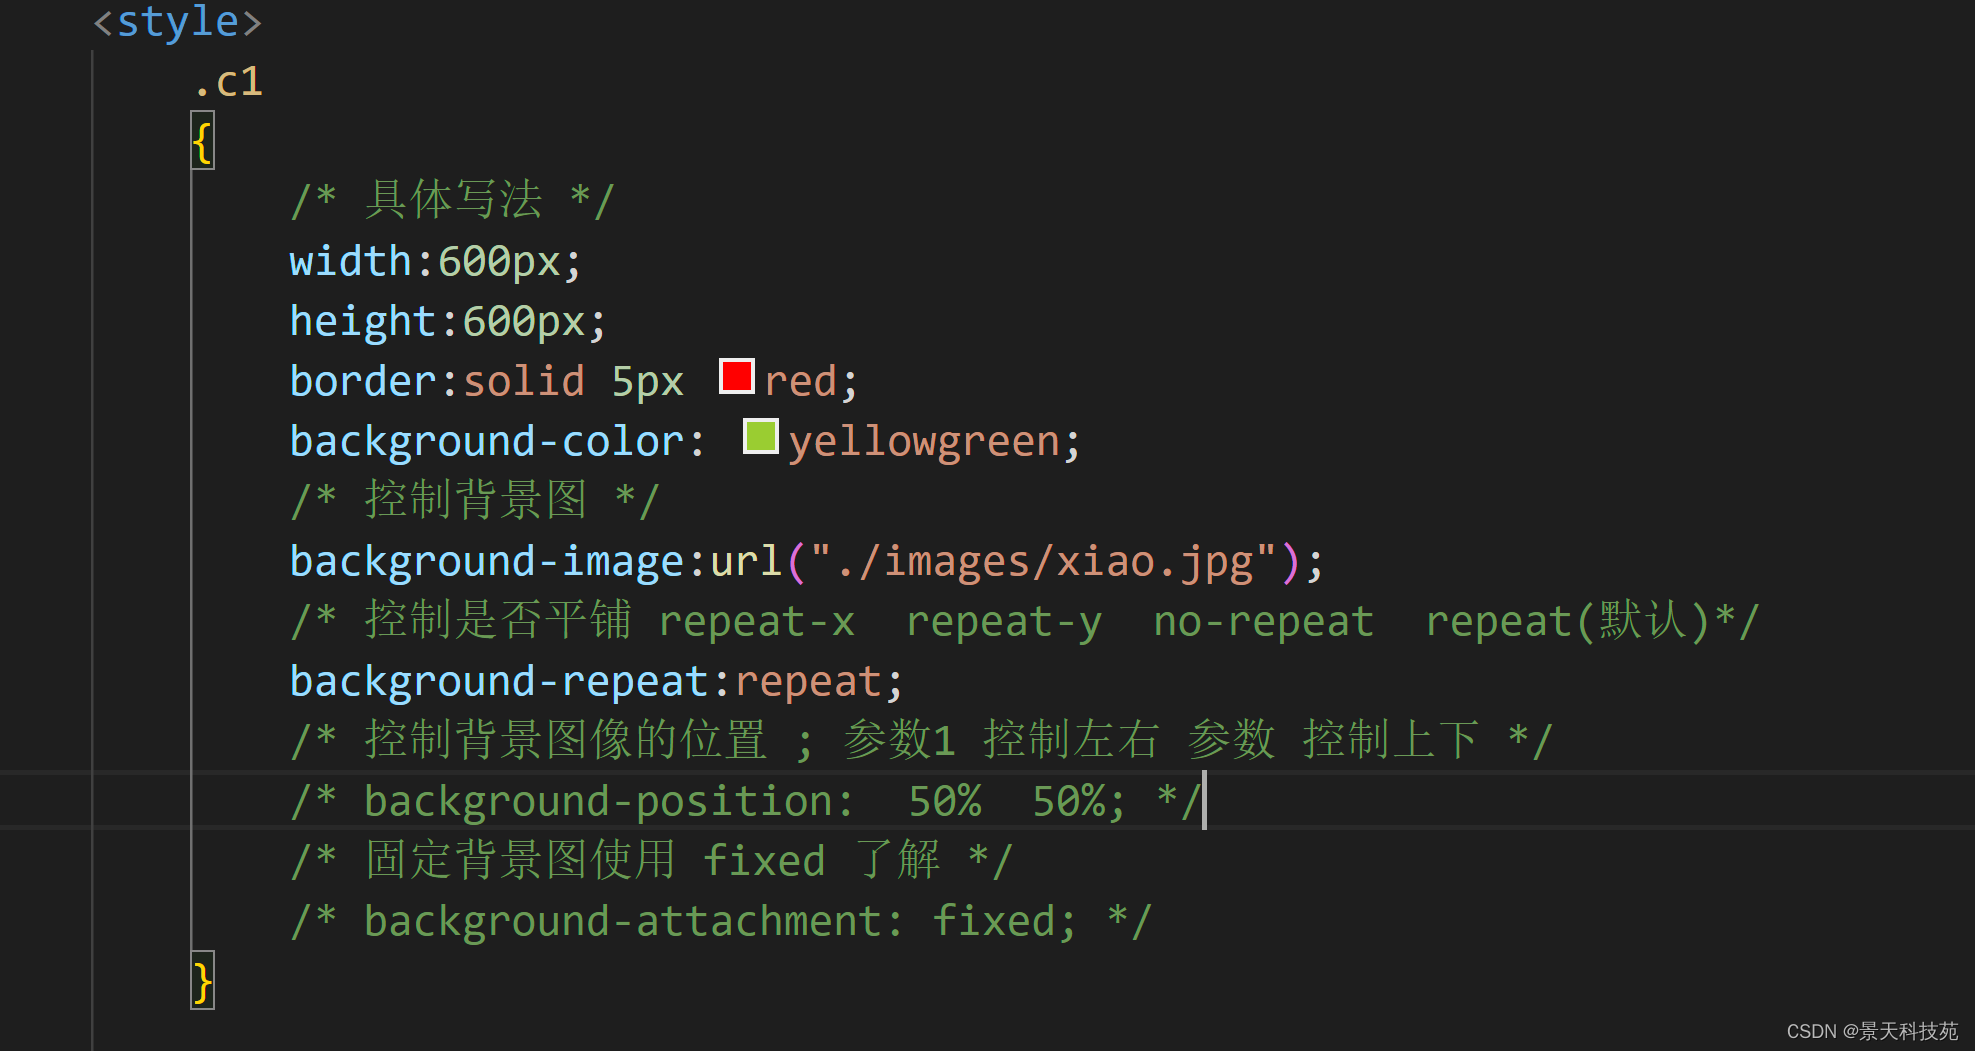
4.背景属性
背景属性
border-radius 元素的圆角
background-color 背景颜色
background-image 背景图片
background-repeat 背景平铺方式
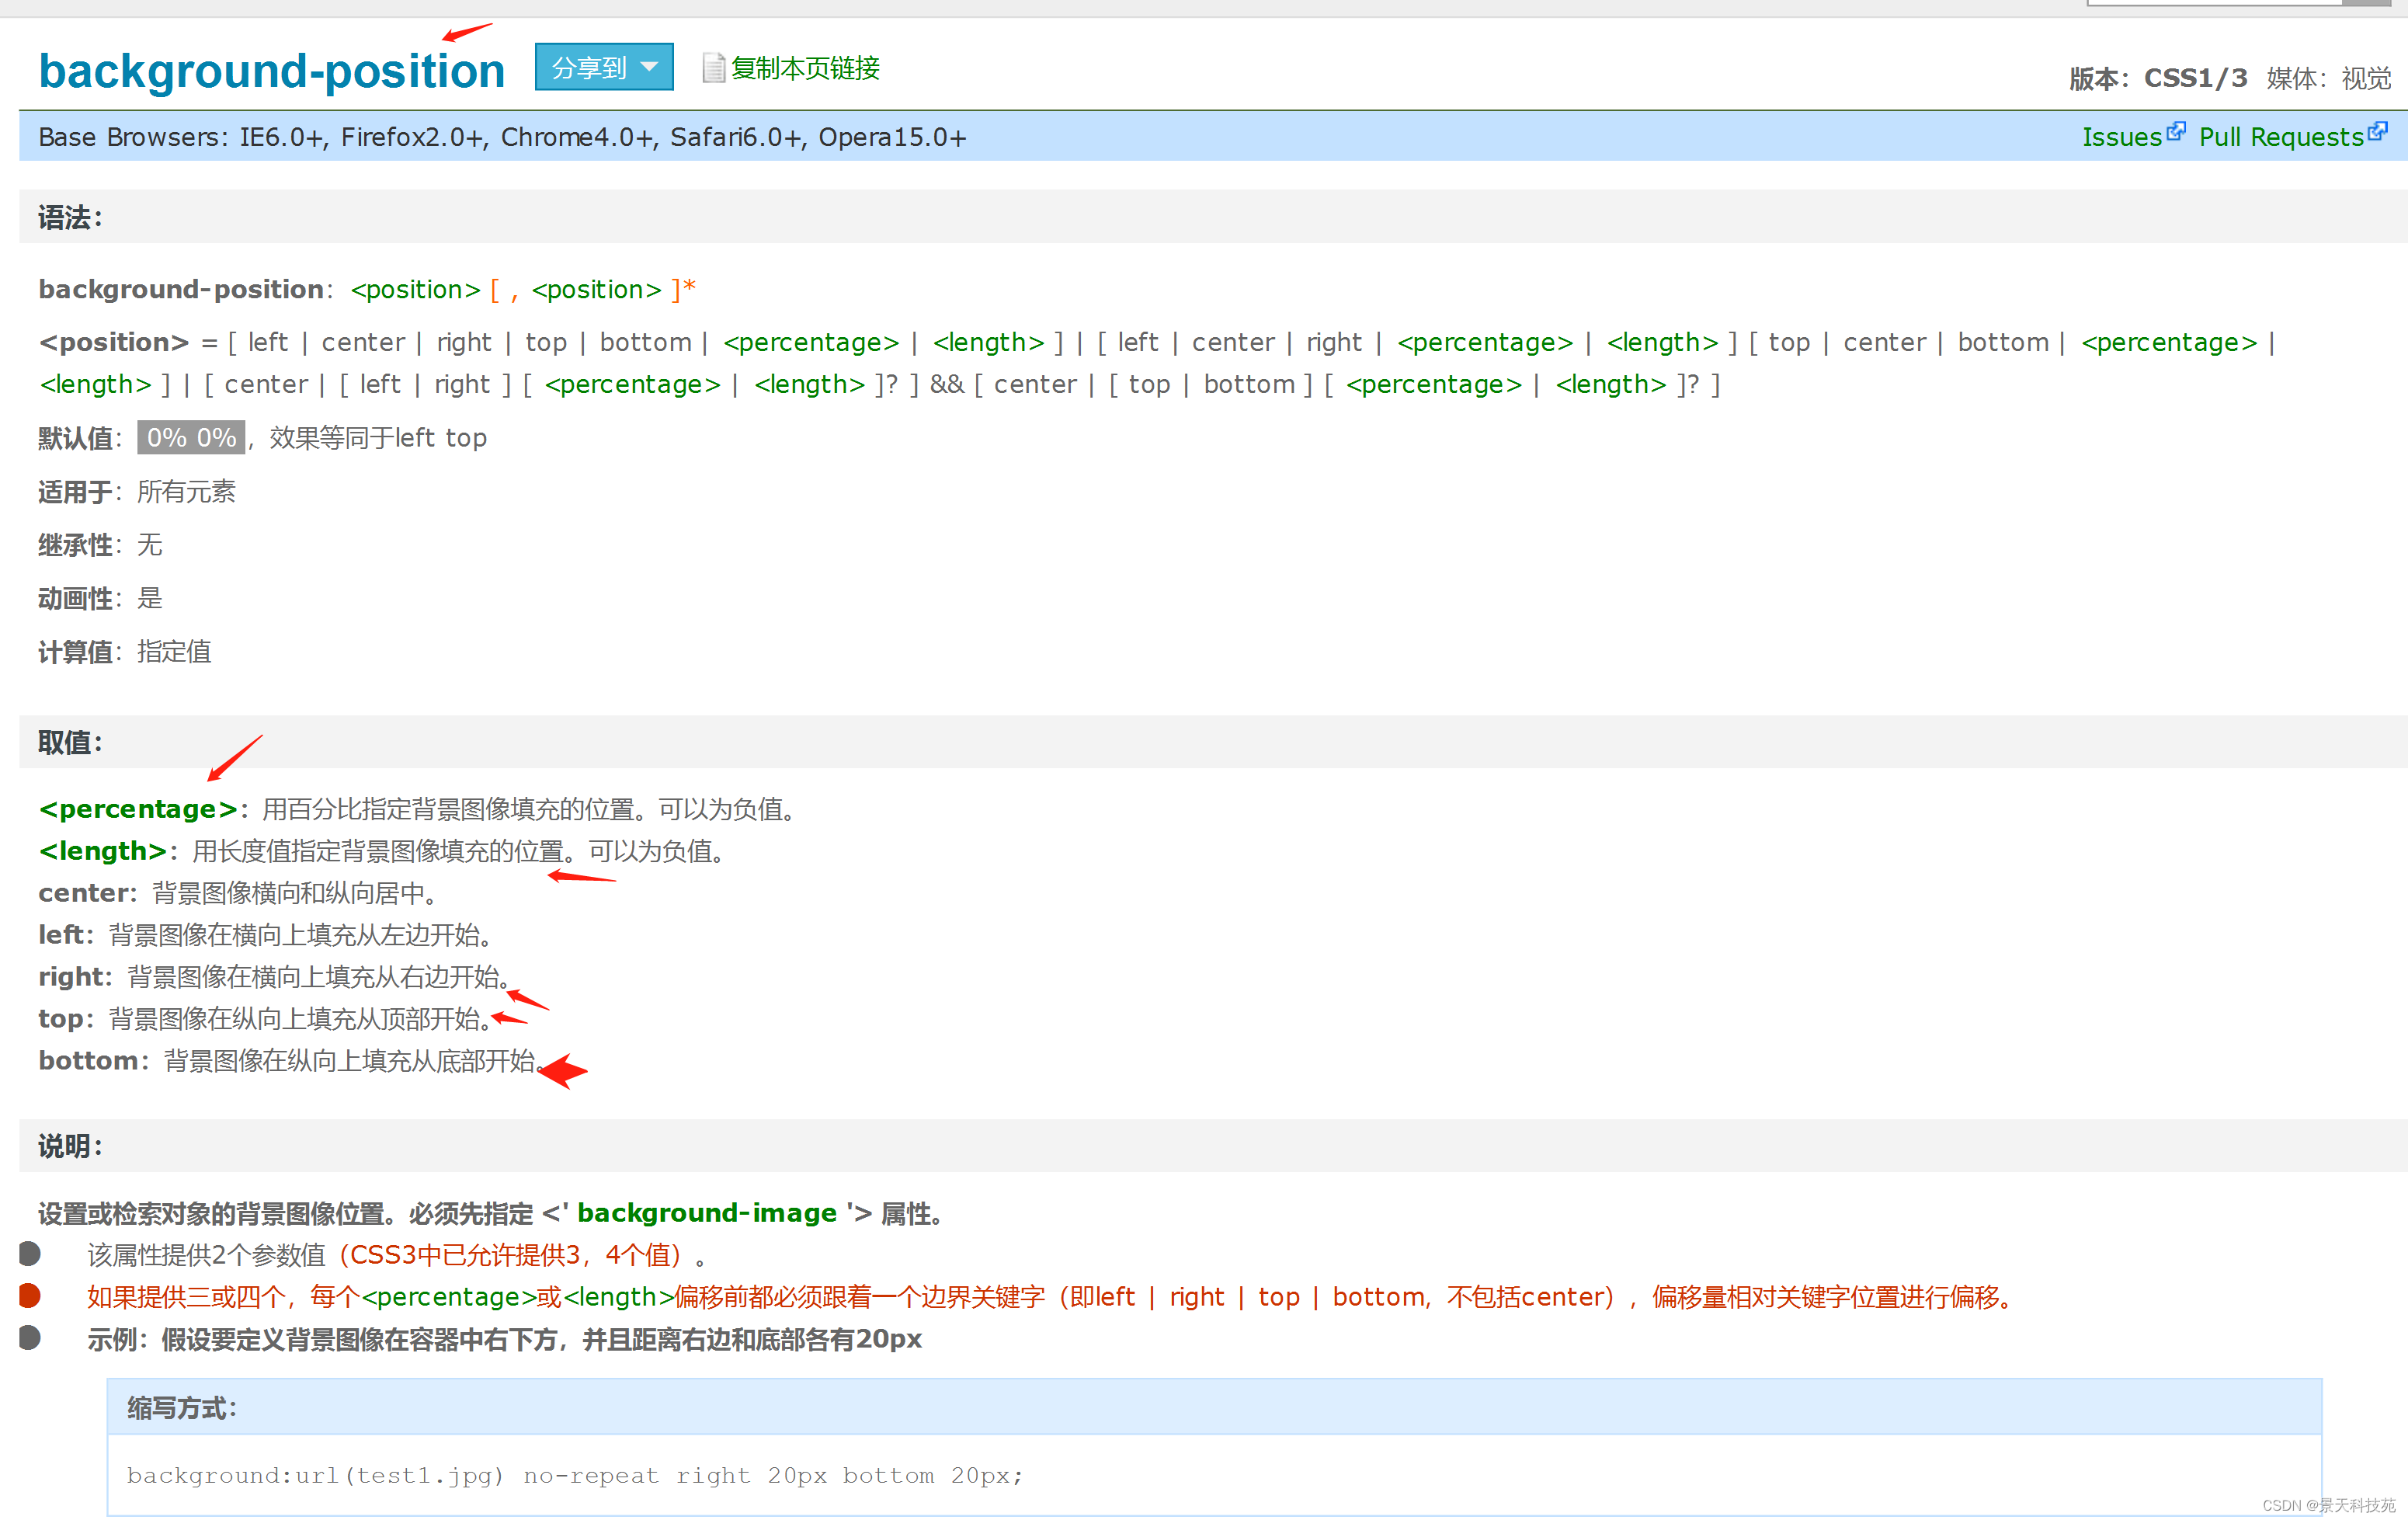
background-position 背景定位位置
background-size 背景尺寸大小
background 上面几个背景属性的缩写
<!DOCTYPE html>
<html lang="en">
<head>
<meta charset="UTF-8">
<meta name="viewport" content="width=device-width, initial-scale=1.0">
<title>css 背景属性</title>
<style>
.c1
{
/* 具体写法 */
width:600px;
height:600px;
border:solid 1px red;
background-color: yellow;
/* 控制背景图 */
background-image:url("./images/xiao.jpg");
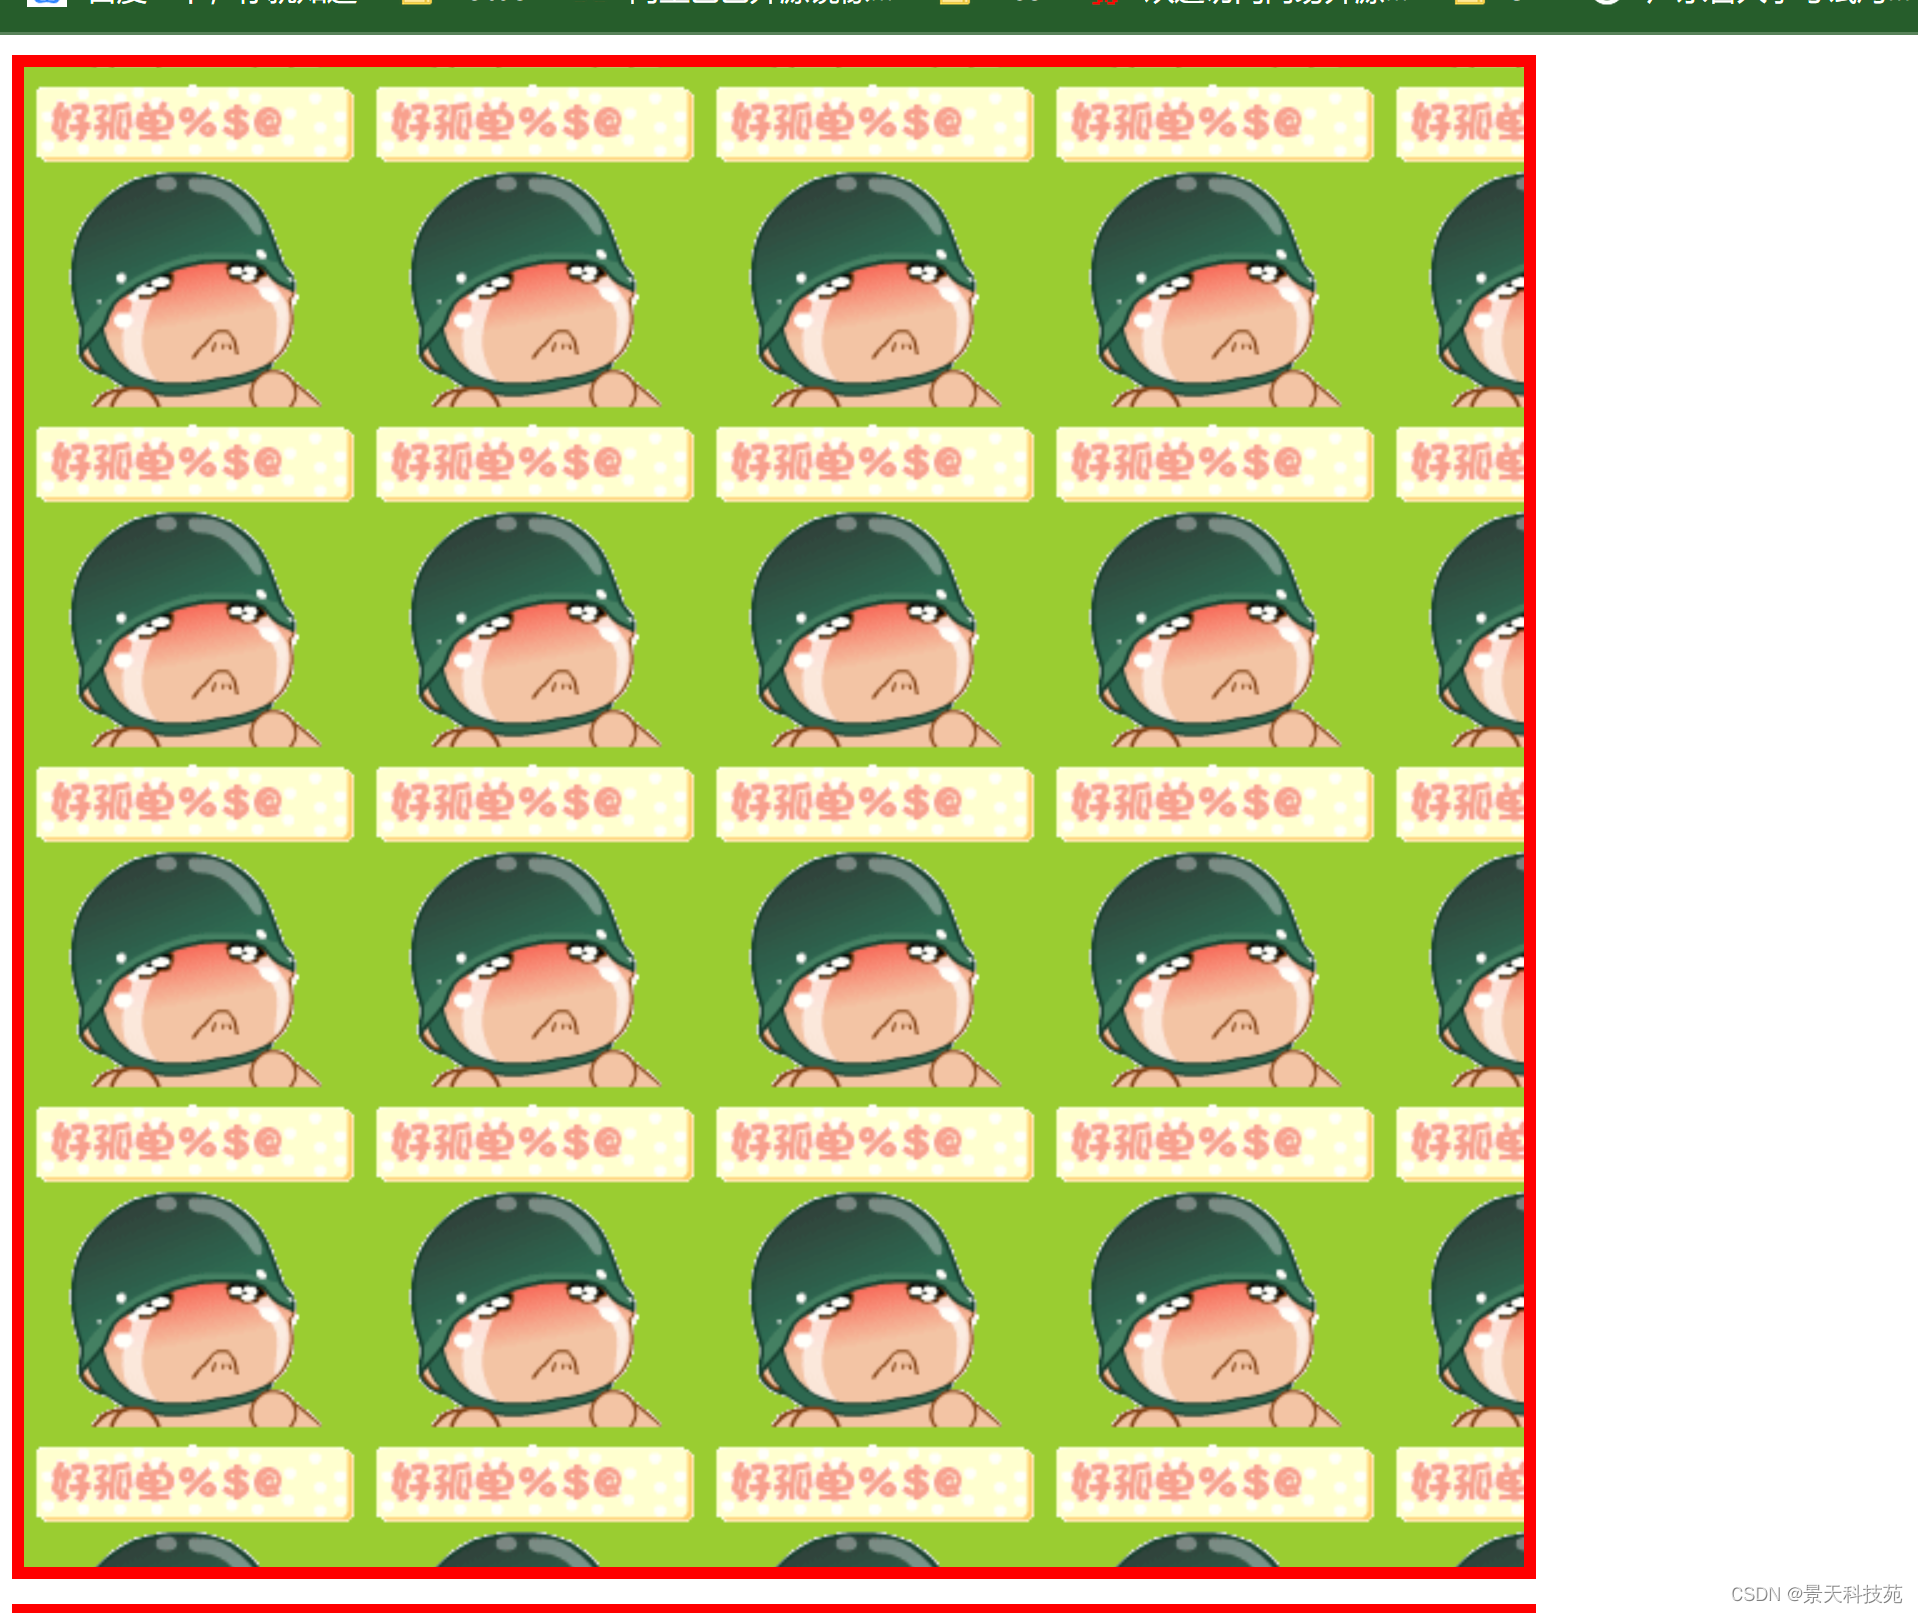
/* 控制是否平铺,是否重复 repeat-x repeat-y no-repeat repeat(默认)*/
background-repeat:no-repeat;
/* 控制背景图像的位置 ; 参数1 控制左右 参数2 控制上下,可正可负 */
/* background-position: 50% 50%; */
/* 固定背景图使用 fixed 了解 */
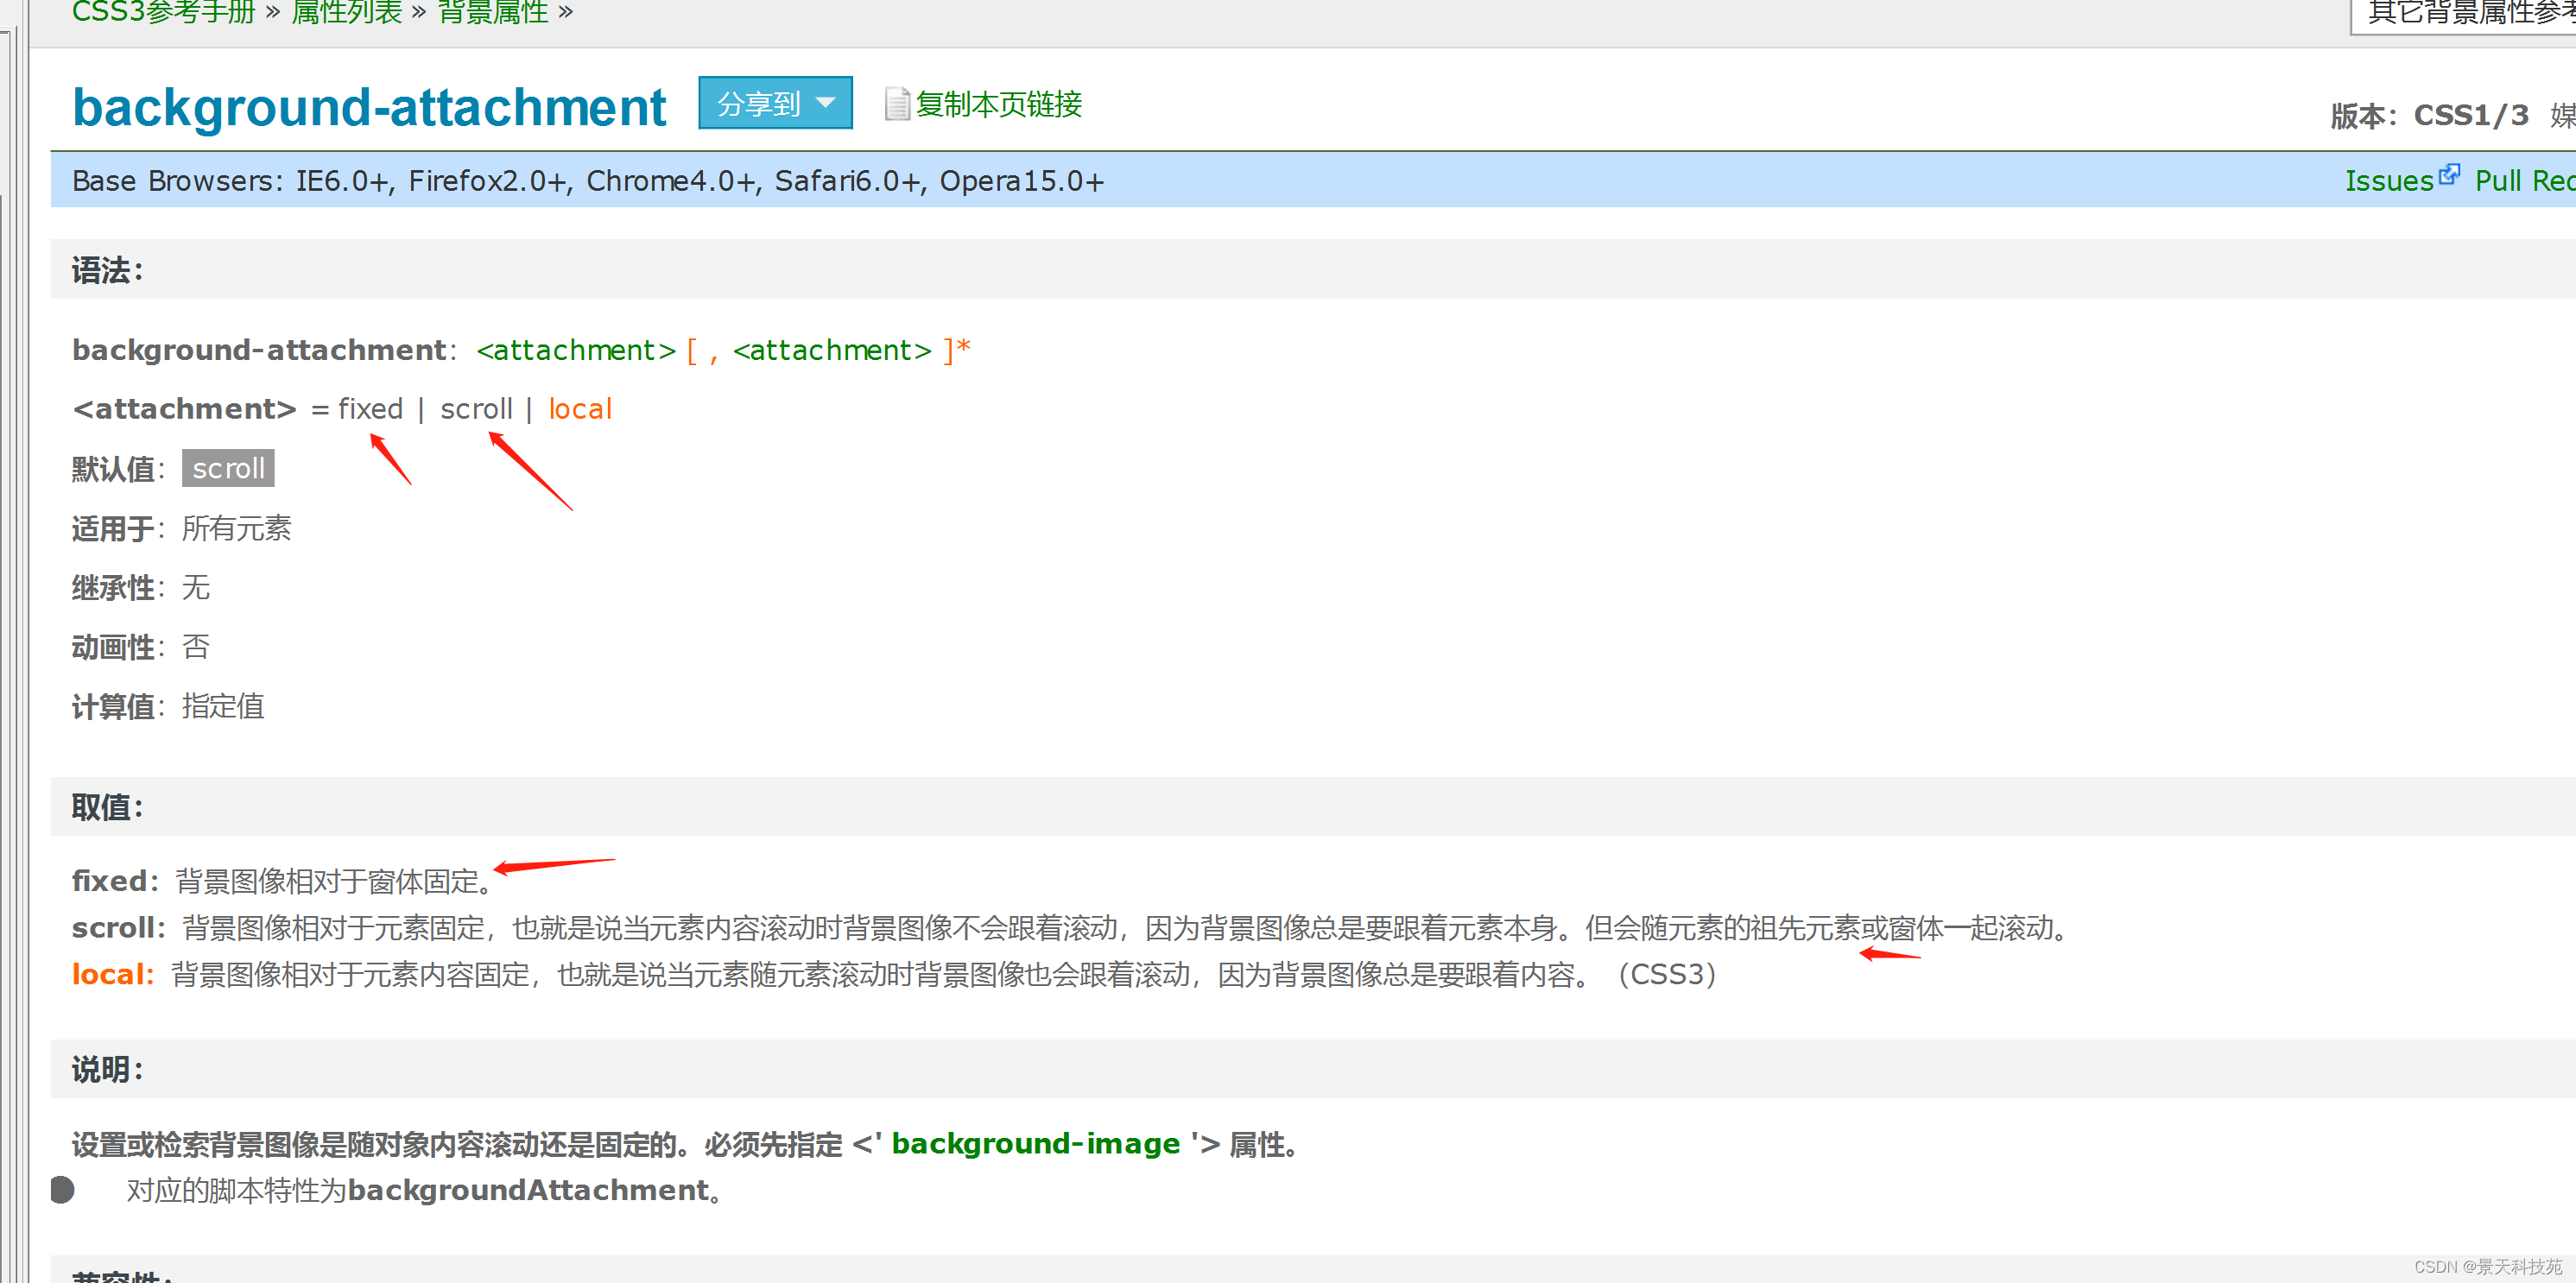
background-attachment: fixed;
}
attachement,默认是scroll
默认是repeat,图像重复直至填充整个盒子,可以设置x水平方向,y垂直方向,或者不重复
.c2
{
    /* 简写 */
    width:600px;
    height:600px;
    margin:10px 20px;
    border:solid 1px red;
    /* 图片 是否平铺 [图片位置] */
    background: url("./images/xiao.jpg") no-repeat 50% 50%;
}
position

    </style>
</head>
<body>
    <div class="c1"></div>
    <div class="c2"></div>
</body>
</html>
5.背景图的引入
<!DOCTYPE html>
<html lang="en">
<head>
<meta charset="UTF-8">
<meta name="viewport" content="width=device-width, initial-scale=1.0">
<title>背景图片的引入</title>
<style>
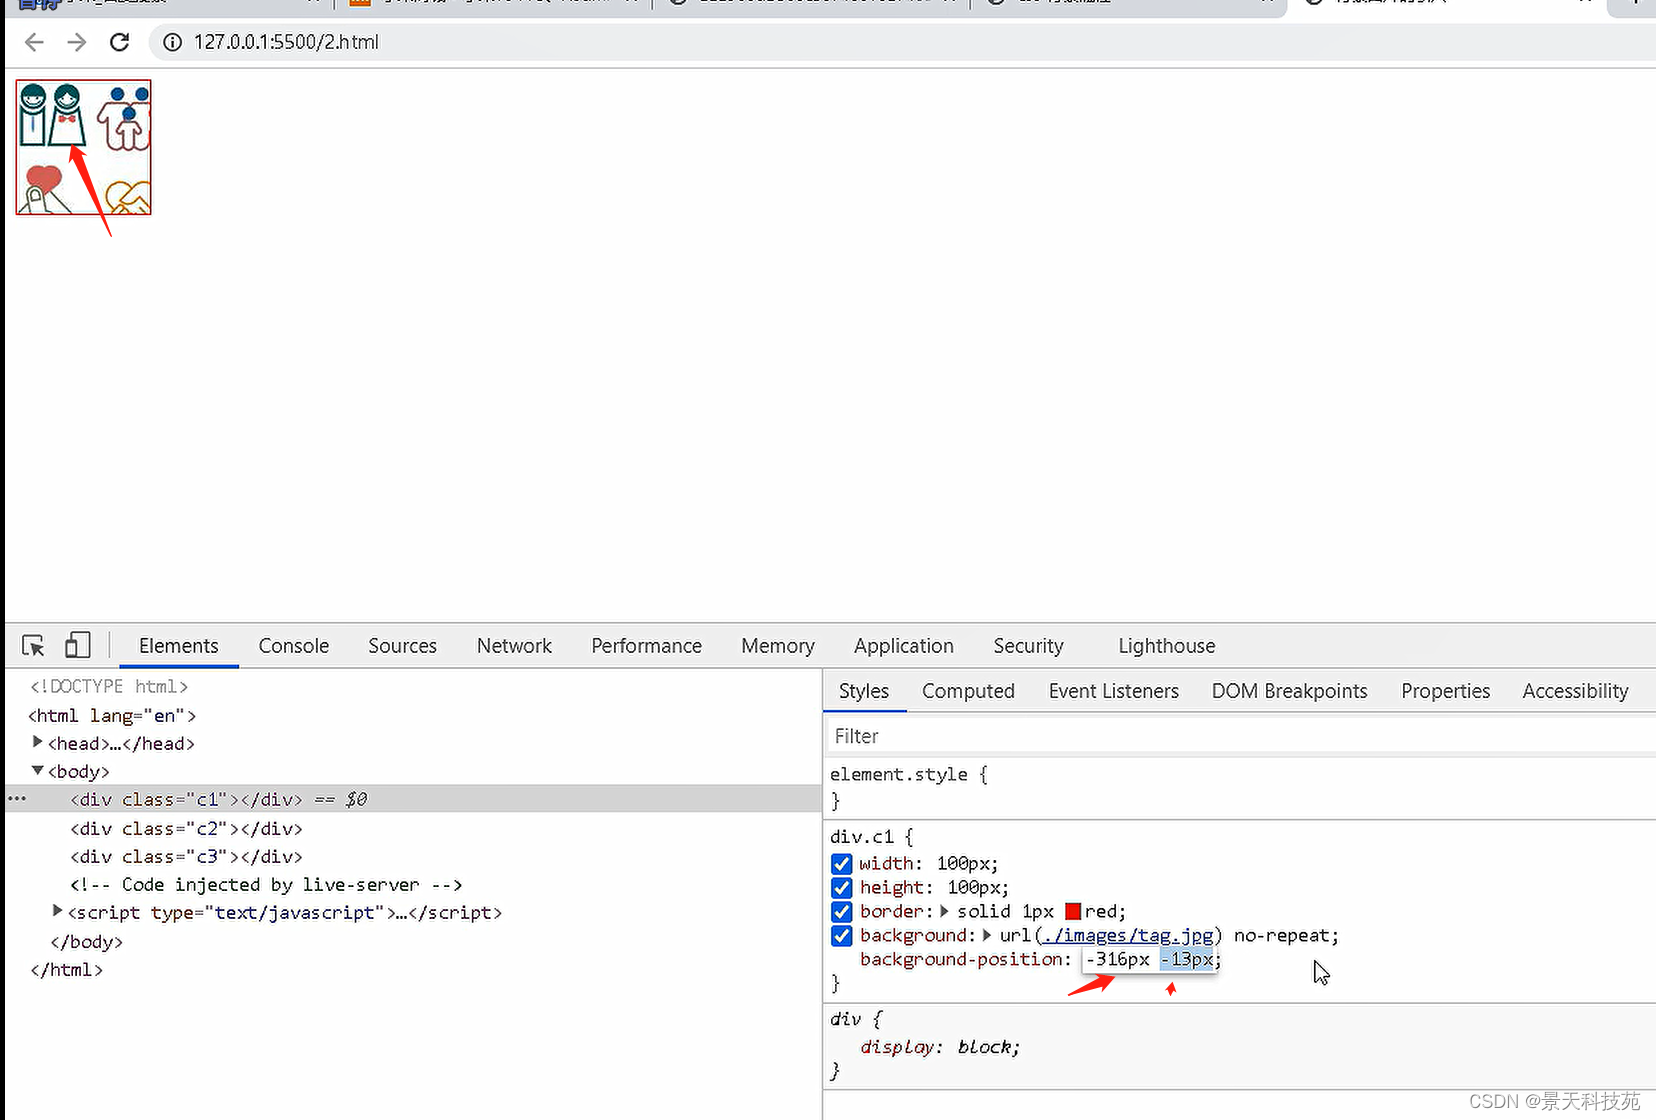
/* 鼠标滑过,点亮图片 */
div.c1
{width:60px;height:60px;border:solid 1px gray;background: url("./images/tag.jpg") no-repeat;}
div.c1:hover
{
background: url("./images/tag.jpg") no-repeat;
background-position: -312px -3.5px;
}
灰色点亮原理:当鼠标滑过时,将对应的彩色图片位置移到灰色图片位置

先在原位置调整坐标,在浏览器调整直到彩色图片移到灰色图片位置,取坐标放到.c1:hover{}里面
多个盒子如果有相同配置,可以通过类选择器来做统一配置,不用每个都配置
但不能用id选择器,因为id选择器只能特指一个
.gg
{
width:400px;
height:400px;
border:solid 1px red;
}
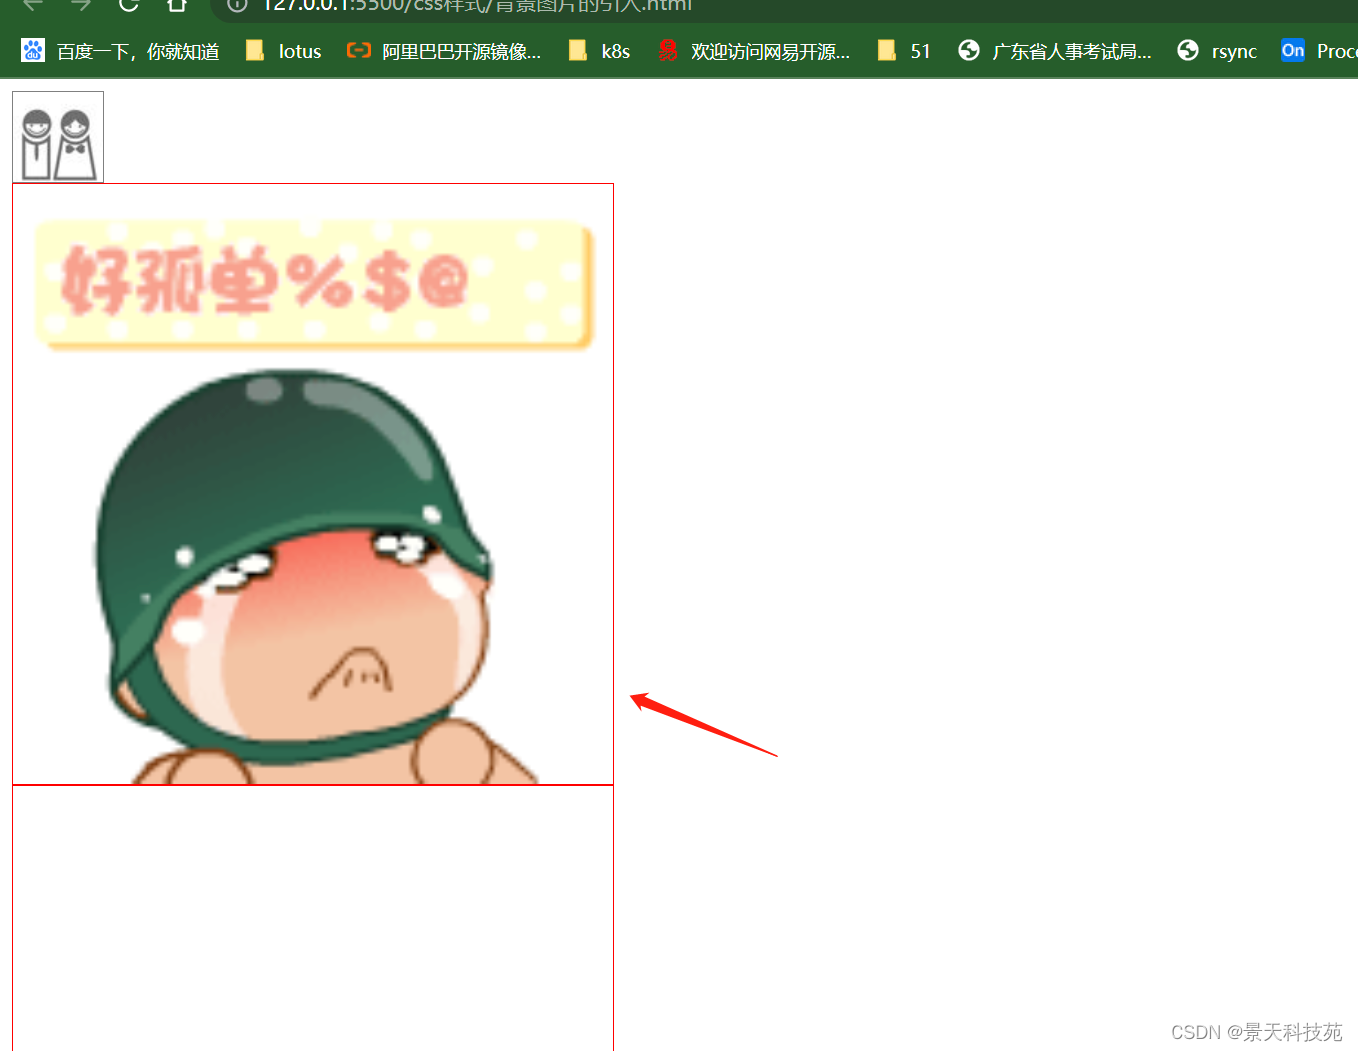
/* 一张图片的导入 */
div.c2
{
background: url("./images/xiao.jpg") no-repeat;
/* 参数1:宽 参数2:高 50px 50px / 100% 100% */
/* 控制背景图像的尺寸大小 background-size: 100% 100% ; */
background-size: 100% auto;
}
背景图片铺满盒子,参数跟像素和百分比都可以。默认是auto,原始图片大小
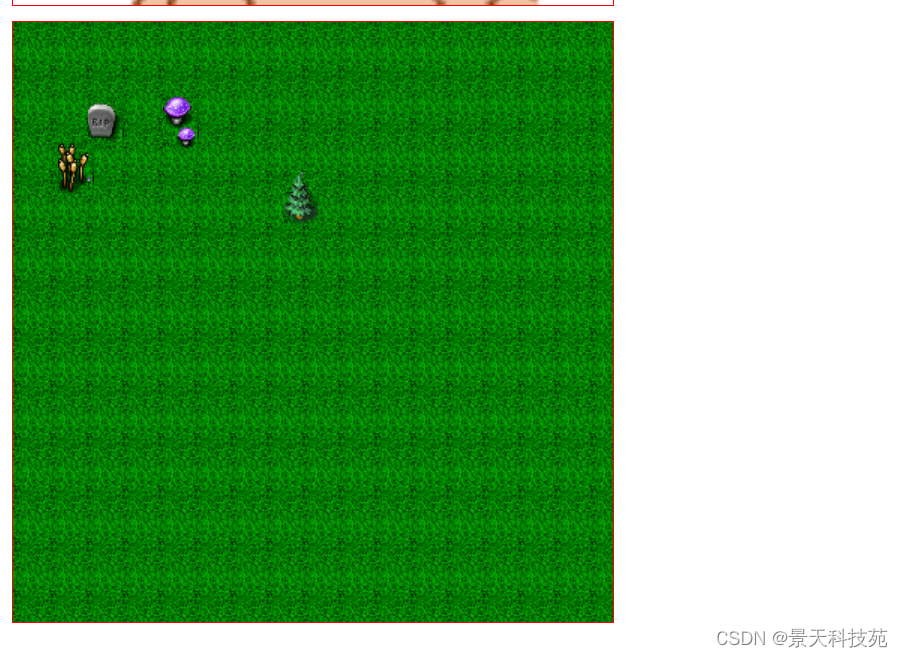
        /* 在一个div里面引入多张图片导入,多个图片之间用逗号隔开 */
背景图放最后,其他物件放在背景图上面
如果坐标相同,上面的会覆盖下面的
然后通过position调整位置

        div.c3
        {
            background:
                url("./images/game/map_19.gif") no-repeat 30px 80px,
                url("./images/game/map_20.gif") no-repeat 50px 50px,
                url("./images/game/map_18.gif") no-repeat 100px 50px,
                url("./images/game/map_14.gif") no-repeat 180px 100px,
                url("./images/game/map_03.gif");
        }
    </style>
</head>
<body>

    <div class="c1"></div>
    <div class="c2 gg"></div>
    <div class="c3 gg"></div>

</body>
</html>


 3773
3773

 被折叠的 条评论
为什么被折叠?
被折叠的 条评论
为什么被折叠?
 到【灌水乐园】发言


