


安装nginx
首先下载需要用的nginx-http-flv-module模块
git clone nginx-http-flv-module下载nginx压缩包并解压
wget https://nginx.org/download/nginx-1.19.4.tar.gz
tar -xzf nginx-1.19.4.tar.gz
cd nginx-1.19.4
编译安装
./configure --prefix=usr/local/nginx --add-module=/tmp/nginx-http-flv-module --with-http_ssl_module
make
make install
配置设置格式:
./configure --add-module=nginx-http-flv-module模块的安装目录 --with-http_ssl_module
搭建直播系统
配置nginx.conf文件
打开 /usr/local/nginx/conf/nginx.conf文件,并参照以下内容进行配置
worker_processes 1;
events {
worker_connections 1024;
}
rtmp {
server {
listen 9999; # 接受推流的端口号
chunk_size 8192; # 单一推流数据包的最大容量?
application pushLive { # 推流时的 uri ,可以自行修改
live on; # 打开直播
meta off; # 为了兼容网页前端的 flv.js,设置为 off 可以避免报错
gop_cache on; # 支持GOP缓存,以减少首屏时间
allow play all; # 允许来自任何 ip 的人拉流
}
}
}
http {
include mime.types;
default_type application/octet-stream;
sendfile on;
keepalive_timeout 65;
server {
listen 8080; # http 服务的端口
server_name localhost;
location /pullLive { # 拉流时的 uri ,可以自行修改
flv_live on; # 打开 http-flv 服务
chunked_transfer_encoding on;
add_header 'Access-Control-Allow-Origin' '*'; # 允许跨域
add_header 'Access-Control-Allow-Credentials' 'true';
}
}
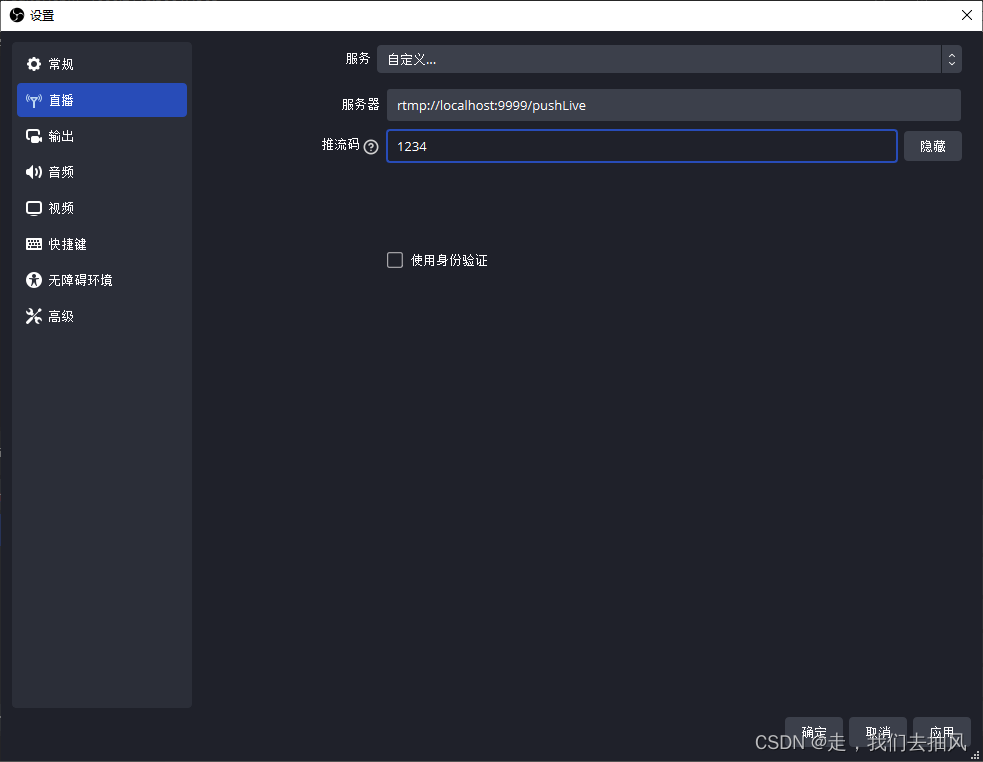
}推流地址:rtmp://localhost:9999/pushLive/rtmpStream
拉流地址:http://localhost:8080/pullLive/?port=9999&app=pushLive&stream=rtmpStream
测试使用
使用OBS推流
使用前端页面拉流
<!DOCTYPE html>
<html>

<head>
    <meta charset="UTF-8">
    <title>直播</title>
</head>

<body>
    <script src="https://lf3-cdn-tos.bytecdntp.com/cdn/expire-1-M/flv.js/1.6.2/flv.min.js" type="application/javascript"></script>
    <video id="videoElement" width="100%" controls></video>
    <script>
        if (flvjs.isSupported()) {
            var videoElement = document.getElementById('videoElement');
            var flvPlayer = flvjs.createPlayer({
                type: 'flv',
                // qfedu 是推流的时候的路径名称
                // dixon 是stream 自定义的名称
                url: 'http://localhost:8080/pullLive/?port=9999&app=pushLive&stream=1234'
            });
            flvPlayer.attachMediaElement(videoElement);
            flvPlayer.load();
            flvPlayer.play();
        }
    </script>
</body>

</html>
以上就是简单的直播系统搭建了,如果觉得写的不错请点个赞吧


 7336
7336


 被折叠的 条评论
为什么被折叠?
被折叠的 条评论
为什么被折叠?
 到【灌水乐园】发言


