


原文链接: http://www.codeproject.com/cpp/MemoryPool.asp
C++ 内存池
目录
l
引言
l
它怎样工作
l
示例
l
使用这些代码
l
好处
l
关于代码
l
ToDo
l
历史
引言
C/C++的内存分配
(通过
malloc或
new)可能需要花费很多时。
更糟糕的是,随着时间的流逝,内存
(memory)将形成碎片,所以一个应用程序的运行会越来越慢当它运行了很长时间和
/或执行了很多的内存分配
(释放
)操作的时候。特别是,你经常申请很小的一块内存,堆
(heap)会变成碎片的。
解决方案:你自己的内存池
一个
(可能的
)解决方法是内存池
(Memory Pool)。
在启动的时候,一个
”内存池
”(Memory Pool)分配一块很大的内存,并将会将这个大块
(block)分成较小的块
(smaller chunks)。每次你从内存池申请内存空间时,它会从先前已经分配的块
(chunks)中得到,而不是从操作系统。最大的优势在于:
l 非常少
(几没有
) 堆碎片
l 比通常的内存申请
/释放
(比如通过
malloc,
new等
)的方式快
另外,你可以得到以下好处:
l 检查任何一个指针是否在内存池里
l 写一个
”堆转储
(Heap-Dump
)”到你的硬盘
(对事后的调试非常有用
)
l 某种
”内存泄漏检测
(memory-leak detection
)”:当你没有释放所有以前分配的内存时,内存池
(Memory Pool)会抛出一个
断言
(
assertion
).
它怎样工作
让我们看一看内存池
(Memory Pool)的
UML模式图:
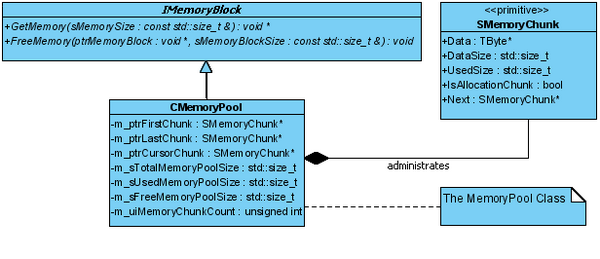
这个模式图只显示了类
CMemoryPool
的一小部分,参看由
Doxygen生成的文档以得到详细的类描述。
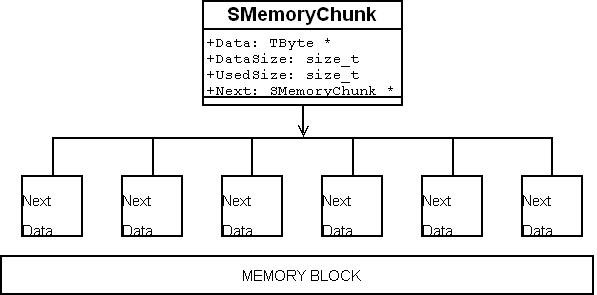
一个关于内存块(MemoryChunks)的单词
你应该从模式图中看到,内存池
(Memory Pool)管理了一个指向结构体
SMemoryChunk
(
m_ptrFirstChunk
,
m_ptrLastChunk
, and
m_ptrCursorChunk
)的指针。这些块
(chunks)建立一个内存块
(memory chunks)的链表。各自指向链表中的下一个块
(chunk)。当从操作系统分配到一块内存时,它将完全的被
SMemoryChunk
s管理。让我们近一点看看一个块
(chunk)。
 typedef struct
SMemoryChunk
typedef struct
SMemoryChunk {
{ TByte *Data ; // The actual Data
std::size_t DataSize ; // Size of the "Data"-Block
std::size_t UsedSize ; // actual used Size
bool IsAllocationChunk ; //
true, when this MemoryChunks //
Points to a "Data"-Block // which can be deallocated via "free()"
SMemoryChunk *Next ; //
Pointer to the Next MemoryChunk // in the List (may be NULL)
TByte *Data ; // The actual Data
std::size_t DataSize ; // Size of the "Data"-Block
std::size_t UsedSize ; // actual used Size
bool IsAllocationChunk ; //
true, when this MemoryChunks //
Points to a "Data"-Block // which can be deallocated via "free()"
SMemoryChunk *Next ; //
Pointer to the Next MemoryChunk // in the List (may be NULL)
 }
SmemoryChunk;
}
SmemoryChunk;
每个块(chunk)持有一个指针,指针指向:
l 一小块内存(
Data),
l 从块(chunk)开始的可用内存的总大小(
DataSize),
l 实际使用的大小(
UsedSize),
l 以及一个指向链表中下一个块(chunk)的指针。
第一步:预申请内存(pre-allocating the memory)
当你调用
CmemoryPool的构造函数,内存池
(Memory Pool)将从操作系统申请它的第一块
(大的
)内存块
(memory-chunk)
/*Constructor
******************/
CMemoryPool::CMemoryPool(const std::size_t &sInitialMemoryPoolSize,
const std::size_t &sMemoryChunkSize,
const std::size_t &sMinimalMemorySizeToAllocate,
bool bSetMemoryData)
{
m_ptrFirstChunk = NULL ;
m_ptrLastChunk = NULL ;
m_ptrCursorChunk = NULL ;
m_sTotalMemoryPoolSize = 0 ;
m_sUsedMemoryPoolSize = 0 ;
m_sFreeMemoryPoolSize = 0 ;
m_sMemoryChunkSize = sMemoryChunkSize ;
m_uiMemoryChunkCount = 0 ;
m_uiObjectCount = 0 ;
m_bSetMemoryData = bSetMemoryData ;
m_sMinimalMemorySizeToAllocate = sMinimalMemorySizeToAllocate ;
// Allocate the Initial amount of Memory from the Operating-System...
AllocateMemory(sInitialMemoryPoolSize) ;
}
类的所有成员通用的初始化在此完成,
AllocateMemory最终完成了从操作系统申请内存。
/******************
AllocateMemory
******************/
bool CMemoryPool::AllocateMemory(const std::size_t &sMemorySize)
{
std::size_t sBestMemBlockSize = CalculateBestMemoryBlockSize(sMemorySize) ;
// allocate from Operating System
TByte *ptrNewMemBlock = (TByte *) malloc (sBestMemBlockSize) ;
...
那么,是如何管理数据的呢?
第二步:已分配内存的分割(segmentation of allocated memory)
正如前面提到的,内存池(
Memory Pool)使用
SMemoryChunk
s管理所有数据。从OS申请完内存之后,我们的块(chunks)和实际的内存块(block)之间就不存在联系:

Memory Pool after initial allocation
我们需要分配一个结构体
SmemoryChunk的数组来管理内存块:
// (AllocateMemory()continued) :
...
unsigned int uiNeededChunks = CalculateNeededChunks(sMemorySize) ;
// allocate Chunk-Array to Manage the Memory
SMemoryChunk *ptrNewChunks =
(SMemoryChunk *) malloc ((uiNeededChunks * sizeof(SMemoryChunk))) ;
assert(((ptrNewMemBlock) && (ptrNewChunks))
&& "Error : System ran out of Memory") ;
...
CalculateNeededChunks()负责计算为管理已经得到的内存需要的块(chunks)的数量。分配完块(chunks)之后(通过
malloc),
ptrNewChunks将指向一个
SmemoryChunk
s的数组。注意,数组里的块
(chunks)现在持有的是垃圾数据,因为我们还没有给
chunk-members赋有用的数据。内存池的堆
(Memory Pool-"Heap"):
Memory Pool after
SMemoryChunk
allocation
还是那句话,数据块
(data block)和
chunks之间没有联系。但是,
AllocateMemory()会照顾它。
LinkChunksToData()最后将把数据块
(data block)和
chunks联系起来,并将为每个
chunk-member赋一个可用的值。
// (AllocateMemory()continued) :
...
// Associate the allocated Memory-Block with the Linked-List of MemoryChunks
return LinkChunksToData(ptrNewChunks, uiNeededChunks, ptrNewMemBlock) ;
让我们看看
LinkChunksToData():
/******************
LinkChunksToData
******************/
bool CMemoryPool::LinkChunksToData(SMemoryChunk *ptrNewChunks,
unsigned int uiChunkCount, TByte *ptrNewMemBlock)
{
SMemoryChunk *ptrNewChunk = NULL ;
unsigned int uiMemOffSet = 0 ;
bool bAllocationChunkAssigned = false ;
for(unsigned int i = 0; i < uiChunkCount; i++)
 {
if(!m_ptrFirstChunk)
{
m_ptrFirstChunk = SetChunkDefaults(&(ptrNewChunks[0])) ;
m_ptrLastChunk = m_ptrFirstChunk ;
m_ptrCursorChunk = m_ptrFirstChunk ;
{
if(!m_ptrFirstChunk)
{
m_ptrFirstChunk = SetChunkDefaults(&(ptrNewChunks[0])) ;
m_ptrLastChunk = m_ptrFirstChunk ;
m_ptrCursorChunk = m_ptrFirstChunk ;
 }
else
{
ptrNewChunk = SetChunkDefaults(&(ptrNewChunks[i])) ;
m_ptrLastChunk->Next = ptrNewChunk ;
m_ptrLastChunk = ptrNewChunk ;
}
uiMemOffSet = (i * ((unsigned int) m_sMemoryChunkSize)) ;
m_ptrLastChunk->Data = &(ptrNewMemBlock[uiMemOffSet]) ;
// The first Chunk assigned to the new Memory-Block will be
// a "AllocationChunk". This means, this Chunks stores the
// "original" Pointer to the MemBlock and is responsible for
// "free()"ing the Memory later....
if(!bAllocationChunkAssigned)
{
m_ptrLastChunk->IsAllocationChunk = true ;
bAllocationChunkAssigned = true ;
}
}
return RecalcChunkMemorySize(m_ptrFirstChunk, m_uiMemoryChunkCount) ;
}
}
else
{
ptrNewChunk = SetChunkDefaults(&(ptrNewChunks[i])) ;
m_ptrLastChunk->Next = ptrNewChunk ;
m_ptrLastChunk = ptrNewChunk ;
}
uiMemOffSet = (i * ((unsigned int) m_sMemoryChunkSize)) ;
m_ptrLastChunk->Data = &(ptrNewMemBlock[uiMemOffSet]) ;
// The first Chunk assigned to the new Memory-Block will be
// a "AllocationChunk". This means, this Chunks stores the
// "original" Pointer to the MemBlock and is responsible for
// "free()"ing the Memory later....
if(!bAllocationChunkAssigned)
{
m_ptrLastChunk->IsAllocationChunk = true ;
bAllocationChunkAssigned = true ;
}
}
return RecalcChunkMemorySize(m_ptrFirstChunk, m_uiMemoryChunkCount) ;
}
让我们一步步地仔细看看这个重要的函数:第一行检查链表里是否已经有可用的块(chunks):
...
if(!m_ptrFirstChunk)
...
我们第一次给类的成员赋值:
...
m_ptrFirstChunk = SetChunkDefaults(&(ptrNewChunks[0])) ;
m_ptrLastChunk = m_ptrFirstChunk ;
m_ptrCursorChunk = m_ptrFirstChunk ;
...
m_ptrFirstChunk现在指向块数组(
chunks-array)的
第一个块,每一个块严格的管理来自内存(
memory block)的
m_sMemoryChunkSize个字节。一个”偏移量”(offset)——这个值是可以计算的所以每个(chunk)能够指向内存块(
memory block)的特定部分。
uiMemOffSet = (i * ((unsigned int) m_sMemoryChunkSize)) ;
m_ptrLastChunk->Data = &(ptrNewMemBlock[uiMemOffSet]) ;
另外,每个新的来自数组的
SmemoryChunk将被追加到链表的最后
一个元素(并且它自己将成为最后一个元素):
...
m_ptrLastChunk->Next = ptrNewChunk ;
m_ptrLastChunk = ptrNewChunk ;
...
在接下来的
"
for loop" 中,内存池(memory pool)将连续的给数组中的所有块(chunks)赋一个可用的数据。
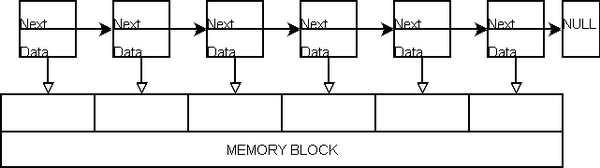
Memory and chunks linked together, pointing to valid data
最后,我们必须重新计算每个块(chunk)能够管理的总的内存大小。这是一个费时的,但是在新的内存追加到内存池时必须做的一件事。这个总的大小将被赋值给chunk的
DataSize 成员。
/******************
RecalcChunkMemorySize
******************/
bool CMemoryPool::RecalcChunkMemorySize(SMemoryChunk *ptrChunk,
unsigned int uiChunkCount)
{
unsigned int uiMemOffSet = 0 ;
for(unsigned int i = 0; i < uiChunkCount; i++)
{
if(ptrChunk)
{
uiMemOffSet = (i * ((unsigned int) m_sMemoryChunkSize)) ;
ptrChunk->DataSize =
(((unsigned int) m_sTotalMemoryPoolSize) - uiMemOffSet) ;
ptrChunk = ptrChunk->Next ;
}
else
{
assert(false && "Error : ptrChunk == NULL") ;
return false ;
}
}
return true ;
}
RecalcChunkMemorySize之后,每个chunk都知道它指向的空闲内存的大小。所以,将很容易确定一个chunk是否能够持有一块特定大小的内存:当
DataSize成员大于
(或等于
)已经申请的内存大小以及
DataSize成员是
0,于是
chunk有能力持有一块内存。最后,内存分割完成了。为了不让事情太抽象,我们假定内存池
(memory pool )包含600字节,每个chunk持有100字节。
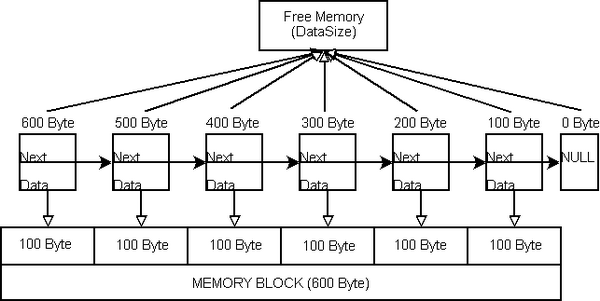
Memory segmentation finished. Each chunk manages exactly 100 bytes
第三步:从内存池申请内存(requesting memory from the memory pool)
那么,如果用户从内存池申请内存会发生什么?最初,内存池里的所有数据是空闲的可用的:

All memory blocks are available
我们看看
GetMemory
:
/******************
GetMemory
******************/
void *CMemoryPool::GetMemory(const std::size_t &sMemorySize)
{
std::size_t sBestMemBlockSize = CalculateBestMemoryBlockSize(sMemorySize) ;
SMemoryChunk *ptrChunk = NULL ;
while(!ptrChunk)
{
// Is a Chunks available to hold the requested amount of Memory ?
ptrChunk = FindChunkSuitableToHoldMemory(sBestMemBlockSize) ;
if (!ptrChunk)
{
// No chunk can be found
// => Memory-Pool is to small. We have to request
// more Memory from the Operating-System....
sBestMemBlockSize = MaxValue(sBestMemBlockSize,
CalculateBestMemoryBlockSize(m_sMinimalMemorySizeToAllocate)) ;
AllocateMemory(sBestMemBlockSize) ;
}
}
// Finally, a suitable Chunk was found.
// Adjust the Values of the internal "TotalSize"/"UsedSize" Members and
// the Values of the MemoryChunk itself.
m_sUsedMemoryPoolSize += sBestMemBlockSize ;
m_sFreeMemoryPoolSize -= sBestMemBlockSize ;
m_uiObjectCount++ ;
SetMemoryChunkValues(ptrChunk, sBestMemBlockSize) ;
// eventually, return the Pointer to the User
return ((void *) ptrChunk->Data) ;
}
当用户从内存池中申请内存是,它将从链表搜索一个能够持有被申请大小的chunk。那意味着:
l 那个chunk的
DataSize必须大于或等于被申请的内存的大小;
l 那个chunk的
UsedSize 必须是0。
这由
FindChunkSuitableToHoldMemory
方法完成。如果它返回
NULL,那么在内存池中没有可用的内存。这将导致
AllocateMemory 的调用
(上面讨论过
),它将从
OS申请更多的内存。如果返回值不是
NULL,一个可用的
chunk被发现。
SetMemoryChunkValues会调整
chunk成员的值,并且最后
Data指针被返回给用户
...
/******************
SetMemoryChunkValues
******************/
void CMemoryPool::SetMemoryChunkValues(SMemoryChunk *ptrChunk,
const std::size_t &sMemBlockSize)
{
if(ptrChunk)
{
ptrChunk->UsedSize = sMemBlockSize ;
}
...
}
示例
假设,用户从内存池申请
250字节:
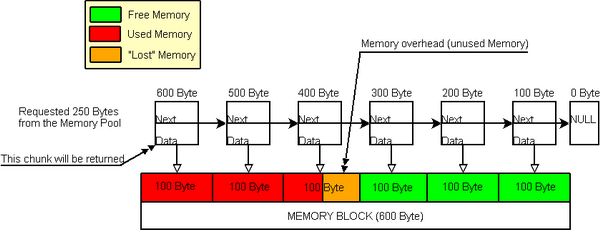
Memory in use
如我们所见,每个内存块(chunk)管理100字节,所以在这里250字节不是很合适。发生了什么事?Well,
GetMemory 从第一个chunk返回
Data指针并把它的
UsedSize设为300字节,因为300字节是能够被管理的内存的最小值并大于等于250。那些剩下的
(300 - 250 = 50)字节被称为内存池的
"memory overhead"。这没有看起来的那么坏,因为这些内存还可以使用
(它仍然在内存池里
)。
当
FindChunkSuitableToHoldMemory搜索可用
chunk时,它仅仅从一个空的
chunk跳到另一个空的
chunk。那意味着,如果某个人申请另一块内存
(memory-chunk),第四块
(持有
300字节的那个
)会成为下一个可用的
("valid") chunk。
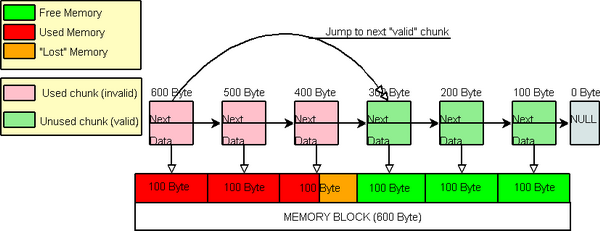
Jump to next valid chunk
使用代码
使用这些代码是简单的、直截了当的:只需要在你的应用里包含
"CMemoryPool.h",并添加几个相关的文件到你的
IDE/Makefile:
- CMemoryPool.h
- CMemoryPool.cpp
- IMemoryBlock.h
- SMemoryChunk.h
你只要创建一个
CmemoryPool类的实例,你就可以从它里面申请内存。所有的内存池的配置在
CmemoryPool类的构造函数(使用可选的参数)里完成。看一看头文件
("CMemoryPool.h")或
Doxygen-doku。所有的文件都有详细的
(Doxygen-)文档。
应用举例
MemPool::CMemoryPool *g_ptrMemPool = new MemPool::CMemoryPool() ;
char *ptrCharArray = (char *) g_ptrMemPool->GetMemory(100) ;
...
g_ptrMemPool->FreeMemory(ptrCharArray, 100) ;
delete g_ptrMemPool ;
好处
内存转储(Memory dump)
你可以在任何时候通过
WriteMemoryDumpToFile(strFileName)写一个
"memory dump"到你的
HDD。看看一个简单的测试类的构造函数
(使用内存池重载了
new和
delete运算符
):
/******************
Constructor
******************/
MyTestClass::MyTestClass()
{
m_cMyArray[0] = 'H' ;
m_cMyArray[1] = 'e' ;
m_cMyArray[2] = 'l' ;
m_cMyArray[3] = 'l' ;
m_cMyArray[4] = 'o' ;
m_cMyArray[5] = NULL ;
m_strMyString = "This is a small Test-String" ;
m_iMyInt = 12345 ;
m_fFloatValue = 23456.7890f ;
m_fDoubleValue = 6789.012345 ;
Next = this ;
}
MyTestClass *ptrTestClass = new MyTestClass ;
g_ptrMemPool->WriteMemoryDumpToFile("MemoryDump.bin") ;
看一看内存转储文件
("MemoryDump.bin"):

如你所见,在内存转储里有
MyTestClass类的所有成员的值。明显的,
"Hello"字符串
(
m_cMyArray
)在那里,以及整型数
m_iMyInt
(3930 0000 = 0x3039 = 12345 decimal)等等。这对调式很有用。
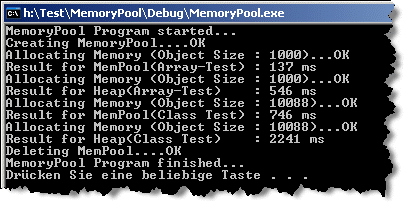
速度测试
我在
Windows平台上做了几个非常简单的测试
(通过
timeGetTime()
),但是结果说明内存池大大提高了应用程序的速度。所有的测试在
Microsoft Visual Studio .NET 2003的
debug模式下
(测试计算机
: Intel Pentium IV Processor (32 bit), 1GB RAM, MS Windows XP Professional).
//Array-test (Memory Pool):
for(unsigned int j = 0; j < TestCount; j++)
{
// ArraySize = 1000
char *ptrArray = (char *) g_ptrMemPool->GetMemory(ArraySize) ;
g_ptrMemPool->FreeMemory(ptrArray, ArraySize) ;
}
//Array-test (Heap):
for(unsigned int j = 0; j < TestCount; j++)
{
// ArraySize = 1000
char *ptrArray = (char *) malloc(ArraySize) ;
free(ptrArray) ;
}
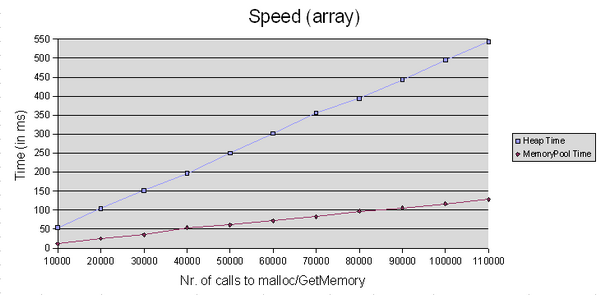
Results for the "array-test
//Class-Test for MemoryPool and Heap (overloaded new/delete)
//Class-Test for MemoryPool and Heap (overloaded new/delete)
for(unsigned int j = 0; j < TestCount; j++)
{
MyTestClass *ptrTestClass = new MyTestClass ;
delete ptrTestClass ;
}
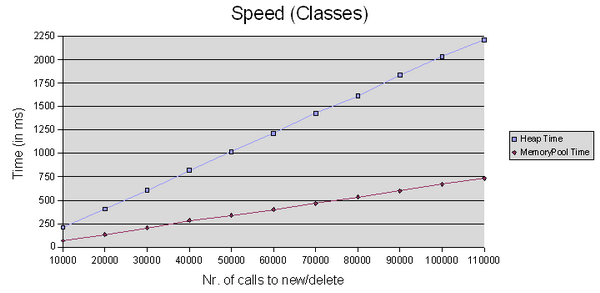
Results for the "classes-test" (overloaded new/delete operators)
关于代码
这些代码在Windows和Linux平台的下列编译器测试通过:
- Microsoft Visual C++ 6.0
- Microsoft Visual C++ .NET 2003
- MinGW (GCC) 3.4.4 (Windows)
- GCC 4.0.X (Debian GNU Linux)
Microsoft Visual C++ 6.0(*.dsw, *.dsp)和
Microsoft Visual C++ .NET 2003 (*.sln, *.vcproj)的工程文件已经包含在下载中。内存池仅用于
ANSI/ISO C++,所以它应当在任何
OS上的标准的
C++编译器编译。在
64位处理器上应当没有问题。
注意:内存池不是线程安全的。
原文地址:http://blog.csdn.net/060/article/details/1326025


 2764
2764

 被折叠的 条评论
为什么被折叠?
被折叠的 条评论
为什么被折叠?
 到【灌水乐园】发言


