


Mysql的主从复制

下载mysql5.7的版本,因为现在企业中主流的数据库的都是mysql5.7版本的
可以在官网中下载mysql5.7的安装包
环境配置:
主库:172.25.66.2 (lucky2)
备库:172.25.66.3(lucky3)
下载好的安装包,然后将其解压,在主数据库和备数据库中同时压缩
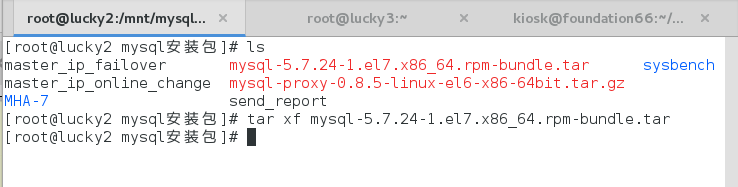
解压好的安装包主备数据库同时安装

下载好了之后,编写mysql的主配置文件 /etc/my.cnf
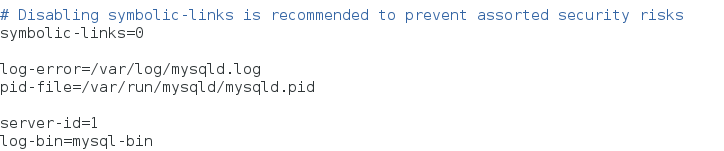
vim /etc/my.cnf 修改mysql配置文件确定主机,以及复制主机操作日志(二进制文件)
主数据库的配置文件
备数据库的配置文件

主备数据库开启服务:systemctl start mysqld
主备数据库,查看原始的数据库密码,登陆数据库。并且更改原始数据库密码。
cat /var/log/mysqld.log | grep password

更改数据库密码,主备数据库密码同时更改。
[root@lucky2 mysql安装包]# mysql_secure_installation

Securing the MySQL server deployment.

Enter password for user root:                   #这个地方输入的密码就是上一步查看的那个密码

The existing password for the user account root has expired. Please set a new password.

New password:                      # 输入新的密码,新的密码要求英文字母、特殊符号和数字大于8位

Re-enter new password:
The 'validate_password' plugin is installed on the server.
The subsequent steps will run with the existing configuration
of the plugin.
Using existing password for root.
主数据库
1、登陆数据库
mysql -uroot -p
2、编写数据库新的文件策略
登陆到数据库中 show databases; 查看库
mysql> grant replication slave on *.*  to repl@'172.25.66.%' identified by'Westos+123';        书写了那个网段的备库可以通过密码连接主库
Query OK, 0 rows affected, 1 warning (0.09 sec)

mysql> show master status;
+------------------+----------+--------------+------------------+-------------------+
| File             | Position | Binlog_Do_DB | Binlog_Ignore_DB | Executed_Gtid_Set |
+------------------+----------+--------------+------------------+-------------------+
| mysql-bin.000002 |      691 |              |                  |                   |
+------------------+----------+--------------+------------------+-------------------+
1 row in set (0.00 sec)
可以使用真实主机检测;
mysql -h 172.25.18.2 -urepl -pWestos+123 #可以登录,但是查看不到任何信息,因为没有权限
备数据库
登陆数据库
mysql -uroot -p
2、编写数据库新的文件策略
登陆到数据库中 show databases; 查看库
mysql> change master to master_host='172.25.66.2',master_user='repl',master_password='Westos+123',master_log_file='mysql-bin.000002',master_log_pos=691;              意思主库是172.25.66.2,并且和主库已经建立联系, 其中master_log_file和maMASTER_LOG_POS的值为0,因为它是日志的开始位置ster_log_pos写在lucky2上执行show master status看到的信息
Query OK, 0 rows affected, 2 warnings (0.53 sec)

mysql> start slave;
Query OK, 0 rows affected (0.08 sec)

mysql> show slave status\G 			##查看主从复制状态
			Slave_IO_Running: Yes               其中的IO 线程和SQL线程是yes状态的就表示和主库连接成功
            Slave_SQL_Running: Yes
检测效果:
在主数据库里面创建新的库和表,在备库中检测是否出现。
注意:写操作只能在master节点上做,因为master节点不会去同步slave节点的内容
以下的操作都是在主库中操作
mysql> create database lucky;    创建一个新的库
Query OK, 1 row affected (0.09 sec)

mysql> use lucky;            进入库中
Database changed
mysql> create table usertb(       创建一个表,并设定表的规则
    -> username varchar(20) not null,
    -> password varchar(20) not null);
Query OK, 0 rows affected (0.73 sec)

mysql> desc usertb;  查看表的整体
+----------+-------------+------+-----+---------+-------+
| Field    | Type        | Null | Key | Default | Extra |
+----------+-------------+------+-----+---------+-------+
| username | varchar(20) | NO   |     | NULL    |       |
| password | varchar(20) | NO   |     | NULL    |       |
+----------+-------------+------+-----+---------+-------+
2 rows in set (0.00 sec)

mysql> insert into usertb values('user1',2333);         在表中插入数据,即用户和密码。
Query OK, 1 row affected (0.12 sec)

mysql> select * from usertb;             查看表中的内容
+----------+----------+
| username | password |
+----------+----------+
| user1    | 2333     |
+----------+----------+
1 row in set (0.00 sec)
备库检测
mysql> use lucky;
Reading table information for completion of table and column names
You can turn off this feature to get a quicker startup with -A

Database changed
mysql> select * from usertb;
+----------+----------+
| username | password |
+----------+----------+
| user1    | 2333     |
+----------+----------+
1 row in set (0.00 sec)
gtid
guid自动定义需要复制的二进制主机数据库日志的位置。不再需要使用命令master_log_pos=690进行定位日志中的位置。
-
在传统的复制里面,当发生故障,需要主从切换,需要找到binlog和pos点,然后将主节点指向新的主节点,相对来说比较麻烦,也容易出错。在MySQL 5.6里面,不用再找binlog和pos点,我们只需要知道主节点的ip,端口,以及账号密码就行,因为复制是自动的,MySQL会通过内部机制GTID自动找点同步
-
从服务器连接到主服务器之后,把自己执行过的GTID(Executed_Gtid_Set)<SQL线程> 、获取到的GTID(Retrieved_Gtid_Set)<IO线程>发给主服务器,主服务器把从服务器缺少的GTID及对应的transactions发过去补全即可。当主服务器挂掉的时候,找出同步最成功的那台从服务器,直接把它提升为主即可。如果硬要指定某一台不是最新的从服务器提升为主, 先change到同步最成功的那台从服务器, 等把GTID全部补全了,就可以把它提升为主了
mysql的gtid需要在mysql的主从复制基础上进行实验,为的是更加方便数据库之间的连接。
主数据库:
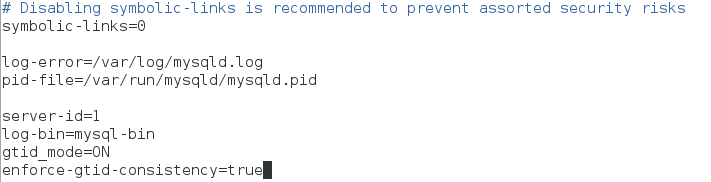
编写主配置文件
 vim /etc/my.cnf
		gtid_mode=ON                                 	##开启gtid模式
		enforce-gtid-consistency=true                ##gtid
重启服务:systemctl restart mysqld
进入主库,登陆数据库
mysql -uroot -p   登陆数据库
mysql> use lucky
Reading table information for completion of table and column names
You can turn off this feature to get a quicker startup with -A

Database changed
mysql> select * from usertb;
+----------+----------+
| username | password |
+----------+----------+
| user1    | 2333     |
+----------+----------+
1 row in set (0.00 sec)
mysql> insert into usertb values('user2',000000);
Query OK, 1 row affected (0.39 sec)

mysql> select * from usertb;
+----------+----------+
| username | password |
+----------+----------+
| user1    | 2333     |
| user2    | 0        |
+----------+----------+
2 rows in set (0.00 sec)
备数据库:
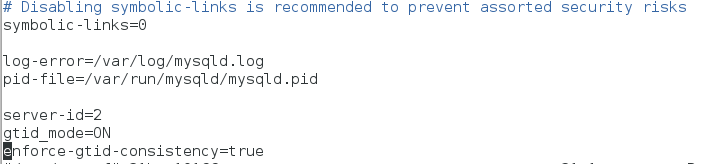
编写配置文件:
 vim /etc/my.cnf
		gtid_mode=ON                                 	##开启gtid模式
		enforce-gtid-consistency=true                ##gtid
重启服务:systemctl restart mysqld
登陆数据库:
mysql -uroot -pWestos+123
mysql> stop slave;         #停止服务
Query OK, 0 rows affected (0.12 sec)

mysql> change master to       #修改master服务,确定主机
    -> master_host='172.25.66.2',       # 确定主机ip
    -> master_user='repl', 		#确定登陆复制用户数据
    -> master_password='Westos+123',		#确定登陆密码
    -> master_auto_position=1;			#开启自动定位复制日志位置
Query OK, 0 rows affected, 2 warnings (0.19 sec)

mysql> start slave;			#开启服务
Query OK, 0 rows affected (0.08 sec)
show slave status\G                                 ##查看服务状态
		 Slave_IO_Running: Yes                       ##前两个参数确定是则说明数据库没有问题
		 Slave_SQL_Running: Yes
		 Retrieved_Gtid_Set:                         ##后两个参数说明打开了gtid服务
		 Executed_Gtid_Set:
mysql> use mysql;
Reading table information for completion of table and column names
You can turn off this feature to get a quicker startup with -A

Database changed
mysql> select * from gtid_executed
    -> ;
+--------------------------------------+----------------+--------------+
| source_uuid                          | interval_start | interval_end |
+--------------------------------------+----------------+--------------+
| 57cec957-9d0d-11e9-826a-525400f2e74a |              1 |            1 |                  这里的1 就是日志位置
+------------------------


 3351
3351


 被折叠的 条评论
为什么被折叠?
被折叠的 条评论
为什么被折叠?
 到【灌水乐园】发言


