arch/arm/lib/crt0.S main主函数

_main


来自于crt0.s函数的注释说明:

/*
 * This file handles the target-independent stages of the U-Boot
 * start-up where a C runtime environment is needed. Its entry point
 * is _main and is branched into from the target's start.S file.
 *
 * _main execution sequence is:
 *
 * 1. Set up initial environment for calling board_init_f().
 *    This environment only provides a stack and a place to store
 *    the GD ('global data') structure, both located in some readily
 *    available RAM (SRAM, locked cache...). In this context, VARIABLE
 *    global data, initialized or not (BSS), are UNAVAILABLE; only
 *    CONSTANT initialized data are available.
 *    建立  调用 board_init_f()函数 的初始化环境,主要是常量数据。
 * 2. Call board_init_f(). This function prepares the hardware for
 *    execution from system RAM (DRAM, DDR...) As system RAM may not
 *    be available yet, , board_init_f() must use the current GD to
 *    store any data which must be passed on to later stages. These
 *    data include the relocation destination, the future stack, and
 *    the future GD location.
 *   调用board_init_f(),PCB硬件的基本初始化,为下面的步骤提供数据临时存储空间。
 * (the following applies only to non-SPL builds)
 *
 * 3. Set up intermediate environment where the stack and GD are the
 *    ones allocated by board_init_f() in system RAM, but BSS and
 *    initialized non-const data are still not available.
 *   设置中间环境为stack和GD。
 * 4. Call relocate_code(). This function relocates U-Boot from its
 *    current location into the relocation destination computed by
 *    board_init_f().
 *    U-boot代码的内存重定向。
 * 5. Set up final environment for calling board_init_r(). This
 *    environment has BSS (initialized to 0), initialized non-const
 *    data (initialized to their intended value), and stack in system
 *    RAM. GD has retained values set by board_init_f(). Some CPUs
 *    have some work left to do at this point regarding memory, so
 *    call c_runtime_cpu_setup.
 *    调用board_init_r(),完整最终环境的设置。
 * 6. Branch to board_init_r().

       跳转到board_init_r()函数。

_main函数在arch/arm/lib/crt0.S中,mian函数的作用在注释中有详细的说明,我们分段来分析一下

[cpp]  view plain  copy
  在CODE上查看代码片 派生到我的代码片
  1. ENTRY(_main)  
  2.   
  3. /* 
  4.  * Set up initial C runtime environment and call board_init_f(0). 
  5.  */  
  6.   
  7. #if defined(CONFIG_SPL_BUILD) && defined(CONFIG_SPL_STACK)  
  8.     ldr sp, =(CONFIG_SPL_STACK)  
  9. #else  
  10.     ldr sp, =(CONFIG_SYS_INIT_SP_ADDR)  
  11. #endif  
  12.     bic sp, sp, #7  /* 8-byte alignment for ABI compliance */  
  13.     sub sp, sp, #GD_SIZE    /* allocate one GD above SP */  
  14.     bic sp, sp, #7  /* 8-byte alignment for ABI compliance */  
  15.     mov r9, sp      /* GD is above SP */  
  16.     mov r0, #0  
  17.     bl  board_init_f  

首先将CONFIG_SYS_INIT_SP_ADDR定义的值加载到栈指针sp中,这个宏定义在配置头文件中指定。

这段代码是为board_init_f C函数调用提供环境,也就是栈指针sp初始化。

8字节对齐,然后减掉GD_SIZE,这个宏定义是指的全局结构体gd的大小,是160字节。在此处,这个结构体用来保存uboot一些全局信息,需要一块单独的内存。

最后将sp保存在r9寄存器中。因此r9寄存器中的地址就是gd结构体的首地址。

在后面所有code中如果要使用gd结构体,必须在文件中加入DECLARE_GLOBAL_DATA_PTR宏定义,定义如下:

[cpp]  view plain  copy
  在CODE上查看代码片 派生到我的代码片
  1. #define DECLARE_GLOBAL_DATA_PTR     register volatile gd_t *gd asm ("r9")  

gd结构体首地址就是r9中的值。

C语言函数栈是向下生长,这里sp为malloc空间顶端减去gd bd空间开始的,起初很纳闷,sp设在这里,以后的C函数调用不都会在malloc空间了吗,堆栈空间不就重合了嘛,不用急,看完board_init_f就明白了。

接着说_main上面一段代码,接着r0赋为0,也就是参数0为0,调用board_init_f

board_init_f     (函数在arch/arm/xxx/board.c位置)

移植uboot先做一个最精简版本,很多配置选项都没有打开,比如fb mmc等硬件都默认不打开,只配置基本的ddr serial,这样先保证uboot能正常启动进入命令行,然后再去添加其他。

我们这里分析就是按最精简版本来,这样可以更加简洁的说明uboot的启动流程。

board_init_f函数主要是根据配置对全局信息结构体gd进行初始化。

gd结构体中有个别成员意义我也不是很理解,这里我只说我理解并且在后面起到作用的成员。

[cpp]  view plain  copy
  在CODE上查看代码片 派生到我的代码片
  1. gd->mon_len = (ulong)&__bss_end - (ulong)_start;  
初始化mon_len,代表uboot code的大小。

[cpp]  view plain  copy
  在CODE上查看代码片 派生到我的代码片
  1. for (init_fnc_ptr = init_sequence; *init_fnc_ptr; ++init_fnc_ptr) {  
  2.     if ((*init_fnc_ptr)() != 0) {  
  3.         hang ();  
  4.     }  
  5. }  
遍历调用init_sequence所有函数,init_sequence定义如下:

[cpp]  view plain  copy
  在CODE上查看代码片 派生到我的代码片
  1. init_fnc_t *init_sequence[] = {  
  2.     arch_cpu_init,      /* basic arch cpu dependent setup */  
  3.     mark_bootstage,  
  4. #ifdef CONFIG_OF_CONTROL  
  5.     fdtdec_check_fdt,  
  6. #endif  
  7. #if defined(CONFIG_BOARD_EARLY_INIT_F)  
  8.     board_early_init_f,  
  9. #endif  
  10.     timer_init,     /* initialize timer */  
  11. #ifdef CONFIG_BOARD_POSTCLK_INIT  
  12.     board_postclk_init,  
  13. #endif  
  14. #ifdef CONFIG_FSL_ESDHC  
  15.     get_clocks,  
  16. #endif  
  17.     env_init,       /* initialize environment */  
  18.     init_baudrate,      /* initialze baudrate settings */  
  19.     serial_init,        /* serial communications setup */  
  20.     console_init_f,     /* stage 1 init of console */  
  21.     display_banner,     /* say that we are here */  
  22.     print_cpuinfo,      /* display cpu info (and speed) */  
  23. #if defined(CONFIG_DISPLAY_BOARDINFO)  
  24.     checkboard,     /* display board info */  
  25. #endif  
  26. #if defined(CONFIG_HARD_I2C) || defined(CONFIG_SYS_I2C)  
  27.     init_func_i2c,  
  28. #endif  
  29.     dram_init,      /* configure available RAM banks */  
  30.     NULL,  
  31. };  
arch_cpu_init需要实现,要先启动uboot,这里可以先写一个空函数。

timer_init在lib/time.c中有实现,也是空函数,但是有__WEAK关键字,如果自己实现,则会调用自己实现的这个函数

对最精简uboot,需要做好就是ddr和serial,所以我们最关心是serial_init,console_init_f以及dram_init.

先看serial_init

[cpp]  view plain  copy
  在CODE上查看代码片 派生到我的代码片
  1. int serial_init(void)  
  2. {  
  3.     return get_current()->start();  
  4. }  
  5. static struct serial_device *get_current(void)  
  6. {  
  7.     struct serial_device *dev;  
  8.   
  9.     if (!(gd->flags & GD_FLG_RELOC))  
  10.         dev = default_serial_console();  
  11.     else if (!serial_current)  
  12.         dev = default_serial_console();  
  13.     else  
  14.         dev = serial_current;  
  15.   
  16.     /* We must have a console device */  
  17.     if (!dev) {  
  18. #ifdef CONFIG_SPL_BUILD  
  19.         puts("Cannot find console\n");  
  20.         hang();  
  21. #else  
  22.         panic("Cannot find console\n");  
  23. #endif  
  24.     }  
  25.   
  26.     return dev;  
  27. }  

gd->flags还没做初始化,serial_current用来存放我们当前要使用的serial,这里也还没做初始化,所以最终serial_device就是default_serial_console(),这个在serial驱动中有实现,来返回一个默认的调试串口。

serial_device结构体代表了一个串口设备,其中的成员都需要在自己的serial驱动中实现。

这样在serial_init中get_current获取就是串口驱动中给出的默认调试串口结构体,执行start,做一些特定串口初始化。

console_init_f将gd中have_console置1,这个函数不详细说了。

display_banner,print_cpuinfo利用现在的调试串口打印了uboot的信息。

接下来就是dram_init。

dram_init对gd->ram_size初始化,以便board_init_f后面代码对dram空间进行规划。

dram_init实现可以通过配置文件定义宏定义来实现,也可以通过对ddrc控制器读获取dram信息。

继续分析board_init_f,剩余代码将会对sdram空间进行规划!

[cpp]  view plain  copy
  在CODE上查看代码片 派生到我的代码片
  1. #if defined(CONFIG_SYS_MEM_TOP_HIDE)  
  2.     /* 
  3.      * Subtract specified amount of memory to hide so that it won't 
  4.      * get "touched" at all by U-Boot. By fixing up gd->ram_size 
  5.      * the Linux kernel should now get passed the now "corrected" 
  6.      * memory size and won't touch it either. This should work 
  7.      * for arch/ppc and arch/powerpc. Only Linux board ports in 
  8.      * arch/powerpc with bootwrapper support, that recalculate the 
  9.      * memory size from the SDRAM controller setup will have to 
  10.      * get fixed. 
  11.      */  
  12.     gd->ram_size -= CONFIG_SYS_MEM_TOP_HIDE;  
  13. #endif  
  14.   
  15.     addr = CONFIG_SYS_SDRAM_BASE + get_effective_memsize();  
CONFIG_SYS_MEM_TOP_HIDE宏定义是将一部分内存空间隐藏,注释说明对于ppc处理器在内核中有接口来实现使用uboot提供的值,这里咱们不考虑。

addr的值由CONFIG_SYS_SDRAM_BASE加上ram_size。也就是到了可用sdram的顶端。

[cpp]  view plain  copy
  在CODE上查看代码片 派生到我的代码片
  1. #if !(defined(CONFIG_SYS_ICACHE_OFF) && defined(CONFIG_SYS_DCACHE_OFF))  
  2.     /* reserve TLB table */  
  3.     gd->arch.tlb_size = PGTABLE_SIZE;  
  4.     addr -= gd->arch.tlb_size;  
  5.   
  6.     /* round down to next 64 kB limit */  
  7.     addr &= ~(0x10000 - 1);  
  8.   
  9.     gd->arch.tlb_addr = addr;  
  10.     debug("TLB table from %08lx to %08lx\n", addr, addr + gd->arch.tlb_size);  
  11. #endif  
  12.   
  13.     /* round down to next 4 kB limit */  
  14.     addr &= ~(4096 - 1);  
  15.     debug("Top of RAM usable for U-Boot at: %08lx\n", addr);  
如果打开了icache以及dcache,则预留出PATABLE_SIZE大小的tlb空间,tlb存放首地址赋值给gd->arch.tlb_addr。

最后addr此时值就是tlb的地址,4kB对齐。

[cpp]  view plain  copy
  在CODE上查看代码片 派生到我的代码片
  1. #ifdef CONFIG_LCD  
  2. #ifdef CONFIG_FB_ADDR  
  3.     gd->fb_base = CONFIG_FB_ADDR;  
  4. #else  
  5.     /* reserve memory for LCD display (always full pages) */  
  6.     addr = lcd_setmem(addr);  
  7.     gd->fb_base = addr;  
  8. #endif /* CONFIG_FB_ADDR */  
  9. #endif /* CONFIG_LCD */  
  10.   
  11.     /* 
  12.      * reserve memory for U-Boot code, data & bss 
  13.      * round down to next 4 kB limit 
  14.      */  
  15.     addr -= gd->mon_len;  
  16.     addr &= ~(4096 - 1);  
  17.   
  18.     debug("Reserving %ldk for U-Boot at: %08lx\n", gd->mon_len >> 10, addr);  
如果需要使用frambuffer,使用配置fb首地址CONFIG_FB_ADDR或者调用lcd_setmem获取fb大小,这里面有板级相关函数需要实现,不过为了先能启动uboot,没有打开fb选项。addr值就是fb首地址。

gd->fb_base保存fb首地址。

接着-gd->mon_len为uboot的code留出空间,到这里addr的值就确定,addr作为uboot relocate的目标addr。

到这里,可以看出uboot现在空间划分是从顶端往下进行的。

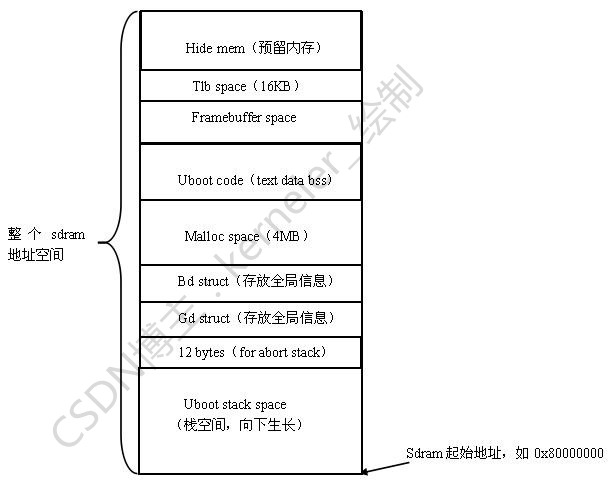
先总结一下addr之上sdram空间的划分:

由高到低 : top-->hide mem-->tlb space(16K)-->framebuffer space-->uboot code space-->addr

接下来要确定addr_sp的值。

[cpp]  view plain  copy
  在CODE上查看代码片 派生到我的代码片
  1. #ifndef CONFIG_SPL_BUILD  
  2.     /* 
  3.      * reserve memory for malloc() arena 
  4.      */  
  5.     addr_sp = addr - TOTAL_MALLOC_LEN;  
  6.     debug("Reserving %dk for malloc() at: %08lx\n",  
  7.             TOTAL_MALLOC_LEN >> 10, addr_sp);  
  8.     /* 
  9.      * (permanently) allocate a Board Info struct 
  10.      * and a permanent copy of the "global" data 
  11.      */  
  12.     addr_sp -= sizeof (bd_t);  
  13.     bd = (bd_t *) addr_sp;  
  14.     gd->bd = bd;  
  15.     debug("Reserving %zu Bytes for Board Info at: %08lx\n",  
  16.             sizeof (bd_t), addr_sp);  
  17. #ifdef CONFIG_MACH_TYPE  
  18.     gd->bd->bi_arch_number = CONFIG_MACH_TYPE; /* board id for Linux */  
  19. #endif  
  20.       
  21.     addr_sp -= sizeof (gd_t);  
  22.     id = (gd_t *) addr_sp;  
  23.     debug("Reserving %zu Bytes for Global Data at: %08lx\n",  
  24.             sizeof (gd_t), addr_sp);  
  25. #ifndef CONFIG_ARM64  
  26.     /* setup stackpointer for exeptions */  
  27.     gd->irq_sp = addr_sp;  
  28. #ifdef CONFIG_USE_IRQ  
  29.     addr_sp -= (CONFIG_STACKSIZE_IRQ+CONFIG_STACKSIZE_FIQ);  
  30.     debug("Reserving %zu Bytes for IRQ stack at: %08lx\n",  
  31.         CONFIG_STACKSIZE_IRQ+CONFIG_STACKSIZE_FIQ, addr_sp);  
  32. #endif  
  33.     /* leave 3 words for abort-stack    */  
  34.     addr_sp -= 12;  
  35.   
  36.     /* 8-byte alignment for ABI compliance */  
  37.     addr_sp &= ~0x07;  
  38. #else   /* CONFIG_ARM64 */  
  39.     /* 16-byte alignment for ABI compliance */  
  40.     addr_sp &= ~0x0f;  
  41. #endif  /* CONFIG_ARM64 */  

首先预留malloc len,这里我定义的是0x400000.

注释中说明,为bd,gd做一个永久的copy。

留出了全局信息bd_t结构体的空间,首地址存在gd->bd。

留出gd_t结构体的空间。首地址存在id中。
将此地址保存在gd->irq_sp中作为异常栈指针。uboot中我们没有用到中断。

最后留出12字节,for abort stack,这个没看懂。

到这里addr_sp值确定,总结一下addr_sp之上空间分配。

由高到低 : addr-->malloc len(0x400000)-->bd len-->gd len-->12 byte-->addr_sp(栈往下增长,addr_sp之下空间作为栈空间)

[cpp]  view plain  copy
  在CODE上查看代码片 派生到我的代码片
  1. gd->bd->bi_baudrate = gd->baudrate;  
  2. /* Ram ist board specific, so move it to board code ... */  
  3. dram_init_banksize();  
  4. display_dram_config();  /* and display it */  
  5.   
  6. gd->relocaddr = addr;  
  7. gd->start_addr_sp = addr_sp;  
  8. gd->reloc_off = addr - (ulong)&_start;  
  9. debug("relocation Offset is: %08lx\n", gd->reloc_off);  
  10. if (new_fdt) {  
  11.     memcpy(new_fdt, gd->fdt_blob, fdt_size);  
  12.     gd->fdt_blob = new_fdt;  
  13. }  
  14. memcpy(id, (void *)gd, sizeof(gd_t));  
给bd->bi_baudrate赋值gd->baudrate,gd->baudrate是在前面baudrate_init中初始化。

dram_init_banksize()是需要实现的板级函数。根据板上ddrc获取ddr的bank信息。填充在gd->bd->bi_dram[CONFIG_NR_DRAM_BANKS]。

gd->relocaaddr为目标addr,gd->start_addr_sp为目标addr_sp,gd->reloc_off为目标addr和现在实际code起始地址的偏移。reloc_off非常重要,会作为后面relocate_code函数的参数,来实现code的拷贝。

最后将gd结构体的数据拷贝到新的地址id上。

board_init_f函数将sdram空间重新进行了划分,可以看出栈空间和堆空间是分开的,就不存在_main调用board_init_f之前的那个问题啦。

并且在重新规划空间完成之前并没有出现初始化堆,以及使用堆空间的问题,比如malloc函数,所以之前的堆栈空间重合的问题是过虑了。

至此,board_init_f结束,回到_main

_main

board_init_f结束后,代码如下:

[cpp]  view plain  copy
  在CODE上查看代码片 派生到我的代码片
  1. #if ! defined(CONFIG_SPL_BUILD)  
  2.   
  3. /* 
  4.  * Set up intermediate environment (new sp and gd) and call 
  5.  * relocate_code(addr_moni). Trick here is that we'll return 
  6.  * 'here' but relocated. 
  7.  */  
  8.   
  9.     ldr sp, [r9, #GD_START_ADDR_SP] /* sp = gd->start_addr_sp */  
  10.     bic sp, sp, #7  /* 8-byte alignment for ABI compliance */  
  11.     ldr r9, [r9, #GD_BD]        /* r9 = gd->bd */  
  12.     sub r9, r9, #GD_SIZE        /* new GD is below bd */  
  13.   
  14.     adr lr, here  
  15.     ldr r0, [r9, #GD_RELOC_OFF]     /* r0 = gd->reloc_off */  
  16.     add lr, lr, r0  
  17.     ldr r0, [r9, #GD_RELOCADDR]     /* r0 = gd->relocaddr */  
  18.     b   relocate_code  
  19. here:  
这段汇编很有意思,前4条汇编实现了新gd结构体的更新。

首先更新sp,并且将sp 8字节对齐,方便后面函数开辟栈能对齐,

然后获取gd->bd地址到r9中,需要注意,在board_init_f中gd->bd已经更新为新分配的bd了,下一条汇编将r9减掉bd的size,这样就获取到了board_init_f中新分配的gd了!

后面汇编则是为relocate_code做准备,首先加载here地址,然后加上新地址偏移量给lr,则是code relocate后的新here了,relocate_code返回条转到lr,则是新位置的here!

最后在r0中保存code的新地址,跳转到relocate_code

relocate_code

relocate_code函数在arch/arm/lib/relocate.S中,这个函数实现了将uboot code拷贝到relocaddr。

这部分算是整个uboot中最核心也是最难理解的代码,我单独写了一篇文章来介绍这一部分的工作原理,感兴趣的朋友可以看下面这个链接

http://blog.csdn.net/skyflying2012/article/details/37660265

这里就不再详说了。

到这里需要总结一下,经过上面的分析可以看出,

新版uboot在sdram空间分配上,是自顶向下,

不管uboot是从哪里启动,spiflash,nandflash,sram等跑到这里code都会被从新定位到sdram上部的一个位置,继续运行。

我找了一个2010.6版本的uboot大体看了一下启动代码,是通过判断_start和TEXT_BASE(链接地址)是否相等来确定是否需要relocate。如果uboot是从sdram启动则不需要relocate。

新版uboot在这方面还是有较大变动。

这样变动我考虑好处可能有二,一是不用考虑启动方式,all relocate code。二是不用考虑uboot链接地址,因为都要重新relocate。

uboot sdram空间规划图:


_main

从relocate_code回到_main中,接下来是main最后一段代码,如下:

[cpp]  view plain  copy
  在CODE上查看代码片 派生到我的代码片
  1. /* Set up final (full) environment */  
  2.   
  3.     bl  c_runtime_cpu_setup /* we still call old routine here */  
  4.   
  5.     ldr r0, =__bss_start    /* this is auto-relocated! */  
  6.     ldr r1, =__bss_end      /* this is auto-relocated! */  
  7.   
  8.     mov r2, #0x00000000     /* prepare zero to clear BSS */  
  9.   
  10. clbss_l:cmp r0, r1          /* while not at end of BSS */  
  11.     strlo   r2, [r0]        /* clear 32-bit BSS word */  
  12.     addlo   r0, r0, #4      /* move to next */  
  13.     blo clbss_l  
  14.   
  15.     bl coloured_LED_init  
  16.     bl red_led_on  
  17.   
  18.     /* call board_init_r(gd_t *id, ulong dest_addr) */  
  19.     mov     r0, r9                  /* gd_t */  
  20.     ldr r1, [r9, #GD_RELOCADDR] /* dest_addr */  
  21.     /* call board_init_r */  
  22.     ldr pc, =board_init_r   /* this is auto-relocated! */  
  23.   
  24.     /* we should not return here. */  
首先跳转到c_runtime_cpu_setup,如下:

[cpp]  view plain  copy
  在CODE上查看代码片 派生到我的代码片
  1. ENTRY(c_runtime_cpu_setup)  
  2. /* 
  3.  * If I-cache is enabled invalidate it 
  4.  */  
  5. #ifndef CONFIG_SYS_ICACHE_OFF  
  6.     mcr p15, 0, r0, c7, c5, 0   @ invalidate icache  
  7.     mcr     p15, 0, r0, c7, c10, 4  @ DSB   
  8.     mcr     p15, 0, r0, c7, c5, 4   @ ISB   
  9. #endif  
  10. /* 
  11.  * Move vector table 
  12.  */  
  13.     /* Set vector address in CP15 VBAR register */  
  14.     ldr     r0, =_start  
  15.     mcr     p15, 0, r0, c12, c0, 0  @Set VBAR  
  16.   
  17.     bx  lr    
  18.   
  19. ENDPROC(c_runtime_cpu_setup)  
如果icache是enable,则无效掉icache,保证从sdram中更新指令到cache中。

接着更新异常向量表首地址,因为code被relocate,所以异常向量表也被relocate。

从c_runtime_cpu_setup返回,下面一段汇编是将bss段清空。

接下来分别调用了coloured_LED_init以及red_led_on,很多开发板都会有led指示灯,这里可以实现上电指示灯亮,有调试作用。

最后r0赋值gd指针,r1赋值relocaddr,进入最后的board_init_r !

board_init_r

参数1是新gd指针,参数2是relocate addr,也就是新code地址

[cpp]  view plain  copy
  在CODE上查看代码片 派生到我的代码片
  1. gd->flags |= GD_FLG_RELOC;  /* tell others: relocation done */  
  2. bootstage_mark_name(BOOTSTAGE_ID_START_UBOOT_R, "board_init_r");  
  3.   
  4. monitor_flash_len = (ulong)&__rel_dyn_end - (ulong)_start;  
  5.   
  6. /* Enable caches */  
  7. enable_caches();  
  8.   
  9. debug("monitor flash len: %08lX\n", monitor_flash_len);  
  10. board_init();   /* Setup chipselects */  

置位gd->flags,标志已经relocate。monitor_flash_len这个变量作用没看懂。使能cache,最后board_init是需要实现的板级支持函数。做开发板的基本初始化。

[cpp]  view plain  copy
  在CODE上查看代码片 派生到我的代码片
  1. #ifdef CONFIG_CLOCKS  
  2.     set_cpu_clk_info(); /* Setup clock information */  
  3. #endif  
  4.   
  5.     serial_initialize();  
  6.   
  7.     debug("Now running in RAM - U-Boot at: %08lx\n", dest_addr);  
如果打开CONFIG_CLOCKS,set_cpu_clk_info也是需要实现的板级支持函数。

重点来说一些serial_initialize,对于最精简能正常启动的uboot,serial和ddr是必须正常工作的。

实现在drivers/serial/serial.c中,如下:

[cpp]  view plain  copy
  在CODE上查看代码片 派生到我的代码片
  1. void serial_initialize(void)  
  2. {  
  3.     mpc8xx_serial_initialize();  
  4.     ns16550_serial_initialize();  
  5.     pxa_serial_initialize();  
  6.     s3c24xx_serial_initialize();  
  7.     s5p_serial_initialize();  
  8.     mpc512x_serial_initialize();。。。。  
  9.    mxs_auart_initialize();  
  10.     arc_serial_initialize();  
  11.     vc0718_serial_initialize();  
  12.   
  13.     serial_assign(default_serial_console()->name);  
  14. }  
所有串口驱动都会实现一个xxxx_serial_initialize函数,并且添加到serial_initialize中,

xxxx_serial_initialize函数中是将所有需要的串口(用结构体struct serial_device表示,其中实现了基本的收 发 配置)调用serial_register注册,serial_register如下:

[cpp]  view plain  copy
  在CODE上查看代码片 派生到我的代码片
  1. void serial_register(struct serial_device *dev)  
  2. {  
  3. #ifdef CONFIG_NEEDS_MANUAL_RELOC  
  4.     if (dev->start)  
  5.         dev->start += gd->reloc_off;  
  6.     if (dev->stop)  
  7.         dev->stop += gd->reloc_off;  
  8.     if (dev->setbrg)  
  9.         dev->setbrg += gd->reloc_off;  
  10.     if (dev->getc)  
  11.         dev->getc += gd->reloc_off;  
  12.     if (dev->tstc)  
  13.         dev->tstc += gd->reloc_off;  
  14.     if (dev->putc)  
  15.         dev->putc += gd->reloc_off;  
  16.     if (dev->puts)  
  17.         dev->puts += gd->reloc_off;  
  18. #endif  
  19.       
  20.     dev->next = serial_devices;  
  21.     serial_devices = dev;  
  22. }  
就是将你的serial_dev加到全局链表serial_devices中。

可以想象,如果你有4个串口,则再你的串口驱动中分别定义4个serial device,并实现对应的收发配置,然后serial_register注册者4个串口。
回到serial-initialize,最后调用serial_assign,default_serial_console我们之前说过,就是你在串口驱动给出一个默认调试串口,serial_assign如下:
[cpp]  view plain  copy
  在CODE上查看代码片 派生到我的代码片
  1. int serial_assign(const char *name)  
  2. {  
  3.     struct serial_device *s;  
  4.   
  5.     for (s = serial_devices; s; s = s->next) {  
  6.         if (strcmp(s->name, name))  
  7.             continue;  
  8.         serial_current = s;  
  9.         return 0;  
  10.     }  
  11.   
  12.     return -EINVAL;  
  13. }  
serial_assign就是从serial_devices链表中找到指定的默认调试串口,条件就是串口的name,最后serial_current就是当前的默认串口了。

总结一下,serial_initialize工作是将所有serial驱动中所有串口注册到serial_devices链表中,然后找到指定的默认串口。
[cpp]  view plain  copy
  在CODE上查看代码片 派生到我的代码片
  1. /* The Malloc area is immediately below the monitor copy in DRAM */  
  2.     malloc_start = dest_addr - TOTAL_MALLOC_LEN;  
  3.     mem_malloc_init (malloc_start, TOTAL_MALLOC_LEN);  

根据咱们之前board_init_f中的分析,relocate addr之下的部分就是malloc的预留空间了。这里获取malloc首地址malloc_start.
[cpp]  view plain  copy
  在CODE上查看代码片 派生到我的代码片
  1. void mem_malloc_init(ulong start, ulong size)  
  2. {     
  3.     mem_malloc_start = start;  
  4.     mem_malloc_end = start + size;  
  5.     mem_malloc_brk = start;  
  6.   
  7.     memset((void *)mem_malloc_start, 0, size);  
  8.   
  9.     malloc_bin_reloc();  
  10. }  
mem_malloc_init中就是对malloc预留的空间初始化,起始地址,结束地址,清空。咱们已经relocate,malloc_bin_reloc中无操作了。

board_init_r接下来的代码是做一些外设的初始化,比如mmc flash eth,环境变量的设置,还有中断的使能等,这里需要说一下是关于串口的2个函数,stdio_init和console_init_r.
看stdio_init代码,我们只定义了serial,会调到serial_stdio_init,如下:
[cpp]  view plain  copy
  在CODE上查看代码片 派生到我的代码片
  1. void serial_stdio_init(void)  
  2. {  
  3.     struct stdio_dev dev;  
  4.     struct serial_device *s = serial_devices;  
  5.       
  6.     while (s) {  
  7.         memset(&dev, 0, sizeof(dev));  
  8.       
  9.         strcpy(dev.name, s->name);  
  10.         dev.flags = DEV_FLAGS_OUTPUT | DEV_FLAGS_INPUT;  
  11.       
  12.         dev.start = s->start;  
  13.         dev.stop = s->stop;  
  14.         dev.putc = s->putc;  
  15.         dev.puts = s->puts;  
  16.         dev.getc = s->getc;  
  17.         dev.tstc = s->tstc;  
  18.   
  19.         stdio_register(&dev);  
  20.   
  21.         s = s->next;  
  22.     }  
  23. }  
将serial_devices链表上所有serial device同样初始化一个stdio_dev,flag为output input,调用stdio-register,将stdio_dev添加到全局devs链表中。

可以想象,serial_stdio_init是在drivers/serial/serial.c中实现,uboot在这里是利用的内核分层思想,drivers/serial下是特定serial驱动,分别调用serial_register注册到serial_devices中,这可以说是通用的serial驱动层,

通用serial层调用serial-stdio-init将所有serial注册到stdio device中,这就是通用的stdio层。

看来分层思想还是非常重要的!

board_init_r中调用完stdio_init后又调用了console_init_r,如下
[cpp]  view plain  copy
  在CODE上查看代码片 派生到我的代码片
  1. int console_init_r(void)  
  2. {  
  3.     struct stdio_dev *inputdev = NULL, *outputdev = NULL;  
  4.     int i;  
  5.     struct list_head *list = stdio_get_list();  
  6.     struct list_head *pos;  
  7.     struct stdio_dev *dev;  
  8.   
  9.     /* Scan devices looking for input and output devices */  
  10.     list_for_each(pos, list) {  
  11.         dev = list_entry(pos, struct stdio_dev, list);  
  12.   
  13.         if ((dev->flags & DEV_FLAGS_INPUT) && (inputdev == NULL)) {  
  14.             inputdev = dev;  
  15.         }  
  16.         if ((dev->flags & DEV_FLAGS_OUTPUT) && (outputdev == NULL)) {  
  17.             outputdev = dev;  
  18.         }  
  19.         if(inputdev && outputdev)  
  20.             break;  
  21.     }  
  22.   
  23.    if (outputdev != NULL) {  
  24.         console_setfile(stdout, outputdev);  
  25.         console_setfile(stderr, outputdev);  
  26.     }  
  27.   
  28.     /* Initializes input console */  
  29.     if (inputdev != NULL) {  
  30.         console_setfile(stdin, inputdev);  
  31.     }  
  32.   
  33. #ifndef CONFIG_SYS_CONSOLE_INFO_QUIET  
  34.     stdio_print_current_devices();  
  35. #endif /* CONFIG_SYS_CONSOLE_INFO_QUIET */  
  36.   
  37.     /* Setting environment variables */  
  38.     for (i = 0; i < 3; i++) {  
  39.         setenv(stdio_names[i], stdio_devices[i]->name);  
  40.     }  
  41.   
  42.     gd->flags |= GD_FLG_DEVINIT;    /* device initialization completed */  
  43.   
  44.     return 0;  
  45. }  
console_init_r前半部分很清楚了,从devs.list链表中查找flag为output或者input的dev,如果只有serial之前注册了stdio_dev,则outputdev inputdev都是咱们注册的第一个serial。

之后调用console_setfile,如下:
[cpp]  view plain  copy
  在CODE上查看代码片 派生到我的代码片
  1. static int console_setfile(int file, struct stdio_dev * dev)  
  2. {  
  3.     int error = 0;  
  4.   
  5.     if (dev == NULL)  
  6.         return -1;  
  7.   
  8.     switch (file) {  
  9.     case stdin:  
  10.     case stdout:  
  11.     case stderr:  
  12.         /* Start new device */  
  13.         if (dev->start) {  
  14.             error = dev->start();  
  15.             /* If it's not started dont use it */  
  16.             if (error < 0)  
  17.                 break;  
  18.         }  
  19.   
  20.         /* Assign the new device (leaving the existing one started) */  
  21.         stdio_devices[file] = dev;  
  22.   
  23.         /* 
  24.          * Update monitor functions 
  25.          * (to use the console stuff by other applications) 
  26.          */  
  27.         switch (file) {  
  28.         case stdin:  
  29.             gd->jt[XF_getc] = dev->getc;  
  30.             gd->jt[XF_tstc] = dev->tstc;  
  31.             break;  
  32.         case stdout:  
  33.             gd->jt[XF_putc] = dev->putc;  
  34.             gd->jt[XF_puts] = dev->puts;  
  35.             gd->jt[XF_printf] = printf;  
  36.             break;  
  37.         }  
  38.   
  39.        break;  
  40.   
  41.     default:        /* Invalid file ID */  
  42.         error = -1;  
  43.     }  
  44.     return error;  
  45. }  
首先运行设备的start,就是特定serial实现的start函数。然后将stdio_device放到stdio_devices全局数组中,这个数组3个成员,stdout,stderr,stdin。最后还会在gd中设一下操作函数。

在console_init_r中最后会改变gd中flag状态,为GD_FLG_DEVINIT。表示设备初始化完成。

board_init_r进行完板级初始化后最后进入死循环,打印命令行,等待命令输入和解析。到这里uboot的启动过程就全部结束了!

上面用很大篇幅自下往上解释uboot下serial到console的架构,那来看一下实际使用时由printf到最后serial输出这个自上到下的流程吧。

首先来看printf,实现在common/console.c中如下:
[cpp]  view plain  copy
  在CODE上查看代码片 派生到我的代码片
  1. int printf(const char *fmt, ...)  
  2. {  
  3.     va_list args;  
  4.     uint i;  
  5.     char printbuffer[CONFIG_SYS_PBSIZE];  
  6.           
  7. #if !defined(CONFIG_SANDBOX) && !defined(CONFIG_PRE_CONSOLE_BUFFER)  
  8.     if (!gd->have_console)  
  9.         return 0;  
  10. #endif    
  11.       
  12.     va_start(args, fmt);  
  13.       
  14.     /* For this to work, printbuffer must be larger than 
  15.      * anything we ever want to print. 
  16.      */   
  17.     i = vscnprintf(printbuffer, sizeof(printbuffer), fmt, args);  
  18.     va_end(args);  
  19.       
  20.     /* Print the string */  
  21.     puts(printbuffer);  
  22.     return i;  
  23. }  
字符串的拼接跟一般printf实现一样,最后调用puts,puts实现也在console.c中,如下:
[cpp]  view plain  copy
  在CODE上查看代码片 派生到我的代码片
  1. void puts(const char *s)  
  2. {  
  3. #ifdef CONFIG_SANDBOX  
  4.     if (!gd) {  
  5.         os_puts(s);  
  6.         return;  
  7.     }  
  8. #endif  
  9.   
  10. #ifdef CONFIG_SILENT_CONSOLE  
  11.     if (gd->flags & GD_FLG_SILENT)  
  12.         return;  
  13. #endif  
  14.   
  15. #ifdef CONFIG_DISABLE_CONSOLE  
  16.     if (gd->flags & GD_FLG_DISABLE_CONSOLE)  
  17.         return;  
  18. #endif  
  19.   
  20.     if (!gd->have_console)  
  21.         return pre_console_puts(s);  
  22.   
  23.     if (gd->flags & GD_FLG_DEVINIT) {  
  24.         /* Send to the standard output */  
  25.         fputs(stdout, s);  
  26.     } else {  
  27.         /* Send directly to the handler */  
  28.         serial_puts(s);  
  29.     }  
  30. }  

gd->have_console在board_init_f的console_init_f中置位,flag的GD_FLG_DEVINIT则是在刚才board_init_r中console_init_r最后置位。

如果GD_FLG_DEVINIT没有置位,表明console没有注册,是在board_init_f之后,board_init_r执行完成之前,这时调用serial_puts,如下:

[cpp]  view plain  copy
  在CODE上查看代码片 派生到我的代码片
  1. void serial_puts(const char *s)  
  2. {  
  3.     get_current()->puts(s);  
  4. }         

直接调到serial.c中的函数,完全符合board_init_f中serial_init的配置,仅仅找到一个默认串口来使用,其他串口暂且不管。
如果GD_FLG_DEVINIT置位,表明console注册完成。调用fputs,如下:

[cpp]  view plain  copy
  在CODE上查看代码片 派生到我的代码片
  1. void fputs(int file, const char *s)  
  2. {     
  3.     if (file < MAX_FILES)  
  4.         console_puts(file, s);  
  5. }     
  6.   
  7. static inline void console_puts(int file, const char *s)  
  8. {  
  9.     stdio_devices[file]->puts(s);  
  10. }  
fputs调console_puts从全局stdio_devices中找到对应stdout对应的成员stdio_device,调用puts,最终也是会调用到特定serial的puts函数。


分析后总结一下:

可以看出,对于serial,uboot实现了一个2级初始化:

stage 1,仅初始化default console serial,printf到puts后会直接调用特定串口的puts函数,实现打印

stage 2,将所有serial注册为stdio_device,并挑出指定调试串口作为stdio_devices的stdout stdin stderr。printf到puts后再到全局stdio_devices中找到对应stdio_device,调用stdio-device的puts,最终调用特定serial的puts,实现打印。

区分这2个stage,是利用gd的flag,GD_FLG_DEVINIT。

原文出处:

http://blog.csdn.net/skyflying2012/article/details/25804209


  • 0
    点赞
  • 7
    收藏
    觉得还不错? 一键收藏
  • 0
    评论
评论
添加红包

请填写红包祝福语或标题

红包个数最小为10个

红包金额最低5元

当前余额3.43前往充值 >
需支付:10.00
成就一亿技术人!
领取后你会自动成为博主和红包主的粉丝 规则
hope_wisdom
发出的红包
实付
使用余额支付
点击重新获取
扫码支付
钱包余额 0

抵扣说明:

1.余额是钱包充值的虚拟货币,按照1:1的比例进行支付金额的抵扣。
2.余额无法直接购买下载,可以购买VIP、付费专栏及课程。

余额充值