


02 【Axios的概述和基本使用】
1.Axios 是什么?
- 前端最流行的
Ajax请求库 - react/vue 官方都推荐使用 axios 发ajax 请求
- 文档: https://github.com/axios/axios
2.Axios 特点
- 基于 xhr + promise 的异步 ajax请求库
- 浏览器端/node 端都可以使用
- 支持请求/响应拦截器
- 支持请求取消
- 请求/响应数据转换
- 批量发送多个请求
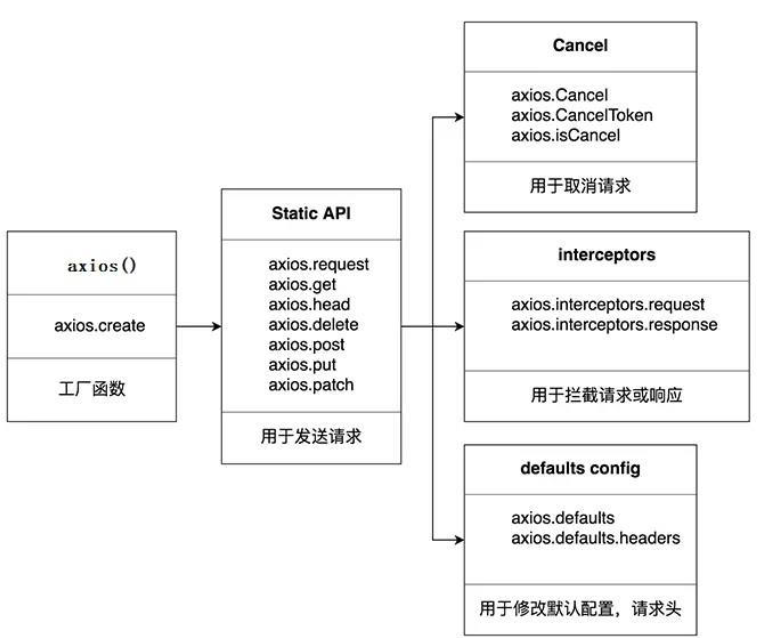
3.Axios 常用语法
axios(config): 通用/最本质的发任意类型请求的方式
axios(url[, config]): 可以只指定url 发get 请求
axios.request(config): 等同于axios(config)
axios.get(url[, config]): 发get 请求
axios.delete(url[, config]): 发delete 请求
axios.post(url[, data, config]): 发post 请求
axios.put(url[, data, config]): 发put 请求
axios.defaults.xxx: 请求的默认全局配置(method\baseURL\params\timeout…)
axios.interceptors.request.use(): 添加请求拦截器
axios.interceptors.response.use(): 添加响应拦截器
axios.create([config]): 创建一个新的axios(它没有下面的功能)
axios.Cancel(): 用于创建取消请求的错误对象
axios.CancelToken(): 用于创建取消请求的 token 对象
axios.isCancel(): 是否是一个取消请求的错误
axios.all(promises): 用于批量执行多个异步请求
axios.spread(): 用来指定接收所有成功数据的回调函数的方法
4.使用
4.1 配置对象常用的配置项
{
  // 路径url
  url: '/user',

  // 请求方法,默认get
  method: 'get',

  //基础url,最终请求的url是 baseURL+url拼接,所以再全局设置默认,可以使得发送请求时的url变得简洁
  baseURL: 'https://some-domain.com/api/',

  //设置请求头
  headers: {'X-Requested-With': 'XMLHttpRequest'},

  //设置请求url的query参数,可以使得url简洁。
  //比如url是https://some-domain.com/api/user  然后params如下设置,那么最终的url是:
  //https://some-domain.com/api/user?ID=12345&name=Jack
  params: {
    ID: 12345,
    name:"Jack"
  },


 //设置请求体
  data: {
    firstName: 'Fred'
  },

  //设置请求的另外一种格式,不过这个是直接设置字符串的
  data: 'Country=Brasil&City=Belo Horizonte',

 //请求超时,单位毫秒,默认0,不超时。
  timeout: 1000,

  //响应数据类型,默认json
  responseType: 'json',

  //响应数据的编码规则,默认utf-8
  responseEncoding: 'utf8',

  //响应体的最大长度
  maxContentLength: 2000,

  // 请求体的最大长度
  maxBodyLength: 2000,

  //设置响应状态码为多少时是成功,调用resolve,否则调用reject失败
  //默认是大于等于200,小于300
  validateStatus: function (status) {
    return status >= 200 && status < 300;
  }
代码
<button id="btn1">发送get请求</button> <br><br>
<button id="btn2">发送post请求</button><br><br>
<button id="btn3">发送put请求</button><br><br>
<button id="btn4">发送delete请求</button>
<hr>
<div>其他发送请求的api:</div><br><br>
<button id="btn5">发送get请求1</button> <br><br>
<button id="btn6">发送post请求1</button><br><br>
<button id="btn7">发送put请求1</button><br><br>
<button id="btn8">发送delete请求1</button>
<script src="https://cdn.jsdelivr.net/npm/axios/dist/axios.min.js"></script>
<script>
//发送get
document.getElementById("btn1").onclick = function(){
axios({
method:"GET",
url:"http://localhost:3000/posts/1"
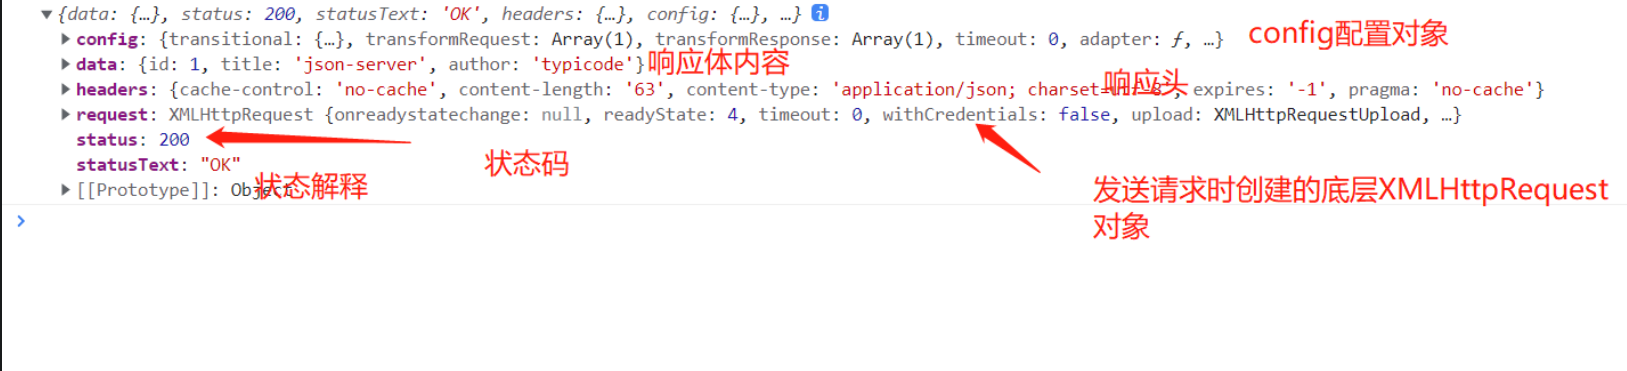
}).then(response=>{
console.log(response);
})
};
//发送post
document.getElementById("btn2").onclick = function(){
axios({
method:"POST",
url:"http://localhost:3000/posts",
data:{
title:"axios学习",
author:"Yehaocong"
}
}).then(response=>{
console.log(response);
})
};
//发送put
document.getElementById("btn3").onclick = function(){
axios({
method:"PUT",
url:"http://localhost:3000/posts/2",
data:{
title:"axios学习",
author:"Liaoxiaoyan"
}
}).then(response=>{
console.log(response);
})
};
document.getElementById("btn4").onclick = function(){
axios({
method:"DELETE",
url:"http://localhost:3000/posts/2",
}).then(response=>{
console.log(response);
})
};
//其他发送请求的api
document.getElementById("btn5").onclick = function(){
//发送get,使用get,第一个参数时url,第二个参数时config配置对象
axios.get("http://localhost:3000/posts/1")
.then(response=>{
console.log(response);
})
};
//发送post
document.getElementById("btn6").onclick = function(){
//发送post请求,第一个参数时url,第二个参数时请求体,第三个参数时config配置对象
axios.post("http://localhost:3000/posts",
{title:"axios学习2",
author:"Yehaocong2"})
.then(response=>{
console.log(response);
})
};
//发送put,
document.getElementById("btn7").onclick = function(){
//发送put,接收三个参数,url 请求体 、 config配置对象
axios.put("http://localhost:3000/posts/2",{title:"axios学习",
author:"Liaoxiaoyan"})
.then(response=>{
console.log(response);
})
};
document.getElementById("btn8").onclick = function(){
//发送delete请求,接收2个参数, url config配置对象
axios.delete("http://localhost:3000/posts/3")
.then(response=>{
console.log(response);
})
};
4.2 默认配置
可以设置全局默认配置,是为了避免多种重复配置在不同请求中重复,比如baseURL、timeout等,这里设置baseURL。
        axios.defaults.baseURL="http://localhost:3000";

        //因为上面配置了baseURL,所以我们之后的请求只需要配置url不用像之前那样的全路径
        axios.get("/posts/1")
       .then(response=>{
           console.log(response);
       })
5.创建一个新的axios对象
根据指定配置创建一个新的 axios, 也就是每个新 axios 都有自己的配置
新 axios 只是没有取消请求和批量发请求的方法, 其它所有语法都是一致的
为什么要设计这个语法?
(1) 需求: 项目中有部分接口需要的配置与另一部分接口需要的配置不太一样, 如何处理(比如有多个baseURL需要指定)
(2) 解决: 创建2 个新axios, 每个都有自己特有的配置, 分别应用到不同要求的接口请求中
const instance = axios.create({ // instance是函数类型
    baseURL: 'http://localhost:3000'
})

// 使用instance发Ajax请求
instance({
    url: '/posts'
})

instance.get('/posts')
6.拦截器
请求拦截器(在发送请求前,使用函数对请求的参数和内容进行处理和检测,若请求有问题可直接进行拦截->取消,后进先执行=则后面的请求拦截器先执行)
响应拦截器(对响应的结果预处理,先进先执行=前面的响应拦截器先执行)
1)请求拦截器:
① 在真正发送请求前执行的回调函数
② 可以对请求进行检查或配置进行特定处理
③ 失败的回调函数,传递的默认是error
④ 成功的回调函数,传递的默认是config(也必须是)
2)响应拦截器
① 在请求得到响应后执行的回调函数
② 可以对响应数据进行特定处理
③ 成功的回调函数,传递的默认是response
④ 失败的回调函数,传递的默认是error
3)请求转换器:对请求头和请求体数据进行特定处理的函数
响应转换器:将响应体json字符串解析为js对象或数组的函数
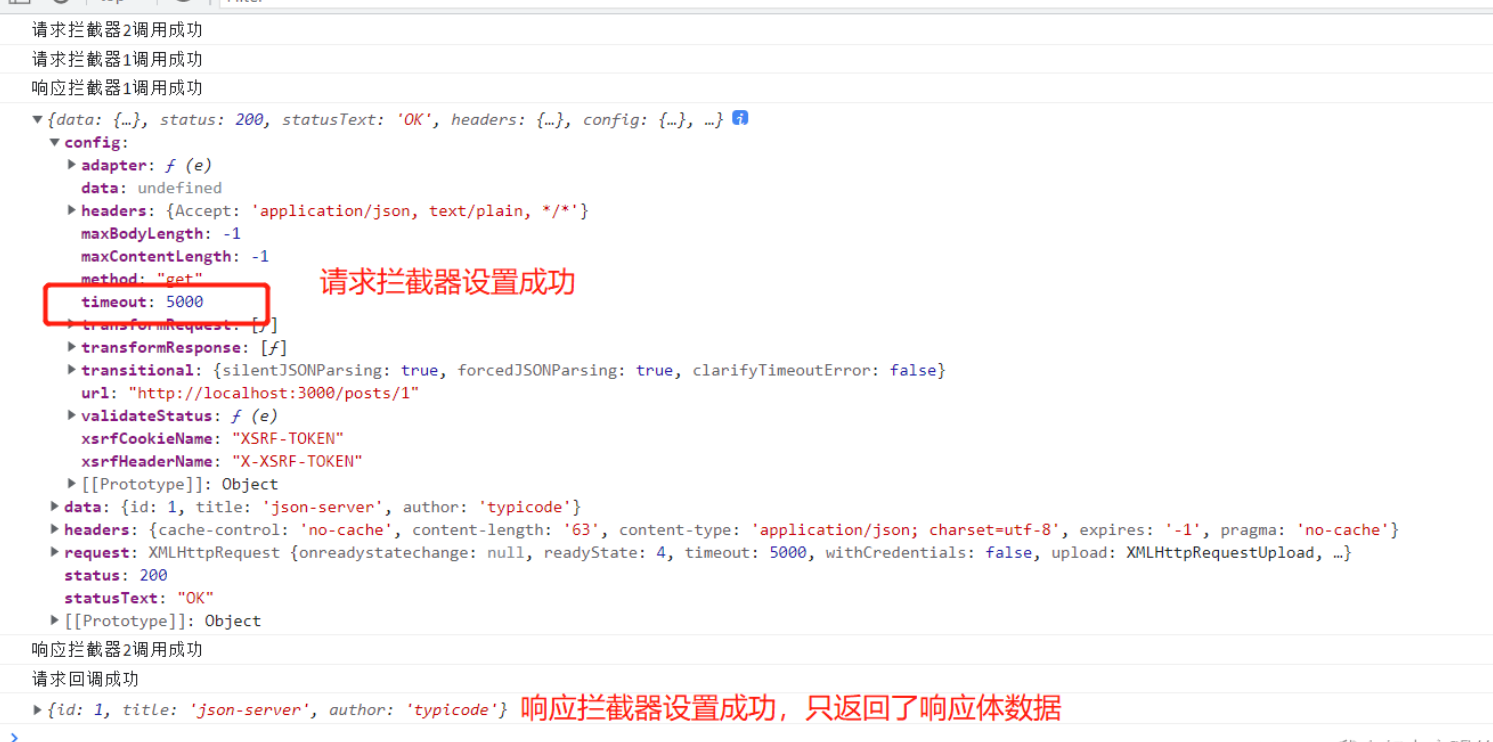
- 说明: 调用axios()并不是立即发送ajax 请求, 而是需要经历一个较长的流程
- 流程: 请求拦截器2 => 请求拦截器1 => 发ajax 请求 => 响应拦截器1 => 响应拦截器2 => 请求的回调
- 注意: 此流程是通过 promise 串连起来的, 请求拦截器传递的是config, 响应拦截器传递的是response
代码
script>
      //设置一个请求拦截器,在请求拦截器中可以对请求参数进行修改
      //config:配置对象
      axios.interceptors.request.use(
        function (config) {
          console.log("请求拦截器 成功 1号");
          // config.headers.test = "I am only a header!";
          //修改 config 中的参数
          config.params = { a: 100 };
          return config;
        },
        error => {
          console.log("请求拦截器 失败 1号");
          return Promise.reject(error);
        }
      );

      axios.interceptors.request.use(
        function (config) {
          config.timeout = 5000;
          console.log("请求拦截器 成功 2号");
          // config.headers.test = "I am only a header!";
          //修改 config 中的参数
          config.timeout = 2000;
          return config;
        },
        error => {
          console.log("请求拦截器 失败 2号");
          return Promise.reject(error);
        }
      );

      //设置一个响应拦截器,可以对响应结果做一些处理
      axios.interceptors.response.use(
        function (response) {
          console.log("响应拦截器 成功 1号");
            //返回到请求回调时,只要data数据
             return response.data;
        },
        function (error) {
          console.log("响应拦截器 失败 1号");
          return Promise.reject(error);
        }
      );

      //设置一个响应拦截器
      axios.interceptors.response.use(
        function (response) {
          console.log("响应拦截器 成功 2号");
          return response;
        },
        function (error) {
          console.log("响应拦截器 失败 2号");
          return Promise.reject(error);
        }
      );

      //发送请求
      axios({
        method: "GET",
        url: "http://localhost:3000/posts",
      })
        .then((response) => {
          console.log("自定义回调处理成功的结果");
          //console.log(response);
        })
        .catch((reason) => {
          console.log(reason);
        });
    </script>
7.取消请求
0.22版本之前可以使用,0.22开始被废弃
  <body>
    <div class="container">
      <h1 class="page-header">axios取消请求</h1>
      <button class="btn btn-primary">发送请求</button>
      <button class="btn btn-warning">取消请求</button>
    </div>
  </body>
  <script>
    //获取按钮
    const btns = document.querySelectorAll("button");
    //2.声明一个全局变量
    let cancel = null;
    //发送请求
    btns[0].onclick = () => {
      //检测上一次请求是否已经完成
      if (cancel !== null) {
        //则代表上一次请求还未取消,故直接取消上一次请求
        cancel();
      }
      axios({
        method: "GET",
        url: "http://localhost:3000/posts",
        //1.添加配置对象的属性
        cancelToken: new axios.CancelToken((c) => {
          //3.将c的值赋值给cancel
          cancel = c;
        }),
      }).then((response) => {
        console.log(response);
        //当请求执行完后 将cancel进行初始化设置
        cancel = null;
      });
    };

    //取消请求
    btns[1].onclick = () => {
      cancel();
    };
  </script>
0.22新方法
<script src="https://cdn.bootcdn.net/ajax/libs/axios/0.27.2/axios.min.js"></script>
 let btn = document.querySelectorAll('button');
const controller = new AbortController();
      btn[0].onclick = function () {
          axios( {
              url:'https://api.uomg.com/api/get.kg?songurl=https://node.kg.qq.com/play?s=YaCv8EYfJunVWYcH',
              signal: controller.signal
              }).then(function(response) {
                  console.log(response);
              });
      }

      btn[1].onclick = function () {
        controller.abort()
      }
8.在vue中封装axios
requests.js
//对于axios进行二次封装
import axios from 'axios';
//获取仓库:存储数据
import store from '@/store';

//axios.create方法执行,其实返回一个axios和request一样的
let requests = axios.create({
  //基础路径,发请求URL携带api【发现:真实服务器接口都携带/api】
  baseURL: '/api',
  //超时的设置
  timeout: 5000,
});

//请求拦截器:将来项目中【N个请求】,只要发请求,会触发请求拦截器!!!
requests.interceptors.request.use(config => {
  //请求拦截器:请求头【header】,请求头能否给服务器携带参数
  //请求拦截器:其实项目中还有一个重要的作用,给服务器携带请求们的公共的参数
  if (store.state.detail.nanoid_token) config.headers.userTempId = store.state.detail.nanoid_token;
  if (store.state.user.token) config.headers.token = store.state.user.token;

  return config;
});

//响应拦截器:请求数据返回会执行
requests.interceptors.response.use(
  res => {
    //res:实质就是项目中发请求、服务器返回的数据
    return res.data;
  },
  err => {
    //温馨提示:某一天发请求,请求失败,请求失败的信息打印出来
    alert(err.message);
    //终止Promise链
    return new Promise();
  }
);

//最后需要暴露:暴露的是添加新的功能的axios,即为requests
export default requests;
使用
import requests from '@/api/requests';
//注册的接口
export const reqRegister = data =>
  requests({ url: `/user/passport/register`, method: 'post', data });


 4492
4492

 被折叠的 条评论
为什么被折叠?
被折叠的 条评论
为什么被折叠?
 到【灌水乐园】发言


