


最近服务器安全检测,发现Linux服务器上安装启动的nginx有漏洞,排查发现nginx版本比较低,需要升级nginx。
一 升级前
nginx安装路径:/usr/local/nginx
nginx配置路径:/usr/local/nginx/conf
nginx配置域名SSL证书路径:/usr/local/nginx/cert
<span style="color:rgba(0, 0, 0, 0.9)"><span style="color:rgba(0, 0, 0, 0.9)"><code>    server {</code><code>        <span style="color:#ca7d37">listen</span>       <span style="color:#0e9ce5">80</span>;</code><code>        <span style="color:#ca7d37">listen</span>       <span style="color:#0e9ce5">443</span> ssl;</code><code>        server_name  app.xxx.com;</code>
<code>        ssl_certificate     /usr/<span style="color:#ca7d37">local</span>/nginx/cert/server.pem;</code><code>        ssl_certificate_key  /usr/<span style="color:#ca7d37">local</span>/nginx/cert/server.key;</code><code>        <span style="color:#ca7d37">//</span> ... 省略...</code><code>     }    </code></span></span>
1、备份
<span style="color:rgba(0, 0, 0, 0.9)"><span style="color:rgba(0, 0, 0, 0.9)"><code><span style="color:#ca7d37">cd</span> /usr/local/</code><code><span style="color:#afafaf"><em>#将nginx打包成tar</em></span></code><code>tar -cvf nginx.tar nginx/</code><code><span style="color:#afafaf"><em>#或者 将nginx文件夹压缩成nginx.tar.gz</em></span></code><code>tar -zcvf nginx.tar.gz nginx/</code></span></span>2、停止nginx
<span style="color:rgba(0, 0, 0, 0.9)"><span style="color:rgba(0, 0, 0, 0.9)"><code><span style="color:#ca7d37">cd</span> /usr/local/nginx/sbin</code><code>./nginx -s stop</code></span></span>或者使用kill -9 nginx的pid(多个进程)
<span style="color:rgba(0, 0, 0, 0.9)"><span style="color:rgba(0, 0, 0, 0.9)"><code><span style="color:#afafaf"><em>#查看nginx所有的进程</em></span></code><code>ps -ef|<span style="color:#ca7d37">grep</span> nginx</code><code><span style="color:#afafaf"><em>#根据上面得到的pid,杀掉进程</em></span></code><code><span style="color:#ca7d37">kill</span> -<span style="color:#0e9ce5">9</span> pid</code></span></span>或者使用pkill
<span style="color:rgba(0, 0, 0, 0.9)"><span style="color:rgba(0, 0, 0, 0.9)"><code><span style="color:#afafaf"><em>#终止所有与 nginx 相关的进程</em></span></code><code><span style="color:#0e9ce5">pkill</span> nginx</code></span></span>3、显示 Nginx 的版本信息以及在编译 Nginx 时所使用的配置参数
<span style="color:rgba(0, 0, 0, 0.9)"><span style="color:rgba(0, 0, 0, 0.9)"><code><span style="color:#ca7d37">cd</span> /usr/local/nginx/sbin</code><code>./nginx -V</code></span></span>执行结果如下:

找到”configure arguments:“后面的内容并记录下来,后续升级编译新版本的nginx时需要。
<span style="color:rgba(0, 0, 0, 0.9)"><span style="color:rgba(0, 0, 0, 0.9)"><code>--prefix=<span style="color:#ca7d37">/usr/</span>local/nginx/ --<span style="color:#ca7d37">with</span>-http_stub_status_module --<span style="color:#ca7d37">with</span>-http_ssl_module --<span style="color:#ca7d37">with</span>-openssl=<span style="color:#ca7d37">/root/</span>openssl-<span style="color:#0e9ce5">1.0</span>.2k</code></span></span>4、重命名
<span style="color:rgba(0, 0, 0, 0.9)"><span style="color:rgba(0, 0, 0, 0.9)"><code><span style="color:#afafaf"><em>#再次备份</em></span></code><code><span style="color:#ca7d37">mv</span> nginx/ nginx_old</code></span></span>二 升级
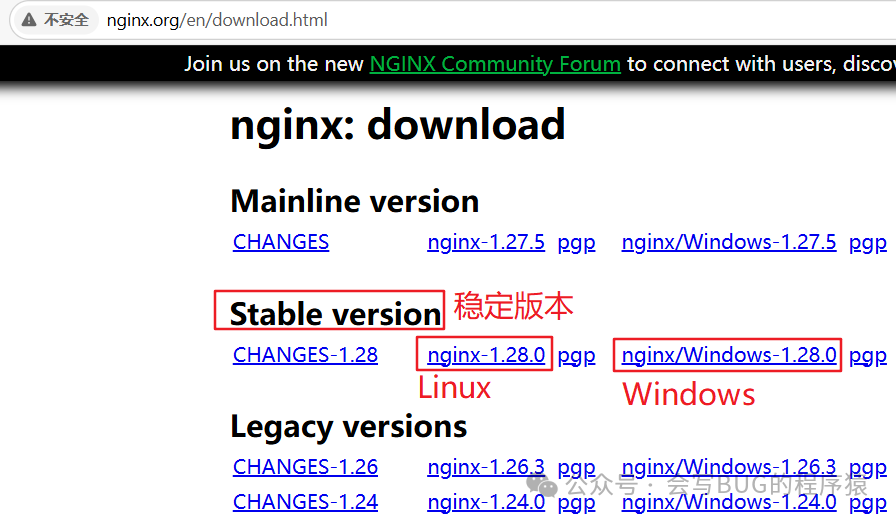
1、下载nginx-1.28.0
下载链接:https://nginx.org/en/download.html
下载后,上传到服务器,或者在Linux服务器上使用wget命令下载
<span style="color:rgba(0, 0, 0, 0.9)"><span style="color:rgba(0, 0, 0, 0.9)"><code><span style="color:#0e9ce5">wget</span> https://nginx.org/download/nginx-<span style="color:#0e9ce5">1</span>.<span style="color:#0e9ce5">28</span>.<span style="color:#0e9ce5">0</span>.tar.gz</code></span></span>或者使用curl下载
<span style="color:rgba(0, 0, 0, 0.9)"><span style="color:rgba(0, 0, 0, 0.9)"><code><span style="color:#0e9ce5">curl</span> -O https://nginx.org/download/nginx-<span style="color:#0e9ce5">1</span>.<span style="color:#0e9ce5">28</span>.<span style="color:#0e9ce5">0</span>.tar.gz</code></span></span>2、上传并解压
比如,这里将nginx-1.28.0.tar.gz上传到/root/下面
<span style="color:rgba(0, 0, 0, 0.9)"><span style="color:rgba(0, 0, 0, 0.9)"><code><span style="color:#0e9ce5">cd</span> /root/</code><code><span style="color:#afafaf"><em>#解压</em></span></code><code><span style="color:#0e9ce5">tar</span> -zxvf nginx-<span style="color:#0e9ce5">1</span>.<span style="color:#0e9ce5">28</span>.<span style="color:#0e9ce5">0</span>.tar.gz</code></span></span>解压后,会在/root目录下产生一个nginx-1.28.0的目录。
3、预编译、编译、安装
<span style="color:rgba(0, 0, 0, 0.9)"><span style="color:rgba(0, 0, 0, 0.9)"><code><span style="color:#ca7d37">cd</span> /root/nginx-1.28.0</code><code><span style="color:#afafaf"><em>#根据”升级前“中第3步中记录的内容编译</em></span></code><code>./configure --prefix=/usr/local/nginx/ --with-http_stub_status_module --with-http_ssl_module --with-openssl=/root/openssl-1.0.2k</code></span></span>configure命令是配置Nginx源码编译安装的脚本。这条命令中,指定了几个选项来定制Nginx的安装过程:
--prefix=/usr/local/nginx/:指定Nginx安装目录为
/usr/local/nginx/。--with-http_stub_status_module:启用stub status模块,该模块提供了一个页面显示Nginx当前的状态信息,如活跃连接数等。
--with-http_ssl_module:启用SSL/TLS支持,这对于提供HTTPS服务是必需的。
--with-openssl=/root/openssl-1.0.2k:指定OpenSSL库的路径。在这个例子中,使用的是OpenSSL版本1.0.2k,它位于
/root/目录下。
<span style="color:rgba(0, 0, 0, 0.9)"><span style="color:rgba(0, 0, 0, 0.9)"><code><span style="color:#afafaf"><em>#编译和安装</em></span></code><code><span style="color:#0e9ce5">make</span> && make install</code></span></span>4、拷贝之前的配置文件、证书到新的nginx
<span style="color:rgba(0, 0, 0, 0.9)"><span style="color:rgba(0, 0, 0, 0.9)"><code><span style="color:#afafaf"><em>#cp拷贝配置文件,-r递归,-f强制覆盖</em></span></code><code><span style="color:#ca7d37">cp</span> -r -f /usr/local/nginx_old/conf/* /usr/local/nginx/conf/</code></span></span>如果提示是否覆盖,输入:y,进行覆盖。
<span style="color:rgba(0, 0, 0, 0.9)"><span style="color:rgba(0, 0, 0, 0.9)"><code><span style="color:#afafaf"><em>#创建目录cert</em></span></code><code><span style="color:#ca7d37">mkdir</span> -p /usr/local/nginx/cert</code><code><span style="color:#afafaf"><em>#cp拷贝域名ssl证书文件到新编译安装好的nginx中</em></span></code><code><span style="color:#ca7d37">cp</span> -r -f /usr/local/nginx_old/cert/* /usr/local/nginx/cert/</code></span></span>5、启动nginx
<span style="color:rgba(0, 0, 0, 0.9)"><span style="color:rgba(0, 0, 0, 0.9)"><code><span style="color:#ca7d37">cd</span> /usr/local/nginx/sbin</code><code>./nginx</code></span></span>6、查看是否启动
<span style="color:rgba(0, 0, 0, 0.9)"><span style="color:rgba(0, 0, 0, 0.9)"><code><span style="color:#0e9ce5">ps</span> -ef|grep nginx</code></span></span>
7、验证版本
<span style="color:rgba(0, 0, 0, 0.9)"><span style="color:rgba(0, 0, 0, 0.9)"><code><span style="color:#ca7d37">cd</span> /usr/local/nginx/sbin</code><code>./nginx -v</code></span></span>


 2909
2909

 被折叠的 条评论
为什么被折叠?
被折叠的 条评论
为什么被折叠?
 到【灌水乐园】发言


