


★开头还是介绍一下群,如果感兴趣PolarDB ,MongoDB ,MySQL ,PostgreSQL ,Redis, OceanBase, Sql Server等有问题,有需求都可以加群群内有各大数据库行业大咖,可以解决你的问题。加群请联系 liuaustin3 ,(共2790人左右 1 + 2 + 3 + 4 +5 + 6 + 7 + 8 +9)(1 2 3 4 5 6 7群均已爆满,开8群260+ 9群)
OceanBase的单机版已经开放给一些老师测试了,有幸被邀请进行单机测试,这次可以测试的是商业版,我已经好久没有尝试一个商业版线下的数据库试用了,上一次还是SQL SERVER 2019 的180天版本。

目前测试提供4.2.5版本,LINUX 7 ,LINUX 8 以及ARM环境下的商用测试版本。在操作前我们有几个需要了解的地方
1 部署方式可以选择单机或者集群 (可以理解为MySQL的主从,或者Oracle的 DG)
2 单机部署可以使用最大1T内的内存,CPU使用多核心的CPU是没有问题,官方建议生产32核心或16核心都可以。
3 支持多种国产操作系统,支持多种硬件系统,支持X86或ARM架构的系统
4 最低的安装要求,2核心的CPU 以及最低不要低于6G的内存,磁盘空间要求20GB
5 这里OB提供了两种版本,小规格/小规模部署安装包与 大规格环境/单机集群组部署安装包,这里请大家注意安装包的区别。
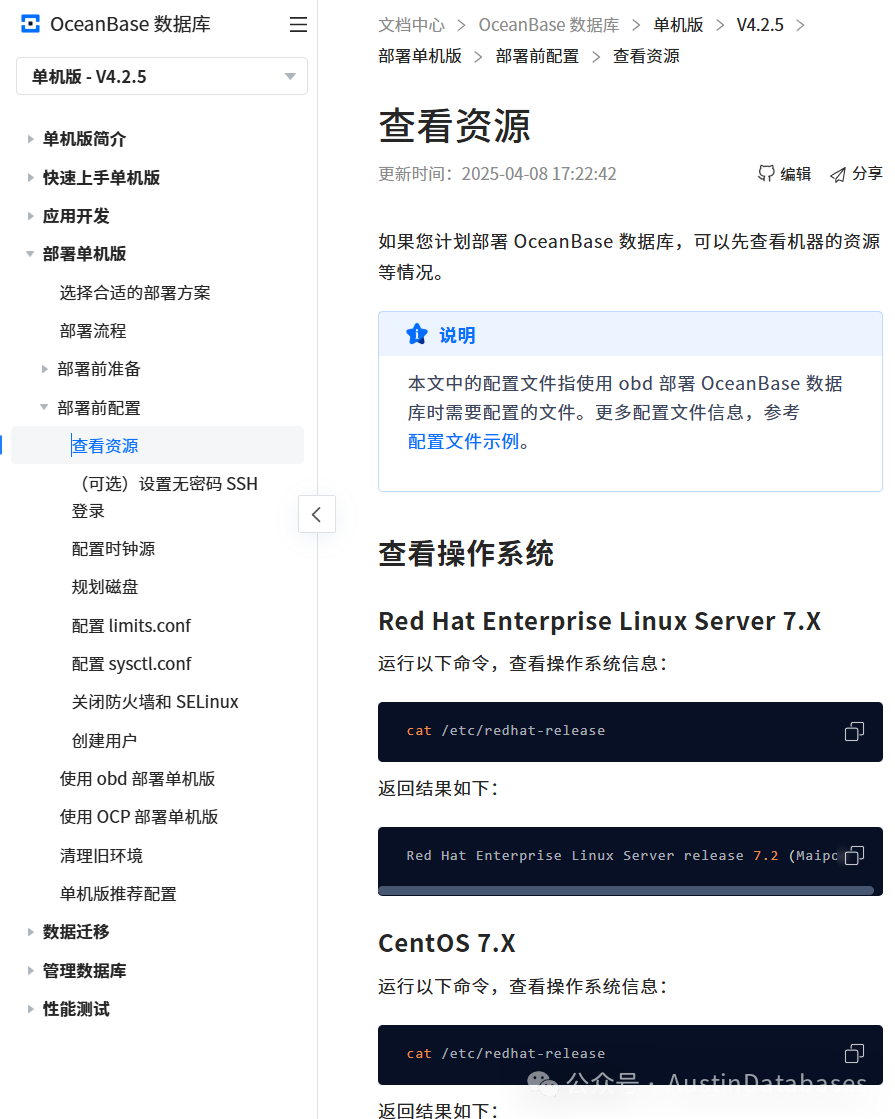
在开始安装前,首先点赞OB的文档,国产数据库文档做的好的,在我心里有两家,一家就是OB,OceanBase的文档做的是非常好,各种详细的信息都可以在文档中找到,有了文档基本上大部分需要操作的细节都可以找到。
商用的服务器,正式安装单机的OB产品,在服务器BIOS可以调整如下的一些配置项 如关闭 Cstate Pstate EIST Power saving等部分的配置,当然如果在生产系统中,这些节能的设置也是要关闭的,这并不是OB自己的独特要求,只是OB文档写的过于详细,在一些其他的产品你很少能看到这些细致的环节。
如:BIOS需要进行配置如下的信息如:
Automatic Power on After Power Loss: Always on

Intel Virtualization Technology:开启

Hyper-threading:开启

Hardware prefetcher:开启

VT-d:开启

SR-IOV:开启

Turbo Mode:开启

Energy performance:开启最大 performance
在要安装的系统中需要针对如下的一些配置文件进行配置来释放整体硬件可以提供的能力。
sudo tee -a /etc/sysctl.conf > /dev/null <<EOF
vm.max_map_count = 655360
vm.min_free_kbytes = 2097152
vm.overcommit_memory = 0
fs.file-max = 6573688
vm.swappiness = 0
EOF

sysctl -p

sudo tee -a /etc/security/limits.conf > /dev/null <<EOF
* soft nofile 655300
* hard nofile 655300
* soft nproc  655300
* hard nproc  655300
* soft core unlimited
* hard core unlimited
* soft stack unlimited
* hard stack unlimited
EOF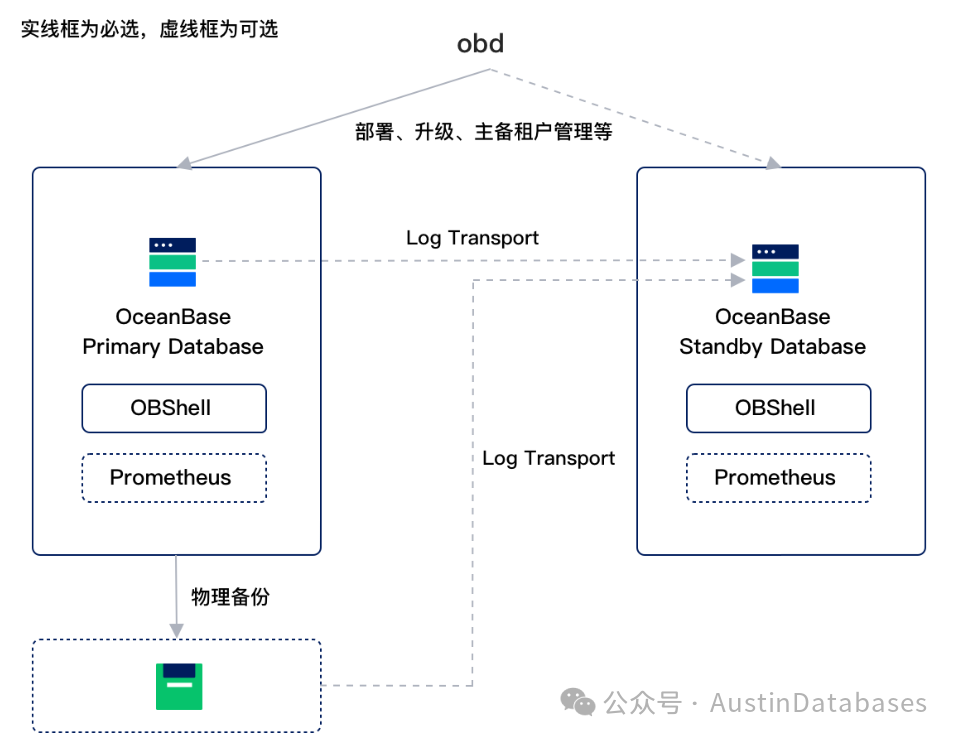
我看着文档马上就可以装起来, 先下载 oceanbase-standalone-all-in-one.tar.gz
[root@OB4 oceanbase-standalone-all-in-one]# ll -ah
total 16K
drwxr-xr-x  6 root root   88 Apr  2 04:28 .
dr-xr-x---. 3 root root 4.0K Apr  9 00:58 ..
drwxr-xr-x  2 root root   87 Apr  2 04:27 bin
drwxr-xr-x  4 root root   28 Apr  2 04:28 obclient
drwxr-xr-x  4 root root   28 Apr  2 04:27 obd
-rw-r--r--  1 root root  666 Apr  2 04:27 README.md
drwxr-xr-x  2 root root 4.0K Apr  2 04:28 rpms
-rw-r--r--  1 root root   27 Apr  2 04:27 VERSION
[root@OB4 oceanbase-standalone-all-in-one]#
安装中需要做如下的一些事情
1 关闭防火墙
# 停止 firewalld 服务
sudo systemctl stop firewalld

# 禁用 firewalld 服务,使其在开机时不启动
sudo systemctl disable firewalld
2 关闭selinux (CENOS REDHAT ROCKY LINUX) 3 安装并设置NTP服务 4 建立admin账号
下面我将通过obd方式对单机版的OB进行安装,根据要求我们首先要安装obd工具与设置我们的数据库可执行文件的变量。
[admin@OB4 oceanbase-standalone-all-in-one]$  sudo bash bin/install_obd.sh
install obd as root
No previous obd installed, try install..., wait a moment
name: grafana
version: 7.5.17
release:1
arch: x86_64
md5: 1bf1f338d3a3445d8599dc6902e7aeed4de4e0d6
size: 177766248
add /home/admin/oceanbase-standalone-all-in-one/rpms/grafana-7.5.17-1.el8.x86_64.rpm to local mirror
name: obagent
version: 4.2.2
release:100000042024011120.el8
arch: x86_64
md5: bf152b880953c2043ddaf80d6180cf22bb8c8ac2
size: 72919140
add /home/admin/oceanbase-standalone-all-in-one/rpms/obagent-4.2.2-100000042024011120.el8.x86_64.rpm to local mirror
name: ob-deploy
version: 3.2.0
release:2.el8
arch: x86_64
md5: 529076c3e548f690ea6cb4e50cd77b2dfc4bfc6d
size: 178634999
add /home/admin/oceanbase-standalone-all-in-one/rpms/ob-deploy-3.2.0-2.el8.x86_64.rpm to local mirror
name: oceanbase-diagnostic-tool
version: 3.2.0
release:52025031411.el8
arch: x86_64
md5: e7aeaa17222aa079c8d9e0c74a73e1d7f9c5501b
size: 71147006
add /home/admin/oceanbase-standalone-all-in-one/rpms/oceanbase-diagnostic-tool-3.2.0-52025031411.el8.x86_64.rpm to local mirror
name: oceanbase-standalone
version: 4.2.5.3
release:103000152025033110.el8
arch: x86_64
md5: 305669b55281773f5c53ff4e44ff9f7bed9f7bc0
size: 1813828757
add /home/admin/oceanbase-standalone-all-in-one/rpms/oceanbase-standalone-4.2.5.3-103000152025033110.el8.x86_64.rpm to local mirror
name: oceanbase-standalone-libs
version: 4.2.5.3
release:103000152025033110.el8
arch: x86_64
md5: 84315910ce45d91ed361867215964369044185c0
size: 7848
add /home/admin/oceanbase-standalone-all-in-one/rpms/oceanbase-standalone-libs-4.2.5.3-103000152025033110.el8.x86_64.rpm to local mirror
name: prometheus
version: 2.37.1
release:10000102022110211.el8
arch: x86_64
md5: e4f8a3e784512fca75bf1b3464247d1f31542cb9
size: 211224073
add /home/admin/oceanbase-standalone-all-in-one/rpms/prometheus-2.37.1-10000102022110211.el8.x86_64.rpm to local mirror
Trace ID: f83ade28-1505-11f0-8700-000c292fc016
If you want to view detailed obd logs, please run: obd display-trace f83ade28-1505-11f0-8700-000c292fc016
Disable remote ok
Trace ID: fc0fcc0c-1505-11f0-ab3b-000c292fc016
If you want to view detailed obd logs, please run: obd display-trace fc0fcc0c-1505-11f0-ab3b-000c292fc016

add auto set env logic to profile: /root/.bash_profile

Execute this command to apply the environment config:`source ~/.oceanbase-all-in-one/bin/env.sh `

Execute this command to apply the environment config:`source ~/.oceanbase-all-in-one/bin/env.sh `
[admin@ob bin]$ cd /home/admin/
[admin@ob ~]$ pwd
/home/admin
[admin@ob ~]$ ll -ah
total 16K
drwx------.  5 admin admin 163 Apr  9 04:02 .
drwxr-xr-x.  3 root  root   19 Apr  9 03:16 ..
-rw-------.  1 admin admin 502 Apr  9 03:24 .bash_history
-rw-r--r--.  1 admin admin  18 Feb 10  2024 .bash_logout
-rw-r--r--.  1 admin admin 170 Apr  9 04:02 .bash_profile
-rw-r--r--.  1 admin admin 376 Feb 10  2024 .bashrc
drwxr-xr-x. 10 admin admin 169 Apr  9 04:01 .obd
drwxrwxr-x.  4 admin admin  28 Apr  9 04:02 .oceanbase-all-in-one
drwxr-xr-x.  6 root  root   88 Apr  9 03:19 oceanbase-standalone-all-in-one
[admin@ob ~]$ source ~/.oceanbase-all-in-one/bin/env.sh
[admin@ob ~]$
[admin@ob ~]$ sudo ./oceanbase-standalone-all-in-one/bin/install_ob.sh
Enter the IP (Default: 192.168.198.100) (only support local IP):
Valid local IP: 192.168.198.100
Enter the current user password :
Trace ID: e34581c6-1519-11f0-848d-000c297bf77b
If you want to view detailed obd logs, please run: obd display-trace e34581c6-1519-11f0-848d-000c297bf77b
get system config ok
+------------------------------------------------------------------+
| System Parameter Change List |
+-----------------+-----------------+---------------+--------------+
| ip | need_change_var | current_value | target_value |
+-----------------+-----------------+---------------+--------------+
| 192.168.198.100 | nofile | 655300 | 655350 |
+-----------------+-----------------+---------------+--------------+
Trace ID: e5204e9a-1519-11f0-bd31-000c297bf77b
If you want to view detailed obd logs, please run: obd display-trace e5204e9a-1519-11f0-bd31-000c297bf77b
Do you want to modify the parameters above? (y/n) (Default: y)
get system config ok
192.168.198.100: ( nofile ) have been successfully modified!
Trace ID: e8b9507e-1519-11f0-a250-000c297bf77b
If you want to view detailed obd logs, please run: obd display-trace e8b9507e-1519-11f0-a250-000c297bf77b
Do you want to quit the script and manually restart the machine to apply the optimizations? (y/n) (Default: n)
Enter the cluster name (Default: standalone; allowed characters: letters, numbers, and underscores):
Enter the OB SQL port (Default: 2881):
Enter the OB RPC port (Default: 2882):
Enter the obshell port (Default: 2886):
Enter the OB root password (Default: 89kbsF4J7m6CHSwXNBaX):
Confirm the OB root password:
Enter the OB cpu count (Default: 8):
Enter the OB memory limit (Configurable Range[6, 8], Default: 8, Unit: G):
Enter the OB installation directory (Default: /root/standalone):
Enter the OB data directory (Default: /data/1/standalone):
Enter the OB log directory (Default: /data/log1/standalone):
The data_dir and redo_dir are using the same disk.
Enter the OB datafile maxsize (Configurable Range[16, 28], Default: 28, Unit: G):
Enter the OB log disk size (Configurable Range[16, 22], Default: 22, Unit: G):
Do you want to create tenant for your business workload? (y/n)(Default: y):
Tenant: sys conifguration: 2C/1G/2G(CPU/Memory/Log disk)
system_memory configuration(Unit: G): 1
Enter the tenant name (Default: test; allowed characters: letters, numbers, and underscores):
Please select the tenant mode (enter the corresponding number):
1) MySQL
2) Oracle
Please enter your choice [1/2] (default 1):
Enter the tenant password:
Confirm the tenant password:
Enter the tenant cpu (Configurable Range[1, 6], Default: 6):
Enter the tenant memory (Configurable Range[1, 6], Default: 6, Unit: G):
Enter the tenant log disk size(Configurable Range[18, 19], Default: 19, Unit: G):
Do you want to enable encryption for password security? (y/n) (Default: n):
Do you need to install the monitoring components (OBAgent, Prometheus, Grafana)? (y/n) (Default: y):
Enter the OBAgent monitoring service port (Default: 8088):
Enter the OBAgent management service port (Default: 8089):
Enter the Prometheus port (Default: 9090):
Enter the Grafana port (Default: 3000):
#Saved configurations:
cluster name: standalone
mysql port: 2881
rpc port: 2882
obshell port: 2886
cpu count: 8
memory limit: 8G
home path: /root/standalone
data dir: /data/1/standalone
log dir: /data/log1/standalone
datafile maxsize: 28G
log disk size: 22G
tenant name: test
tenant cpu: 6
tenant memory: 6G
tenant log disk size: 19G
OBAgent monitoring service port: 8088
OBAgent management service port: 8089
Prometheus port: 9090
Grafana port: 3000
Are you sure these configurations are correct? (y/n) (Default: y):
Configuration confirmed.
start cluster...
Package oceanbase-standalone-4.2.5.3-103000152025033110.el8 is available.
Package obagent-4.2.2-100000042024011120.el8 is available.
Package prometheus-2.37.1-10000102022110211.el8 is available.
Package grafana-7.5.17-1 is available.
install oceanbase-standalone-4.2.5.3 forlocal ok
install obagent-4.2.2 forlocal ok
install prometheus-2.37.1 forlocal ok
install grafana-7.5.17 forlocal ok
Cluster param config check ok
Open ssh connection ok
Generate obagent configuration ok
Generate prometheus configuration ok
Generate grafana configuration ok
+----------------------------------------------------------------------------------------------------+
| Packages |
+----------------------+---------+------------------------+------------------------------------------+
| Repository | Version | Release | Md5 |
+----------------------+---------+------------------------+------------------------------------------+
| oceanbase-standalone | 4.2.5.3 | 103000152025033110.el8 | 305669b55281773f5c53ff4e44ff9f7bed9f7bc0 |
| obagent | 4.2.2 | 100000042024011120.el8 | bf152b880953c2043ddaf80d6180cf22bb8c8ac2 |
| prometheus | 2.37.1 | 10000102022110211.el8 | e4f8a3e784512fca75bf1b3464247d1f31542cb9 |
| grafana | 7.5.17 | 1 | 1bf1f338d3a3445d8599dc6902e7aeed4de4e0d6 |
+----------------------+---------+------------------------+------------------------------------------+
Repository integrity check ok
Load param plugin ok
Open ssh connection ok
Initializes obagent work home ok
Initializes observer work home ok
Initializes prometheus work home ok
Initializes grafana work home ok
Parameter check ok
Remote oceanbase-standalone-4.2.5.3-103000152025033110.el8-305669b55281773f5c53ff4e44ff9f7bed9f7bc0 repository install ok
Remote oceanbase-standalone-4.2.5.3-103000152025033110.el8-305669b55281773f5c53ff4e44ff9f7bed9f7bc0 repository lib check ok
Remote obagent-4.2.2-100000042024011120.el8-bf152b880953c2043ddaf80d6180cf22bb8c8ac2 repository install ok
Remote obagent-4.2.2-100000042024011120.el8-bf152b880953c2043ddaf80d6180cf22bb8c8ac2 repository lib check ok
Remote prometheus-2.37.1-10000102022110211.el8-e4f8a3e784512fca75bf1b3464247d1f31542cb9 repository install ok
Remote prometheus-2.37.1-10000102022110211.el8-e4f8a3e784512fca75bf1b3464247d1f31542cb9 repository lib check ok
Remote grafana-7.5.17-1-1bf1f338d3a3445d8599dc6902e7aeed4de4e0d6 repository install ok
Remote grafana-7.5.17-1-1bf1f338d3a3445d8599dc6902e7aeed4de4e0d6 repository lib check ok
standalone deployed
Get local repositories ok
Load cluster param plugin ok
Open ssh connection ok
[WARN] OBD-1007: (192.168.198.100) The recommended number of open files is 655350 (Current value: 655300)
[WARN] OBD-1012: (192.168.198.100) clog and data use the same disk (/)
Check before start obagent ok
Check before start prometheus ok
Check before start grafana ok
cluster scenario: None
Start observer ok
observer program health check ok
Connect to observer 192.168.198.100:2881 ok
oceanbase bootstrap ok
obshell start ok
obshell program health check ok
obshell bootstrap ok
Start obagent ok
obagent program health check ok
Start promethues ok
prometheus program health check ok
Start grafana ok
grafana program health check ok
Connect to grafana ok
Grafana modify password ok
Connect to observer 192.168.198.100:2881 ok
Wait for observer init ok
+---------------------------------------------------+
| oceanbase-standalone |
+-----------------+---------+------+-------+--------+
| ip | version | port | zone | status |
+-----------------+---------+------+-------+--------+
| 192.168.198.100 | 4.2.5.3 | 2881 | zone1 | ACTIVE |
+-----------------+---------+------+-------+--------+
obclient -h192.168.198.100 -P2881 -uroot@sys -p'admin' -Doceanbase -A
cluster unique id: 2454337f-f49a-52cb-afa7-a5f6c3dc3987-196199f71a2-03050204
Connect to Obagent ok
+--------------------------------------------------------------------+
| obagent |
+-----------------+--------------------+--------------------+--------+
| ip | mgragent_http_port | monagent_http_port | status |
+-----------------+--------------------+--------------------+--------+
| 192.168.198.100 | 8089 | 8088 | active |
+-----------------+--------------------+--------------------+--------+
Connect to Prometheus ok
+-----------------------------------------------------------+
| prometheus |
+-----------------------------+-------+------------+--------+
| url | user | password | status |
+-----------------------------+-------+------------+--------+
| http://192.168.198.100:9090 | admin | euwXnVcpK9 | active |
+-----------------------------+-------+------------+--------+
Connect to grafana ok
+----------------------------------------------------------------------+
| grafana |
+-----------------------------------------+-------+-----------+--------+
| url | user | password | status |
+-----------------------------------------+-------+-----------+--------+
| http://192.168.198.100:3000/d/oceanbase | admin | oceanbase | active |
+-----------------------------------------+-------+-----------+--------+
standalone running
Trace ID: 2bf80f7e-151a-11f0-8d47-000c297bf77b
If you want to view detailed obd logs, please run: obd display-trace 2bf80f7e-151a-11f0-8d47-000c297bf77b
create tenant...
Get local repositories ok
Open ssh connection ok
Connect to observer 192.168.198.100:2881 ok
Create tenant test ok
Exec oceanbase-standalone-4.2.5.3-103000152025033110.el8-305669b55281773f5c53ff4e44ff9f7bed9f7bc0 import_time_zone_info.py ok
Exec oceanbase-standalone-4.2.5.3-103000152025033110.el8-305669b55281773f5c53ff4e44ff9f7bed9f7bc0 import_srs_data.py ok
obclient -h192.168.198.100 -P2881 -uroot@test -Doceanbase -A
Trace ID: 26712666-151b-11f0-a287-000c297bf77b
If you want to view detailed obd logs, please run: obd display-trace 26712666-151b-11f0-a287-000c297bf77b
You can access the test tenant using the following command.:
obclient -h192.168.198.100 -P2881 -uroot@test -padmin
If this cluster is for production use, please import a commercial license in time.
[admin@ob ~]$ obclient -h192.168.198.100 -P2881 -uroot@test -padmin
Welcome to the OceanBase. Commands end with ; or \g.
Your OceanBase connection id is 3221517760
Server version: OceanBase 4.2.5.3 (r103000152025033110-f5b88cd987f23383677f2eb53cf76ed38a48979b) (Built Mar 31 2025 11:08:41)
Copyright (c) 2000, 2018, OceanBase and/or its affiliates. All rights reserved.
Type 'help;' or '\h'forhelp. Type '\c' to clear the current input statement.
obclient(root@test)[(none)]>整体的安装部分比较顺畅,没有遇到一些错误或者无法安装的情况,当然这和撰写的非常详细的文档是分不开的,同时与安装包的细节把握也是分不开的。商用版本身是支持ORACLE 或 MYSQL的兼容模式,在安装时可以进行选择。以上的安装是通过OBD来进行安装,OBD的安装方式适合主机数量较少的情况,而如果是更多的主机,今天文中的第二种方式。同时OceanBase单机版本在大规格环境中提供基于OCP的图形的方面,我这里就不做记录了,我这里通过第二种安装方式 yaml的安装方式来将OB单机版部署,这是自动化安装方式的首选。同时这样的安装方式支持远程通过ssh-keygen的远程安装控制方式。
首先要在配置中打通ssh免密,因为在yaml自动化安装中,远程安装是需要ssh-keygen免密的方式的,需要通过建立秘钥的前置工作,如果是本地安装也可以在Yaml文件中写清楚密码(admin账号的密码),OB提供了远程yaml的安装方式,通过提供的ssh-keygen的免密安装方式,从原理上OB的obd yaml 安装是可以大批量通过一台机器来远程操控多台OB自动化安装的。(通过控制主机,连接其他的需要安装的主机,通过自动化批量部署)
相关的安装步骤中需要注意以下几点 (OB的安装文档上都有清晰的提示,但我个人着急安装没有仔细看,导致安装中第一次失败,这里提醒和我一样心急的人)
1 在自动化安装的时候,一定要把OB所需的目录 /data /redo 等用admin的权限赋予如 chown -R admin:admin /data
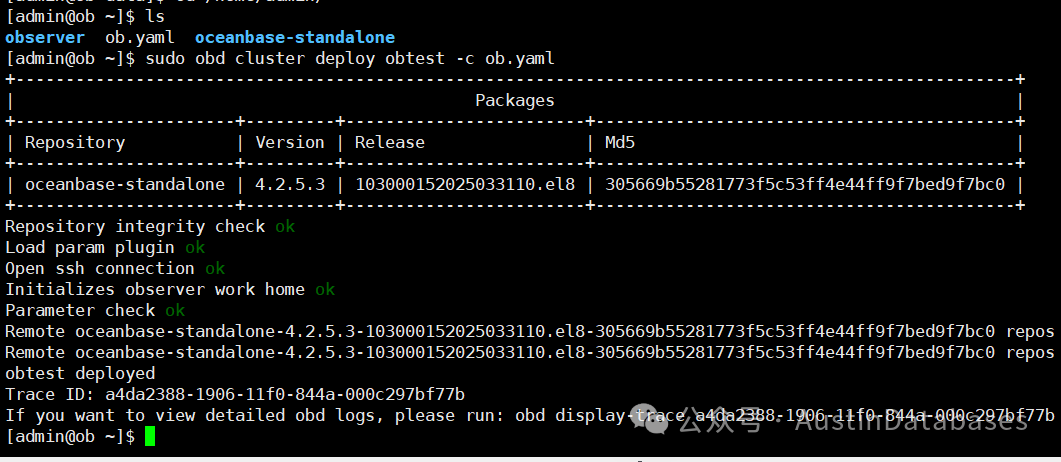
2 在安装中通过admin账号安装,一定要 sudo obd cluster deploy obtest -c ob.yaml 否则权限会不足报错
3 如果是本地安装可以不使用ssh-keygen建立互信,只需要再安装文件中写清admin的用户名和密码即可安装。
下面我把yaml的文件的内容写到里面,整体的安装中的参数都在OB的文档中有明确的标注。
user:
  username: admin
  password: admin
# key_file: /home/admin/.ssh/id_rsa

oceanbase-standalone:
  servers:
    - ip: 192.168.198.100

  global:
    cluster_id: 1
    # 请设置与资源匹配的合适内存限制。
    memory_limit: 16G       # 单个 observer 的最大运行内存
    system_memory: 10G      # 预留的系统内存,供一般租户使用
    datafile_size: 20G      # 数据文件大小
    datafile_next: 20G
    datafile_maxsize: 50G
    log_disk_size: 20G      # clog 文件使用的磁盘空间大小
    enable_syslog_wf: false# 是否将 WARNING 级别以上的系统日志打印到单独的日志文件,默认为 true
    max_syslog_file_count: 4 # 启用自动回收前的最大保留日志文件数,默认为 0
    # observer 集群名称,需与 obproxy 的 cluster_name 保持一致
    appname: obtest
    mysql_port: 2881        # OceanBase 数据库的外部端口,默认值为 2881。集群启动后请勿更改此值。
    rpc_port: 2882          # OceanBase 数据库的内部端口,默认值为 2882。集群启动后请勿更改此值。
    obshell_port: 2886      # OceanBase 数据库的运维端口
    # OceanBase 数据库的工作目录,数据库在此目录下启动。此为必填字段。
    home_path: /home/admin/observer
    # 数据存储目录,默认值为 $home_path/store
    data_dir: /data
    # clog 目录,默认值与 data_dir 相同
    redo_dir: /redo
安装还有一个点是需要注意的,这里我也是着急没有看,还去问OB的老师为什么没有装上,这里也给大家做一个提示。OB的单机安装有两个规格,其中小规格是不能通过OCP的安装方式安装的,而如果想使用OCP安装就需要通过下载大规格的单机集群组部署安装包,这点也是我自己没有注意,文档中都有明确的提示。
写到最后,在安装中我想到一个问题,后续也想针对此问题继续研究。这个我问题是,OB单机版到底能不能替换单机的 MYSQL 或者MYSQL的主从集群。
为什么我要提到这点,一些企业的DBA或数据库负责人经常会私下问这样一个问题,MySQL无法进入央企,国企的数据库准入名录,而他们开发的产品是基于MySQL数据库产品开发的,有没有兼容MySQL的国产单机产品可以供他们替换MySQL。作为一个DBA手里不能没有武器,怎么找到替换MySQL的单机类产品是数据库架构师的一个重要功课。
同时我关注单机的OB是否能和MySQL的性能可以匹敌,或者强于MySQL。
总结,OB已经有了全系的数据库产品,包括分布式、单机、一体机、开源分布式、开源单机、公有云产品、混合云部署、HTAP,一些企业的CTO希望用一种数据库解决公司各种数据处理问题,减少多技术栈带来的成本和运维问题,那么目前首推的就是OB,而不是其他的数据库产品,OB的产品线的完整性正在推动OB往中国最有实力的数据库企业迈进。
OceanBase 相关文章
OceanBase 6大学习法--OBCA视频学习总结第六章
OceanBase 6大学习法--OBCA视频学习总结第五章--索引与表设计
OceanBase 6大学习法--OBCA视频学习总结第五章--开发与库表设计
OceanBase 6大学习法--OBCA视频学习总结第四章 --数据库安装
OceanBase 6大学习法--OBCA视频学习总结第三章--数据库引擎
OceanBase 架构学习--OB上手视频学习总结第二章 (OBCA)
OceanBase 6大学习法--OB上手视频学习总结第一章
没有谁是垮掉的一代--记 第四届 OceanBase 数据库大赛
跟我学OceanBase4.0 --阅读白皮书 (OB分布式优化哪里了提高了速度)
跟我学OceanBase4.0 --阅读白皮书 (4.0优化的核心点是什么)
跟我学OceanBase4.0 --阅读白皮书 (0.5-4.0的架构与之前架构特点)
跟我学OceanBase4.0 --阅读白皮书 (旧的概念害死人呀,更新知识和理念)
OceanBase 学习记录-- 建立MySQL租户,像用MySQL一样使用OB
PostgreSQL 相关文章
“PostgreSQL” 高性能主从强一致读写分离,我行,你没戏!
PostgreSQL 添加索引导致崩溃,参数调整需谨慎--文档未必完全覆盖场景
PostgreSQL SQL优化用兵法,优化后提高 140倍速度
PostgreSQL 运维的难与“难” --上海PG大会主题记录
PostgreSQL 什么都能存,什么都能塞 --- 你能成熟一点吗?
全世界都在“搞” PostgreSQL ,从Oracle 得到一个“馊主意”开始
PostgreSQL 加索引系统OOM 怨我了--- 不怨你怨谁
PostgreSQL “我怎么就连个数据库都不会建?” --- 你还真不会!
病毒攻击PostgreSQL暴力破解系统,防范加固系统方案(内附分析日志脚本)
PostgreSQL 远程管理越来越简单,6个自动化脚本开胃菜
PostgreSQL 稳定性平台 PG中文社区大会--杭州来去匆匆
PostgreSQL 分组查询可以不进行全表扫描吗?速度提高上千倍?
POSTGRESQL --Austindatabaes 历年文章整理
PostgreSQL 查询语句开发写不好是必然,不是PG的锅
PostgreSQL 字符集乌龙导致数据查询排序的问题,与 MySQL 稳定 "PG不稳定"
PostgreSQL Patroni 3.0 新功能规划 2023年 纽约PG 大会 (音译)
PostgreSQL 玩PG我们是认真的,vacuum 稳定性平台我们有了
PostgreSQL DBA硬扛 垃圾 “开发”,“架构师”,滥用PG 你们滚出 !(附送定期清理连接脚本)
PolarDB 相关文章
PolarDB MySQL 加索引卡主的整体解决方案“PostgreSQL” 高性能主从强一致读写分离,我行,你没戏!
POLARDB 添加字段 “卡” 住---这锅Polar不背
PolarDB 版本差异分析--外人不知道的秘密(谁是绵羊,谁是怪兽)
PolarDB 答题拿-- 飞刀总的书、同款卫衣、T恤,来自杭州的Package(活动结束了)
PolarDB for MySQL 三大核心之一POLARFS 今天扒开它--- 嘛是火
MySQL相关文章
MySQL 的SQL引擎很差吗?由一个同学提出问题引出的实验
用MySql不是MySQL, 不用MySQL都是MySQL 横批 哼哼哈哈啊啊
MYSQL --Austindatabases 历年文章合集
MongoDB 相关文章
MongoDB “升级项目” 大型连续剧(1)-- 可“生”可不升
MongoDB 大俗大雅,上来问分片真三俗 -- 4 分什么分
MongoDB 大俗大雅,高端知识讲“庸俗” --3 奇葩数据更新方法
MongoDB 大俗大雅,高端的知识讲“通俗” -- 2 嵌套和引用
MongoDB 大俗大雅,高端的知识讲“低俗” -- 1 什么叫多模
MongoDB 合作考试报销活动 贴附属,MongoDB基础知识速通
MongoDB 使用网上妙招,直接DOWN机---清理表碎片导致的灾祸 (送书活动结束)
MongoDB 2023年度纽约 MongoDB 年度大会话题 -- MongoDB 数据模式与建模
MongoDB 双机热备那篇文章是 “毒”
MongoDB 会丢数据吗?在次补刀MongoDB 双机热备
MONGODB ---- Austindatabases 历年文章合集
临时工访谈系列
没有谁是垮掉的一代--记 第四届 OceanBase 数据库大赛
SQL SERVER 系列
SQL SERVER 如何实现UNDO REDO 和PostgreSQL 有近亲关系吗


 被折叠的 条评论
为什么被折叠?
被折叠的 条评论
为什么被折叠?
 到【灌水乐园】发言


