


碎片的生命周期
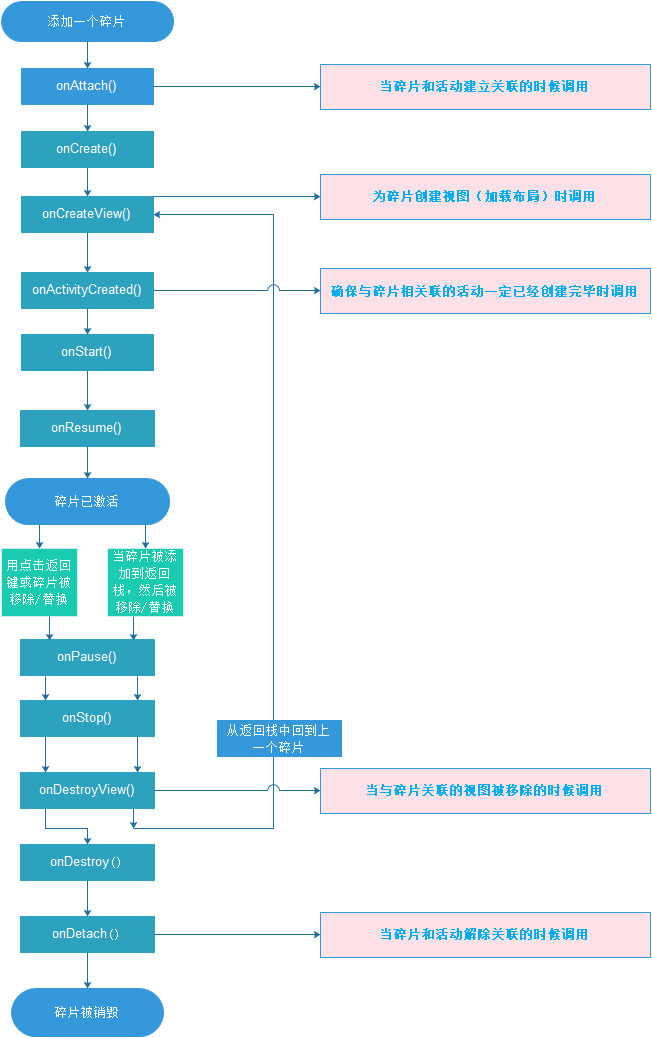
1、运行状态当一个碎片是可见的,并且它所关联的活动正处于运行状态时,该碎片也处于运行状态。
2、暂停状态
当一个活动处于暂停状态时(由于另一个未占满屏幕的活动被添加到栈顶),与它相关联的可见碎片就会进入到暂停状态。
3、停止状态
当一个活动进入停止状态时,与它相关联的碎片就会进入到停止状态。或者通过调用FragmentTransaction的remove()、replace()方法将碎片从活动中移除,或者在事务提交之前调用addToBackStack()方法,这时碎片也会也会进入到停止状态。
4、销毁状态
碎片总是依附于活动而存在的,因此当活动被销毁时,与它相关联的碎片就会进入到销毁状态,或者调用FragmentTransaction的remove()、replace()方法将碎片从活动中移除,但是在事务提交之前并没有调用addToBackStack()方法,这是碎片也会进入到销毁状态。
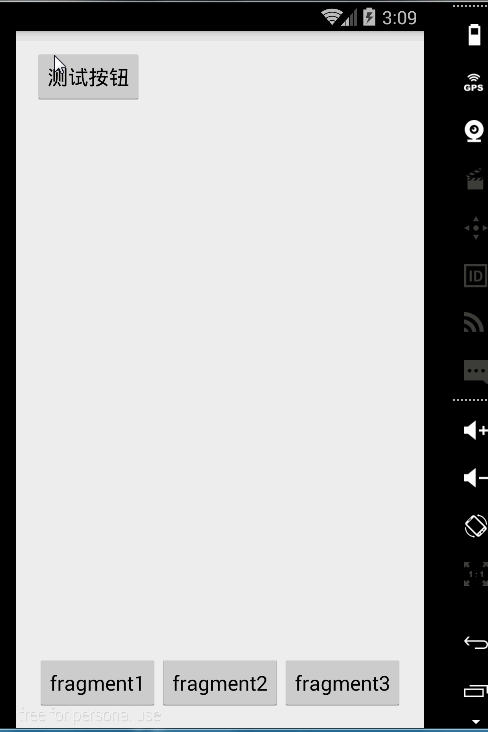
firstFragment
public class firstFragment extends Fragment {
    private Button mButtonTest;
    @Nullable
    @Override
    public View onCreateView(LayoutInflater inflater, ViewGroup container, Bundle savedInstanceState) {
     View view=inflater.inflate(R.layout.fragment_test,null);
        mButtonTest= (Button) view.findViewById(R.id.button_test);

       mButtonTest.setOnClickListener(new View.OnClickListener() {
           @Override
           public void onClick(View v) {
               Toast.makeText(getActivity(), "我点击了测试按钮", Toast.LENGTH_SHORT).show();
           }
       });
        return view;
    }
}
secondFragment
public class secondFragment extends Fragment{
private TextView mTextview;
    @Nullable
    @Override
    public View onCreateView(LayoutInflater inflater, ViewGroup container, Bundle savedInstanceState) {
        View view =inflater.inflate(R.layout.fragment_second,null);
        mTextview= (TextView) view.findViewById(R.id.textview_1);

        return view ;
    }


    public void setText(String text) {
        if (mTextview!=null){
            mTextview.setText(text);
        }

    }
}
thirdFragment
public class thirdFragment extends Fragment{
    private EditText mEditText;

    @Nullable
    @Override
    public View onCreateView(LayoutInflater inflater, ViewGroup container, Bundle savedInstanceState) {
        View view=inflater.inflate(R.layout.fragment_third,null);
        mEditText= (EditText) view.findViewById(R.id.editText);

        return view ;
    }

    public String  getText() {
        String s=null;
        if (mEditText!=null){
            s=mEditText.getText().toString();
        }
        return s;
    }
}
MainActivity
public class MainActivity extends FragmentActivity implements View.OnClickListener {
    private FrameLayout mFrameContainer;
    private Button mBtn1;
    private Button mBtn2;
    private Button mBtn3;
    private firstFragment mfirstFragment;
    private secondFragment msecondFragment;
    private thirdFragment mthirdFragment;
    private FragmentManager mFragmentManager;
    private android.support.v4.app.FragmentTransaction mtransaction;

    @Override
    protected void onCreate(Bundle savedInstanceState) {
        super.onCreate(savedInstanceState);
        setContentView(R.layout.activity_main);
//        FragmentManager manager=getSupportFragmentManager();
        mFrameContainer = (FrameLayout) findViewById(R.id.frame_container);
        mBtn1 = (Button) findViewById(R.id.button1);
        mBtn2 = (Button) findViewById(R.id.button2);
        mBtn3 = (Button) findViewById(R.id.button3);
        mBtn1.setOnClickListener(this);
        mBtn2.setOnClickListener(this);
        mBtn3.setOnClickListener(this);
        mFragmentManager = getSupportFragmentManager();
        mfirstFragment = new firstFragment();
        msecondFragment = new secondFragment();
        mthirdFragment = new thirdFragment();
        mtransaction = mFragmentManager.beginTransaction();
        mtransaction.add(R.id.frame_container, mfirstFragment);
        mtransaction.add(R.id.frame_container, msecondFragment);
        mtransaction.add(R.id.frame_container, mthirdFragment);
        mtransaction.hide(mfirstFragment);
        mtransaction.hide(msecondFragment);
       // mtransaction.hide(mthirdFragment);
        mtransaction.commit();
    }


    @Override
    public void onClick(View v) {
        switch (v.getId()) {
            case R.id.button1:

                mtransaction = mFragmentManager.beginTransaction();
                mtransaction.hide(msecondFragment);
                mtransaction.hide(mthirdFragment);
                mtransaction.show(mfirstFragment);
//                mtransaction.replace(R.id.frame_container, new firstFragment());
                mtransaction.commit();
                break;
            case R.id.button2:
                mtransaction = mFragmentManager.beginTransaction();
                String text = mthirdFragment.getText();
                msecondFragment.setText(text);
                mtransaction.hide(mfirstFragment);
                mtransaction.hide(mthirdFragment);
                mtransaction.show(msecondFragment);

//                mtransaction.replace(R.id.frame_container, new secondFragment());
                mtransaction.commit();
                break;
            case R.id.button3:
                mtransaction = mFragmentManager.beginTransaction();

                mtransaction.hide(msecondFragment);
                mtransaction.hide(mfirstFragment);
                mtransaction.show(mthirdFragment);
//                mtransaction.replace(R.id.frame_container, new thirdFragment());
                mtransaction.commit();
                break;
            default:
                break;
        }
    }
}
activity_main.xml
<RelativeLayout xmlns:android="http://schemas.android.com/apk/res/android"
    xmlns:tools="http://schemas.android.com/tools" android:layout_width="match_parent"
    android:layout_height="match_parent" android:paddingLeft="@dimen/activity_horizontal_margin"
    android:paddingRight="@dimen/activity_horizontal_margin"
    android:paddingTop="@dimen/activity_vertical_margin"
    android:paddingBottom="@dimen/activity_vertical_margin" tools:context=".MainActivity">
<!--<fragment class="com.example.administrator.myfragment.fragment.firstFragment"-->
    <!--android:layout_width="match_parent"-->

    <!--android:layout_height="match_parent">-->

<!--</fragment>-->
    <FrameLayout
        android:id="@+id/frame_container"
        android:layout_width="match_parent"
        android:layout_height="match_parent">

    </FrameLayout>
<LinearLayout
    android:layout_width="match_parent"
    android:layout_height="wrap_content"
    android:layout_alignParentBottom="true"
    android:orientation="horizontal"
    android:gravity="center">
<Button
    android:id="@+id/button1"
    android:layout_width="wrap_content"
    android:layout_height="wrap_content"
    android:text="fragment1"/>
    <Button
        android:id="@+id/button2"
        android:layout_width="wrap_content"
        android:layout_height="wrap_content"
        android:text="fragment2"/>
    <Button
        android:id="@+id/button3"
        android:layout_width="wrap_content"
        android:layout_height="wrap_content"
        android:text="fragment3"/>
</LinearLayout>
</RelativeLayout>
fragment_first.xml
<?xml version="1.0" encoding="utf-8"?>
<LinearLayout xmlns:android="http://schemas.android.com/apk/res/android"
    android:layout_width="match_parent" android:layout_height="match_parent">

    <Button
        android:id="@+id/button_test"
        android:layout_width="wrap_content"
        android:layout_height="wrap_content"
        android:text="测试按钮"/>
</LinearLayout>
fragment_second.xml
<?xml version="1.0" encoding="utf-8"?>
<LinearLayout xmlns:android="http://schemas.android.com/apk/res/android"
    android:layout_width="match_parent"
    android:layout_height="match_parent">
<TextView
    android:id="@+id/textview_1"
    android:layout_width="wrap_content"
    android:layout_height="wrap_content"
    android:text="我是一个文本"
    />
</LinearLayout>
fragment_third.xml
<?xml version="1.0" encoding="utf-8"?>
<LinearLayout xmlns:android="http://schemas.android.com/apk/res/android"
    android:layout_width="match_parent"
    android:layout_height="match_parent">
<EditText
    android:id="@+id/editText"
    android:layout_width="wrap_content"
    android:layout_height="wrap_content"
    android:hint="我是内容"/>
</LinearLayout>
动态添加碎片五部曲
1、创建待添加的碎片实例
2、获取到FragmentManager,在活动中可以直接调用getFragmentManager()方法得到。
3、开启一个事务,通过调用beginTransaction()方法开启。
4、向容器内加入碎片,一般使用replace()方法实现,需要传入容器的id和待添加的碎片实例。
5、提交事务,调用commit()方法来完成。


 被折叠的 条评论
为什么被折叠?
被折叠的 条评论
为什么被折叠?
 到【灌水乐园】发言


