重写InputMethodService,手动切换输入法问题

实现输入法的步骤:

输入法程序的核心是一个服务类,这个类必须继承自InputMethodService。

下面先来看看实现一个基本的输入法程序的步骤。

(1)建立一个继承自android.inputmethodservice.InputMethodService的类,称为输入法的服务类。

(2)在AndroidManifest.xml文件中配置这个服务类。

(3)编写一个用于显示软键盘的布局文件。

(4)覆盖InputMethodService类的onCreateInputView方法。

(5)onCreateInputView方法需要返回与第3步建立的布局文件对应的View对象。在返回之前,一般需要设置相应控件的事件,如软键盘按钮单击事件。

(6)在输入法服务类或其他类中编写响应软键盘中按键事件的代码,如按钮单击事件、物理键盘事件等。


下面就来实现一个简单的输入法程序。

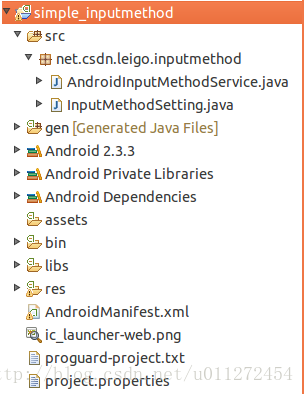
第一步:新建一个Android工程命名为simple_inputmethod目录结构如下图:


第二步:建立一个AndroidInputMethodService类,该类继承自InputMethodService,然后在Android.Manifest.xml文件中配置:

AndroidInputMethodService类:

[java]  view plain  copy
  1. package net.csdn.leigo.inputmethod;  
  2.   
  3. import net.csdn.leigo.inputmethod.R;  
  4. import android.inputmethodservice.InputMethodService;  
  5. import android.util.Log;  
  6. import android.view.View;  
  7. import android.view.View.OnClickListener;  
  8. import android.view.inputmethod.EditorInfo;  
  9. import android.view.inputmethod.InputConnection;  
  10. import android.widget.Button;  
  11.   
  12. public class AndroidInputMethodService extends InputMethodService implements  
  13.         OnClickListener {  
  14. }  

AndroidManifest.xml:

[html]  view plain  copy
  1. <?xml version="1.0" encoding="utf-8"?>  
  2. <manifest xmlns:android="http://schemas.android.com/apk/res/android"  
  3.     package="net.csdn.leigo.inputmethod"  
  4.     android:versionCode="1"  
  5.     android:versionName="1.0" >  
  6.   
  7.     <uses-sdk  
  8.         android:minSdkVersion="10"  
  9.         android:targetSdkVersion="10" />  
  10.   
  11.     <application  
  12.         android:allowBackup="true"  
  13.         android:icon="@drawable/ic_launcher"  
  14.         android:label="@string/app_name"  
  15.         android:theme="@style/AppTheme" >  
  16.   
  17.         <!-- Optional: an activity for controlling the IME settings -->  
  18.         <activity android:name="net.csdn.leigo.inputmethod..InputMethodSetting" >  
  19.             <intent-filter>  
  20.                 <action android:name="android.intent.action.MAIN" />  
  21.             </intent-filter>  
  22.         </activity>  
  23.         <!-- Declares the input method service -->  
  24.         <service  
  25.             android:name="net.csdn.leigo.inputmethod.AndroidInputMethodService"  
  26.             android:permission="android.permission.BIND_INPUT_METHOD" >  
  27.             <intent-filter>  
  28.                 <action android:name="android.view.InputMethod" />  
  29.             </intent-filter>  
  30.   
  31.             <meta-data  
  32.                 android:name="android.view.im"  
  33.                 android:resource="@xml/method" />  
  34.         </service>  
  35.     </application>  
  36.   
  37. </manifest>  
配置输入法服务时必须设置
[html]  view plain  copy
  1. android.permission.BIND_INPUT_METHOD"  
权限,并且在<intent-filter>标签中添加一个
[html]  view plain  copy
  1. "android.view.InputMethod"   
动作。

在<service>标签中还加入一个<meta-data>标签,用于配置输入法,也就是在“语言与键盘”设置界面可以看到我们编写的输入法,其中android:resource属性制定了

一个输入法资源ID。这个资源文件(method.xml)在res\xml目录中,代码如下:

[html]  view plain  copy
  1. <?xml version="1.0" encoding="UTF-8"?>  
  2. <input-method xmlns:android="http://schemas.android.com/apk/res/android"  
  3.     android:settingsActivity="net.csdn.leigo.inputmethod.InputMethodSetting"/>  

<input-method>标签的android:settingActivity属性可以制定输入法设置窗口。


InputMethodSetting.java:

[java]  view plain  copy
  1. package net.csdn.leigo.inputmethod;  
  2.   
  3. import android.app.Activity;  
  4. import android.os.Bundle;  
  5.   
  6. public class InputMethodSetting extends Activity {  
  7.       
  8.     @Override  
  9.     protected void onCreate(Bundle savedInstanceState) {  
  10.         super.onCreate(savedInstanceState);  
  11.         setContentView(R.layout.setting);  
  12.     }  
  13.   
  14. }  

setting.xml:

[html]  view plain  copy
  1. <?xml version="1.0" encoding="utf-8"?>  
  2. <LinearLayout xmlns:android="http://schemas.android.com/apk/res/android"  
  3.     android:layout_width="fill_parent"  
  4.     android:layout_height="fill_parent"  
  5.     android:orientation="horizontal" >  
  6.   
  7.     <TextView  
  8.         android:id="@+id/textview"  
  9.         android:layout_width="wrap_content"  
  10.         android:layout_height="wrap_content"  
  11.         android:text="输入法设置窗口" />  
  12.   
  13. </LinearLayout>  


第三步:编写一个布局文件。这个布局文件实际上就是软键盘的布局。在这个布局中有5个水平排列的按钮,其中前4个用于输入4个字符串(就是<Button>标签的android:text属性值),最后一个按钮用于隐藏软键盘:

keyboard.xml:

[java]  view plain  copy
  1. <?xml version="1.0" encoding="utf-8"?>  
  2. <LinearLayout xmlns:android="http://schemas.android.com/apk/res/android"  
  3.     android:layout_width="match_parent"  
  4.     android:layout_height="match_parent"  
  5.     android:orientation="horizontal" >  
  6.   
  7.     <Button  
  8.         android:id="@+id/btn1"  
  9.         android:layout_width="wrap_content"  
  10.         android:layout_height="wrap_content"  
  11.         android:text="a" />  
  12.   
  13.     <Button  
  14.         android:id="@+id/btn2"  
  15.         android:layout_width="wrap_content"  
  16.         android:layout_height="wrap_content"  
  17.         android:layout_marginLeft="6dp"  
  18.         android:text="b" />  
  19.   
  20.     <Button  
  21.         android:id="@+id/btn3"  
  22.         android:layout_width="wrap_content"  
  23.         android:layout_height="wrap_content"  
  24.         android:layout_marginLeft="6dp"  
  25.         android:text="c" />  
  26.   
  27.     <Button  
  28.         android:id="@+id/btn4"  
  29.         android:layout_width="wrap_content"  
  30.         android:layout_height="wrap_content"  
  31.         android:layout_marginLeft="6dp"  
  32.         android:text="d" />  
  33.   
  34.     <Button  
  35.         android:id="@+id/btn_hide"  
  36.         android:layout_width="wrap_content"  
  37.         android:layout_height="wrap_content"  
  38.         android:layout_marginLeft="6dp"  
  39.         android:text="Hide" />  
  40.   
  41. </LinearLayout>  

第四步:修改AndroidInputMethodService类的代码,首先覆盖onCreateInputView方法,然后在onCreateInputView方法中装载keyboard,xml布局文件,并设置按钮的单击事件,最后返回软键盘的View对象。

[java]  view plain  copy
  1. @Override  
  2.     public View onCreateInputView() {  
  3.         // 装载keyboard.xml文件  
  4.         View view = getLayoutInflater().inflate(R.layout.keyboard, null);  
  5.         // 设置布局中5个按钮的单击事件  
  6.         view.findViewById(R.id.btn1).setOnClickListener(this);  
  7.         view.findViewById(R.id.btn2).setOnClickListener(this);  
  8.         view.findViewById(R.id.btn3).setOnClickListener(this);  
  9.         view.findViewById(R.id.btn4).setOnClickListener(this);  
  10.         view.findViewById(R.id.btn_hide).setOnClickListener(this);  
  11.         Log.d(TAG, "onCreateInputView()");  
  12.         // 返回View对象  
  13.         return view;  
  14.     }  

注意:输入法界面(软键盘)并不许要我们自己建立Activity,这个Activity是由系统提供的,而我们只需要在Activity上显示的View对象即可,也就是onCreateInputView方法的返回值。


最后一部需要处理按钮的单击动作,AndroidInputMethodService类需要实现OnClickListener接口。

[java]  view plain  copy
  1. @Override  
  2.     public void onClick(View v) {  
  3.         if (v.getId() == R.id.btn_hide) {  
  4.             // 隐藏软键盘  
  5.             hideWindow();  
  6.         } else {  
  7.             Button button = (Button) v;  
  8.             // 获得InputConnection对象  
  9.             InputConnection inputConnection = getCurrentInputConnection();  
  10.             if (button.getId() == R.id.btn1) {  
  11.                 // 设置预输入文本  
  12.                 // setComposingText方法的第2个参数值为1,表示在当前位置预输入文本  
  13.                 inputConnection.setComposingText(button.getText(), 1);  
  14.             } else {  
  15.                 // 向当前获得焦点的EditText控件输出文本  
  16.                 // commitText方法第2个参数值为1,表示在当前位置插入文本  
  17.                 inputConnection.commitText(button.getText(), 1);  
  18.             }  
  19.         }  
  20.     }  
通过InoutConnection.setComposingText方法可以预输入文本。预输入文本一般会在输入的文本下方显示一个下划线,直到将其替换成正式输入的文本,否则下划线一直存在。
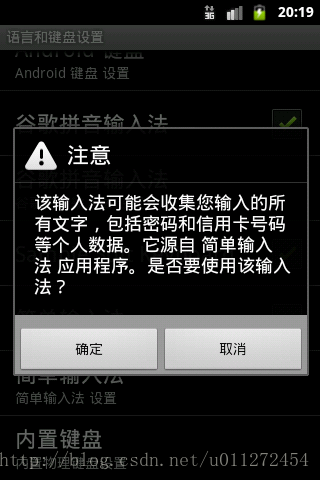
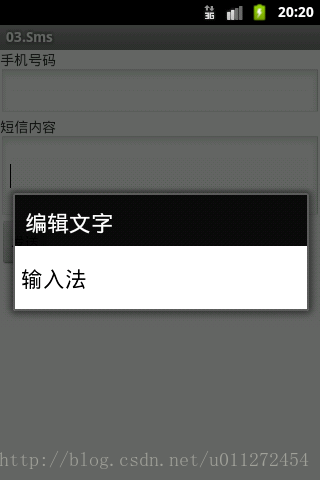
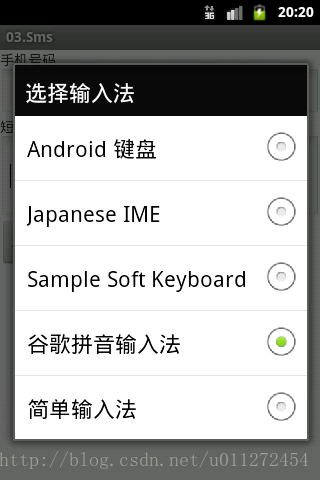

运行工程查看效果图:

经测试,如果EditText的inputType属性为默认时,点击可以输入,但是若是其他的例如phone或者email之类,点击就没有什么效果。这个可以参考文档或者在下一篇会有介绍。

  • 1
    点赞
  • 4
    收藏
    觉得还不错? 一键收藏
  • 2
    评论

“相关推荐”对你有帮助么?

  • 非常没帮助
  • 没帮助
  • 一般
  • 有帮助
  • 非常有帮助
提交
评论 2
添加红包

请填写红包祝福语或标题

红包个数最小为10个

红包金额最低5元

当前余额3.43前往充值 >
需支付:10.00
成就一亿技术人!
领取后你会自动成为博主和红包主的粉丝 规则
hope_wisdom
发出的红包
实付
使用余额支付
点击重新获取
扫码支付
钱包余额 0

抵扣说明:

1.余额是钱包充值的虚拟货币,按照1:1的比例进行支付金额的抵扣。
2.余额无法直接购买下载,可以购买VIP、付费专栏及课程。

余额充值