


一.NIO的介绍
NIO:是在JDK1.4以上对IO进行的改进,之前NIO的名字叫做new io 简写就是NIO
NIO与IO有同样的作用和目的,但是使用的方式完全不同,NIO支持面向缓冲区的,基于通道的IO操作.NIO将以更加高效的方式进行读写.
和IO的主要区别?
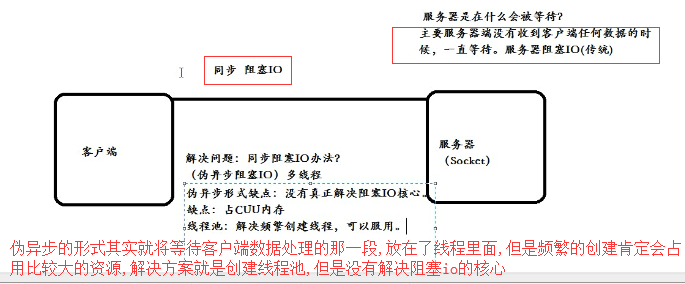
传统的同步阻塞模型开发中,ServerSocket负责绑定IP地址,启动监听端口;Socket负责发起连接操作。连接成功后,双方通过输入和输出流进行同步阻塞式通信。
简单的描述一下BIO的服务端通信模型:采用BIO通信模型的服务端,通常由一个独立的Acceptor线程负责监听客户端的连接,它接收到客户端连接请求之后为每个客户端创建一个新的线程进行链路处理没处理完成后,通过输出流返回应答给客户端,线程销毁。即典型的一请求一应答通宵模型。 该模型最大的问题就是缺乏弹性伸缩能力,当客户端并发访问量增加后,服务端的线程个数和客户端并发访问数呈1:1的正比关系,Java中的线程也是比较宝贵的系统资源,线程数量快速膨胀后,系统的性能将急剧下降,随着访问量的继续增大,系统最终就死-掉-了。
为了改进这种一连接一线程的模型,我们可以使用线程池来管理这些线程(需要了解更多请参考前面提供的文章),实现1个或多个线程处理N个客户端的模型(但是底层还是使用的同步阻塞I/O),通常被称为“伪异步I/O模型“。因为限制了线程数量,如果发生大量并发请求,超过最大数量的线程就只能等待,直到线程池中的有空闲的线程可以被复用。而对Socket的输入流就行读取时,会一直阻塞,直到发生资源为止。 所以在读取数据较慢时(比如数据量大、网络传输慢等),大量并发的情况下,其他接入的消息,只能一直等待,这就是最大的弊端。
而后面即将介绍的NIO,就能解决这个难题。
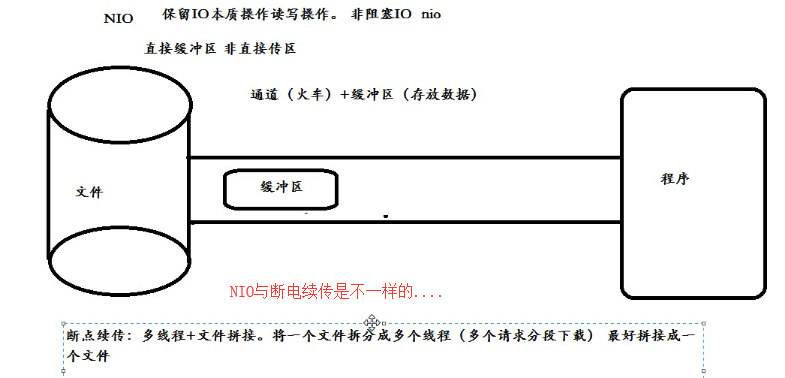
1.IO面向流,NIO面向缓冲区 IO流比如自来水管, NIO比如火车,NIO是双向的,可以复用,IO是单向的.
2.NIO是非阻塞的,效率高,IO是阻塞式的编程
我们来看一下IO的形象图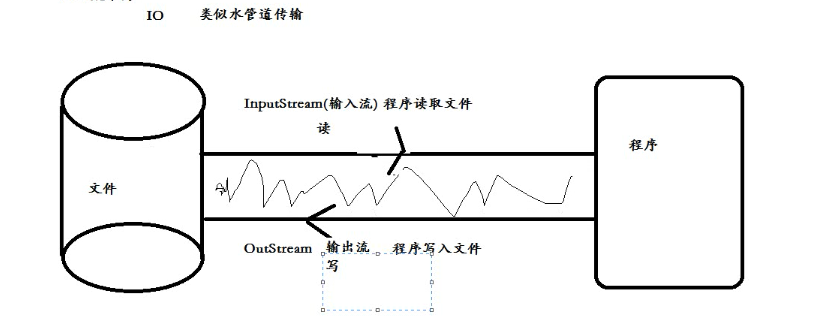
我们在来看一下NIO的形象图
二:Buffer的数据存储
我门通过继承关系可以发现 ByteBuffer继承了Buffer,Buffer里面有四个重要的参数,我门一并说一下这四个核心参数的意义
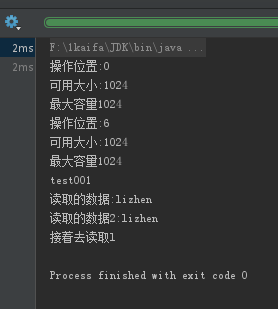
@Test
public void test001() {
    /**
     * 核心参数
     * private int position = 0;  缓冲区正在操作的位置 默认从0开始
     * private int limit; 缓冲区的可用大小,并不是剩余大小
     * private int capacity; 缓冲区的最大容量,一旦声明不能改变
     *
     * 核心方法
     * put() 往buffer存放数据
     * get() 获取数据
     */
    try {
        //初始化butebuffer的大小
        ByteBuffer allocate = ByteBuffer.allocate(1024);

        //将核心参数打印出来
        System.out.println("操作位置:" + allocate.position());
        System.out.println("可用大小:" + allocate.limit());
        System.out.println("最大容量" + allocate.capacity());
        allocate.put("lizhen".getBytes());
        //将核心参数打印出来
        System.out.println("操作位置:" + allocate.position());
        System.out.println("可用大小:" + allocate.limit());
        System.out.println("最大容量" + allocate.capacity());
        System.out.println("test001");
        /**
         * 开启读模式
         * 如果开启会将指针移动到0,就是重头开始读
         * 如果不开启,直接从指针6的位置开始读取,这样读取1024个字节时就会,越界
         */
        allocate.flip();
        byte[] bytes = new byte[allocate.limit()];
        ByteBuffer byteBuffer = allocate.get(bytes);
        String s = new String(bytes, 0, bytes.length);
        System.out.println("读取的数据:" + s);

        /**
         * 如果需要重复读取的话需要调用这个方法
         * 将指针也还原到0
         */
        allocate.rewind();
        byte[] bytes2 = new byte[allocate.limit()];
        ByteBuffer byteBuffer2 = allocate.get(bytes2);
        String s2 = new String(bytes2, 0, bytes2.length);
        System.out.println("读取的数据2:" + s2);

        /**
         * 调用清空缓冲数据被遗忘
         */
        allocate.clear();
        System.out.println("接着去读取" + (char) allocate.get());
    } catch (Exception e) {
        e.printStackTrace();
    }

}
三:mark与reset的用法
开发当中用的不多,只是作为了解
public static void main(String[] args) {
    ByteBuffer allocate = ByteBuffer.allocate(1024);
    allocate.put("LiZhen".getBytes());
    //开启读取模式
    allocate.flip();
    byte[] bytes = new byte[allocate.limit()];
    allocate.get(bytes, 0, 2);
    System.out.println("标记前指针位置:" + allocate.position());
    System.out.println("标记前获取缓冲数据:" + new String(bytes, 0, 2));
    //标记位置
    allocate.mark();
    allocate.get(bytes, 2, 2);
    System.out.println("标记后指针位置:" + allocate.position());
    System.out.println("标记后获取缓冲数据:" + new String(bytes, 0, 2));

    //还原位置
    allocate.reset();
    System.out.println("位置还原后指针位置:" + allocate.position());
}

四:直接缓冲区与非缓冲区
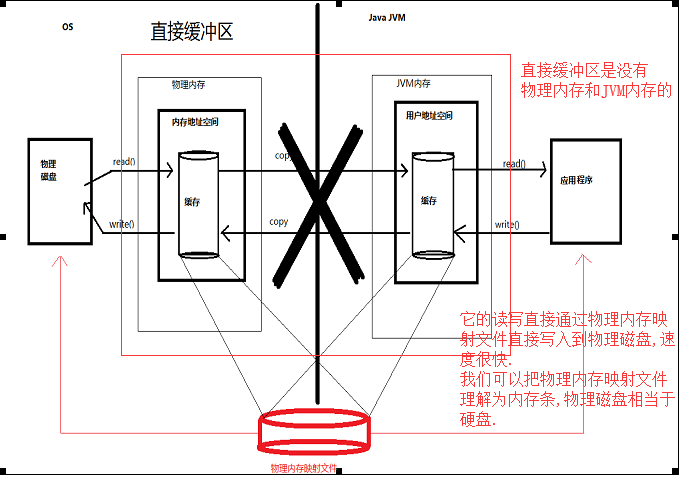
缓冲区分为两种,一种是直接缓冲区,一种是非缓冲区.
非缓冲区:存放在jvm,需要来回的拷贝
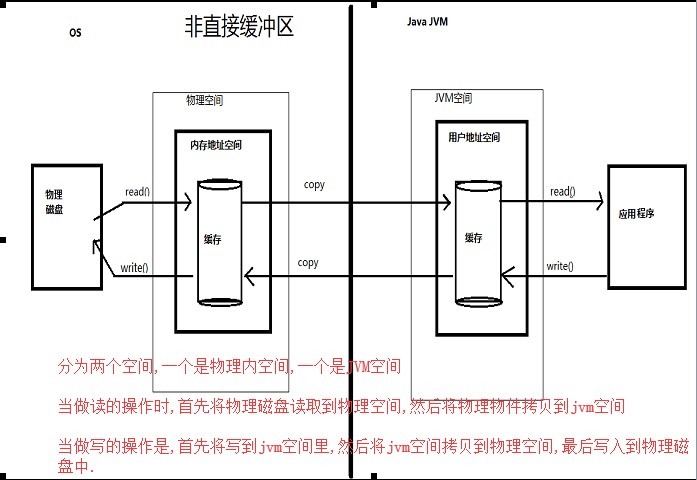
直接缓冲区:存放在物理内存中,效率高,因为不需要来回的拷贝,但是很占内存,不安全,我要清理内存的话,你中间写的瞬间就会丢失
五:实际操作直接缓冲区与非直接缓冲区
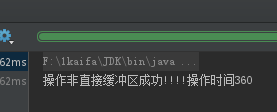
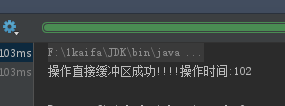
/**
 * 直接缓冲区
 * @throws IOException
 */
@Test
public void test002() throws IOException {
    long currentTimeMillis = System.currentTimeMillis();
    //创建管道
    FileChannel inputChannel = FileChannel.open(Paths.get("F:\\1.MP4"), StandardOpenOption.READ);
    FileChannel outputChannel = FileChannel.open(Paths.get("F:\\2.MP4"), StandardOpenOption.READ,StandardOpenOption.WRITE, StandardOpenOption.CREATE);
    //定义映射文件
    MappedByteBuffer inputmap = inputChannel.map(FileChannel.MapMode.READ_ONLY, 0, inputChannel.size());
    MappedByteBuffer outmap = outputChannel.map(FileChannel.MapMode.READ_WRITE, 0, inputChannel.size());
    //直接对缓冲区进行操作
    byte[] bytes = new byte[inputmap.limit()];
    inputmap.get(bytes);
    outmap.put(bytes);
    inputChannel.close();
    outputChannel.close();
    long currentTimeMillis1 = System.currentTimeMillis();
    long l = currentTimeMillis1 - currentTimeMillis;
    System.out.println("操作直接缓冲区成功!!!!操作时间:"+l);
}

/**
 * 非直接缓冲区,读写操作
 * @throws IOException
 */
@Test
public void test001() throws IOException {
    long currentTimeMillis = System.currentTimeMillis();
    //读入流
    FileInputStream fileInputStream = new FileInputStream("F:\\1.MP4");
    //写入流
    FileOutputStream fileOutputStream = new FileOutputStream("F:\\2.MP4");
    //创建通道
    FileChannel inputchannel = fileInputStream.getChannel();
    FileChannel outputchannel = fileOutputStream.getChannel();
    //分配制定大小缓冲区
    ByteBuffer allocate = ByteBuffer.allocate(1024);
    while (inputchannel.read(allocate) != -1) {
        //开启读取模式
        allocate.flip();
        //将数据写入到通道中
        outputchannel.write(allocate);
        //清空缓冲区
        allocate.clear();
    }
    //关闭通道,关闭流
    inputchannel.close();
    outputchannel.close();
    fileInputStream.close();
    fileOutputStream.close();
    long currentTimeMillis1 = System.currentTimeMillis();
    long l = currentTimeMillis1 - currentTimeMillis;
    System.out.println("操作缓冲区成功!!!!操作时间"+l);
}
从这我们可以看出操作直接缓冲区要比操作非直接缓冲区.快了好几倍
六:分散读取,聚集写入
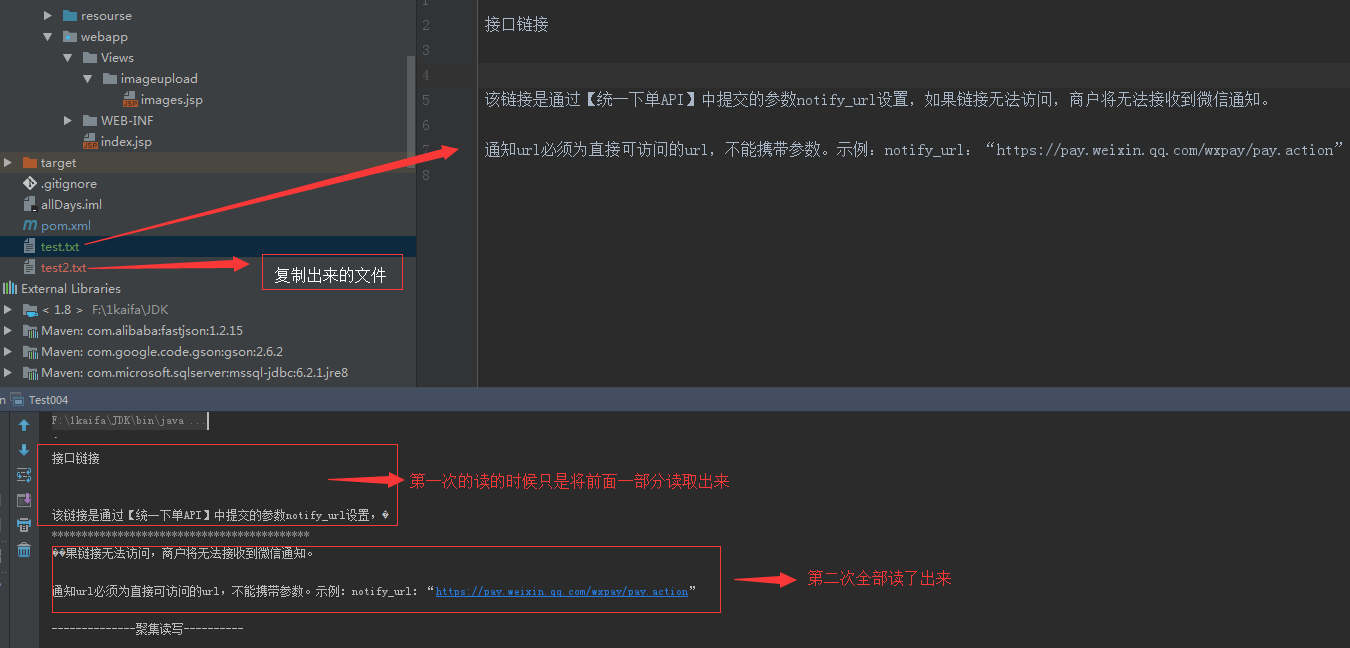
package NIO;


import java.io.IOException;
import java.io.RandomAccessFile;
import java.nio.ByteBuffer;
import java.nio.channels.FileChannel;

/**
 * Created by lizhen on 2018/3/6.
 */
public class Test004 {
    public static void main(String[] args) throws IOException {
        //随机访问
        RandomAccessFile randomAccessFile = new RandomAccessFile("test.txt", "rw");
        //获取通道
        FileChannel channel = randomAccessFile.getChannel();
        //分配大小,指定缓冲区
        ByteBuffer allocate = ByteBuffer.allocate(100);
        ByteBuffer allocate1 = ByteBuffer.allocate(1024);
        //分散读取
        ByteBuffer[] byteBuffers = {allocate,allocate1};
        channel.read(byteBuffers);
        for (ByteBuffer byteBuffer :byteBuffers){
            //切换成读写模式
            byteBuffer.flip();
        }
        System.out.println(new String(byteBuffers[0].array(),0,byteBuffers[0].limit()));
        System.out.println("*******************************************");
        System.out.println(new String(byteBuffers[1].array(),0,byteBuffers[1].limit()));
        System.out.println("--------------聚集读写----------");
        RandomAccessFile rw = new RandomAccessFile("test2.txt", "rw");
        FileChannel channel1 = rw.getChannel();
        channel1.write(byteBuffers);
        channel.close();
        channel1.close();
    }
}
我们在看一下控制台打印的效果
七:非阻塞IO与阻塞IO的区别
什么是阻塞
阻塞概念:应用程序在获取网络数据的时候,如果网络传输很慢,那么程序就一直等着,直接到传输完毕。
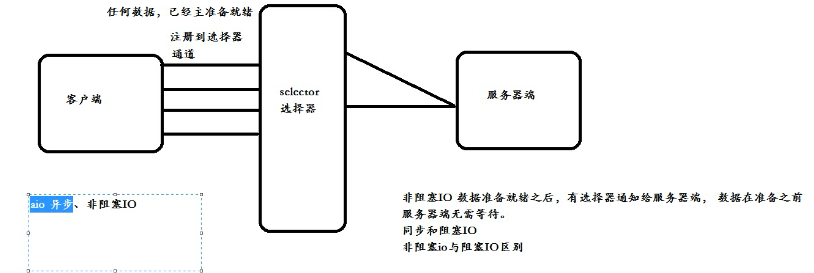
什么是非阻塞应用程序直接可以获取已经准备好的数据,无需等待.
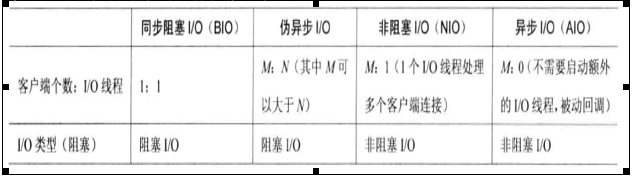
IO为同步阻塞形式,NIO为同步非阻塞形式。NIO没有实现异步,在JDK1.7之后,升级了NIO库包,支持异步费阻塞通讯模型
BIO:同步阻塞式IO,服务器实现模式为:一个连接一个线程,即客户端有连接请求时服务器端就需要启动一个线程进行处理,如果这个连接不做任何事情会造成不必要的线程开销,当然可以通过线程池机制改善(也叫伪异步)。
NIO:同步非阻塞式IO,服务器实现模式为:一个请求一个线程,即客户端发送的连接请求都会注册到多路复用器上(也叫选择器),多路复用器(选择器)轮询到连接有I/O请求时才启动一个线程进行处理。
AIO(NIO.2):异步非阻塞式IO,服务器实现模式为:一个有效请求一个线程,客户端的I/O请求都是由OS先完成了再通知服务器应用去启动线程进行处理。
伪异步
由于BIO一个客户端需要一个线程去处理,因此我们进行优化,后端使用线程池来处理多个客户端的请求接入,形成客户端个数M:线程池最大的线程数N的比例关系,其中M可以远远大于N,通过线程池可以灵活的调配线程资源,设置线程的最大值,防止由于海量并发接入导致线程耗尽。
阻塞io示意图
非阻塞io的示意图
八:NIO客户端与服务端
//nio   异步非阻塞
class Client {

    public static void main(String[] args) throws IOException {
        System.out.println("客户端已经启动....");
        // 1.创建通道
        SocketChannel sChannel = SocketChannel.open(new InetSocketAddress("127.0.0.1", 8080));
        // 2.切换异步非阻塞
        sChannel.configureBlocking(false);
        // 3.指定缓冲区大小
        ByteBuffer byteBuffer = ByteBuffer.allocate(1024);
        Scanner scanner=  new Scanner(System.in);
        while (scanner.hasNext()) {
            String str=scanner.next();
            byteBuffer.put((new Date().toString()+"\n"+str).getBytes());
            // 4.切换读取模式
            byteBuffer.flip();
            sChannel.write(byteBuffer);
            byteBuffer.clear();
        }
        sChannel.close();
    }

}

// nio
class Server {
    public static void main(String[] args) throws IOException {
        System.out.println("服务器端已经启动....");
        // 1.创建通道
        ServerSocketChannel sChannel = ServerSocketChannel.open();
        // 2.切换读取模式
        sChannel.configureBlocking(false);
        // 3.绑定连接
        sChannel.bind(new InetSocketAddress(8080));
        // 4.获取选择器
        Selector selector = Selector.open();
        // 5.将通道注册到选择器 "并且指定监听接受事件"
        sChannel.register(selector, SelectionKey.OP_ACCEPT);
        // 6. 轮训式 获取选择 "已经准备就绪"的事件
        while (selector.select() > 0) {
            // 7.获取当前选择器所有注册的"选择键(已经就绪的监听事件)"
            Iterator<SelectionKey> it = selector.selectedKeys().iterator();
            while (it.hasNext()) {
                // 8.获取准备就绪的事件
                SelectionKey sk = it.next();
                // 9.判断具体是什么事件准备就绪
                if (sk.isAcceptable()) {
                    // 10.若"接受就绪",获取客户端连接
                    SocketChannel socketChannel = sChannel.accept();
                    // 11.设置阻塞模式
                    socketChannel.configureBlocking(false);
                    // 12.将该通道注册到服务器上
                    socketChannel.register(selector, SelectionKey.OP_READ);
                } else if (sk.isReadable()) {
                    // 13.获取当前选择器"就绪" 状态的通道
                    SocketChannel socketChannel = (SocketChannel) sk.channel();
                    // 14.读取数据
                    ByteBuffer buf = ByteBuffer.allocate(1024);
                    int len = 0;
                    while ((len = socketChannel.read(buf)) > 0) {
                        buf.flip();
                        System.out.println(new String(buf.array(), 0, len));
                        buf.clear();
                    }
                }
                it.remove();
            }
        }

    }
}
这些代码我们只作为了解,因为写起来是在是很复杂,所有有了后面的Netty,它是对NIO做了一层封装
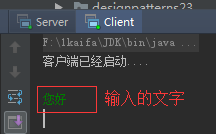
我们看一下通过浏览器和启动客户端,服务端的反应效果.


 242
242

 被折叠的 条评论
为什么被折叠?
被折叠的 条评论
为什么被折叠?
 到【灌水乐园】发言


