


BeanPostProcessor接口:
public interface BeanPostProcessor {
    Object postProcessBeforeInitialization(Object bean, String beanName) throws BeansException;

    Object postProcessAfterInitialization(Object bean,  String beanName) throws BeansException;

}
该接口中包含两个方法。BeanPostProcessor接口的作用:
通过这两个回调函数来实现自己的实例化逻辑来覆盖默认的实例化逻辑,依赖注入逻辑等等。你可以实现一个或者多个BeanPostProcessor插件当年想实现自己的某些逻辑在Spring IOC容器对Bean进行了默认初始化以后。
例子1:
Desk.java
package com.mxsm.spring.bean;

import org.springframework.beans.factory.InitializingBean;

public class Desk implements InitializingBean{

    private String width;

    private String hight;

    private String length;


    public Desk(String width, String hight, String length) {
        super();
        this.width = width;
        this.hight = hight;
        this.length = length;
    }

    public Desk() {
        super();
        // TODO Auto-generated constructor stub
    }

    public String getWidth() {
        return width;
    }

    public void setWidth(String width) {
        this.width = width;
    }

    public String getHight() {
        return hight;
    }

    public void setHight(String hight) {
        this.hight = hight;
    }

    public String getLength() {
        return length;
    }

    public void setLength(String length) {
        this.length = length;
    }

    @Override
    public void afterPropertiesSet() throws Exception {
        // TODO Auto-generated method stub
        System.out.println("############:1");
    }

    @Override
    public String toString() {
        return "Desk [width=" + width + ", hight=" + hight + ", length="
                + length + "]";
    }
}
TestBeanPostProcessor.java
package com.mxsm.spring.bean.beanpostprocessor;

import org.springframework.beans.BeansException;
import org.springframework.beans.factory.config.BeanPostProcessor;

import com.mxsm.spring.bean.Desk;

public class TestBeanPostProcessor implements BeanPostProcessor{

    @Override
    public Object postProcessBeforeInitialization(Object bean, String beanName)
            throws BeansException {
        // TODO Auto-generated method stub
        System.out.println(beanName+"   ---1");
        if(bean instanceof Desk){
            Desk d = (Desk)bean;
            System.out.println(d.getHight());
        }


        return bean;
    }

    @Override
    public Object postProcessAfterInitialization(Object bean, String beanName)
            throws BeansException {
        // TODO Auto-generated method stub
        System.out.println(beanName+"   ---2");
        if(bean instanceof Desk){
            Desk d = (Desk)bean;
            System.out.println(d.getHight());
        }
        return bean;
    }

}
Spring xml 配置:
<?xml version="1.0" encoding="UTF-8"?>
<beans xmlns="http://www.springframework.org/schema/beans"
    xmlns:xsi="http://www.w3.org/2001/XMLSchema-instance"
    xsi:schemaLocation="http://www.springframework.org/schema/beans
        http://www.springframework.org/schema/beans/spring-beans.xsd">

    <bean id="beanPostProcessor" class="com.mxsm.spring.bean.beanpostprocessor.TestBeanPostProcessor">
    </bean>

    <bean id="desk_1" class="com.mxsm.spring.bean.Desk">
        <constructor-arg name="hight" value="1.3"/>
        <constructor-arg name="length" value="1.4"/>
        <constructor-arg name="width" value="1.5"/>
    </bean>

</beans>
测试代码(Junit4进行单元测试):
package com.mxsm.spring;

import org.junit.Test;
import org.springframework.context.ApplicationContext;
import org.springframework.context.support.ClassPathXmlApplicationContext;

import com.mxsm.spring.bean.Desk;

public class SpringBeanPostProcessor {

    @Test
    public void testBeanPostProcessor(){

        @SuppressWarnings("resource")
        ApplicationContext applicationContext = new ClassPathXmlApplicationContext("application_BeanPostProcessor.xml");
        Desk desk1 = applicationContext.getBean("desk_1",Desk.class);
        System.out.println(desk1);

    }

}
代码测试接口截图:
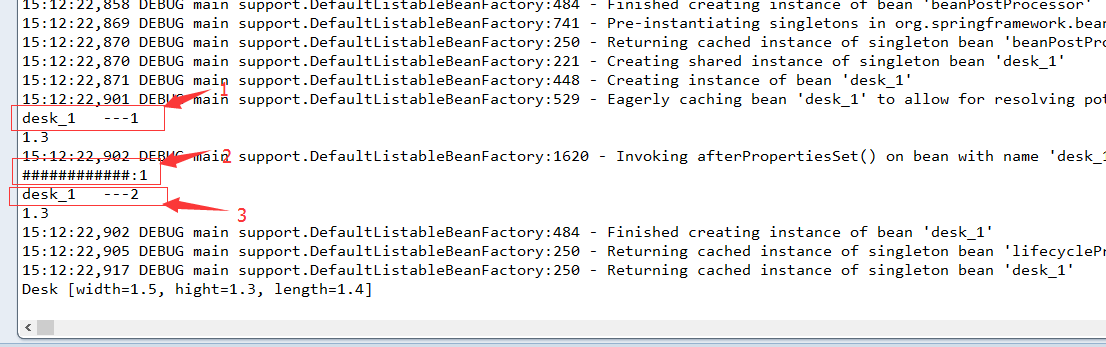
首先执行的postProcessBeforeInitialization方法,然后执行的是afterPropertiesSet最后执行postProcessAfterInitialization方法。afterPropertiesSet执行的位置要注意。
例子二:
Desk.java 和上面的一样。
Desk2.java的也一样代码。
增加一个配置文件application_BeanPostProcessor2.xml
<?xml version="1.0" encoding="UTF-8"?>
<beans xmlns="http://www.springframework.org/schema/beans"
    xmlns:xsi="http://www.w3.org/2001/XMLSchema-instance"
    xsi:schemaLocation="http://www.springframework.org/schema/beans
        http://www.springframework.org/schema/beans/spring-beans.xsd">

    <bean id="desk_2" class="com.mxsm.spring.bean.Desk2">
        <constructor-arg name="hight" value="1.888"/>
        <constructor-arg name="length" value="1.9999"/>
        <constructor-arg name="width" value="1.7777"/>
    </bean>

</beans>
测试代码增加一个方法:
    @Test
    public void testBeanPostProcessor2(){

        @SuppressWarnings("resource")
        ApplicationContext applicationContext = new ClassPathXmlApplicationContext("application_BeanPostProcessor.xml","application_BeanPostProcessor2.xml");
        Desk2 desk2 = applicationContext.getBean("desk_2",Desk2.class);
        System.out.println(desk2);


    }
测试结果:
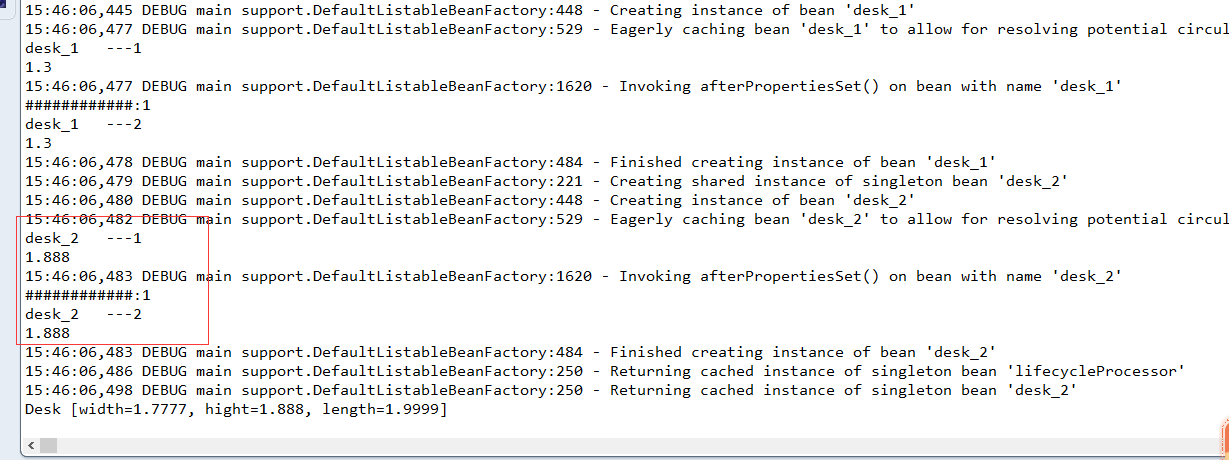
从这个例子可以看出:只要一个IOC容器定义了其他的容器能进行继承。
(备注:所有的测试代码都能在:https://github.com/mxsm找到,项目名称SpringLearnExamples)


 1069
1069

 被折叠的 条评论
为什么被折叠?
被折叠的 条评论
为什么被折叠?
 到【灌水乐园】发言


