


Spring 5 框架【完整版】
- Spring 5 框架
-
- 一、Spring 简介
- 二、IOC容器
- 三、AOP
- 四、JdbcTemplate
Spring 5 框架
一、Spring 简介
1、Spring特点
-
Spring是轻量级的开源的JavaEE,框架
-
Spring可以解决企业应用开发的复杂性。
-
Spring有两个核心部分:IOC和 Aop
(1) IOC:控制反转,把创建对象过程交给Spring进行管理(2) Aop:面向切面,不修改源代码进行功能增强
-
Spring特点
(1) 方便解耦,简化开发(2) Aop编程支持·
(3) 方便程序测试,
(4) 方便和其他框架进行整合
(5) 方便进行事务操作,
(6)降低API开发难度
2、下载spring5资源
1-百度网盘
链接:https://pan.baidu.com/s/1LqEl6jD96etBQYFT1voMfg
提取码:zp4h
2-网页下载
主要就是一些资源jar包等等
-
spring官网
https://spring.io/ -
Projects----->Spring Framework

-
选择LEARN(GA稳定版本)

-
聪给GitHub中下载

-
Access

-
Downloading a Distribution
(https://repo.spring.io)

- https://repo.spring.io


- https://repo.spring.io/release/org/springframework/spring/


1.案例一(入门)
- 创建类 Main
package com.company.demo1;

public class Main {


     public void add(){


         System.out.println("add.......");
    }


}
- 创建配置文件XML spring5_demo1.xml
<?xml version="1.0" encoding="UTF-8"?>
<beans xmlns="http://www.springframework.org/schema/beans"
       xmlns:xsi="http://www.w3.org/2001/XMLSchema-instance"
       xsi:schemaLocation="http://www.springframework.org/schema/beans http://www.springframework.org/schema/beans/spring-beans.xsd">

    <!--1.配置文件Main对象的创建-->
    <bean id="main" class="com.company.demo1.Main"></bean>

</beans>
- 创建测试类 TestSpring5
public class TestSpring5 {

    @Test
    public void testMain(){

       //1.加载spring配置文件,两种接口
        // BeanFactory(父类)/ApplicationContext(子类)

        ApplicationContext context=
                new ClassPathXmlApplicationContext("spring5_demo1.xml");
        //2.获取配置文件的对象
        Main main=context.getBean("main",Main.class);
       //输出类的对象
        System.out.println(main);
       //输出方法信息
        main.add();
    }
}
- 测试结果

二、IOC容器
(1)、IOC底层原理
(2)、IOC接口( BeanFactory)
(3)、IOC操作 Bean管理(基于xml)
(4)、IOC操作Bean管理(基于注解)
1、什么是IOC(概念和原理)
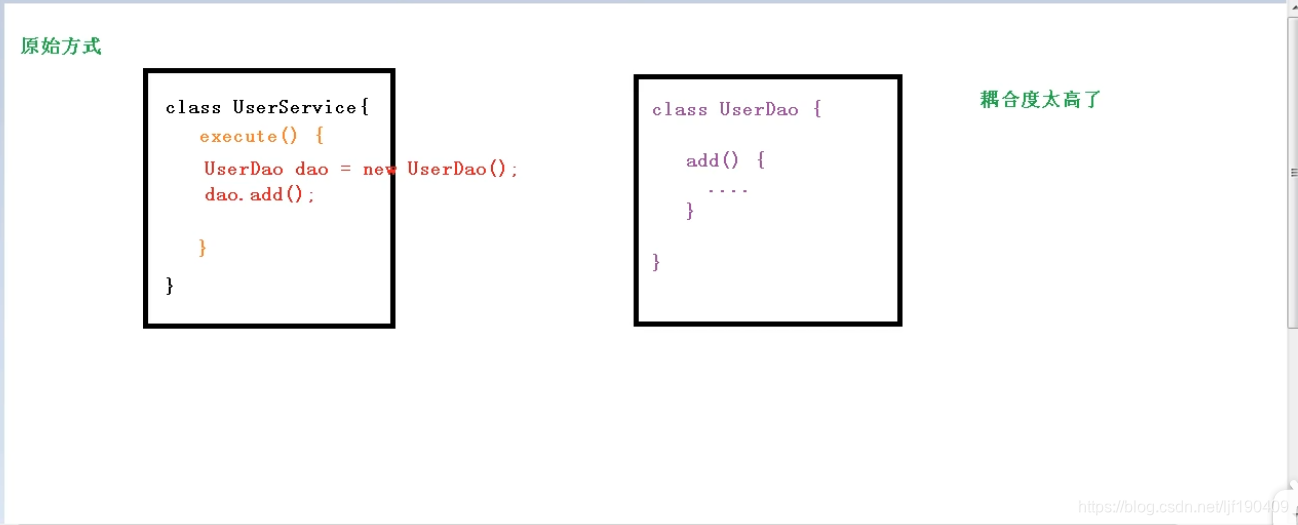
1.1、什么是IOC(控制反转)
a)把对象创建和对象之间的调用过程,交给Spring进行管理
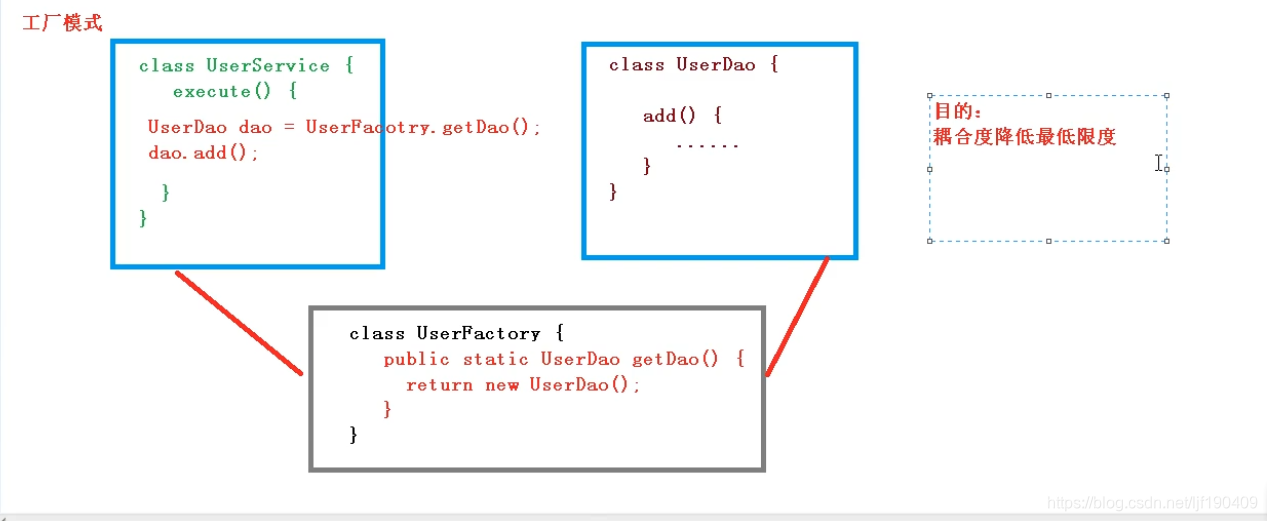
b)使用IOC目的:为了降低耦合度
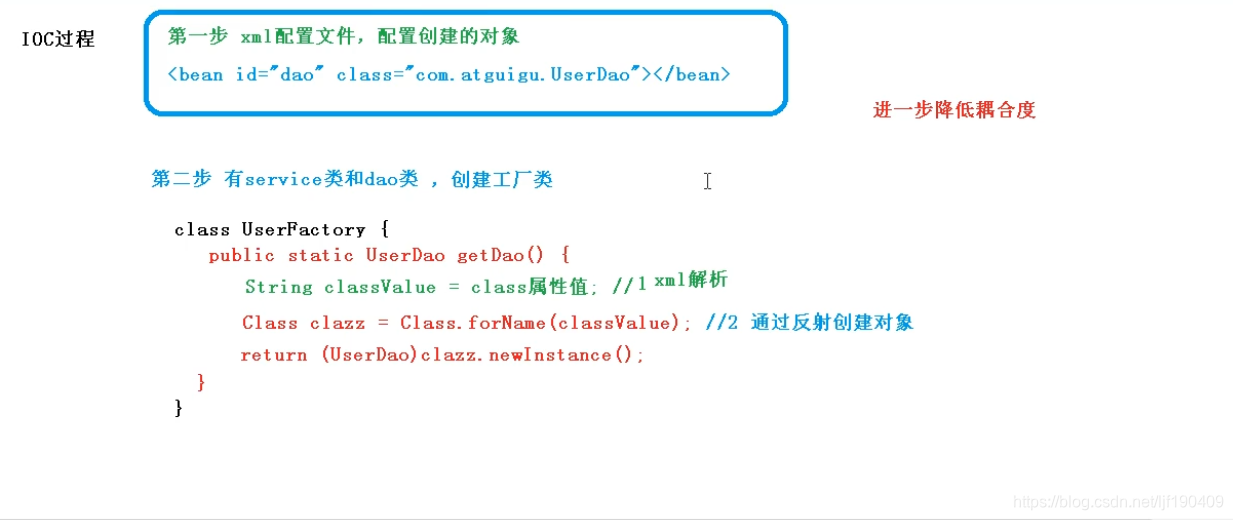
1.2、 IOC底层
a)xml解析、工厂模式、反射
1.3、IOC底层原理过程
2、IOC(接口)
-
IOC思想基于IOC容器完成,IOC容器底层就是对象工厂
-
Spring 提供IOC容器实现两种方式:(两个接口)。
a)BeanFactory接口:
-----IOC容器基本实现,是Spring内部接口的使用接口,不提供给开发人员进行使用(加载配置文件时候不会创建对象,在获取对象时才会创建对象。) b)ApplicationContext接口:
-----BeanFactory接口的子接口,提供更多更强大的功能,提供给开发人员使用(加载配置文件时候就会把在配置文件对象进行创建)//1.加载spring配置文件,两种接口 // BeanFactory(父类) / ApplicationContext(子类) ApplicationContext context= new ClassPathXmlApplicationContext("spring5_demo1.xml"); //2.获取配置文件的对象 Main main=context.getBean("main",Main.class); -
ApplicationContext接口的实现类
3、IOC操作Bean管理
3.1、什么是Bean管理
(1)Bean管理就是两个操作:
(2)Spring创建对象;
(3)Spring注入属性;
3.2、Bean管理操作有两种工作方式
(1)基于xml配置文件方式实现
(2)基于注解方式实现
4、IOC操作Bean管理( 基于xml配置文件方式 )
4.1、基于XML方式创建对象
   <!--1.配置文件Main对象的创建-->
    <bean id="main" class="com.company.demo1.Main"></bean>
- (1)在spring配置文件中,使用bean标签,标签里面添加对应属性,就可以实现对象创建
- (2)在bean标签有很多属性,介绍常用的属性
- id属性:唯一标识
- class属性:类的路径(包类路径)
- (3)创建对象时候,默认也是执行无参数构造方法v
4.2、基于XML方式注入属性
-
DI : 依赖注入,就是注入属性
a : 第一种注入方式:使用set方法
b : 第二种注入方式:有参构造注入
c : p名称空间注入,可以简化基于xml配置方式。(了解)
4.3、第一种注入方式:使用set方法
案例:
/*
*实体类
*/
public class Book {

  	private  String bname;
    private  String ba;
    private  String address;


//set方法注入

    public void setBname(String bname) {

        this.bname = bname;

    }
    public  void setBa(String ba){


        this.ba = ba;
    }
    public  void setAddress(String address) {

        this.address = address;
    }
//输出结果
    public void add1(){

        System.out.println(bname+"::"+ba+"::"+address);
    }
}
<!-- 配置文件-->
<?xml version="1.0" encoding="UTF-8"?>
<beans xmlns="http://www.springframework.org/schema/beans"
xmlns:xsi="http://www.w3.org/2001/XMLSchema-instance"
xsi:schemaLocation="http://www.springframework.org/schema/beans http://www.springframework.org/schema/beans/spring-beans.xsd">
<!-- 2.set方法注入属性-->
<bean id="book" class="com.company.demo1.Book">
<!-- 使用property完成属性的注入
name:类里面的属性名称
value:向属性注入的值
-->
<property name="bname" value="易筋经"></property>
<property name="ba" value="老子"></property>
<!-- NUll值 -->
<!-- <property name="address">-->
<!-- <null></null>-->
<!-- </property>-->
<!-- 属性值包含特殊符号 value="<<南京>>"
1.把<>进行转义<>
2.把带特殊符号内容写入CDATA
-->
<property name="address">
<value><![CDATA[<<南京>>]]></value>
</property>
</bean>
</beans>
/*
* 测试类
*/
    @Test
    public void testBook(){

        //1.加载spring配置文件,两种接口
        // BeanFactory(父类)/ApplicationContext(子类)

        ApplicationContext context=
                new ClassPathXmlApplicationContext("spring5_demo1.xml");
        //2.获取配置文件的对象
        Book book= context.getBean("book",Book.class)
        System.out.println(book);
        book.add1();
    }

4.4、第二种注入方式:有参构造注入
案例:
/*
*实体类
*/
package com.company.demo1;

public class Orders {

    private String oname;
    private String address;


    public Orders(String oname, String address) {

        this.oname = oname;
        this.address = address;
    }
    public void add(){

        System.out.println(oname+"::"+address);
    }
}
<!--  配置文件-->
<!--    3.有参构造注入属性-->
    <bean id="orders" class="com.company.demo1.Orders">
        <constructor-arg name="oname" value="abc"></constructor-arg>
        <constructor-arg name="address" value="China"></constructor-arg>
    </bean>
/*
* 测试类
*/
   @Test
    public void testOrders(){

        //1.加载spring配置文件,两种接口
        // BeanFactory(父类)/ApplicationContext(子类)

        ApplicationContext context=
                new ClassPathXmlApplicationContext("spring5_demo1.xml");
        //2.获取配置文件的对象
        Orders orders= context.getBean("orders",Orders.class);

        System.out.println(orders);
        orders.add();
    }

4.5、第三种注入方式,p名称空间注入,可以简化基于xml配置方式。(了解)
<!--1、添加p名称空间在配置文件头部-->
<?xml version="1.0" encoding="UTF-8"?>
<beans xmlns="http://www.springframework.org/schema/beans"
       xmlns:xsi="http://www.w3.org/2001/XMLSchema-instance"
       xmlns:p="http://www.springframework.org/schema/p"		<!--在这里添加一行p-->

<!--2、在bean标签进行属性注入(算是set方式注入的简化操作)-->

    <bean id="orders" class="com.company.demo1.Orders" p:oname="abc" p:address="China">

    </bean>
5、IOC操作Bean管理( xml方式注入其他类型属性 )
5.1、字面量–NULL值
案例:
/*
*实体类
*/
public class Book {

  	private  String bname;
    private  String ba;
    private  String address;


//set方法注入

    public void setBname(String bname) {

        this.bname = bname;

    }
    public  void setBa(String ba){


        this.ba = ba;
    }
    public  void setAddress(String address) {

        this.address = address;
    }
//输出结果
    public void add1(){

        System.out.println(bname+"::"+ba+"::"+address);
    }
}
<!--  配置文件-->
<?xml version="1.0" encoding="UTF-8"?>
<beans xmlns="http://www.springframework.org/schema/beans"
       xmlns:xsi="http://www.w3.org/2001/XMLSchema-instance"
       xsi:schemaLocation="http://www.springframework.org/schema/beans http://www.springframework.org/schema/beans/spring-beans.xsd">

<!--    2.set方法注入属性-->
    <bean id="book" class="com.company.demo1.Book">
    <!-- 使用property完成属性的注入
        name:类里面的属性名称
        value:向属性注入的值
     -->
        <property name="bname" value="易筋经"></property>
        <property name="ba" value="老子"></property>

        <!-- NUll值 -->
       <property name="address">
            <null></null>
       </property>

    </bean>
</beans>
/*
* 测试类
*/
    @Test
    public void testBook(){

        //1.加载spring配置文件,两种接口
        // BeanFactory(父类)/ApplicationContext(子类)

        ApplicationContext context=
                new ClassPathXmlApplicationContext("spring5_demo1.xml");
        //2.获取配置文件的对象
        Book book= context.getBean("book",Book.class)
        System.out.println(book);
        book.add1();
    }
5.2、字面量–属性包含特殊符号
案例:
/*
*实体类
*/
public class Book {

  	private  String bname;
    private  String ba;
    private  String address;


//set方法注入

    public void setBname(String bname) {

        this.bname = bname;

    }
    public  void setBa(String ba){


        this.ba = ba;
    }
    public  void setAddress(String address) {

        this.address = address;
    }
//输出结果
    public void add1(){

        System.out.println(bname+"::"+ba+"::"+address);
    }
}
<!-- 配置文件-->
<?xml version="1.0" encoding="UTF-8"?>
<beans xmlns="http://www.springframework.org/schema/beans"
xmlns:xsi="http://www.w3.org/2001/XMLSchema-instance"
xsi:schemaLocation="http://www.springframework.org/schema/beans http://www.springframework.org/schema/beans/spring-beans.xsd">
<!-- 2.set方法注入属性-->
<bean id="book" class="com.company.demo1.Book">
<!-- 使用property完成属性的注入
name:类里面的属性名称
value:向属性注入的值
-->
<property name="bname" value="易筋经"></property>
<property name="ba" value="老子"></property>
<!-- 属性值包含特殊符号 value="<<南京>>"
1.把<>进行转义<>
2.把带特殊符号内容写入CDATA
-->
<property name="address">
<value><![CDATA[<<南京>>]]></value>
</property>
</bean>
</beans>
/*
* 测试类
*/
    @Test
    public void testBook(){

        //1.加载spring配置文件,两种接口
        // BeanFactory(父类)/ApplicationContext(子类)

        ApplicationContext context=
                new ClassPathXmlApplicationContext("spring5_demo1.xml");
        //2.获取配置文件的对象
        Book book= context.getBean("book",Book.class)
        System.out.println(book);
        book.add1();
    }
5.3、注入属性-外部Bean
<!--1 service和dao对象创建-->
<bean id="userService" class="com.company.demo2.service.UserService">
    <!--注入userDao对象
        name属性:类里面属性名称
        ref属性:创建userDao对象bean标签id值
    -->
    <property name="userDao" ref="userDaoImpl"></property>
</bean>
<bean id="userDaoImpl" class="com.company.demo2.dao.UserDaoImpl"></bean>
-
创建两个类service类和dao类
-
在service调用dao里面的方法
-
在spring配置文件中进行配置,
案例:
package com.company.demo2.dao;

public interface UserDao {

    public void update();
}
package com.company.demo2.dao;

public class UserDaoImpl implements UserDao {

    @Override
    public void update() {


        System.out.println("dao update...........");
    }
}
package com.company.demo2.service;

import com.company.demo2.dao.UserDao;

public class UserService {

    //创建UserDao类型属性,生成set方法
    private UserDao userDao;

    public void setUserDao(UserDao userDao) {

        this.userDao = userDao;
    }

    public void add() {

        System.out.println("service add...............");
        userDao.update();//调用dao方法
    }
}
<?xml version="1.0" encoding="UTF-8"?>
<beans xmlns="http://www.springframework.org/schema/beans"
       xmlns:xsi="http://www.w3.org/2001/XMLSchema-instance"
       xsi:schemaLocation="http://www.springframework.org/schema/beans http://www.springframework.org/schema/beans/spring-beans.xsd">


<!-- 注入属性-外部bean   -->

    <!--1 service和dao对象创建-->
    <bean id="userService" class="com.company.demo2.service.UserService">
        <!--注入userDao对象
            name属性:类里面属性名称
            ref属性:创建userDao对象bean标签id值
        -->
        <property name="userDao" ref="userDaoImpl"></property
最低0.47元/天 解锁文章


 6852
6852


 被折叠的 条评论
为什么被折叠?
被折叠的 条评论
为什么被折叠?
 到【灌水乐园】发言


