


iOS 实现一个类似电商购物车界面示例
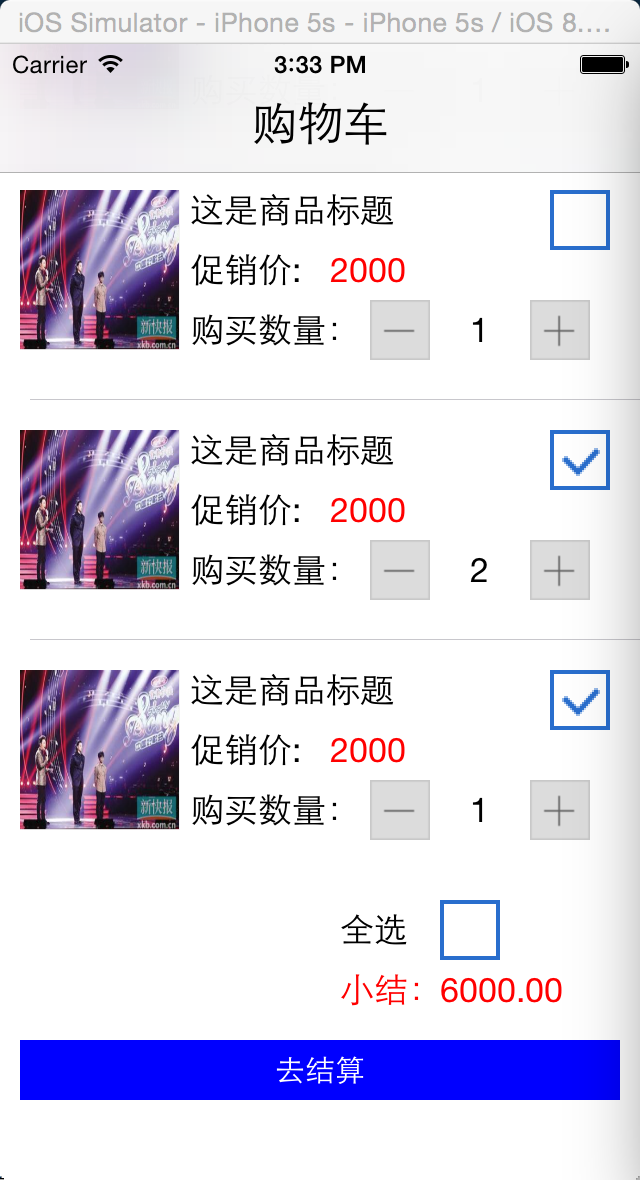
主要实现了商品的展示,并且可以对商品进行多选操作,以及改变商品的购买数量。与此同时,计算出,选中的总价格。
做此类型项目:要注意的:视图与数据要分离开来。视图的展现来源是数据模型层。所以我做的操作就是改变数据层的内容,在根据数据内容,去更新视图界面。
已下是具体实现思路与代码:
1. 实现步骤
- 在AppDelegate.m中包含ViewController.h头文件,创建ViewController对象(vc),接着创建一个UINavigationController对象(nVC)将vc设置为自己的根视图,最后设置self.window.rootViewController为nVC。
- 在ViewController.m中创建一个全局的可变数组,并往里面添加表格需要的数据字典对象。
- 创建一个GoodsInfoModel 类,继承于NSObject 类,用于做数据模型
- 创建一个MyCustomCell 类 ,继承于UITableViewCell,自定义单元格类
- 在MyCustomCell.m 类中,实现单元格的布局
- 在 ViewController.m 创建表格视图,并且创建表格尾部视图
- MyCustomCell 类中定义协议,实现代理,完成加、减的运算。
- 在 ViewController.m 实现全选运算。
2. 代码实现
2.1 完成界面的导航栏创建
在AppDelegate.m中包含ViewController.h头文件,创建ViewController对象(vc),接着创建一个UINavigationController对象(nVC)将vc设置为自己的根视图,最后设置self.window.rootViewController为nVC。
2.1.1 代码
在AppDelegate.m的 - (BOOL)application:(UIApplication)application didFinishLaunchingWithOptions:(NSDictionary )launchOptions方法中实现以下代码(记得包含#import "ViewController.h"):
//创建窗口
self.window = [[UIWindow alloc]initWithFrame:[UIScreen mainScreen].bounds];
self.window.backgroundColor = [UIColor whiteColor];
//创建一个导航控制器,成为根视图
UINavigationController *nav = [[UINavigationController alloc]initWithRootViewController:[ViewController new]];
self.window.rootViewController = nav;
//显示窗口
[self.window makeKeyAndVisible];
在 ViewController.m 的 viewDidLoad 中去设置,导航栏标题
self.title = @"购物车";
//设置标题的属性样式等
[self.navigationController.navigationBar setTitleTextAttributes:@{NSForegroundColorAttributeName : [UIColor blackColor],NSFontAttributeName:[UIFont systemFontOfSize:23.0f]}];
效果图:
2.2 创建一个模型类用于存放数据模型
创建一个GoodsInfoModel 类 ,继承于 NSObject
实现代码如下: GoodsInfoModel.h 中
@interface GoodsInfoModel : NSObject
@property(strong,nonatomic)NSString *imageName;//商品图片
@property(strong,nonatomic)NSString *goodsTitle;//商品标题
@property(strong,nonatomic)NSString *goodsPrice;//商品单价
@property(assign,nonatomic)BOOL selectState;//是否选中状态
@property(assign,nonatomic)int goodsNum;//商品个数
-(instancetype)initWithDict:(NSDictionary *)dict;
@end
GoodsInfoModel.m 中
-(instancetype)initWithDict:(NSDictionary *)dict
{
if (self = [super init])
{
self.imageName = dict[@"imageName"];
self.goodsTitle = dict[@"goodsTitle"];
self.goodsPrice = dict[@"goodsPrice"];
self.goodsNum = [dict[@"goodsNum"]intValue];
self.selectState = [dict[@"selectState"]boolValue];
}
return self;
}
2.3 创建设置表格数据的数据
在ViewController.m中创建一个全局的可变数组,并往里面添加表格需要的数据字典对象。
2.3.1 代码
在ViewController.m的- (void)viewDidLoad中实现以下代码(先在ViewController.m中声明infoArr对象)。代码如下
@interface ViewController ()<UITableViewDataSource,UITableViewDelegate,MyCustomCellDelegate>
{
UITableView *_MyTableView;
float allPrice;
NSMutableArray *infoArr;
}
@property(strong,nonatomic)UIButton *allSelectBtn;
@property(strong,nonatomic)UILabel *allPriceLab;
@end
---------------------------------------------------------------
//初始化数据
allPrice = 0.0;
 最低0.47元/天 解锁文章


 2740
2740

 被折叠的 条评论
为什么被折叠?
被折叠的 条评论
为什么被折叠?
 到【灌水乐园】发言


