


☣SpringSecurity权限管理框架
✧ 什么是安全框架?
解决系统安全问题的框架。如果没有安全框架,我们需要手动处理每个资源的访问控制,非常麻烦。使用安全框架,我们可以通过配置的方式实现对资源的访问限制。
✧ 常用的权限管理框架:
✧Spring Security:Spring系列的权限管理框架,内部带有AOP,DI,IOC的功能,约定大于配置的特点,大大的提高了对权限的代码效率,主要是**认证**,和**授权**两个模块。
✧Apache Shiro:一个功能强大且易于使用的Java安全框架,提供了认证,授权,加密,和会话管理。
☣⇢目录⇠☣
一、快速入门
1、入门小案例
① 新建一个java项目引入依赖
<parent>
    <groupId>org.springframework.boot</groupId>
    <artifactId>spring-boot-starter-parent</artifactId>
    <version>2.2.2.RELEASE</version>
    <relativePath/>
    <!-- lookup parent from repository -->
  </parent>

 <!--spring security 组件-->
    <dependency>
      <groupId>org.springframework.boot</groupId>
      <artifactId>spring-boot-starter-security</artifactId>
    </dependency>
    <!--web 组件-->
    <dependency>
      <groupId>org.springframework.boot</groupId>
      <artifactId>spring-boot-starter-web</artifactId>
    </dependency>
    <!-- test 组件-->
    <dependency>
      <groupId>org.springframework.boot</groupId>
      <artifactId>spring-boot-starter-test</artifactId>
      <scope>test</scope>
      <exclusions>
        <exclusion>
          <groupId>org.junit.vintage</groupId>
          <artifactId>junit-vintage-engine</artifactId>
        </exclusion>
      </exclusions>
    </dependency>
    <dependency>
      <groupId>org.springframework.security</groupId>
      <artifactId>spring-security-test</artifactId>
      <scope>test</scope>
    </dependency>

<build>
    <plugins>
      <plugin>
        <groupId>org.springframework.boot</groupId>
        <artifactId>spring-boot-maven-plugin</artifactId>
      </plugin>
    </plugins>
  </build>
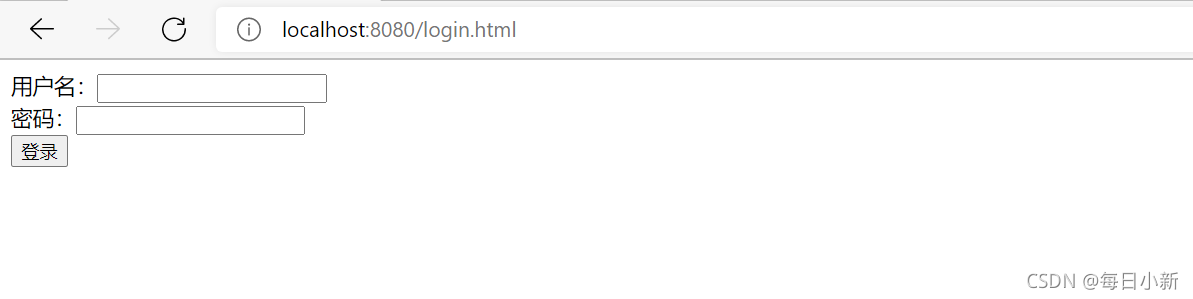
② 编写一个resource/static/login.html静态页面准备
<!DOCTYPE html>
<html lang="en">
<head><meta charset="UTF-8">
    <title>Title</title>
</head>
<body>
<form action="/login" method="post">
    用户名:<input type="text" name="userName" /><br/>
    密码:<input type="password" name="passWord" /><br/>
    <input type="submit" value="登录" />
</form>
</body>
</html>
③ 创建启动项目的Start类
@SpringBootApplication
public class SpringSecurityApplication {
    public static void main(String[] args) {
        SpringApplication.run(SpringSecurityApplication.class);
    }
}
启动测试

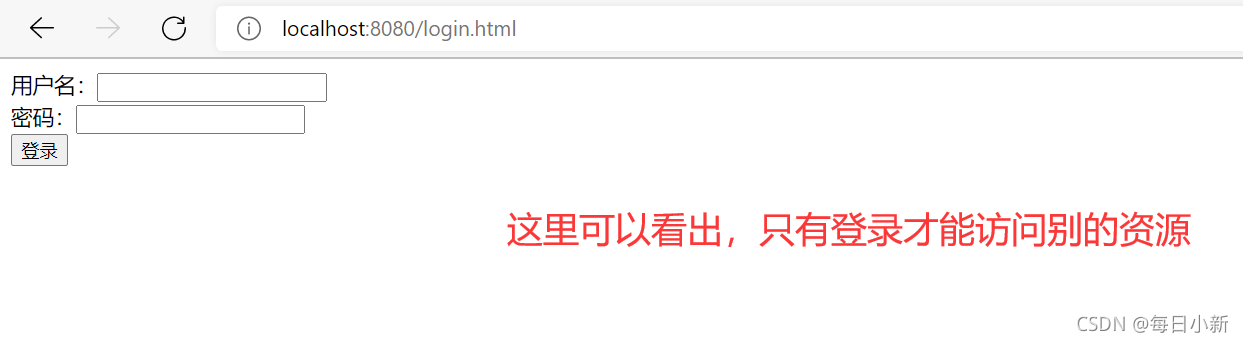
总结:SpringSecurity默认需要登录才能访问其他资源,否则全部都会被拦截
2、如何才能使用自定义登录逻辑?
想要自定义用户登录,则需要配置一个SpringSecurityService.java和一个SpringSecurityConfig.java
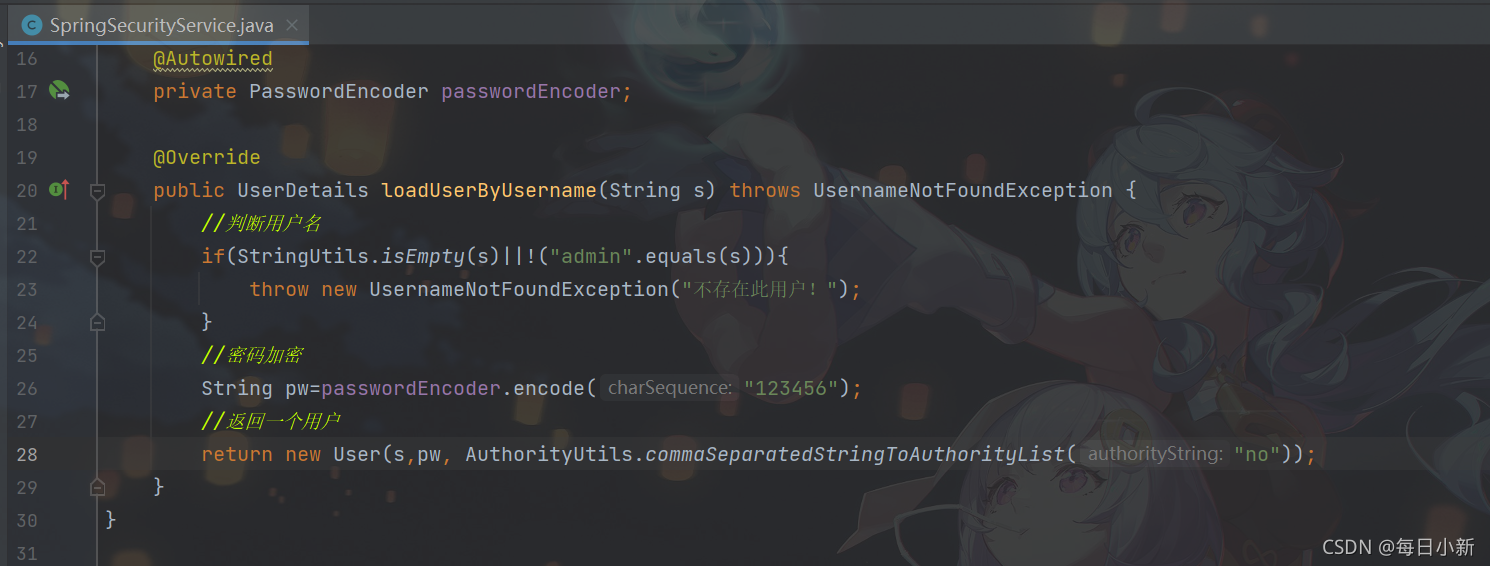
✧ SpringSecurityService.java:实现接口UserDetailsService,重写loadUserByUsername(String s)方法,在方法里自定义用户(通过这个方法链接数据库进行用户查询)这里定义用户名:admin,密码:123456
@Service
/*自定义用户*/
public class SpringSecurityService implements UserDetailsService {
    @Autowired
    private PasswordEncoder passwordEncoder;

    @Override
    public UserDetails loadUserByUsername(String s) throws UsernameNotFoundException {
        //判断用户名
        if(StringUtils.isEmpty(s)||!("admin".equals(s))){
            throw new UsernameNotFoundException("不存在此用户!");
        }
        //密码加密
        String pw=passwordEncoder.encode("123456");
        //返回一个用户,以及权限或角色
        return new User(s,pw, AuthorityUtils.commaSeparatedStringToAuthorityList("admin,normal"));
    }
}
✧ SpringSecurityConfig.java:项目配置文件,内部配置密码加密接口的实现类PasswordEncoder
@SpringBootConfiguration
/*登录页面自定义*/
public class SpringSecurityConfig {
    //配置passwordEncode的实现类
    @Bean
    public PasswordEncoder passwordEncoder(){
        return new BCryptPasswordEncoder();
    }
}

总结:这里实现了接口UserDetailsService接口为了自定义用户,使用PasswordEncoder接口类,实现了密码的加密!
3、如何默认使用自己的login页面
修改配置文件需要实现接口WebSecurityConfigurerAdapter类,重写方法configure(HttpSecurity http)进行页面的指定,和权限的拦截。
@SpringBootConfiguration
/*登录页面自定义*/
public class SpringSecurityConfig extends WebSecurityConfigurerAdapter {

    //配置passwordEncode的实现类
    @Bean
    public PasswordEncoder passwordEncoder(){
        return new BCryptPasswordEncoder();
    }

    //重写方法配置
    @Override
    protected void configure(HttpSecurity http) throws Exception {
        //关闭csrf
        http.csrf().disable();
        //配置登录页面
        http.formLogin()
                .loginPage("/login.html")
                .loginProcessingUrl("/login")
                //登陆成功
                .successForwardUrl("/tomain")
                //登录失败
                .failureForwardUrl("/toagain")
                //配置登录参数
                //.usernameParameter("userName")
                //.passwordParameter("passWord");
        //权限配置
        http.authorizeRequests()
                //以下允许访问
                .antMatchers("/login.html","/login").permitAll()
                //配置其他资源必须登录才能访问
                .anyRequest().authenticated();
    }
}
补充:这里登录成功或者失败跳转内容需要写一个Controller层
@RestController
public class MainController {

    @PostMapping("/tomain")
    public String main(){
        return "欢迎登录";
    }

	@GetMapping("login")
    public String toLogin(){
        return "Hello SpringSecurity";
    }

    @PostMapping("/toagain")
    public String toagain(){
        return "登录失败,请重新<a href=\"/login.html\">登录</a>";
    }
}
二、知识点解析
①、UserDetailsService详解
当什么也没有配置的时候,账号和密码是由 Spring Security 定义生成的。而在实际项目中账号和密码都是从数据库中查询出来的。所以我们要通过自定义逻辑控制认证逻辑。如果需要自定义逻辑时,只需要实现 UserDetailsService 接口即可。接口定义如下:

返回值 UserDetails 是一个接口,定义如下
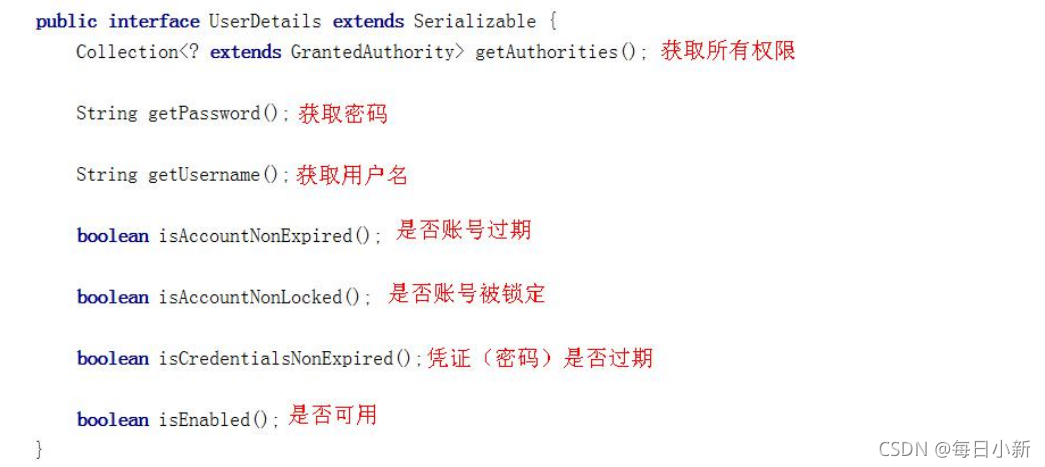
要想返回 UserDetails 的实例就只能返回接口的实现类,也就是User类,容易与我们平时定义的User类混淆,User类提供很多方法,此处我们使用它的带参构造器。

- username :用户名
- password :密码
- authorities :用户具有的权限。此处不允许为 null(
多个权限用逗号分割)
②、 PasswordEncoder 密码解析器详解
当我们使用密码加密时,需要使用接口的实现类,因此需要单独在配置文件中配置指定它的实现类,因为它的实现类过多。
接口介绍:
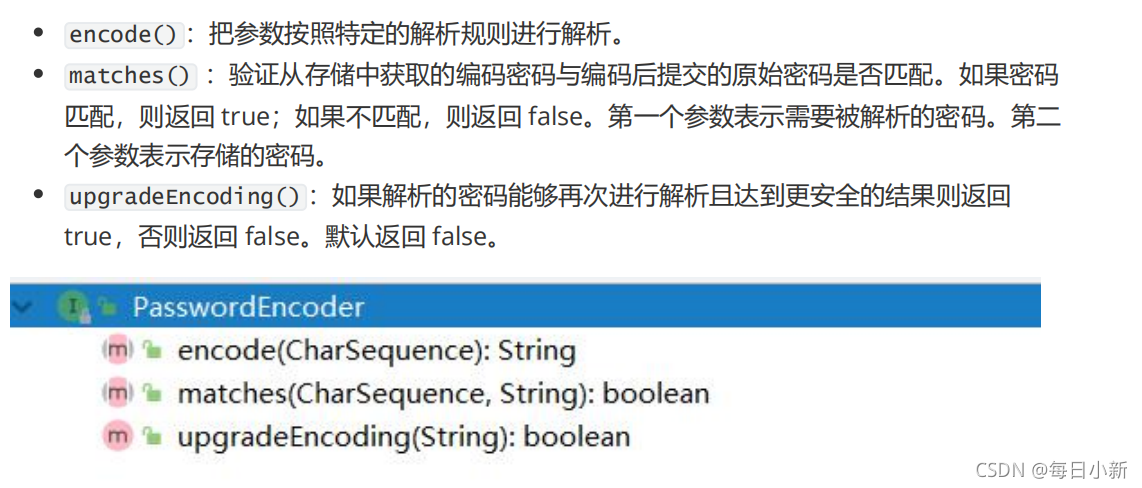
BCryptPasswordEncoder 是 Spring Security 官方推荐的密码解析器,平时多使用这个解析器。BCryptPasswordEncoder 是对 bcrypt 强散列方法的具体实现。是基于Hash算法实现的单向加密。可以通过strength控制加密强度,默认 10.
测试:》》》》
@SpringBootTest
public class SecurityTest {
    @Test
    public void test(){
        PasswordEncoder passwordEncoder=new BCryptPasswordEncoder();
        System.out.println(passwordEncoder.encode("1234"));
    }
}
③、认证过程其他常用配置(内置控制访问方法)
(1)通过Handle修改登录成功和登录失败
- SecuritySuccessHandle 类(定义成功类通过继承来重写方法
onAuthenticationSuccess)
@Component
public class SecuritySuccessHandle implements AuthenticationSuccessHandler {
    @Override
    public void onAuthenticationSuccess(HttpServletRequest httpServletRequest, HttpServletResponse httpServletResponse, Authentication authentication) throws IOException, ServletException {
        //设置编码格式
        httpServletRequest.setCharacterEncoding("utf-8");
        httpServletResponse.setContentType("application/json,charset=utf-8");
        httpServletResponse.setCharacterEncoding("utf-8");
        //打印流
        PrintWriter printWriter=null;
        printWriter=httpServletResponse.getWriter();
        printWriter.write("{\"code\":200,\"msg\",\"登陆成功\"}");
    }
}
- SecurityFailHandle类(定义登录失败类继承重写方法
onAuthenticationFailure)
@Component
public class SecurityFailHandle implements AuthenticationFailureHandler {

    @Override
    public void onAuthenticationFailure(HttpServletRequest httpServletRequest, HttpServletResponse httpServletResponse, AuthenticationException e) throws IOException, ServletException {
        //设置编码格式
        httpServletRequest.setCharacterEncoding("utf-8");
        httpServletResponse.setContentType("application/json,charset=utf-8");
        httpServletResponse.setCharacterEncoding("utf-8");
        //打印流
        PrintWriter printWriter=null;
        printWriter=httpServletResponse.getWriter();
        printWriter.write("{\"code\":500,\"msg\",\"登陆失败\"}");
    }
}
- 修改
SpringSecurityConfig配置文件
@SpringBootConfiguration
/*内部访问控制*/
public class SpringSecurityConfig2 extends WebSecurityConfigurerAdapter {
//引入handle
@Autowired
SecuritySuccessHandle securitySuccessHandle;
@Autowired
SecurityFailHandle securityFailHandle;
//配置passwordEncode的实现类
@Bean
public PasswordEncoder passwordEncoder(){
return new BCryptPasswordEncoder();
}
//重写方法配置
@Override
protected void configure(HttpSecurity http) throws Exception {
//关闭csrf
http.csrf().disable();
//配置登录页面
http.formLogin()
.loginPage("/login.html")
.loginProcessingUrl("/login")
//登陆成功handle
.successHandler(securitySuccessHandle)//Post请求
//登录失败handle
.failureHandler(securityFailHandle)
//配置登录参数
.usernameParameter("userName")
.passwordParameter("passWord");
//权限配置
http.authorizeRequests()
//一下允许访问
.antMatchers("/login.html","/login").permitAll()
//资源不被任何人访问
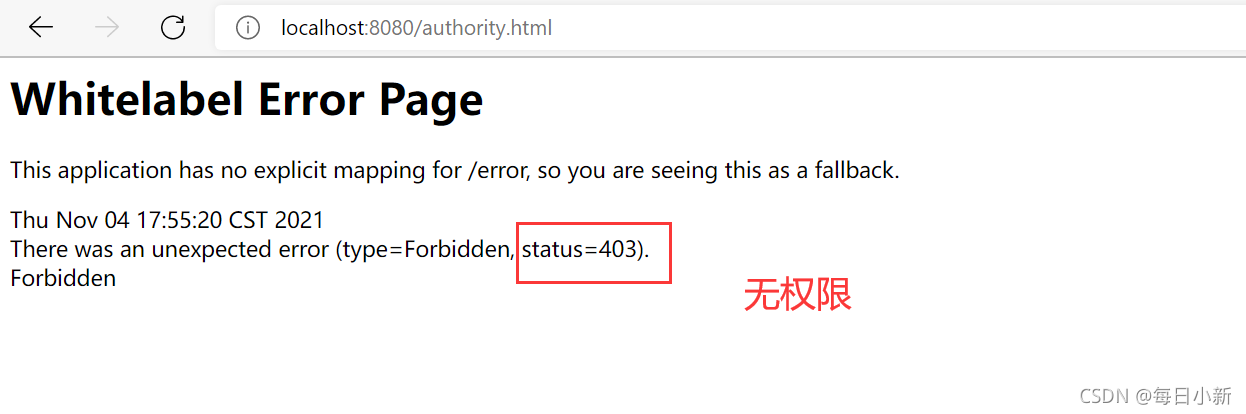
.antMatchers("/denyall.html").denyAll()
//There was an unexpected error (type=Forbidden, status=403).
//配置其他资源必须登录才能访问
.anyRequest().authenticated();//放在最后
}
}
⭐上面的案例一个实现AuthenticationSuccessHandler成功接口,一个实现失败接口AuthenticationFailureHandler,常用方法:
- authentication.getAuthorities():获取用户权限信息
- authentication.getPrincipal():获取用户信息
⭐常用内置控制方法:
- anyRequest():全部拦截
- authenticated():需要认证才能访问
- antMatchers():?(单个字符),*(零个多个字符),**(零个多个目录)
- permitAll():放行通常与antMatchers()配合使用
重点 - regexMathchers():正则表达式匹配模式eg: .+[.]js
- anonymous():匿名访问与permitAll相似
- antMathcher().denyAll():资源不被任何人访问
- antmatchers().rememberMe():记住我的情况下才能访问我的资源
- antMatchers().fullyAuthenticated():没记住我访问的资源
三、角色权限控制
1、权限访问控制
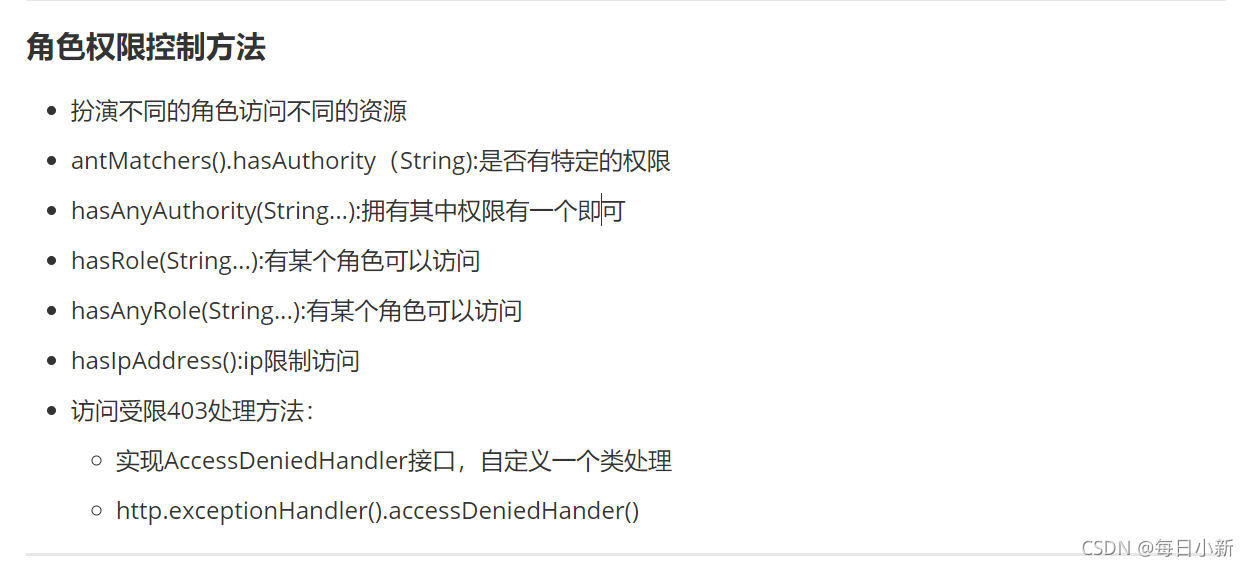
- antMatchers().hasAuthority(String):是否有特定的权限
- antMatchers().hasAnyAuthority(String…):拥有其中权限有一个即可
修改配置文件SpringSecurityConfig.java
//@SpringBootConfiguration
/*角色权限访问控制*/
public class SpringSecurityConfig3 extends WebSecurityConfigurerAdapter {
//引入handle
@Autowired
SecuritySuccessHandle securitySuccessHandle;
@Autowired
SecurityFailHandle securityFailHandle;
//配置passwordEncode的实现类
@Bean
public PasswordEncoder passwordEncoder(){
return new BCryptPasswordEncoder();
}
//重写方法配置
@Override
protected void configure(HttpSecurity http) throws Exception {
//关闭csrf
http.csrf().disable();
//配置登录页面
http.formLogin()
.loginPage("/login.html")
.loginProcessingUrl("/login")
//登陆成功handle
.successHandler(securitySuccessHandle)//Post请求
//登录失败handle
.failureHandler(securityFailHandle)
//配置登录参数
.usernameParameter("userName")
.passwordParameter("passWord");
//权限配置
http.authorizeRequests()
//设置指定权限
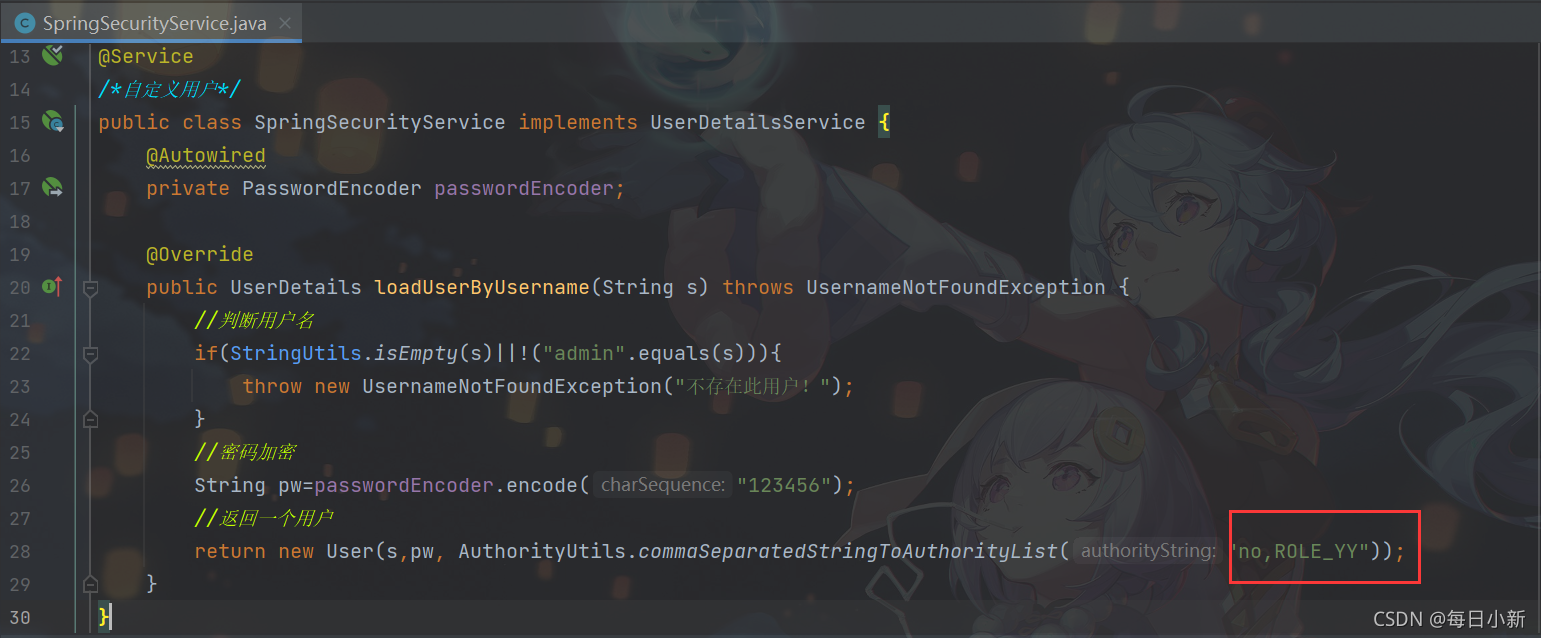
.antMatchers("/authority.html").hasAuthority("admin")
//指定某个权限
.antMatchers("/authority.html").hasAnyAuthority("admin","normal")
//允许访问
.antMatchers("/login.html","/login").permitAll()
//资源不被任何人访问
.antMatchers("/denyall.html").denyAll()
//There was an unexpected error (type=Forbidden, status=403).
//配置其他资源必须登录才能访问
.anyRequest().authenticated();//放在最后
}
}
以上用户的权限为no,authority.html需要admin或normal权限的人才能访问。
2、角色访问控制
- hasRole(String…):有某个角色可以访问
- hasAnyRole(String…):有某个角色可以访问
修改配置文件SpringSecurityConfig.java
//@SpringBootConfiguration
/*角色权限访问控制*/
public class SpringSecurityConfig3 extends WebSecurityConfigurerAdapter {
    //引入handle
    @Autowired
    SecuritySuccessHandle securitySuccessHandle;
    @Autowired
    SecurityFailHandle securityFailHandle;

    //配置passwordEncode的实现类
    @Bean
    public PasswordEncoder passwordEncoder(){
        return new BCryptPasswordEncoder();
    }

    //重写方法配置
    @Override
    protected void configure(HttpSecurity http) throws Exception {
        //关闭csrf
        http.csrf().disable();
        //配置登录页面
        http.formLogin()
                .loginPage("/login.html")
                .loginProcessingUrl("/login")
                //登陆成功handle
                .successHandler(securitySuccessHandle)//Post请求
                //登录失败handle
                .failureHandler(securityFailHandle)
                //配置登录参数
                .usernameParameter("userName")
                .passwordParameter("passWord");
        //权限配置
        http.authorizeRequests()
                //指定角色
                .antMatchers("/authority.html").hasRole("QQ")
                //指定某个角色
                .antMatchers("/authority.html").hasAnyRole("AA","BB")
                //允许访问
                .antMatchers("/login.html","/login").permitAll()
                //资源不被任何人访问
                .antMatchers("/denyall.html").denyAll()
                //There was an unexpected error (type=Forbidden, status=403).
                //配置其他资源必须登录才能访问
                .anyRequest().authenticated();//放在最后

    }
}
以上设置只有角色时AA,BB,QQ的人能访问authority.html,这里我们设置的用户时YY角色

3、访问受限403处理方法
- 实现AccessDeniedHandler接口,自定义一个类处理
- 配置文件:http.exceptionHandler().accessDeniedHander()
修改配置文件SpringSecurityConfig.java
@SpringBootConfiguration
/*角色权限访问控制*/
public class SpringSecurityConfig3 extends WebSecurityConfigurerAdapter {
    //引入handle
    @Autowired
    SecuritySuccessHandle securitySuccessHandle;
    @Autowired
    SecurityFailHandle securityFailHandle;
    @Autowired
    SecurityAccessDeniedHandler securityAccessDeniedHandler;

    //配置passwordEncode的实现类
    @Bean
    public PasswordEncoder passwordEncoder(){
        return new BCryptPasswordEncoder();
    }

    //重写方法配置
    @Override
    protected void configure(HttpSecurity http) throws Exception {
        //关闭csrf
        http.csrf().disable();
        //配置登录页面
        http.formLogin()
                .loginPage("/login.html")
                .loginProcessingUrl("/login")
                //登陆成功handle
                .successHandler(securitySuccessHandle)//Post请求
                //登录失败handle
                .failureHandler(securityFailHandle)
                //配置登录参数
                .usernameParameter("userName")
                .passwordParameter("passWord");
        //权限配置
        http.authorizeRequests()
                //设置指定权限
//                .antMatchers("/authority.html").hasAuthority("admin")
                //指定某个权限
//                .antMatchers("/authority.html").hasAnyAuthority("admin","normal")
                //指定角色
                .antMatchers("/authority.html").hasRole("QQ")
                //指定某个角色
                .antMatchers("/authority.html").hasAnyRole("AA","BB")
                //一下允许访问
                .antMatchers("/login.html","/login").permitAll()
                //资源不被任何人访问
                .antMatchers("/denyall.html").denyAll()
                //There was an unexpected error (type=Forbidden, status=403).
                //配置其他资源必须登录才能访问
                .anyRequest().authenticated();//放在最后

//        对403情况的处理
                http.exceptionHandling()
                        .accessDeniedHandler(securityAccessDeniedHandler);
    }
}
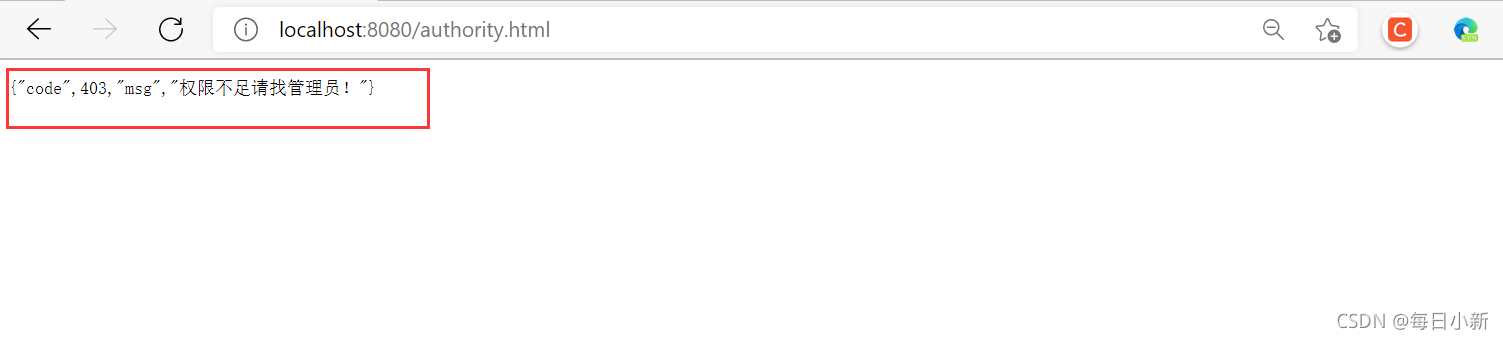
自定义处理类:SecurityAccessDeniedHandler.java
@Component
public class SecurityAccessDeniedHandler implements AccessDeniedHandler {
    @Override
    public void handle(HttpServletRequest httpServletRequest, HttpServletResponse httpServletResponse, AccessDeniedException e) throws IOException, ServletException {
        //设置响应编码
        httpServletResponse.setCharacterEncoding("utf-8");
        httpServletResponse.setContentType("application/json,charset=utf-8");
        //打印流
        PrintWriter printWriter=null;
        printWriter=httpServletResponse.getWriter();
        printWriter.write("{\"code\",403,\"msg\",\"权限不足请找管理员!\"}");
    }
}
测试结果:


 1457
1457


 被折叠的 条评论
为什么被折叠?
被折叠的 条评论
为什么被折叠?
 到【灌水乐园】发言


