


 本文介绍了如何在Spring Boot应用中实现用户登录、注册、页面国际化切换、登录验证、数据绑定及操作,包括HTML模板调整、Thymeleaf配置、视图控制器、拦截器、数据库操作和404错误处理。
修改语法
将html中添加 xmls:th=“http://www.thymeleaf.org”>
<html lang="en" xmlns:th="http://www.thymeleaf.org">
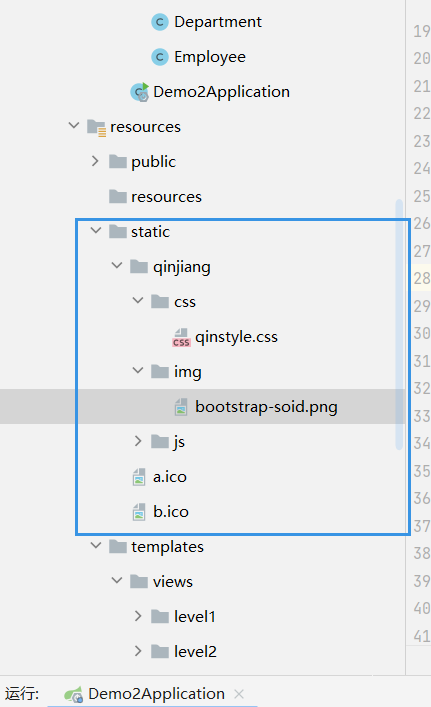
超链接,href变为th:href,url使用@开头,其中/代表项目的根目录,一般从static或thymeleaf目录开始写目录
<link th:href="@{/qinjiang/css/qinstyle.css}" rel="stylesheet">
去除thymeleaf的缓存,在application.properties
spring.thymeleaf.cache=false
图片,加上th:@{}
<img th:src="@{/qinjiang/img/bootstrap-soid.svg}" alt="">
建虚拟目录
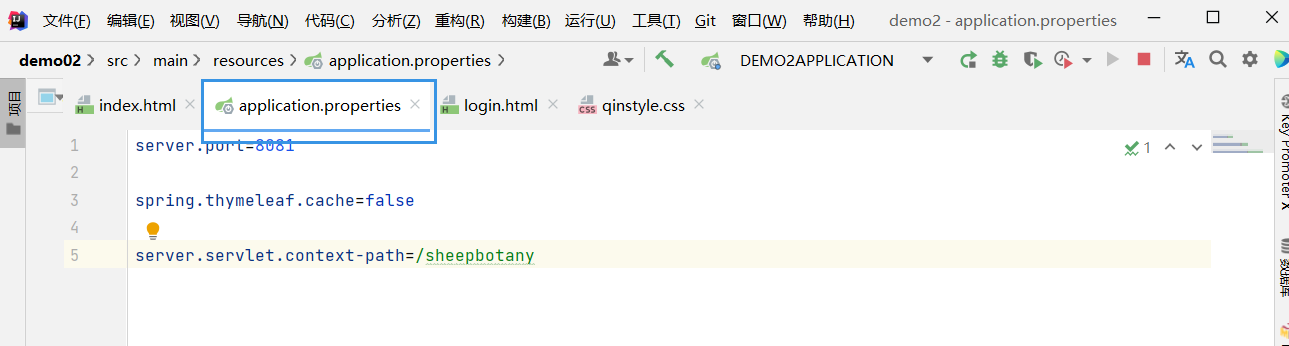
server.servlet.context-path=/sheepbotany
相当于在所有目录前添加sheepbotany目录,此时访问时需要添加
原来:
后:

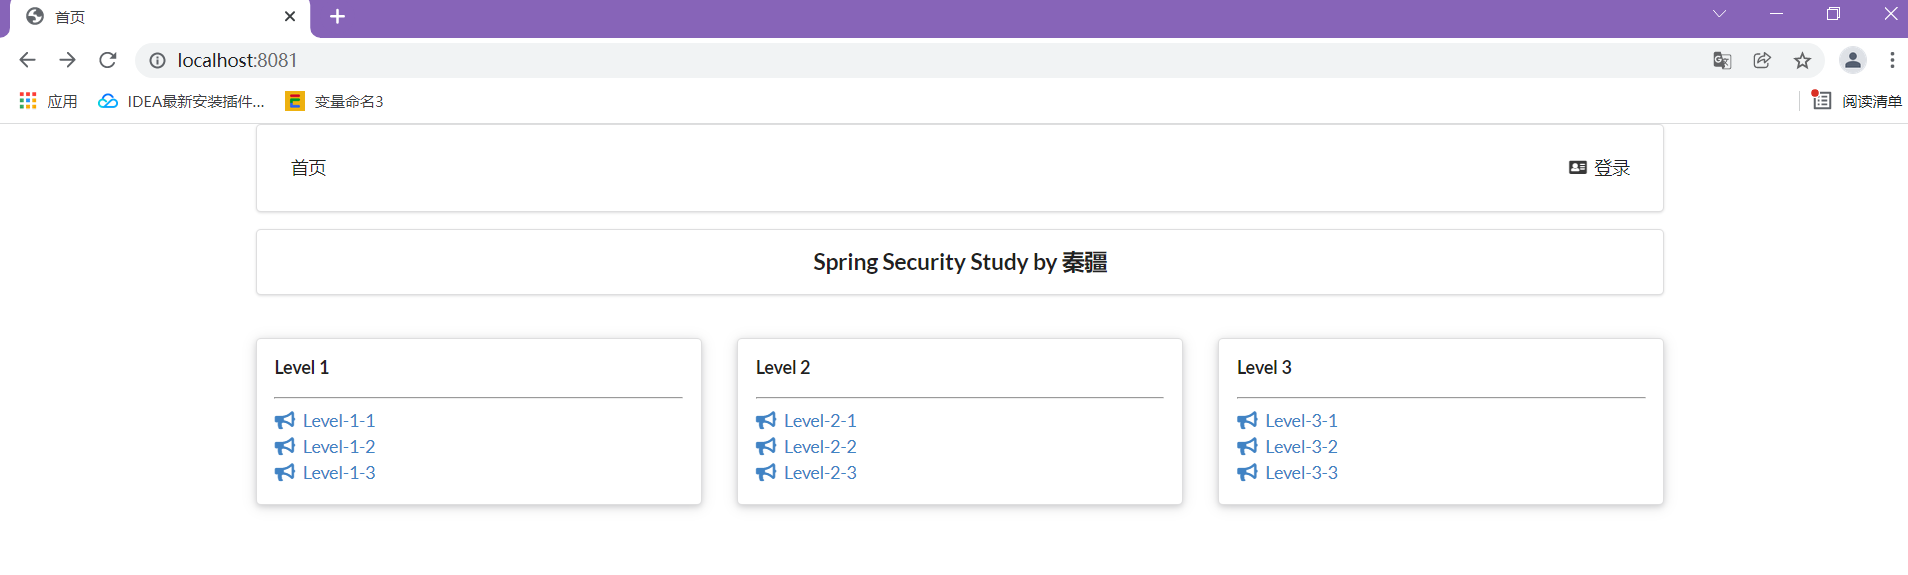
2:实现中英文切换
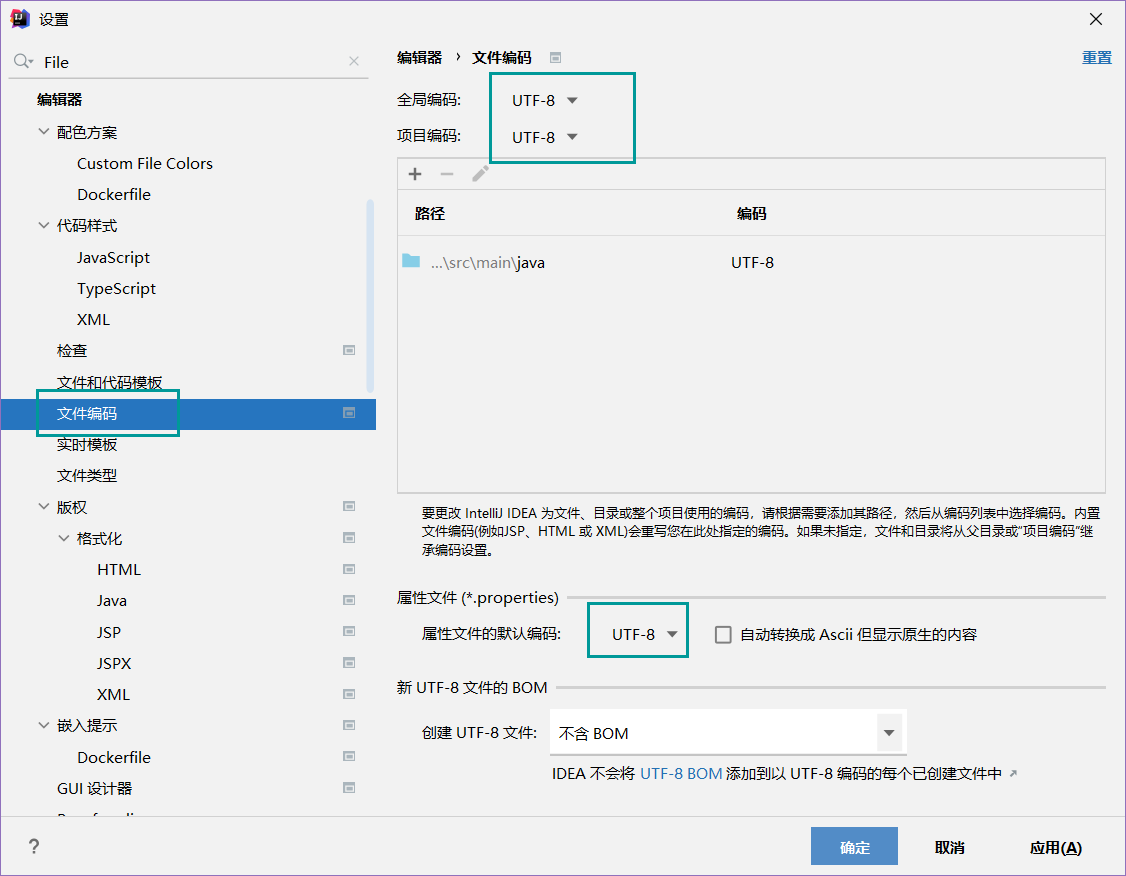
1:确保file-Encoding为UTF-8
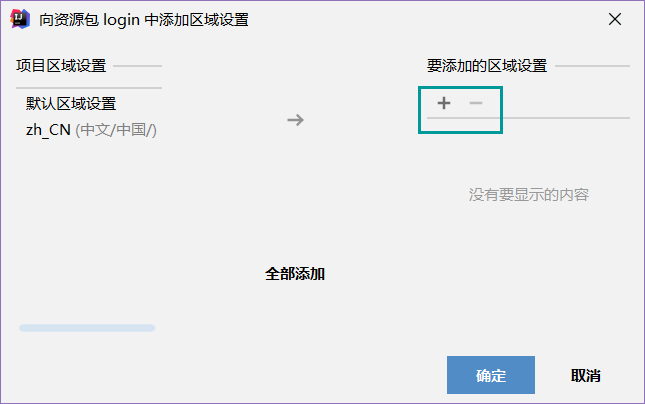
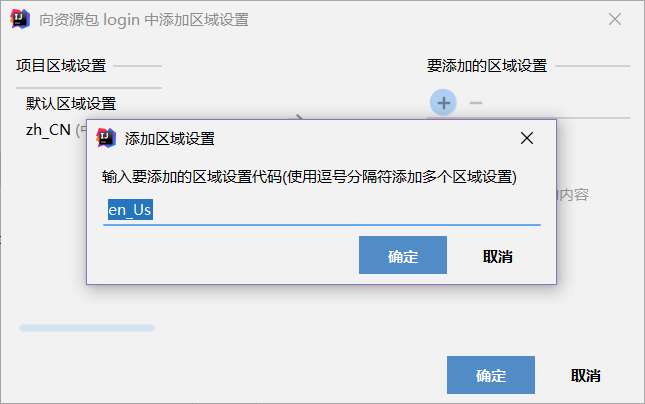
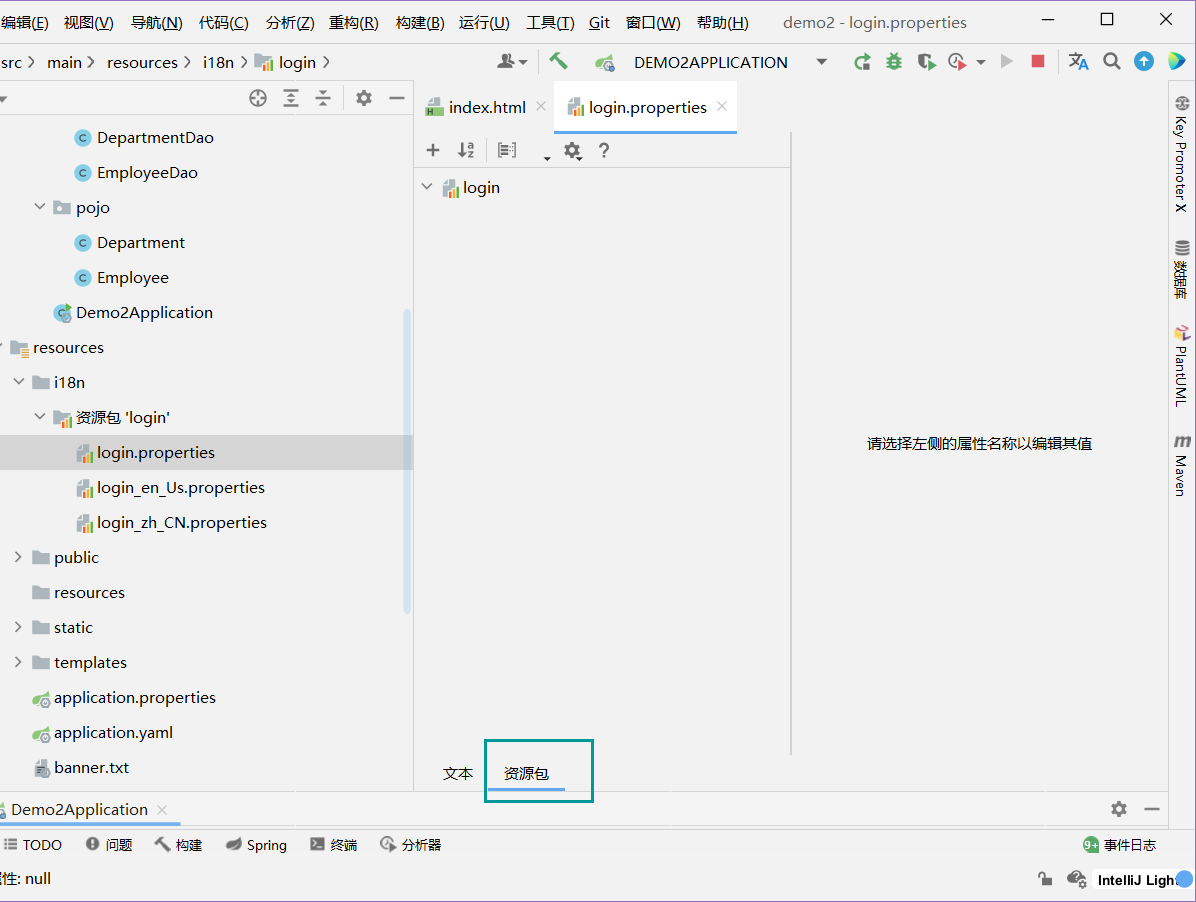
在resources目录下新建i8n目录,然后新建login.properties与login_zh_CN.properties此时会出现资源包‘login’文件夹,将此属性文件添加到资源包。
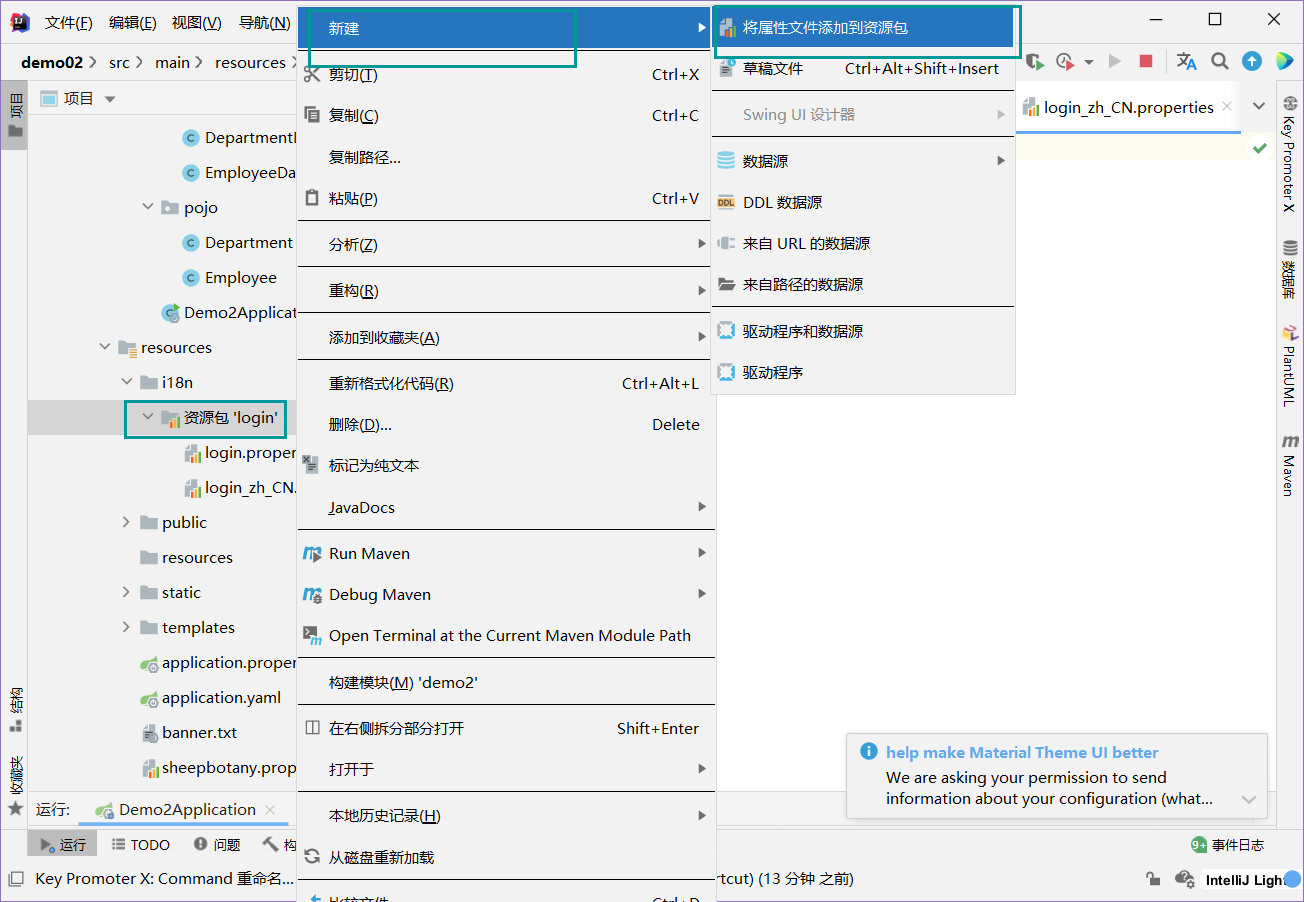
点击加号
打开login.properties,点击资源包
进行绑定
spring.message.basename=i18n.login
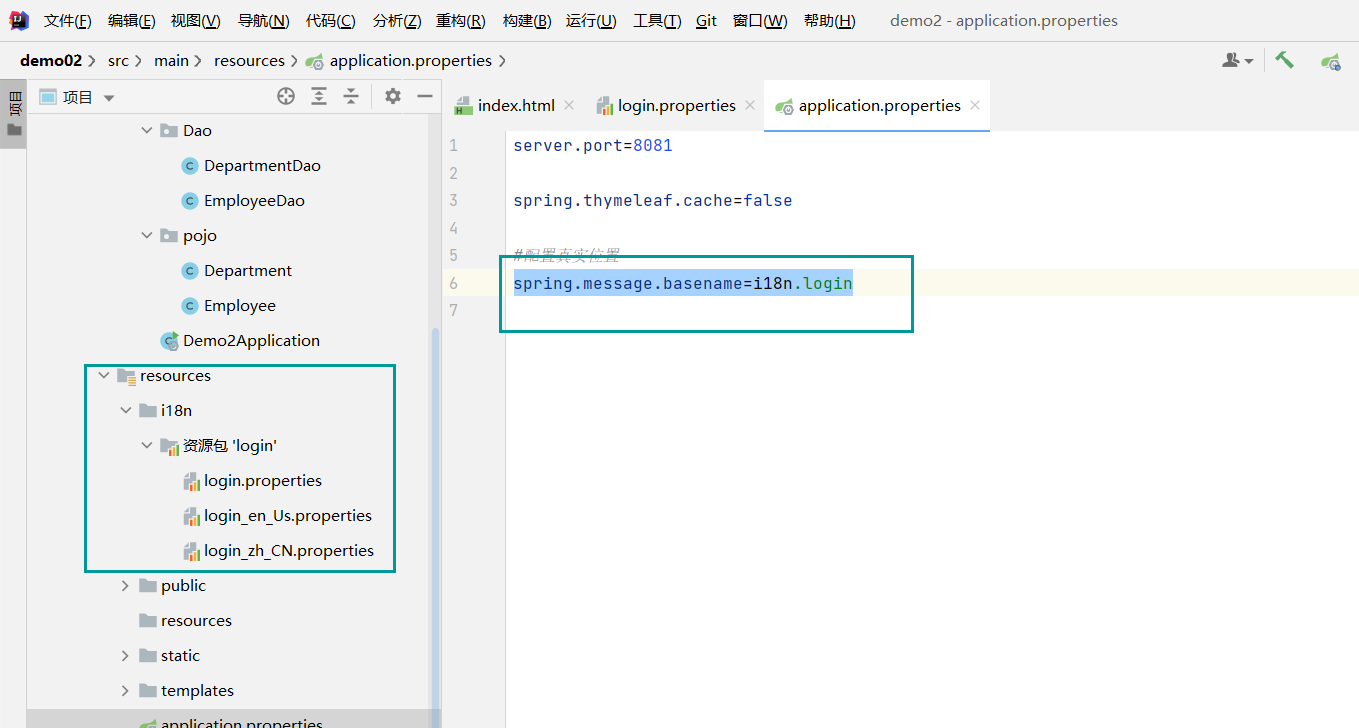
并把页面相应的sign in改为th:text="#{login.tip}"
<h1 class="header" th:text="#{login.tip}">登录</h1>
修改按钮
[[#{login.remember}]]
中英文切换链接
<a th:href="@{/index.html(l='zh_CN')}">中文</a>
<a th:href="@{/index.html(l='en_US')}">英文</a>
接口:
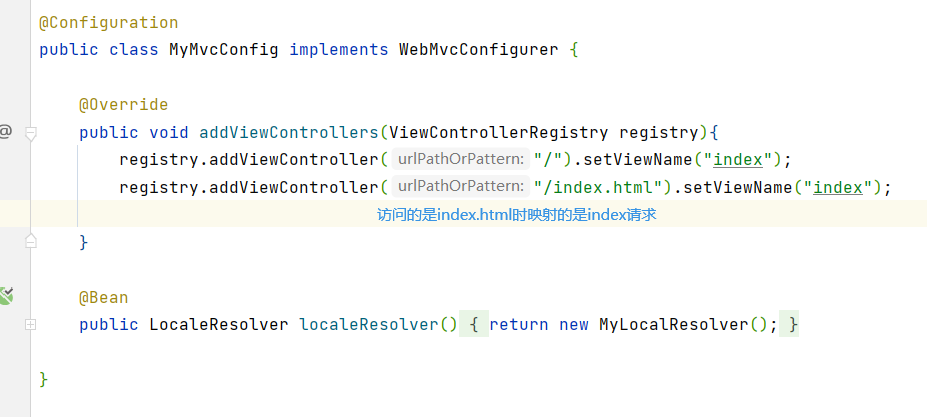
@Configuration
public class MyMvcConfig implements WebMvcConfigurer {

    @Override
    public void addViewControllers(ViewControllerRegistry registry){
        registry.addViewController("/").setViewName("index");
        registry.addViewController("/index.html").setViewName("index");

    }

    @Bean
    public LocaleResolver localeResolver(){
        return new MyLocalResolver();
    }

}
public class MyLocalResolver implements LocaleResolver {
    @Override
    public Locale resolveLocale(HttpServletRequest request) {
        //获得请求中的语言参数
        String language=request.getParameter("l");
        Locale locale=Locale.getDefault();//语言参数不存在时则使用默认
        //如果请求的链接携带了国际化参数
        if(!StringUtils.isEmpty(language)){
            //zh_CN
            String[] split=language.split("_");
            //国家,地区
            locale=new Locale(split[0],split[1]);
        }

        return locale;
    }

    @Override
    public void setLocale(HttpServletRequest request, HttpServletResponse response, Locale locale) {

    }
}
3:实现登录功能
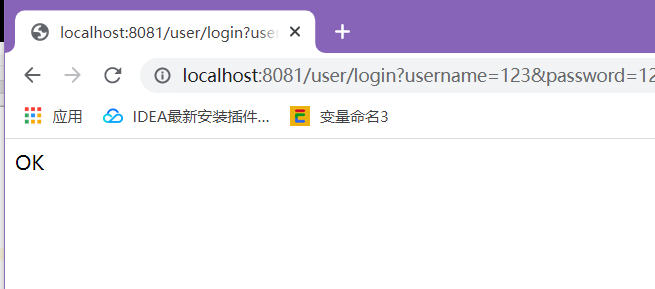
1:action中存放映射地址,login表示映射主体,返回字符串OK
@ResponseBody的作用其实是将java对象转为json格式的数据。
@Controller
public class LoginController {
    @RequestMapping("/user/login")
    @ResponseBody
    public String login(){
        return "OK";
    }
}
<form th:action="@{/user/login}">
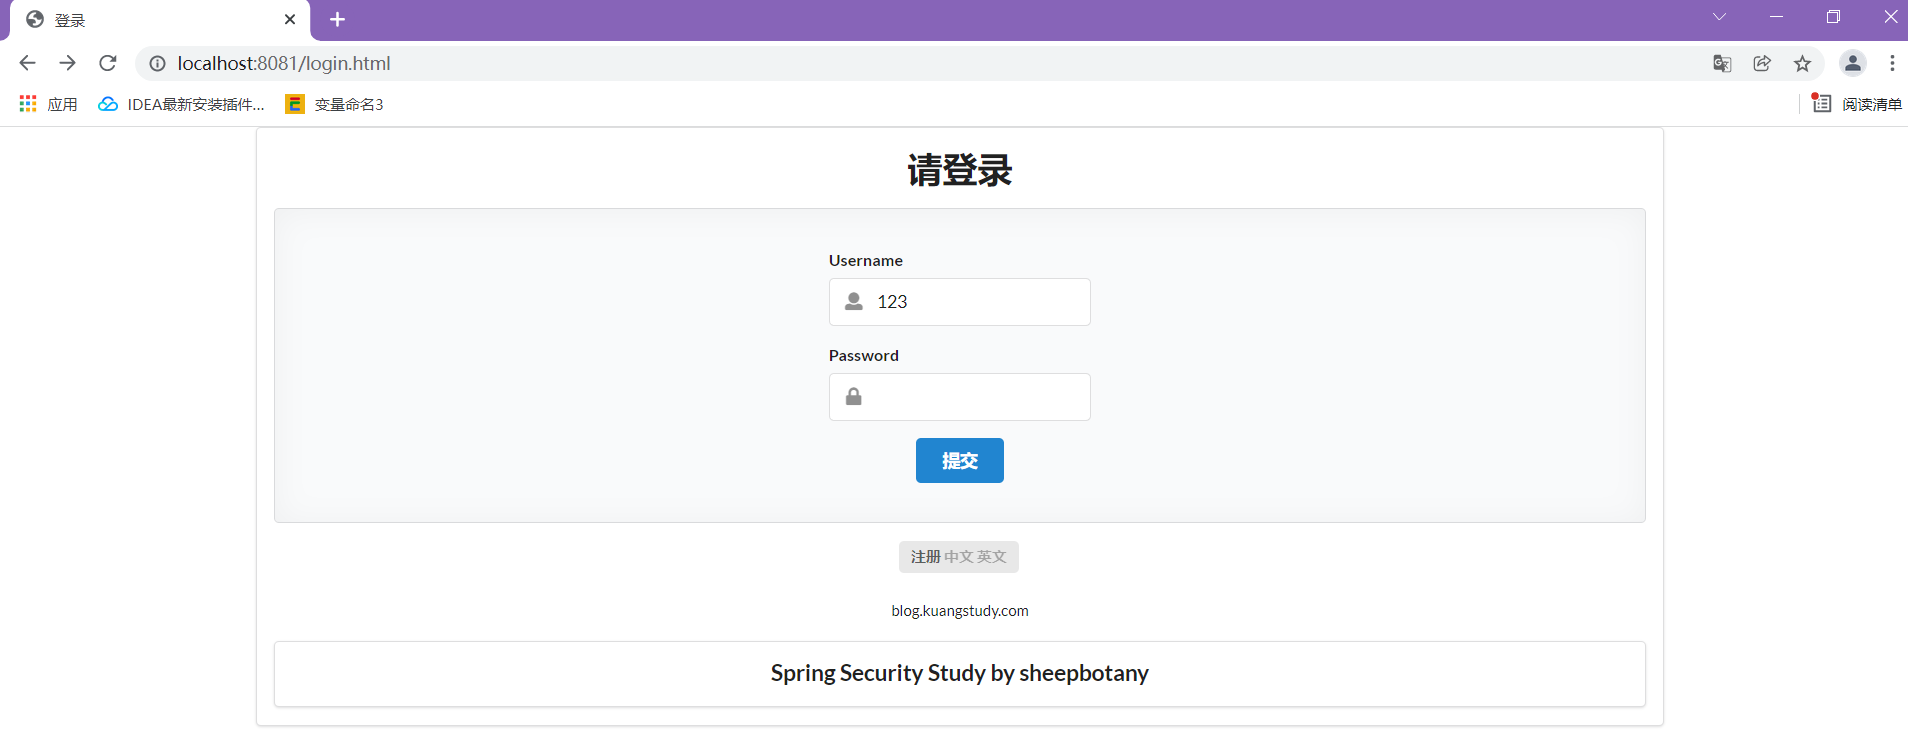
随便输入账号和密码
2:添加参数
<input type="password" name="password">
<input type="text" placeholder="Username" name="username">
<p style="color: palevioletred" th:text="${msg}" th:if="${not #strings.isEmpty(msg)}"></p>
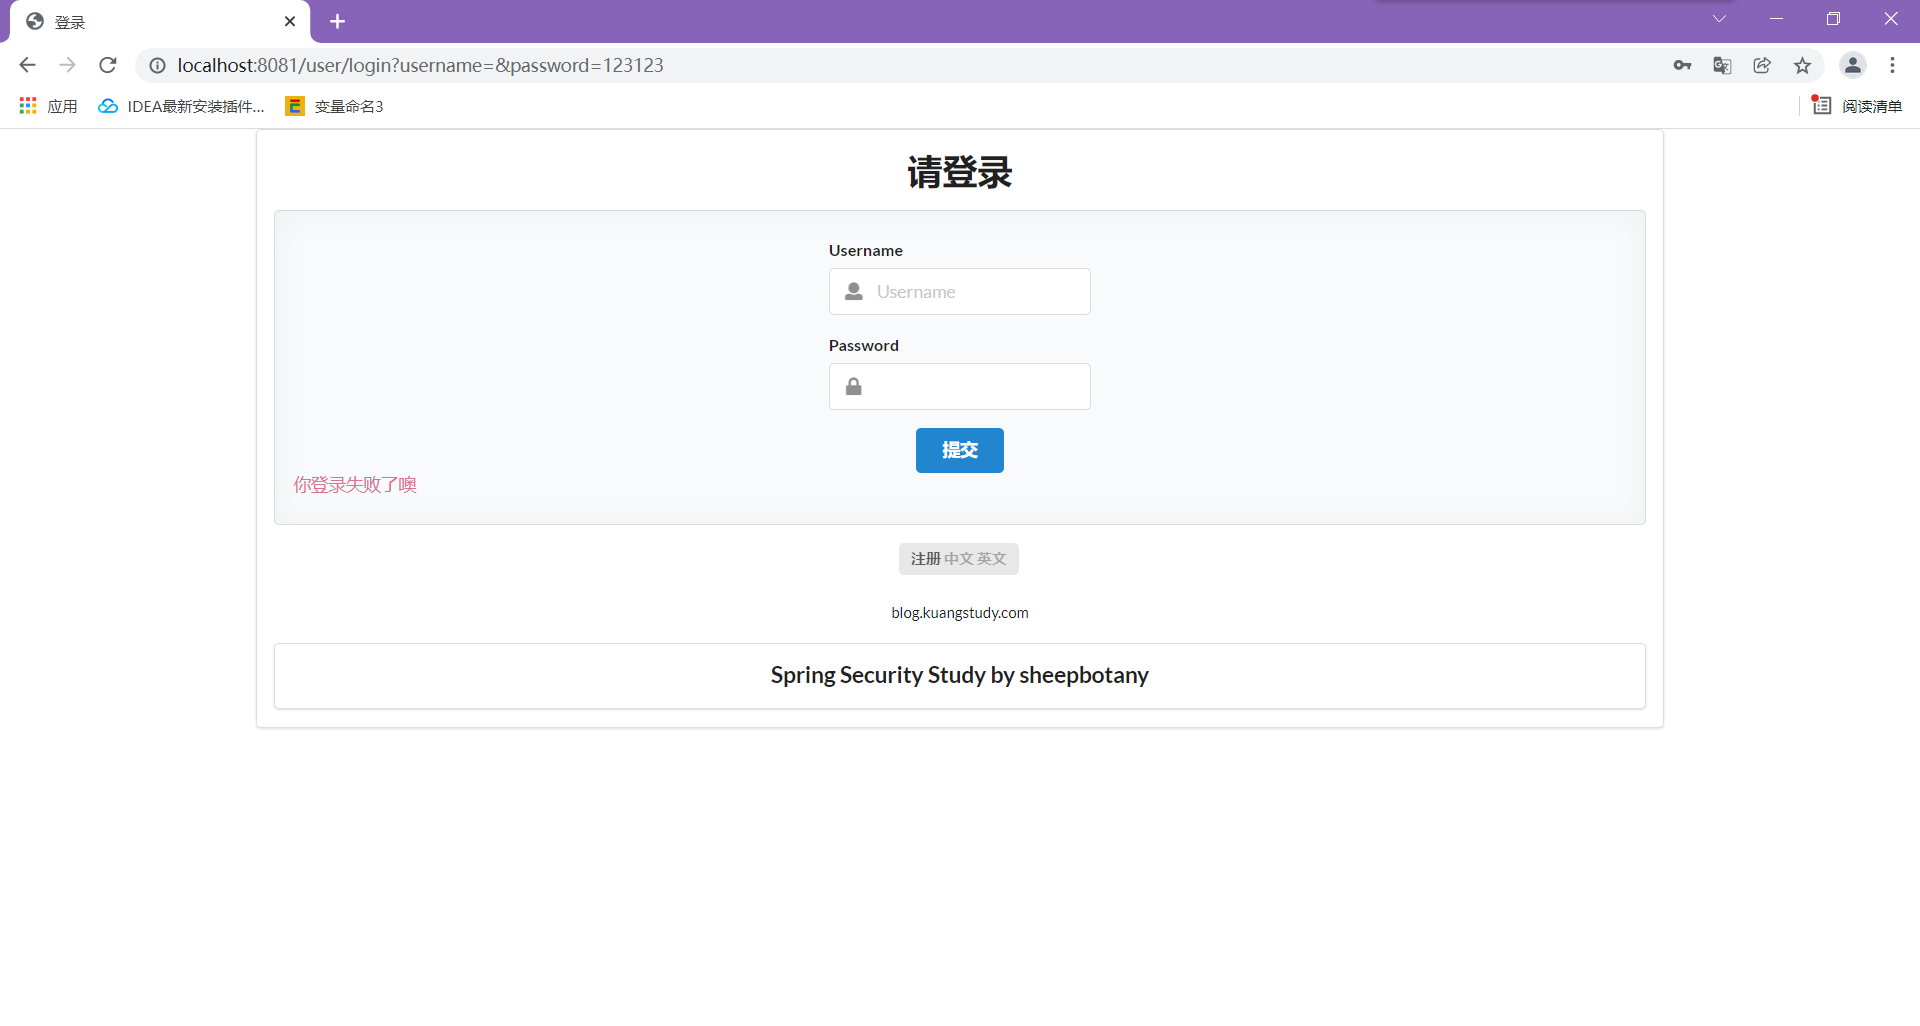
登录:
当账号不为空而且密码为123456
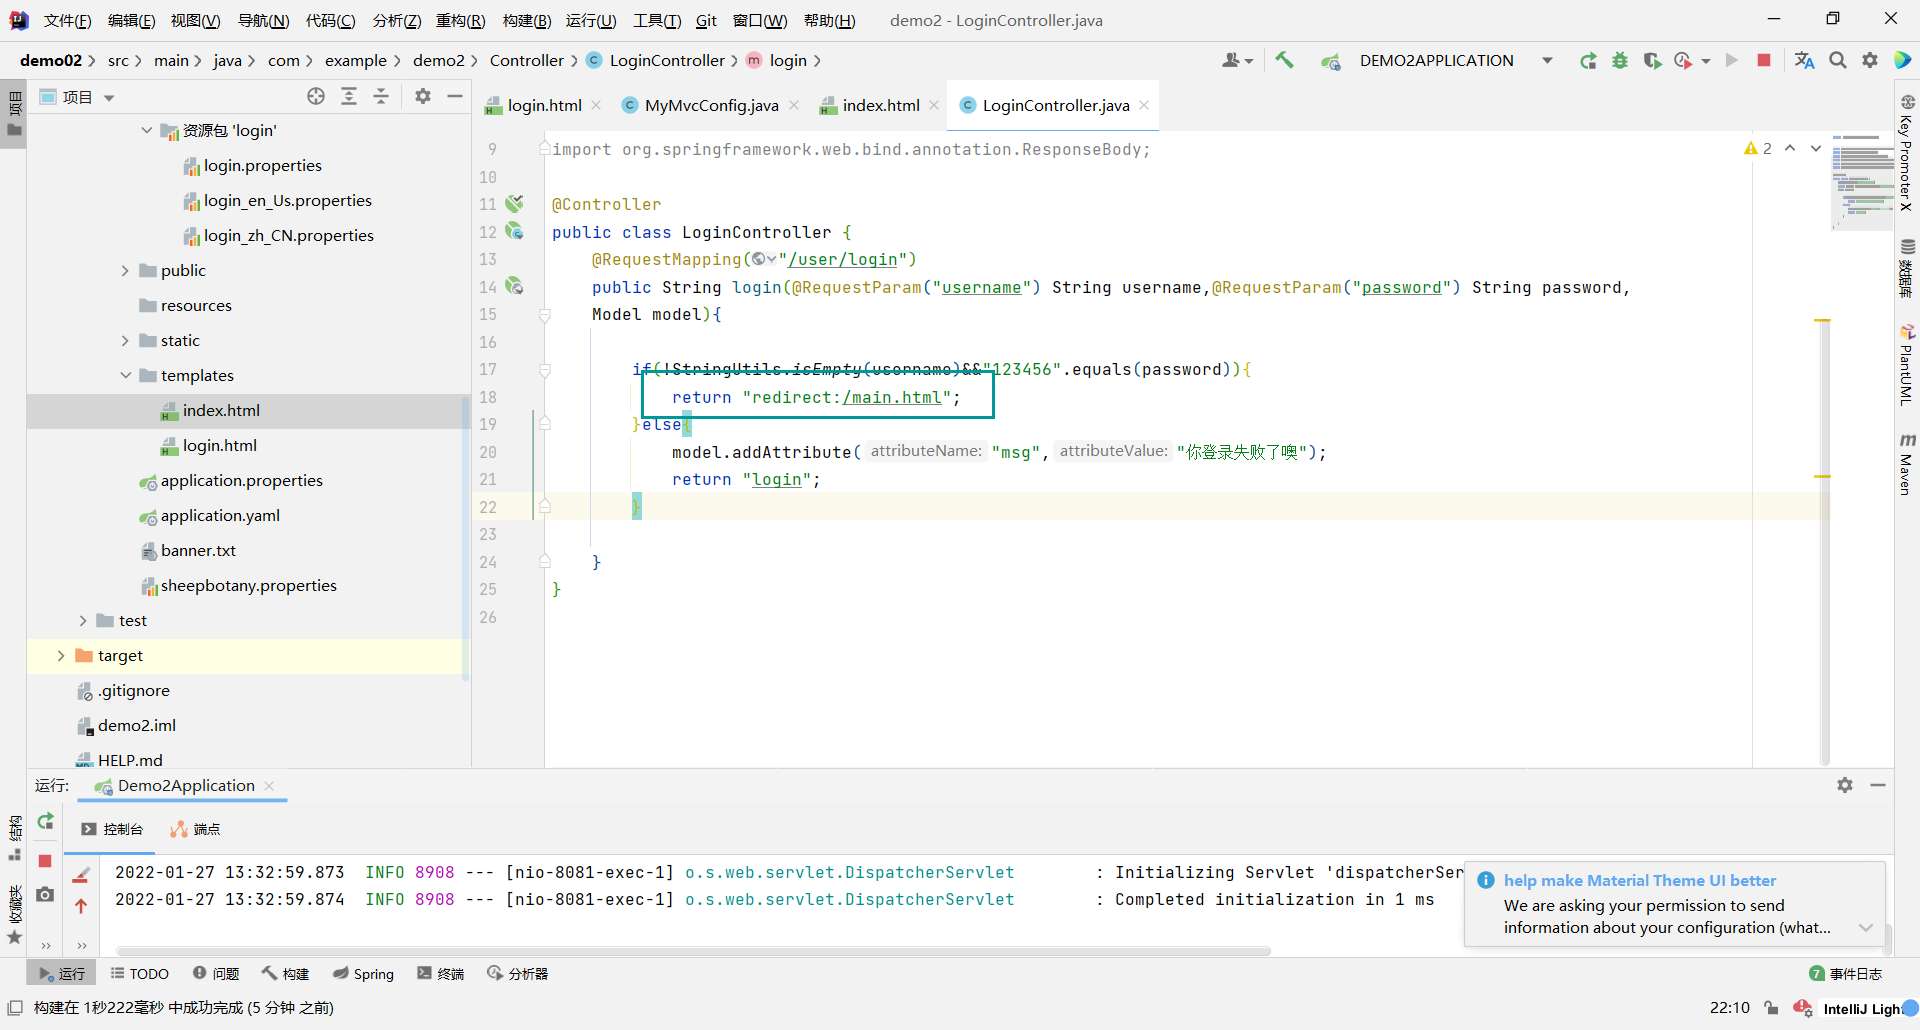
@Controller
public class LoginController {
    @RequestMapping("/user/login")
    public String login(@RequestParam("username") String username,@RequestParam("password") String password,
    Model model){

        if(!StringUtils.isEmpty(username)&&"123456".equals(password)){
            return "index";
        }else{
            model.addAttribute("msg","你登录失败了噢");
            return "login";
        }

    }
}
3:修改html映射地址
在MyMvcConfig类中写入:
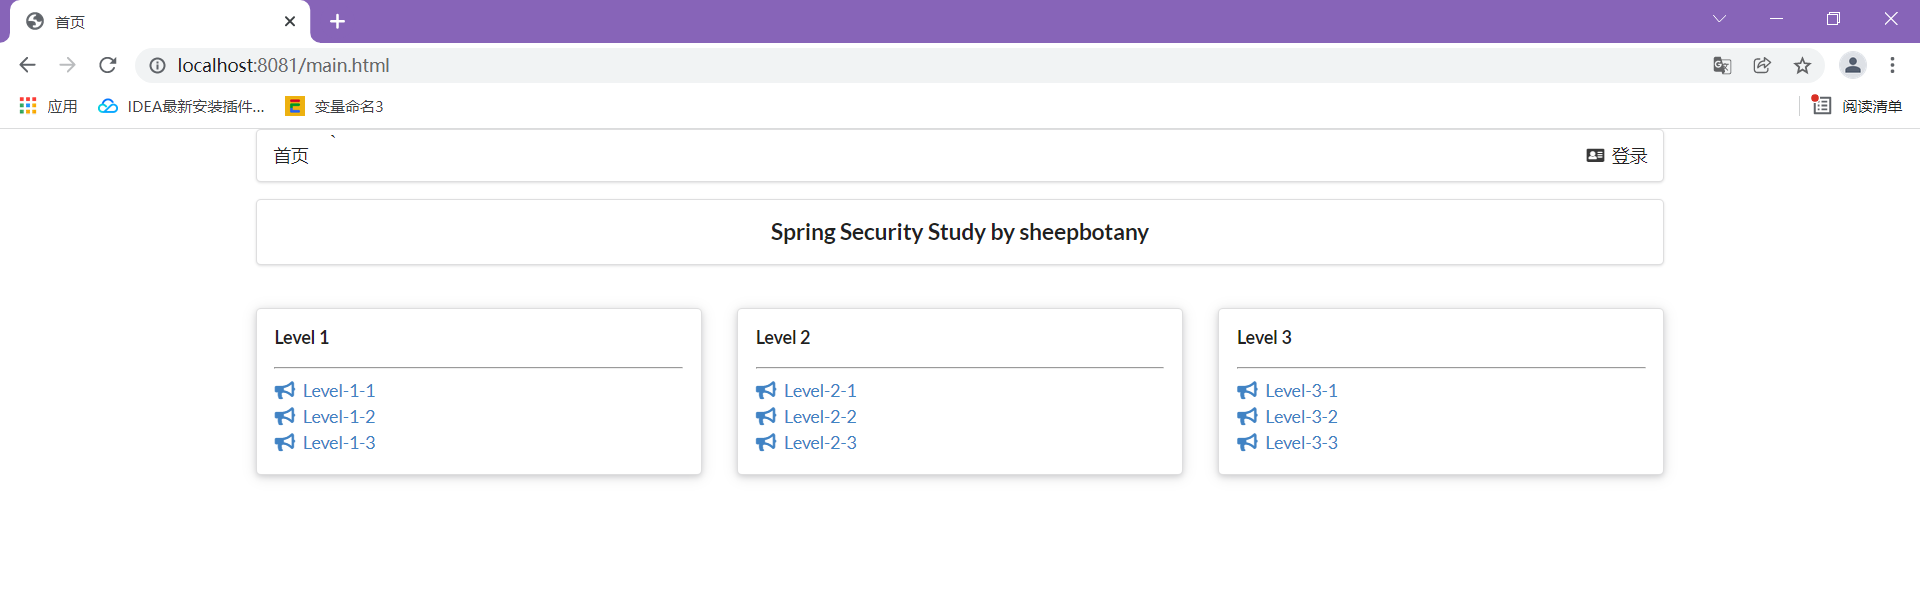
registry.addViewController("main.html").setViewName("index");
4:拦截器
接收前端的账号和密码
判断账号和密码时设置请求loginUser与参数
在拦截器中进行接收请求与参数
判断请求返回true或者false
在config类中重写拦截器方法进行接收,是true时允许通过,同时添加不是true也可以通过的部分。
(如果没有检测到session则弹出)
public class LoginHandlerInterceptor implements HandlerInterceptor {

    @Override
    public boolean preHandle(HttpServletRequest request, HttpServletResponse response, Object handler) throws Exception {
        //登录成功后,应该有用户的session
        Object loginUser=request.getSession().getAttribute("loginUser");
        if(loginUser==null){
            //没有登录
            request.setAttribute("msg","没有权限,请先登录");
            request.getRequestDispatcher("/login.html").forward(request,response);
            return false;
        }else {
            return true;
        }

    }


}
MyMvcConfig类加入
public void addInterceptors(InterceptorRegistry registry){
    registry.addInterceptor((new LoginHandlerInterceptor())).
            addPathPatterns("/**").excludePathPatterns(
                    "/login.html","/","/user/login","/css/*","/js/**","/img/**");
}
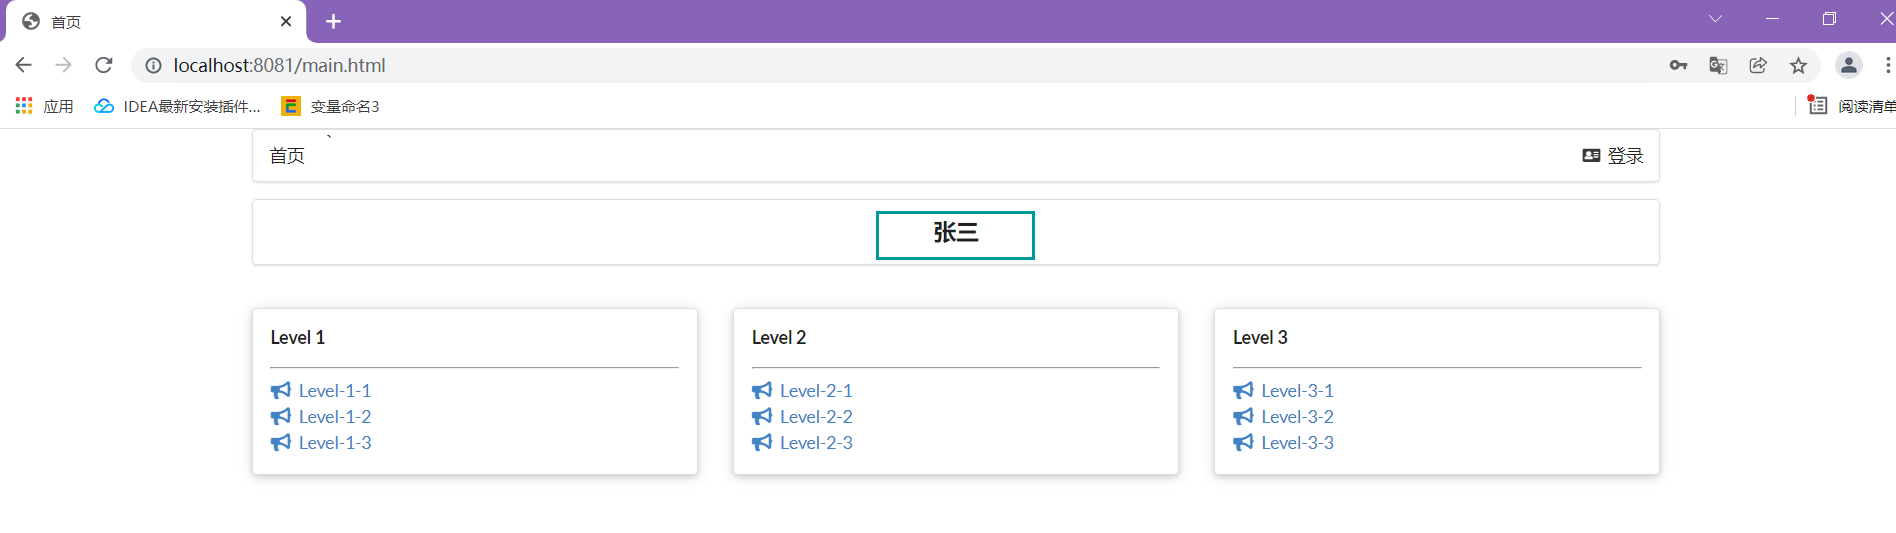
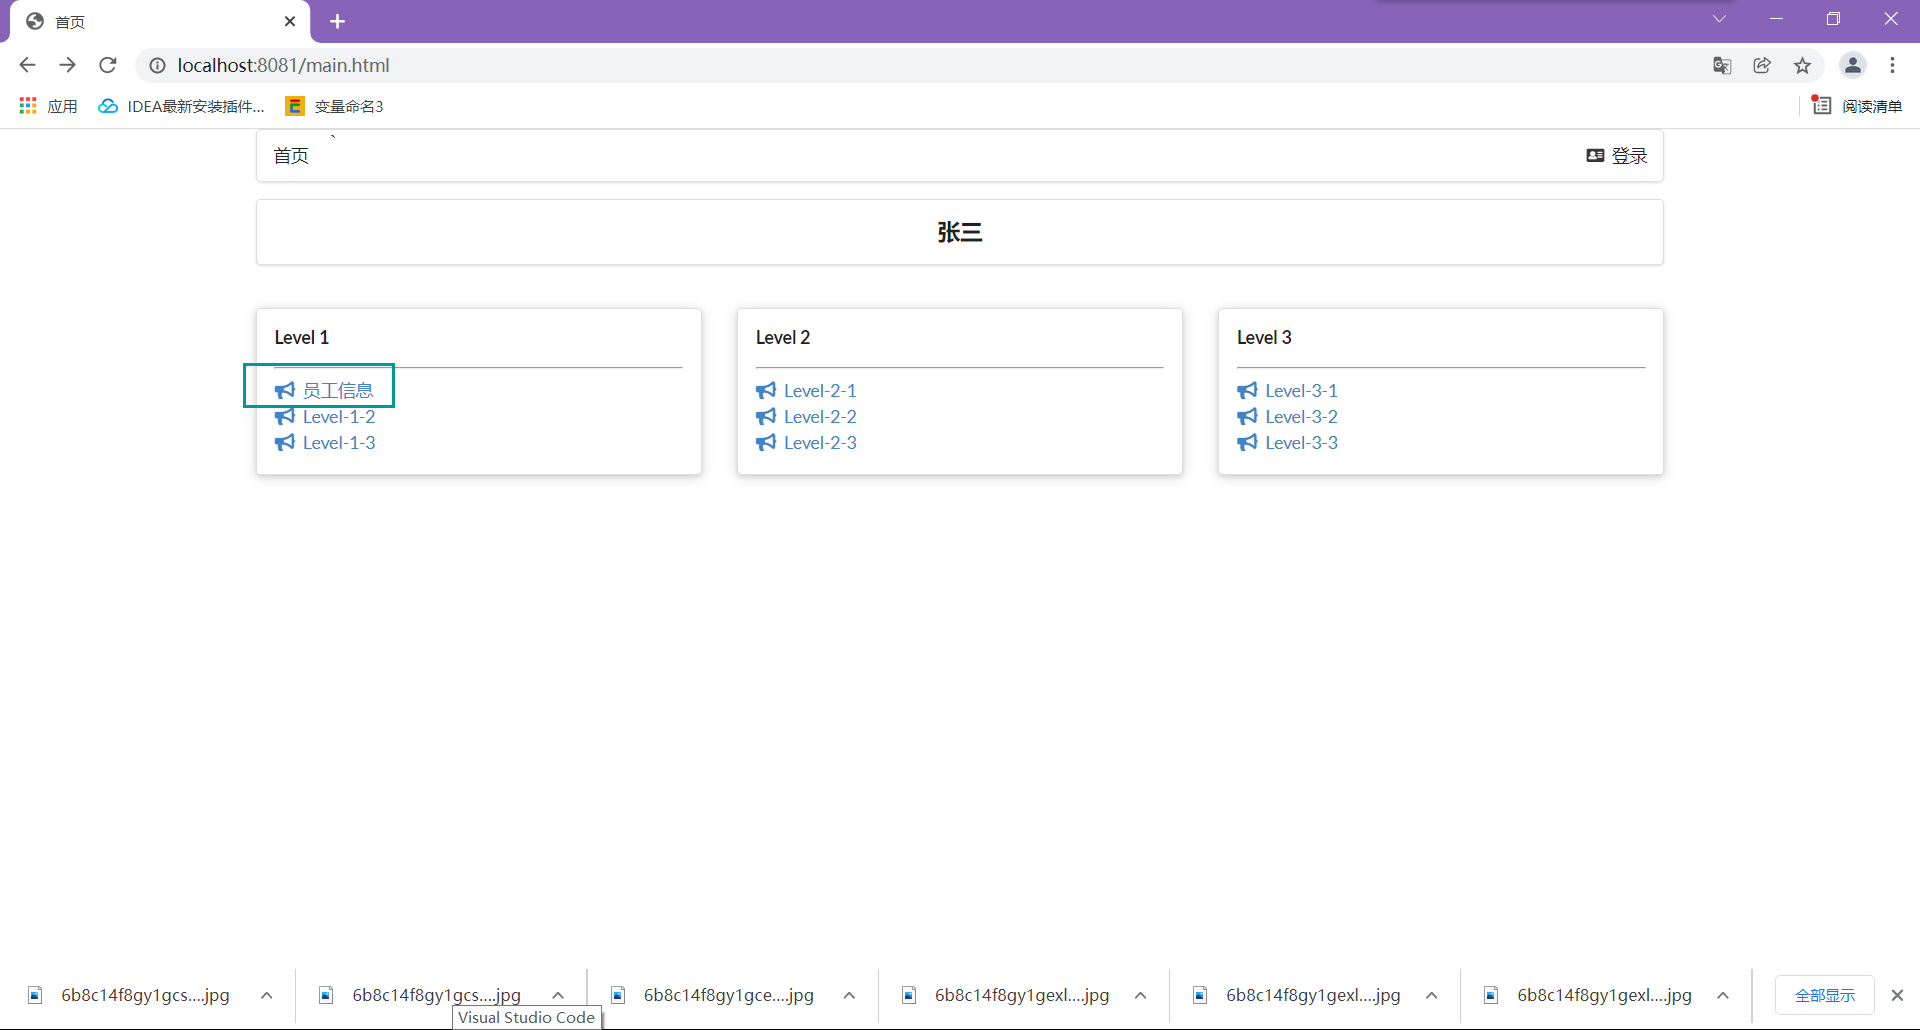
5:实现登录后显示用户姓名
<h3>[[${session.loginUser}]]</h3>
6:登录后对用户进行遍历
用户表见博客:
springboot使用HashMap的数据库_lllwky的博客-CSDN博客
跳转的链接:
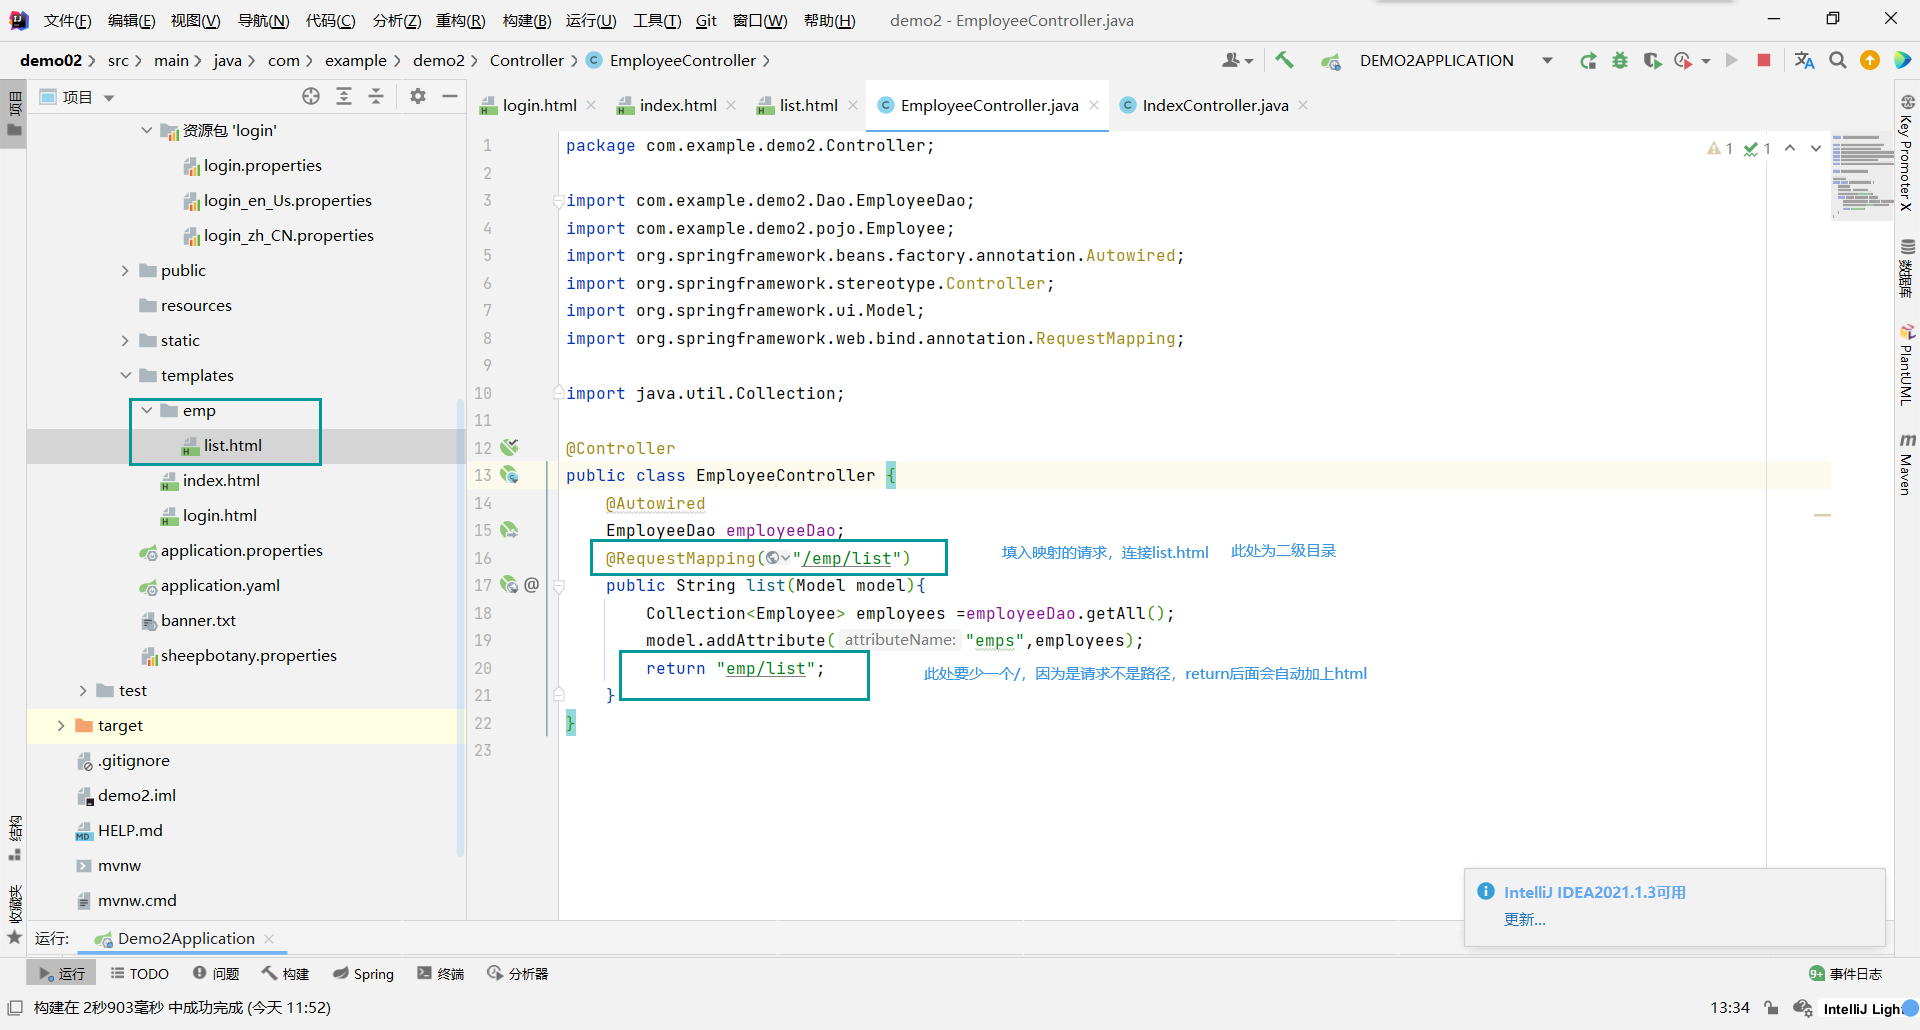
Controller类
package com.example.demo2.Controller;
import com.example.demo2.Dao.EmployeeDao;
import com.example.demo2.pojo.Employee;
import org.springframework.beans.factory.annotation.Autowired;
import org.springframework.stereotype.Controller;
import org.springframework.ui.Model;
import org.springframework.web.bind.annotation.RequestMapping;
import java.util.Collection;
@Controller
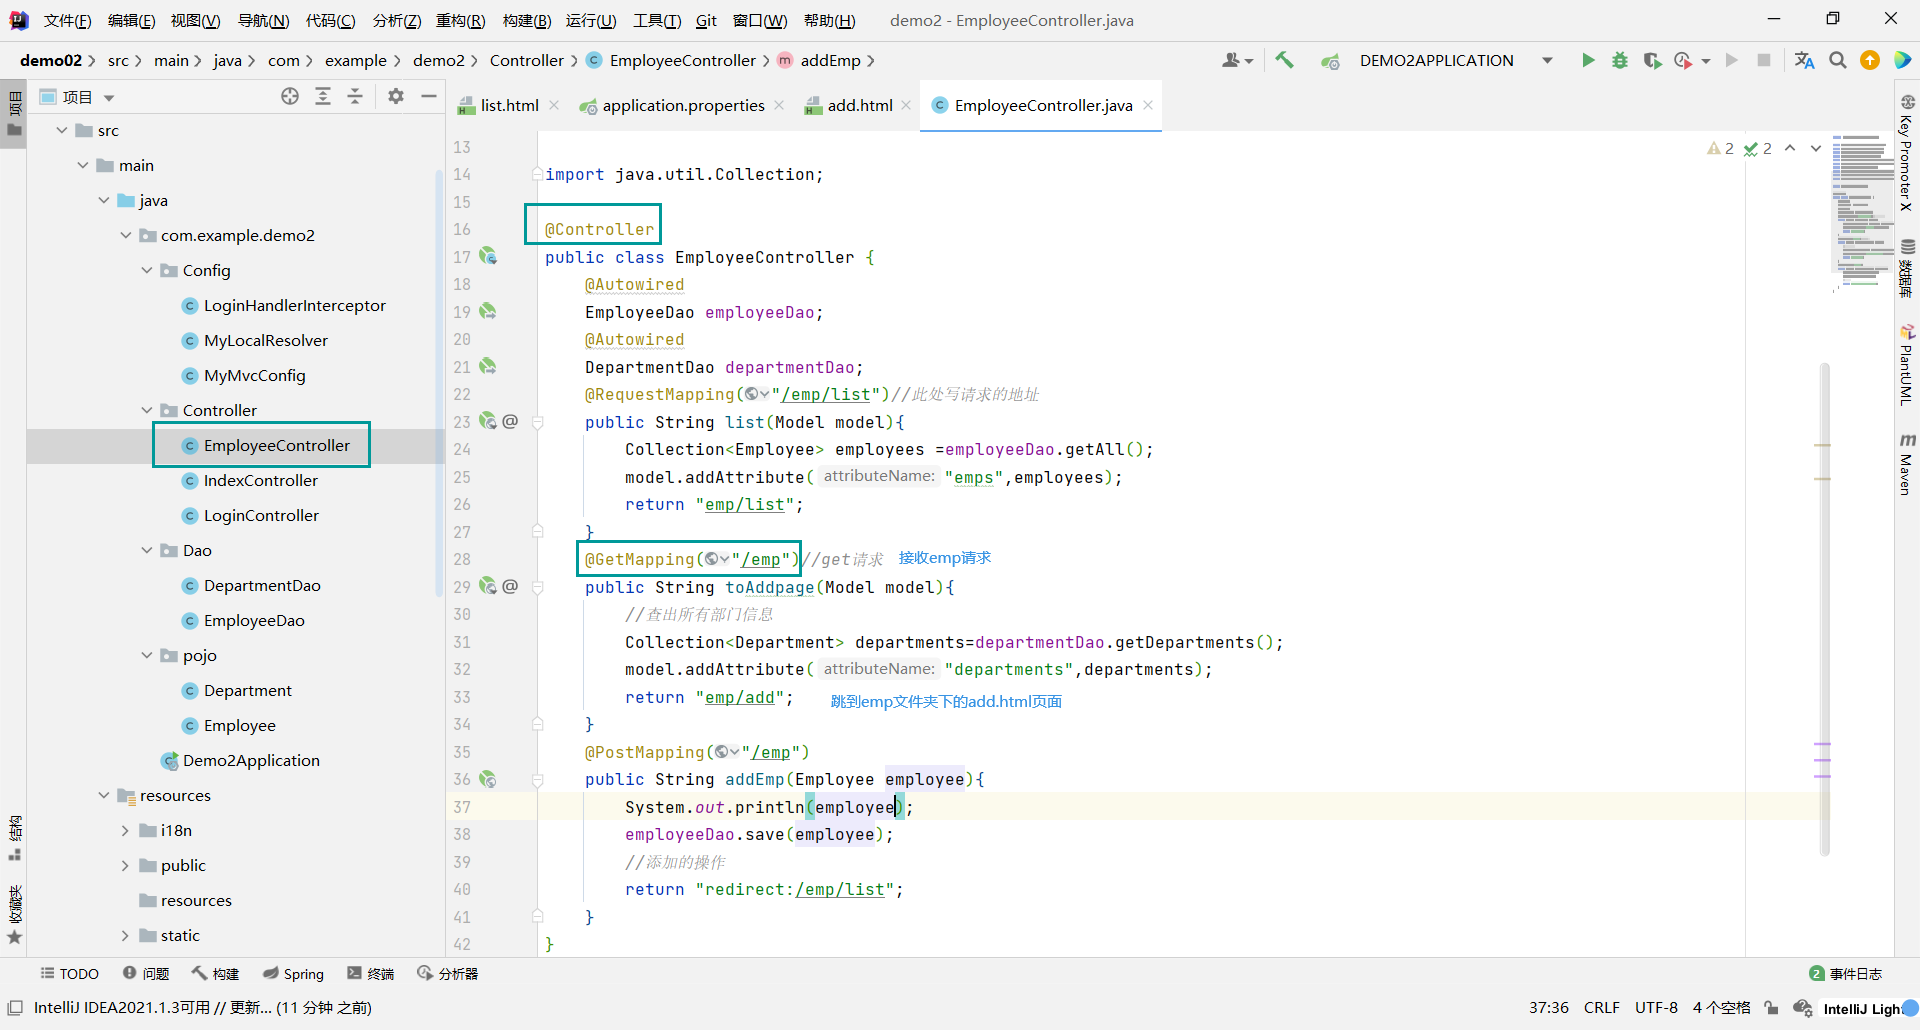
public class EmployeeController {
@Autowired
EmployeeDao employeeDao;
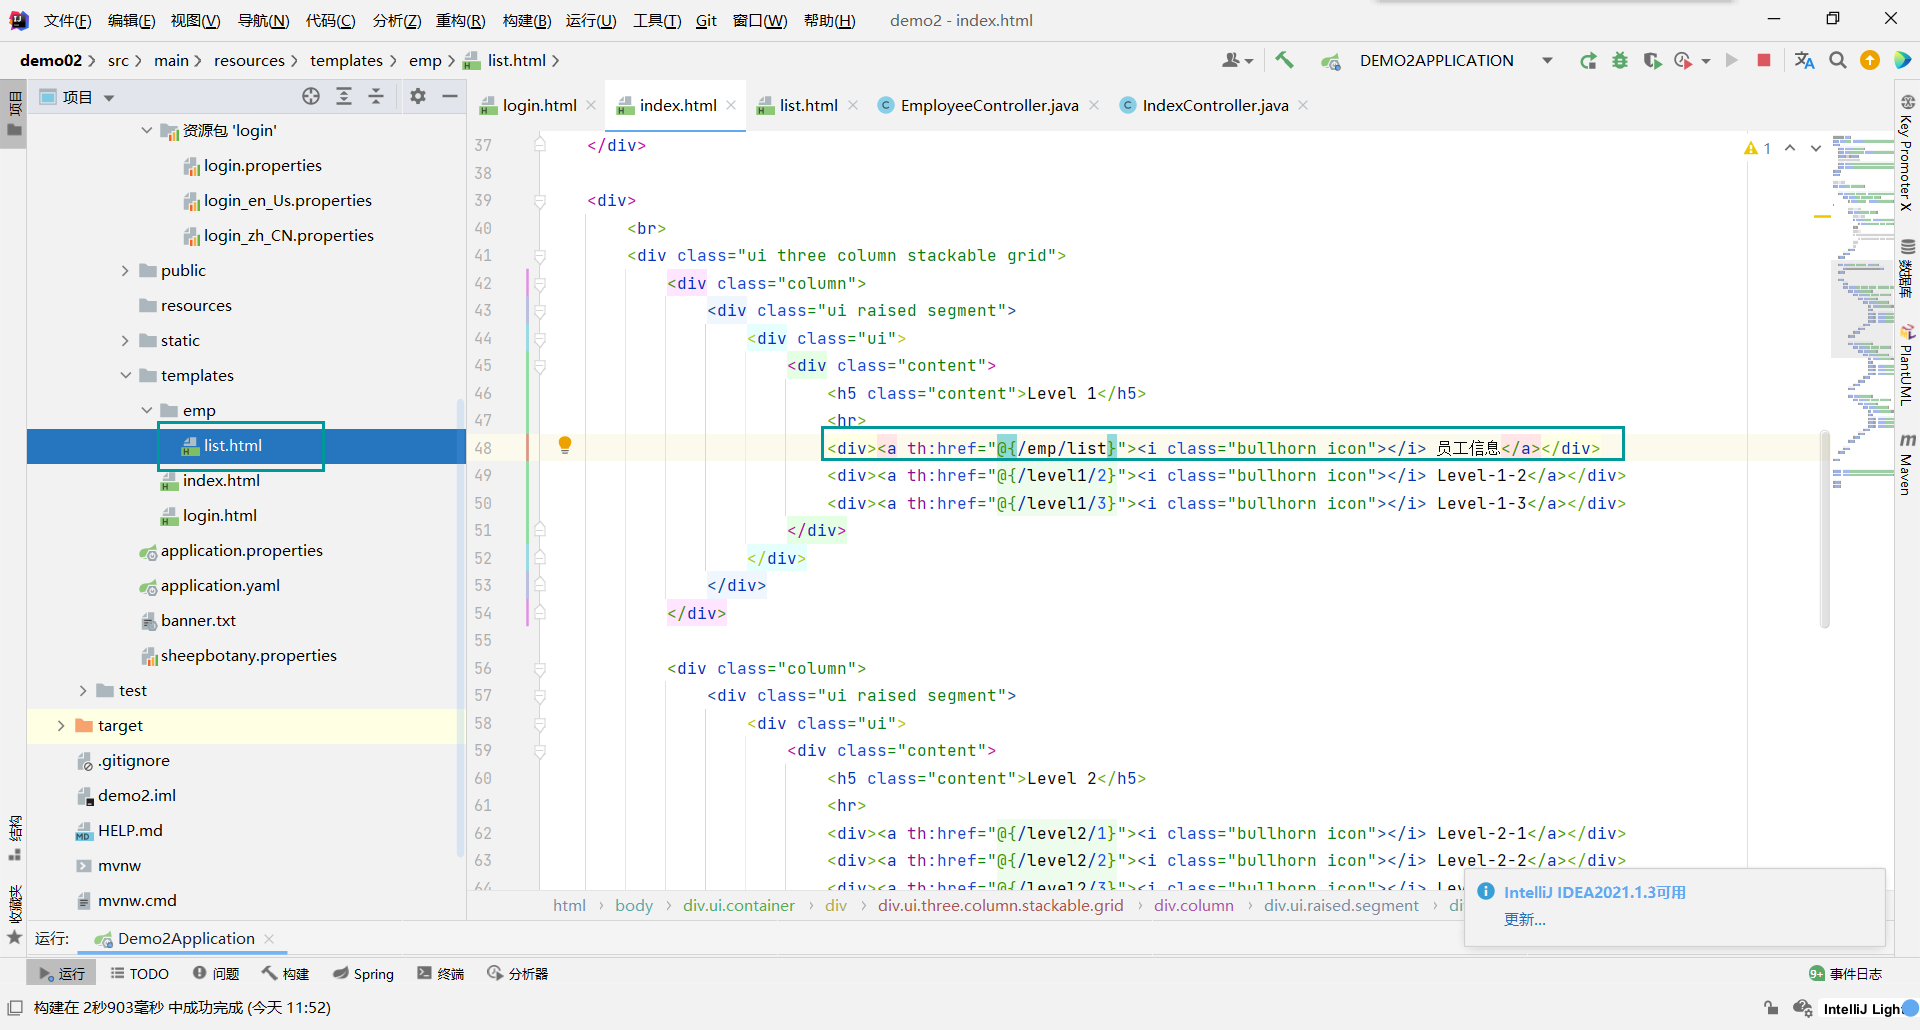
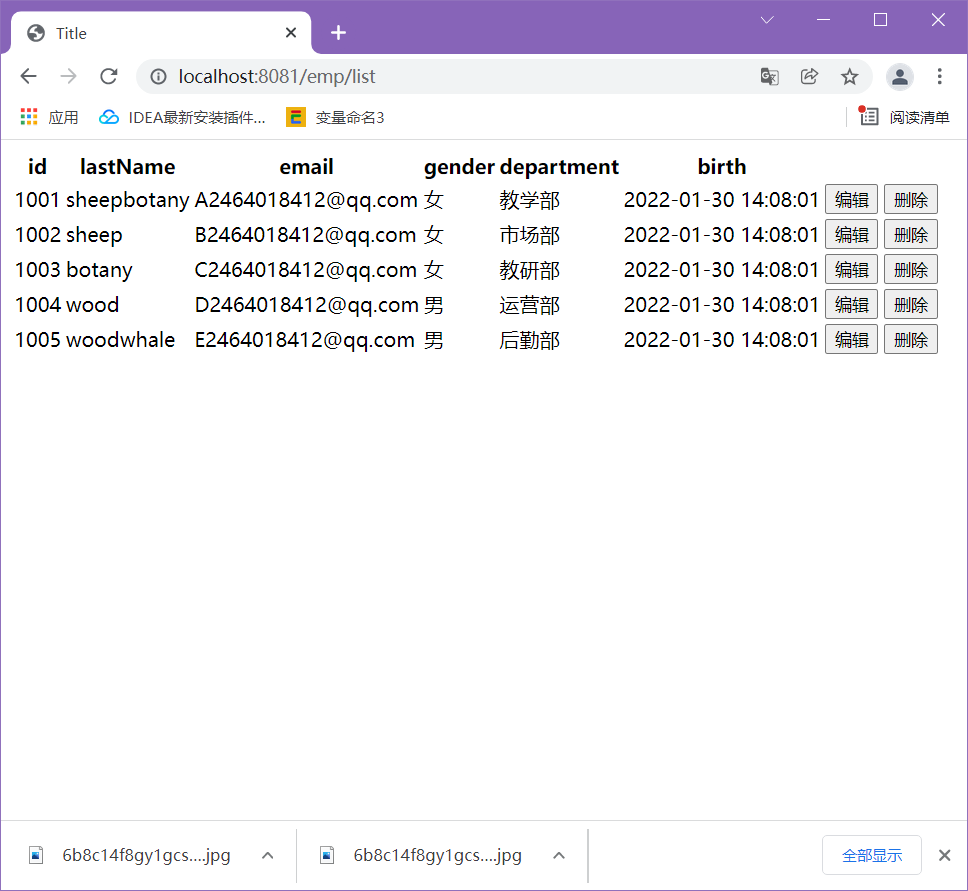
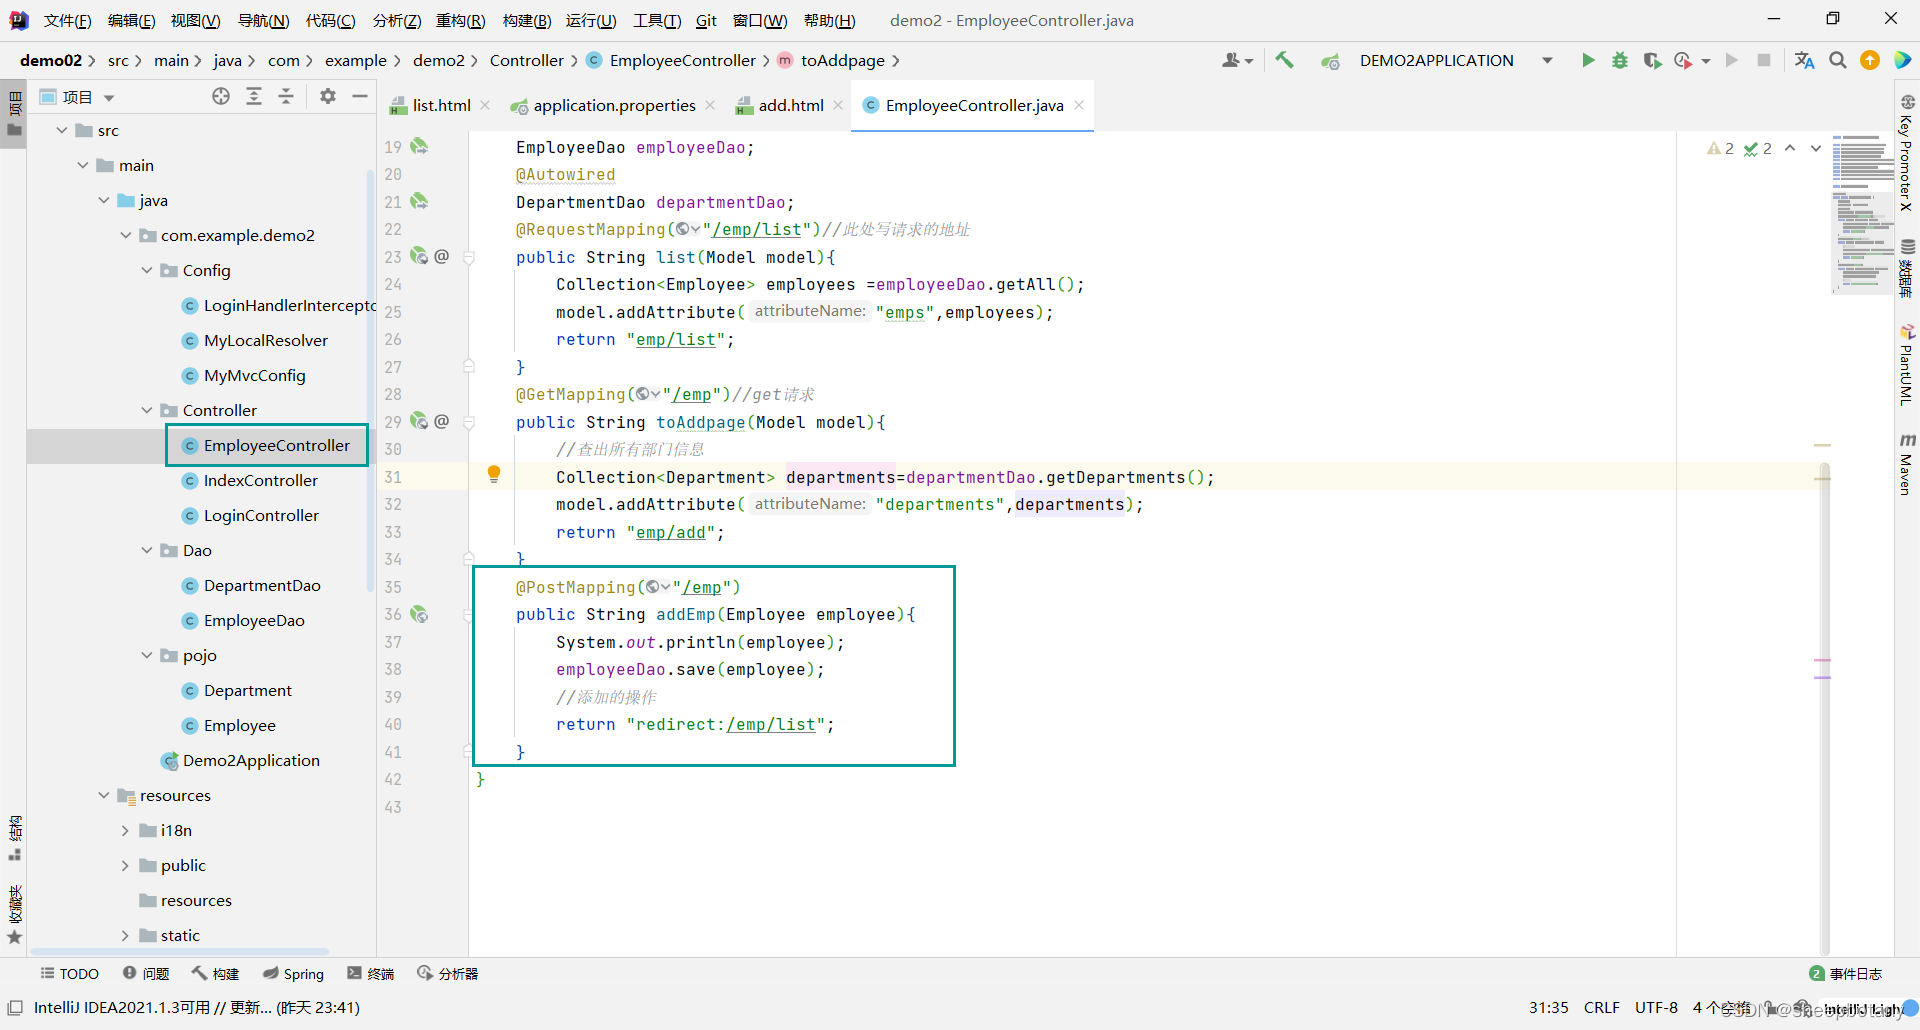
@RequestMapping("/emp/list")
public String list(Model model){
Collection<Employee> employees =employeeDao.getAll();
model.addAttribute("emps",employees);
return "emp/list";
}
}
访问二级目录下的html
因为return的是emp/list,所以访问的请求显示的也是:
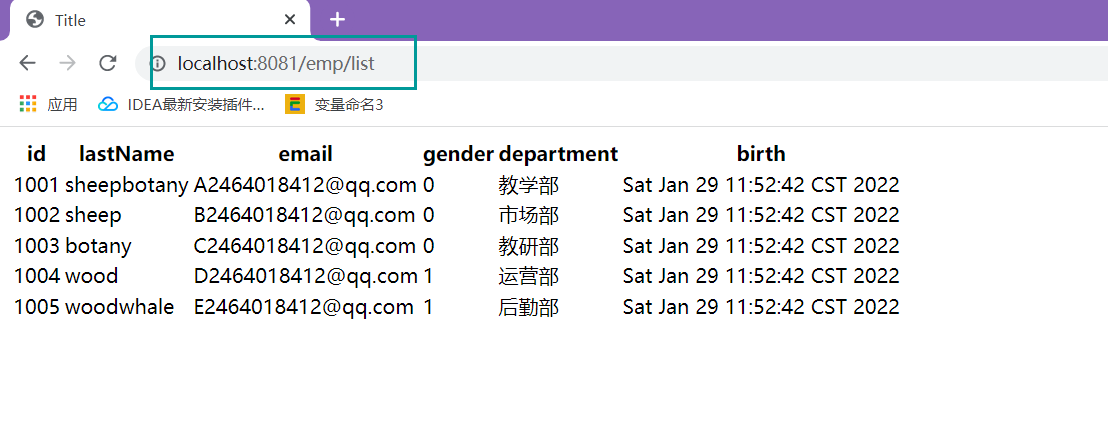
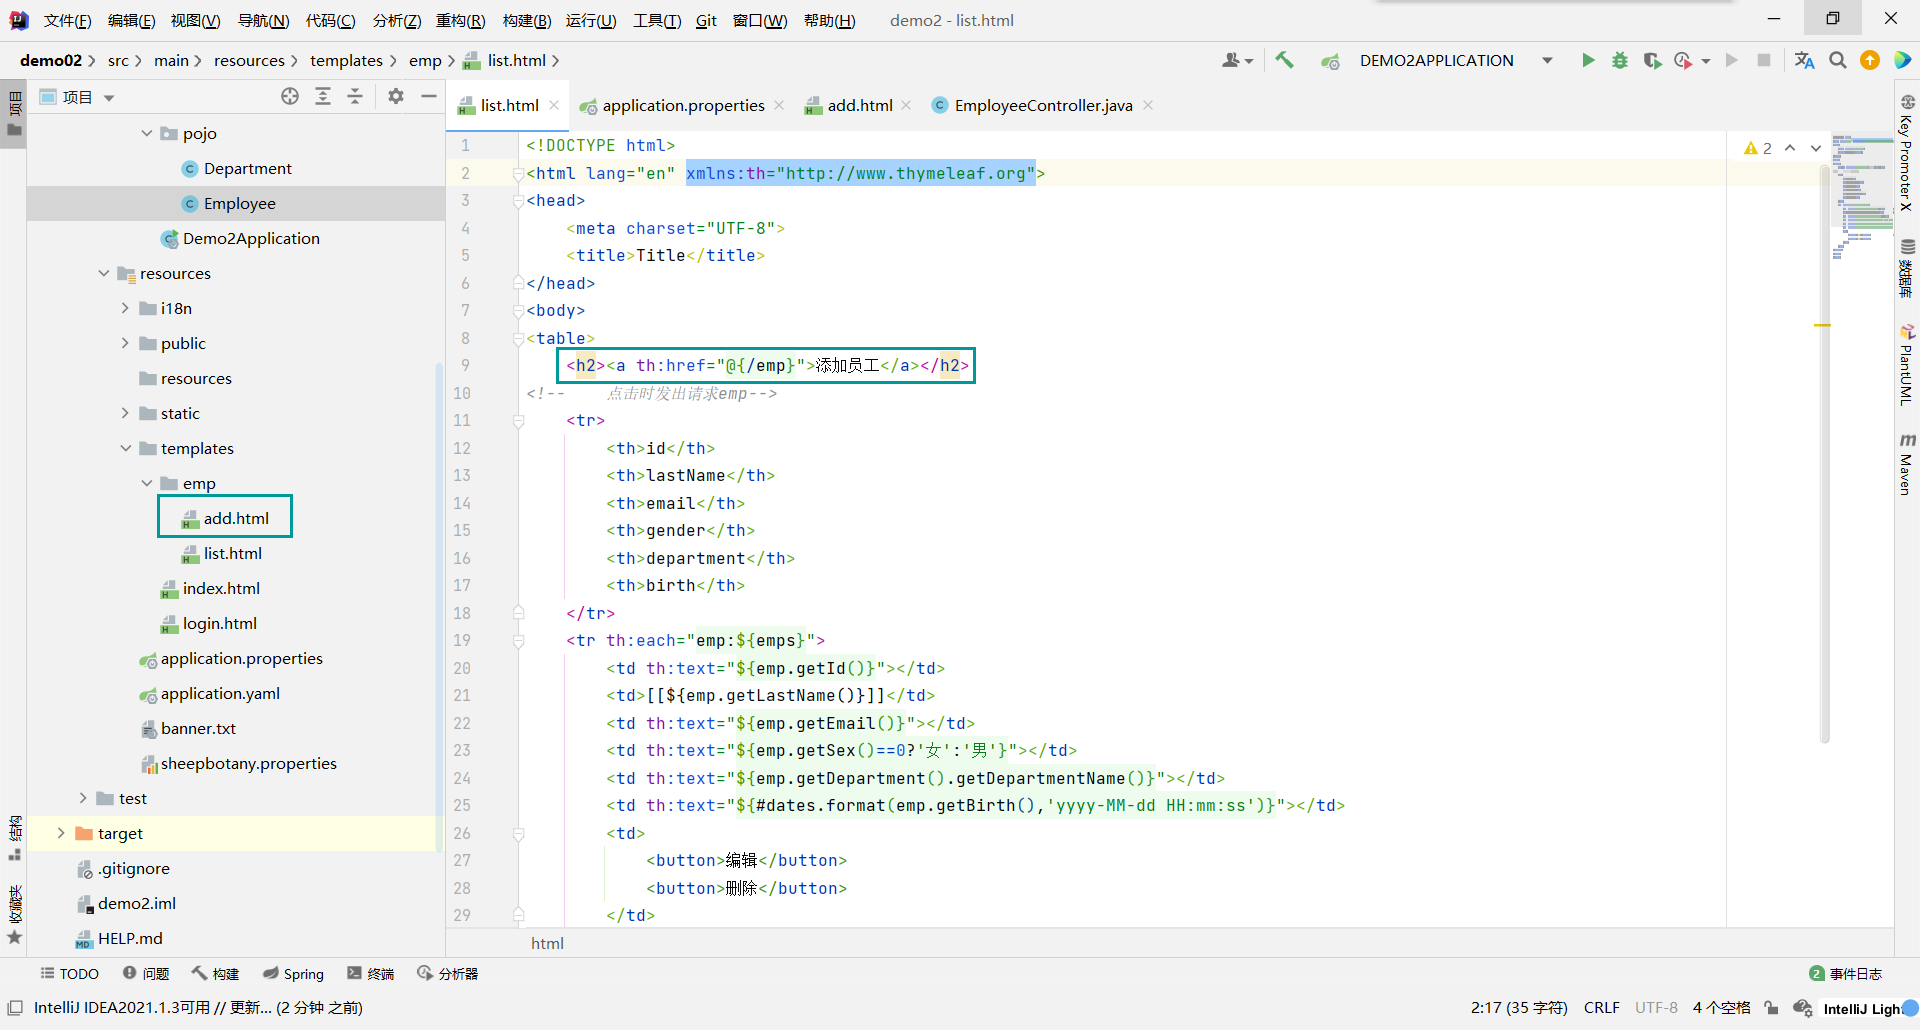
<table>
    <tr>
        <th>id</th>
        <th>lastName</th>
        <th>email</th>
        <th>gender</th>
        <th>department</th>
        <th>birth</th>
    </tr>
    <tr th:each="emp:${emps}">
        <td th:text="${emp.getId()}"></td>
        <td>[[${emp.getLastName()}]]</td>
        <td th:text="${emp.getEmail()}"></td>
        <td th:text="${emp.getSex()}"></td>
        <td th:text="${emp.getDepartment().getDepartmentName()}"></td>
        <td th:text="${emp.getBirth()}"></td>
    </tr>
</table>
时间和性别进行修改:
<td th:text="${emp.getSex()==0?'女':'男'}"></td>
 <td th:text="${#dates.format(emp.getBirth(),'yyyy-MM-dd HH:mm:ss')}"></td>
7:实现增加用户
跳转到add页面
1:文件位置
此处/emp意思为当点击链接时发送emp请求
get到请求并传参到前端:
@GetMapping("/emp")//get请求
public String toAddpage(Model model){
    //查出所有部门信息
    Collection<Department> departments=departmentDao.getDepartments();
    model.addAttribute("departments",departments);
    return "emp/add";
}
add.html页面
<html lang="en" xmlns:th="http://www.thymeleaf.org">
<head>
    <meta charset="UTF-8">
    <title>Title</title>
</head>
<body>
<form th:action="@{/emp}" method="post">
<table>
  <tr>
    <td><lable>LastName:</lable></td>
    <td><input type="text" name="lastName"></td>
  </tr>
  <tr>
    <td><lable>Email:</lable></td>
    <td><input type="text" name="email"></td>
  </tr>
  <tr>
    <td><lable>Gender:</lable></td>
    <td><input name="sex" type="radio" value="0">女</td>
    <td><input name="sex" type="radio" value="1">男</td>
  </tr>
  <tr>
    <td><lable>department</lable></td>
    <td>
    <select name="department.id" id="">
      <option th:each="dept:${departments}" th:text="${dept.getDepartmentName()}" th:value="${dept.getId()}"></option>
    </select>
    </td>
  <tr>
  <td><lable>Birth</lable></td>
  <td><input type="text" name="birth"></td>
  </tr>
<tr>
  <td><button type="submit">提交</button></td>
</tr>
</table>
</form>
</body>
</html>
添加用户时,发出post请求,请求名依然是emp,此时在controller中进入post方法,并将employee返回给前端。
@PostMapping("/emp")
public String addEmp(Employee employee){
    System.out.println(employee);
    employeeDao.save(employee);
    //添加的操作
    return "redirect:/emp/list";
}
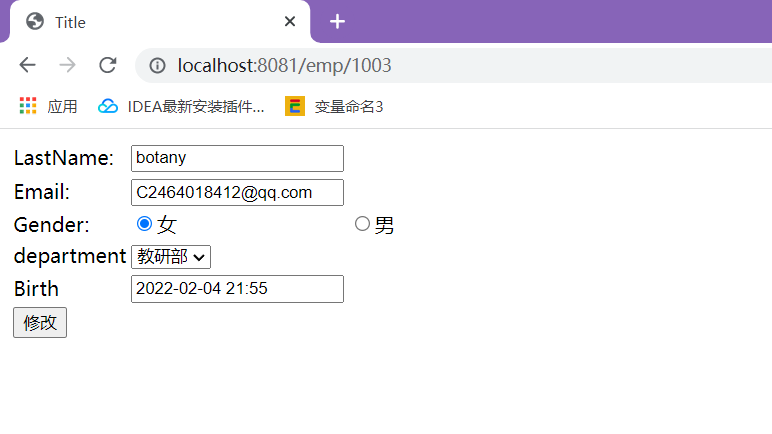
8:实现修改用户

前端代码:
<html lang="en" xmlns:th="http://www.thymeleaf.org">
<head>
    <meta charset="UTF-8">
    <title>Title</title>
</head>
<body>
<form th:action="@{/updateEmp}" method="post">
  <input type="hidden" name="id" th:value="${emp.getId()}">
<table>
  <tr>
    <td><label>LastName:</label></td>
    <td><input th:value="${emp.getLastName()}" type="text" name="lastName"></td>
  </tr>
  <tr>
    <td><label>Email:</label></td>
    <td><input th:value="${emp.getEmail()}" type="text" name="email"></td>
  </tr>
  <tr>
    <td><label>Gender:</label></td>
    <td><input th:checked="${emp.getSex()==0}" name="sex" type="radio" value="0">女</td>
    <td><input th:checked="${emp.getSex()==1}" name="sex" type="radio" value="1">男</td>
  </tr>
  <tr>
    <td><label>department</label></td>
    <td>
    <select name="department.id" id="">
      <option th:selected="${dept.getId()==emp.getDepartment().getId()}" th:each="dept:${departments}"
              th:text="${dept.getDepartmentName()}" th:value="${dept.getId()}"></option>
    </select>
    </td>
  <tr>
  <td><lable>Birth</lable></td>
  <td><input th:value="${#dates.format(emp.getBirth(),'yyyy-MM-dd HH:mm')}"  type="text" name="birth"></td>
  </tr>
<tr>
  <td><button type="submit">修改</button></td>
</tr>
</table>
</form>
</body>
</html>
部门的选择:emp的id与部门的id相等
后端部分
@GetMapping("/emp/{id}")
public String toUpdate(@PathVariable("id")Integer id,Model model){
    Employee employee=employeeDao.getElementById(id);
    model.addAttribute("emp",employee);
    Collection<Department> departments=departmentDao.getDepartments();
    model.addAttribute("departments",departments);

    return "emp/update";
}

@PostMapping ("/updateEmp")
public String updateEmp(Employee employee){
    employeeDao.save(employee);
    return "redirect:/emp/list";

}
效果:
9:实现删除用户
使用的方法:
employeeDao.delete(id);
前端页面的list.html加上:
<a th:href="@{/delEmp/{id}(id=${emp.getId()})}">删除</a>
@GetMapping("/delEmp/{id}")
public String deleteEmp(@PathVariable("id")Integer id){
    employeeDao.delete(id);
    return "redirect:/emp/list";
}
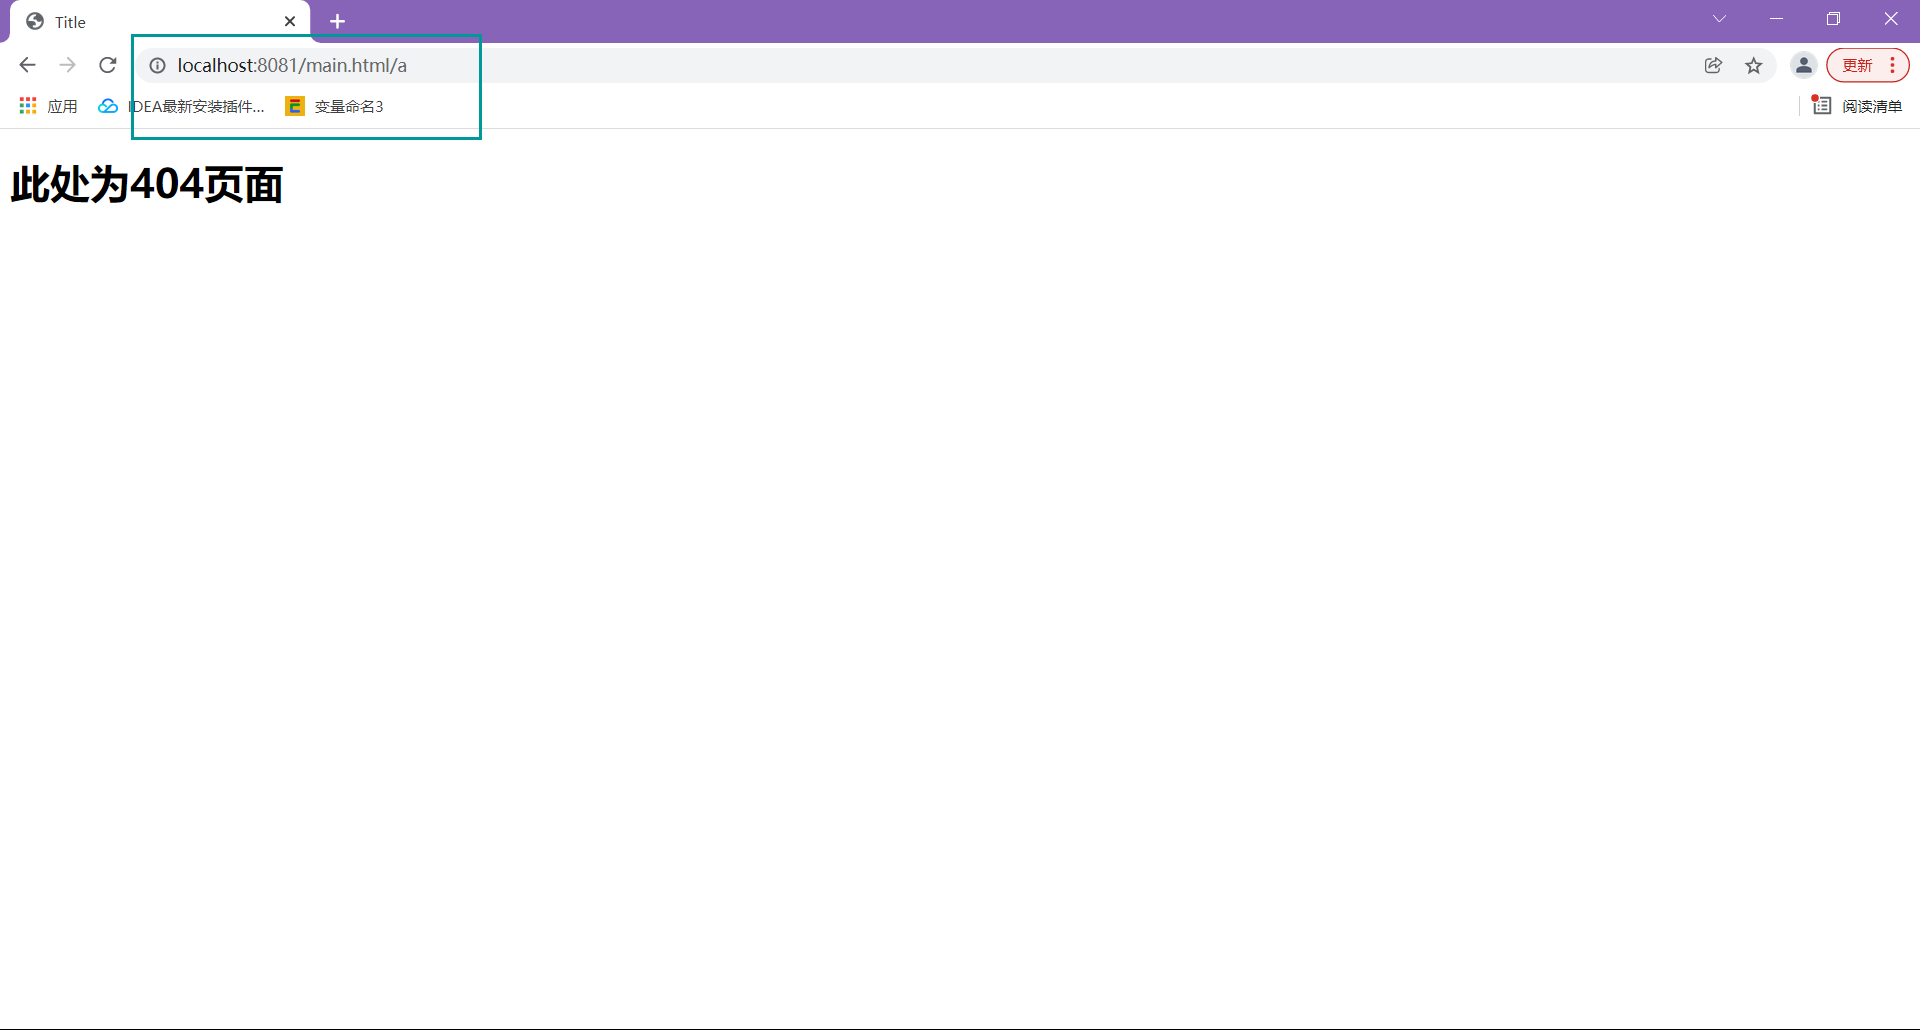
10:写自己喜欢的404页面
只需要在templetes页面中新建error文件夹,然后加上404.html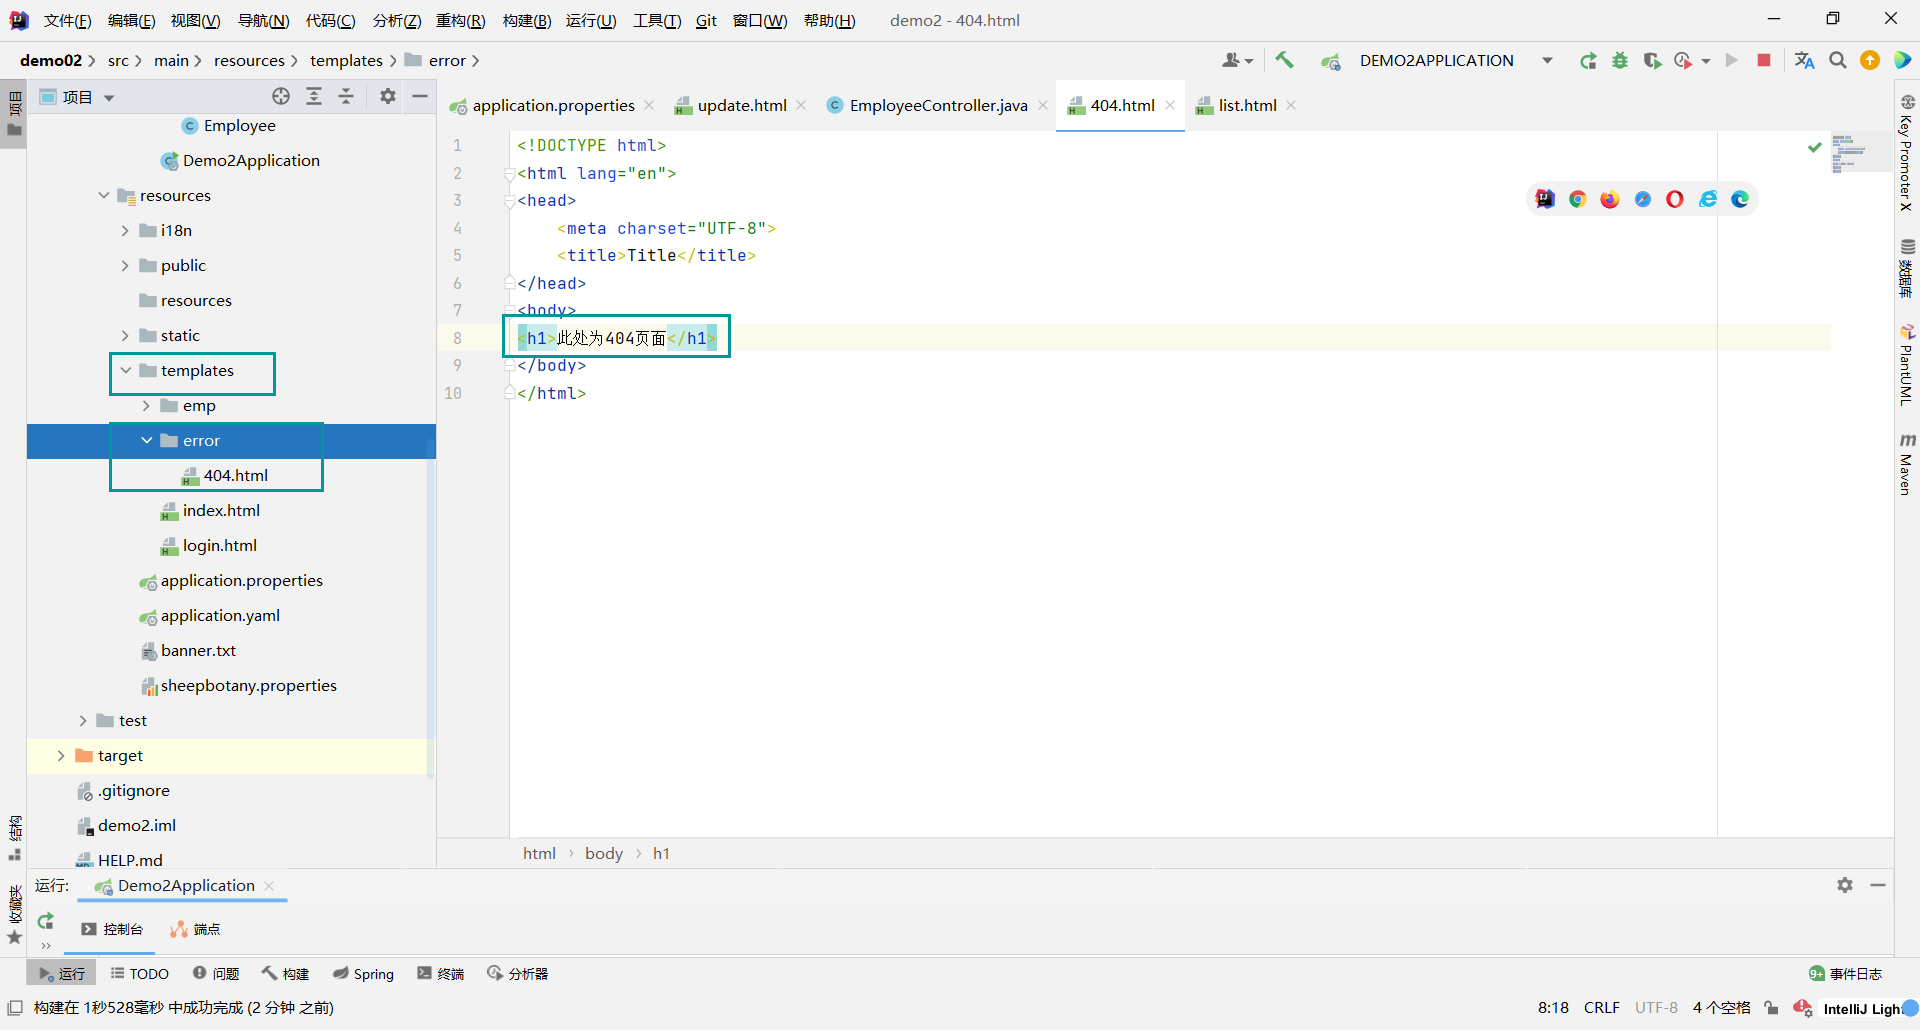
此时输入不存在的页面会弹出:
11:注销登录
html中写入
<a th:href="@{/user/logout}"><i class="bullhorn icon"></i> 注销登录</a>
在Controller中写入:
@RequestMapping("/user/logout")
public String logout(HttpSession session){
    session.invalidate();
    return "redirect:/login.html";

}
ger id){
employeeDao.delete(id);
return “redirect:/emp/list”;
}
### 10:写自己喜欢的404页面

只需要在templetes页面中新建error文件夹,然后加上404.html[外链图片转存中...(img-gq6kCgkK-1644071037101)]


此时输入不存在的页面会弹出:

[外链图片转存中...(img-VhdBjYsb-1644071037102)]

### 11:注销登录

html中写入

```html
<a th:href="@{/user/logout}"><i class="bullhorn icon"></i> 注销登录</a>
在Controller中写入:
@RequestMapping("/user/logout")
public String logout(HttpSession session){
    session.invalidate();
    return "redirect:/login.html";

}


 809
809

 被折叠的 条评论
为什么被折叠?
被折叠的 条评论
为什么被折叠?
 到【灌水乐园】发言


