


 本文介绍了如何使用Python的OpenCV库从摄像头录制视频,并演示了如何封装代码以处理视频,包括人脸检测功能。通过实例展示如何保存为MP4格式,同时提供了关键帧处理和实时反馈选项。
问题描述
Python OpenCV 保存mp4视频
代码
0为摄像头,换为路径则读取视频文件
import cv2

cap = cv2.VideoCapture(0)  # 打开摄像头

fourcc = cv2.VideoWriter_fourcc(*'MP4V')  # 视频编解码器
fps = cap.get(cv2.CAP_PROP_FPS)  # 帧数
width, height = int(cap.get(cv2.CAP_PROP_FRAME_WIDTH)), int(cap.get(cv2.CAP_PROP_FRAME_HEIGHT))  # 宽高
out = cv2.VideoWriter('result.mp4', fourcc, fps, (width, height))  # 写入视频

while cap.isOpened():
    ret, frame = cap.read()
    if ret == True:
        out.write(frame)  # 写入帧
        cv2.imshow('frame', frame)
        if cv2.waitKey(1) & 0xFF == ord('q'):  # q退出
            break
    else:
        break

cap.release()
out.release()
cv2.destroyAllWindows()
推荐阅读
封装
加载处理图像处理函数直接保存视频
process_video.py
import cv2
from timeit import default_timer as timer


def process_video(filename=0, func=None, output='result.mp4', verbose=0):
    """处理视频

    :param filename: 视频源,默认为摄像头
    :param func: 处理每一帧的函数名
    :param output: 保存的文件名
    :param verbose: 可视化,0不可视化,1显示处理后的结果,2显示对比结果
    """
    cap = cv2.VideoCapture(filename)  # 打开摄像头
    fourcc = cv2.VideoWriter_fourcc(*'MP4V')  # 视频编解码器
    fps = cap.get(cv2.CAP_PROP_FPS)  # 帧数
    width, height = int(cap.get(cv2.CAP_PROP_FRAME_WIDTH)), int(cap.get(cv2.CAP_PROP_FRAME_HEIGHT))  # 宽高
    out = cv2.VideoWriter(output, fourcc, fps, (width, height))  # 写入视频

    if verbose > 0 or filename == 0:
        print('英文下输入q停止')

    count = cap.get(cv2.CAP_PROP_FRAME_COUNT)  # 总帧数
    accum_time = 0  # 累计时间
    curr_fps = 0  # 当前帧数
    prev_time = timer()  # 上一段的时间

    while cap.isOpened():
        if count > 0:
            current = cap.get(cv2.CAP_PROP_POS_FRAMES)  # 当前第几帧
            curr_time = timer()  # 当前时间
            exec_time = curr_time - prev_time  # 处理时间
            prev_time = curr_time  # 上一段的时间设为当前时间
            accum_time = accum_time + exec_time  # 累计时间
            curr_fps = curr_fps + 1
            if accum_time >= 1:
                accum_time = accum_time - 1
                print('进度:{:.2f}%\tFPS:{}'.format(current / count * 100, curr_fps))
                curr_fps = 0  # 重置帧数
        ret, frame = cap.read()
        if ret == True:
            result = func(frame) if func else frame
            out.write(result)  # 写入帧
            if verbose > 0 or filename == 0:
                cv2.imshow('after', result)
                if verbose == 2:
                    cv2.imshow('before', frame)
                if cv2.waitKey(1) & 0xFF == ord('q'):  # q退出
                    break
        else:
            break
    cap.release()
    out.release()
    cv2.destroyAllWindows()


if __name__ == '__main__':
    process_video()
main.py
import cv2
import numpy as np

from process_video import process_video


def flip(frame):
    """图像翻转"""
    return cv2.flip(frame, 0)


net = cv2.dnn.readNetFromTensorflow(
    'model/opencv_face_detector_uint8.pb',
    'model/opencv_face_detector.pbtxt'
)  # TensorFlow模型


def face_detect(frame):
    """人脸检测"""
    frame = frame.copy()
    height, width, channel = frame.shape  # 高、宽、通道数
    blob = cv2.dnn.blobFromImage(cv2.resize(frame, (300, 300)), 1.0, (300, 300),
                                 (104.0, 177.0, 123.0))  # 调整大小并降低光照的影响
    net.setInput(blob)  # 设置输入
    detections = net.forward()  # 检测结果
    faces = detections[0, 0]  # 人脸结果
    for face in faces:
        confidence = face[2]  # 置信度
        if confidence > 0.5:  # 置信度阈值设为0.5
            box = face[3:7] * np.array([width, height, width, height])  # 人脸矩形框坐标
            pt1 = int(box[0]), int(box[1])  # 左上角坐标
            pt2 = int(box[2]), int(box[3])  # 右下角坐标
            cv2.rectangle(frame, pt1, pt2, (0, 255, 0), thickness=2)  # 画出人脸矩形框

            text = '{:.2f}%'.format(confidence * 100)  # 置信度文本
            startX, startY = pt1
            y = startY - 10 if startY - 10 > 10 else startY + 10
            org = (startX, y)  # 文本的左下角坐标
            cv2.putText(frame, text, org, cv2.FONT_HERSHEY_SIMPLEX, 0.5, (0, 255, 0), thickness=2)  # 画出置信度
    return frame


if __name__ == '__main__':
    process_video('test.mp4', func=face_detect, verbose=2)
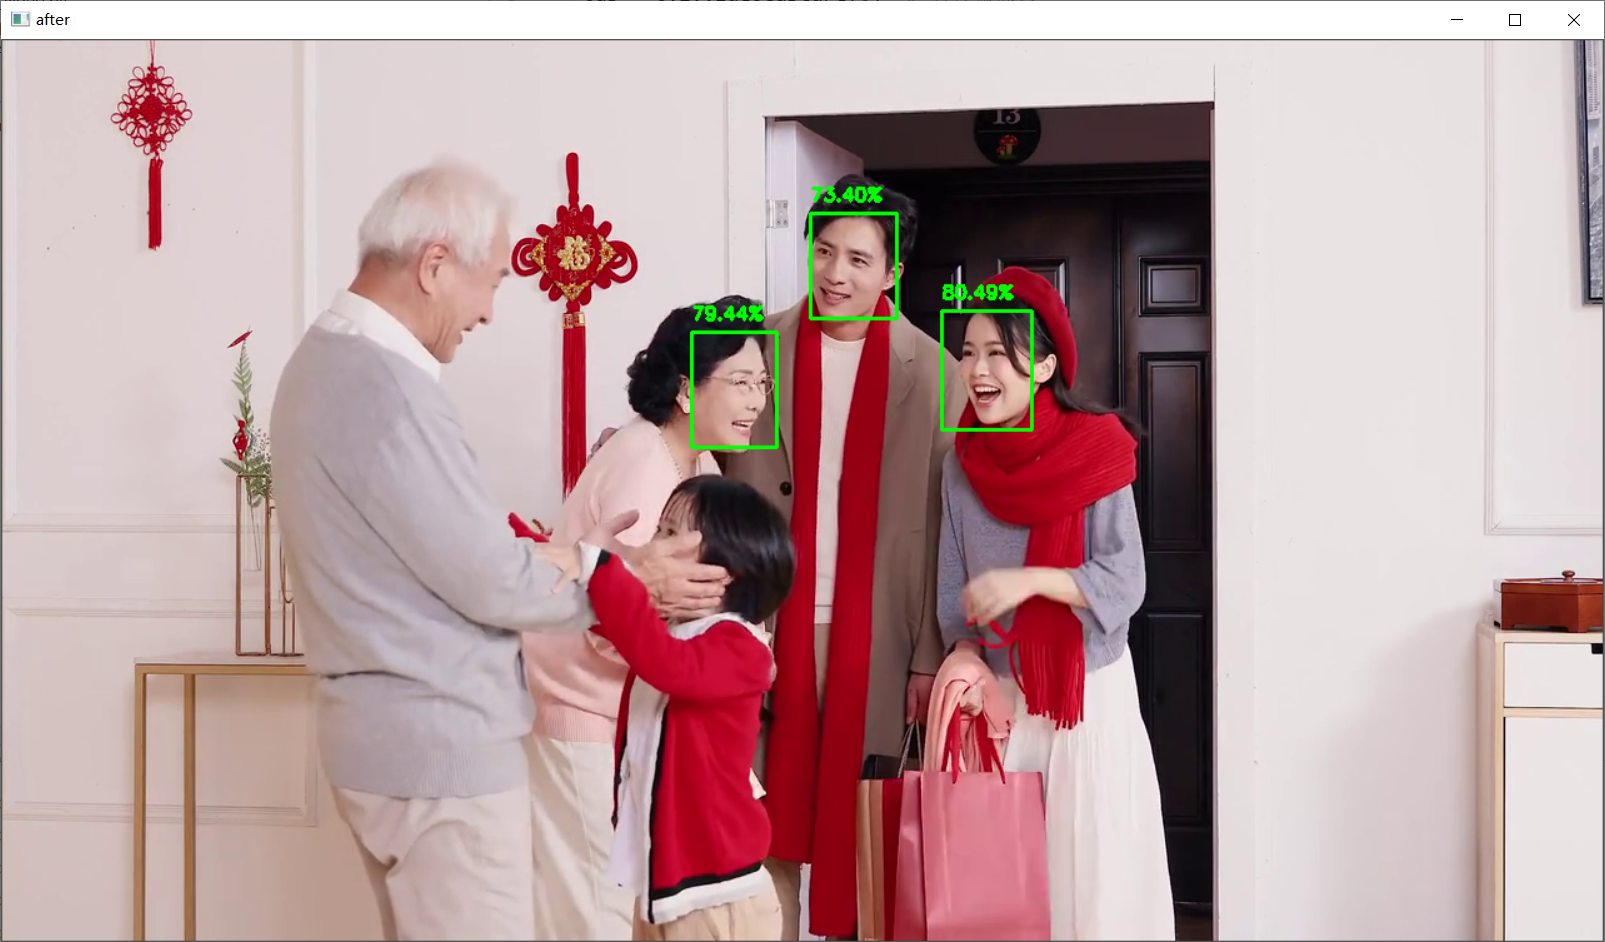
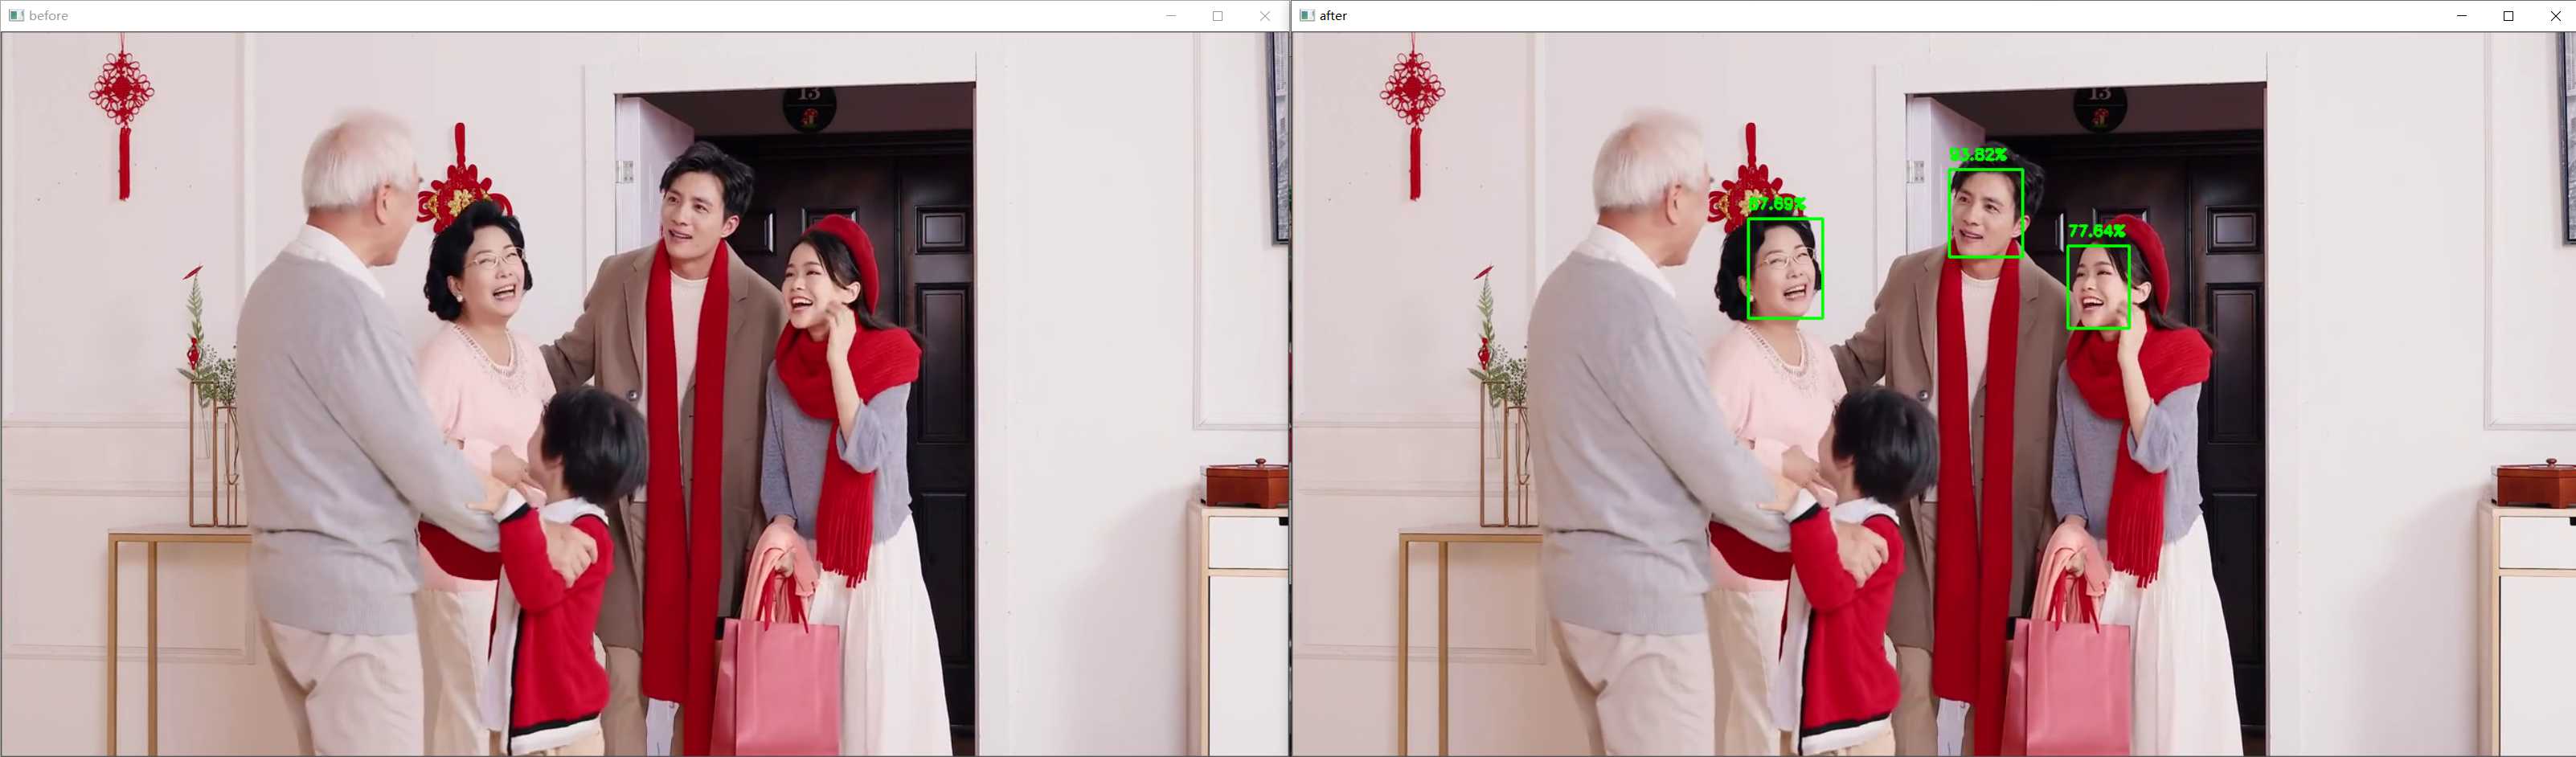
效果
verbose=1
verbose=2


 1859
1859

 被折叠的 条评论
为什么被折叠?
被折叠的 条评论
为什么被折叠?
 到【灌水乐园】发言


