PAT-2019年冬季考试-甲级-7-4 Cartesian Tree (30分)

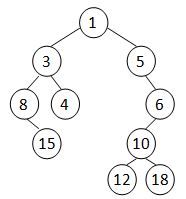
A Cartesian tree is a binary tree constructed from a sequence of distinct numbers. The tree is heap-ordered, and an inorder traversal returns the original sequence. For example, given the sequence { 8, 15, 3, 4, 1, 5, 12, 10, 18, 6 }, the min-heap Cartesian tree is shown by the figure.
在这里插入图片描述

Your job is to output the level-order traversal sequence of the min-heap Cartesian tree.

Input Specification:

Each input file contains one test case. Each case starts from giving a positive integer N (≤30), and then N distinct numbers in the next line, separated by a space. All the numbers are in the range of int.

Output Specification:

For each test case, print in a line the level-order traversal sequence of the min-heap Cartesian tree. All the numbers in a line must be separated by exactly one space, and there must be no extra space at the beginning or the end of the line.

Sample Input:

10
8 15 3 4 1 5 12 10 18 6

Sample Output:

1 3 5 8 4 6 15 10 12 18

思路&分析

给出了一组树的inorder traversal中序遍历结果,用最小堆的形式建树。因为中序遍历根节点在中间,最小堆的根节点最小,那么每次从序列中找到最小值就是根,左半部分为左子树,右半部分为右子树,递归建树即可。最后根据题目要求用队列输出层次遍历结果。

注意点:

感觉没什么注意点…虽然是最后一题,但确是通过率最高的一题(通过率与分值成正比 :smile)建树基本功。

提交代码(AC)

#include <iostream>
#include <stdio.h>
#include <vector>
#include <queue>
#include <string>
#
  • 0
    点赞
  • 0
    收藏
    觉得还不错? 一键收藏
  • 0
    评论
cesium-sensor.js是一个用于Cesium的JavaScript库,它提供了一些传感器效果,如agi_conicSensor、agi_rectangularSensor、agi_customPatternSensor和agi_Vector。你可以通过引入cesium-sensor.js文件来使用这些效果。 以下是一个使用cesium-sensor.js的示例代码: ```javascript // 引入cesium-sensor.js文件 import "/js/cesium-sensor-volumes"; // 创建一个Cesium Viewer对象 var viewer = new Cesium.Viewer("cesiumContainer"); // 创建一个传感器对象 var sensor = new Cesium.ConicSensorGraphics({ // 设置传感器的位置和方向 position: Cesium.Cartesian3.fromDegrees(-75.59777, 40.03883, 1000), direction: Cesium.Cartesian3.fromDegrees(-75.59777, 40.03883, 100), // 设置传感器的其他属性 radius: 1000, innerHalfAngle: Cesium.Math.toRadians(30), outerHalfAngle: Cesium.Math.toRadians(60), showIntersection: true, intersectionColor: Cesium.Color.RED, intersectionWidth: 2, }); // 将传感器对象添加到场景中 viewer.entities.add({ position: sensor.position, orientation: sensor.orientation, conicSensor: sensor, }); // 设置相机的初始位置和方向 viewer.camera.setView({ destination: Cesium.Cartesian3.fromDegrees(-75.59777, 40.03883, 10000), orientation: { heading: Cesium.Math.toRadians(0), pitch: Cesium.Math.toRadians(-90), roll: Cesium.Math.toRadians(0), }, }); ``` 这段代码演示了如何使用cesium-sensor.js库创建一个圆锥传感器,并将其添加到Cesium的场景中。你可以根据需要调整传感器的位置、方向和其他属性。

“相关推荐”对你有帮助么?

  • 非常没帮助
  • 没帮助
  • 一般
  • 有帮助
  • 非常有帮助
提交
评论
添加红包

请填写红包祝福语或标题

红包个数最小为10个

红包金额最低5元

当前余额3.43前往充值 >
需支付:10.00
成就一亿技术人!
领取后你会自动成为博主和红包主的粉丝 规则
hope_wisdom
发出的红包
实付
使用余额支付
点击重新获取
扫码支付
钱包余额 0

抵扣说明:

1.余额是钱包充值的虚拟货币,按照1:1的比例进行支付金额的抵扣。
2.余额无法直接购买下载,可以购买VIP、付费专栏及课程。

余额充值