


我们来了解一些ListView在加载大量网络图片的时候存在的常见问题:
1.性能问题,ListView的滑动有卡顿,不流畅,造成非常糟糕的用户体验。
2.图片的错位问题。
3.图片太大,加载Bitmap时造成的OOM(Outofmemory),也就是栈内存溢出。
4.异步线程丢失的问题。
针对所存在的问题我们逐个击破,彻底的掌握ListView的优化问题,有利于我们的学习和工作。
(一)性能问题:
在这个问题上我们可以在Adapter适配器中中复用convertView和写一个内部ViewHolder类来解决。但是如果每个Adapter中都写一个ViewHolder类会显得非常的麻烦,下面我给大家一个万能的ViewHolder类,方便在任何Adapter中调用。
调用BaseViewHolder类的示例代码:
<span style="font-size:14px;">    if (convertView == null) {
            convertView = LayoutInflater.from(context).inflate(
                    R.layout.personplans_item, parent, false);
        }


        TextView tv_product_type1 = BaseViewHolder.get(convertView,
                R.id.tv_product_type1);  </span>
注意:在BaseViewHolder类中我们看到SparseArray是Android提供的一个工具类,用意是用来取代HashMap工具类的。如下图:

SparseArray是android里为<Interger,Object>这样的Hashmap而专门写的类,目的是提高效率。具体如何提高效率可以去Android文档查询一下,这里就不赘述了。
(二)图片错位问题
这个问题导致的原因是因为复用ConvertView导致的,在加载大量的Item时,常见的错位问题。这种问题的解决思路通常是以图片的Url做为唯一的key,然后setTag中,然后获取时根据图片的URL来获得图片。
(三)防止OOM,以及异步加载。
关于异步加载图片的思路是:
1.第一次进入时,是没有图片的,这时候我们会启动一个线程池,异步的从网上获得图片数据,为了防止图片过大导致OOM,可以调用BitmapFactory中的Options类对图片进行适当的缩放,最后再显示主线程的ImageView上。
2.把加载好的图片以图片的Url做为唯一的key存入内存缓存当中,并严格的控制好这个缓存的大小,防止OOM的发生。
3.把图片缓存在SD当中,如果没有SD卡就放在系统的缓存目录cache中,以保证在APP退出后,下次进来能看到缓存中的图片,这样就可以让使你的APP不会给客户呈现一片空白的景象。
4.用户第二次进来的时候,加载图片的流程则是倒序的,首先从内容中看是否存在缓存图片,如果没有就从SD卡当中寻找,再没有然后才是从网络中获取图片数据。这样做的既可以提高加载图片的效率,同时也节约了用户的流量。
说完了理论性的东西,我们来开始动手实战一下吧,下面介绍一个GitHub上一个很轻巧的开源框架LazyListGitHub地址,然后基于它做一些我们想要的效果,关于开源的东西,我们不止要学会用,还要从中能学到东西。众所周知的Android-Universal-Image-Loader其实就是基于LazyList的一个拓展 ,增加了更多的配置。但是从学习的角度我们还是希望能从原理学起,太多的功能封装,难免会让我们晕乎,简单的功能实现就够了。
1.先来看一下运行效果图:
2.来看一下LazyList项目的结构:
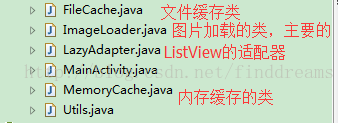
构非常的简单,整个项目的体积才10多k,适合加入我们自己的项目当中去,研究起来也不会觉得难,因为都是最为核心的东西。
3.调用Lazylist的入口:
<span style="font-size:14px;">    adapter = new LazyAdapter(this, mStrings);
            list.setAdapter(adapter);  </span>
传入一个装满图片Url地址的字符串数组进去,然后在LazyAdapter中对ListView中的进行显示。
4.具体LazyAdapter中调用的代码是:
<span style="font-size:14px;">    public class LazyAdapter extends BaseAdapter {

        private Activity activity;
        private String[] data;
        private static LayoutInflater inflater=null;
        public ImageLoader imageLoader;

        public LazyAdapter(Activity a, String[] d) {
            activity = a;
            data=d;
            inflater = (LayoutInflater)activity.getSystemService(Context.LAYOUT_INFLATER_SERVICE);
            imageLoader=new ImageLoader(activity.getApplicationContext());
        }

        public int getCount() {
            return data.length;
        }

        public Object getItem(int position) {
            return position;
        }

        public long getItemId(int position) {
            return position;
        }

        public View getView(int position, View convertView, ViewGroup parent) {
            View vi=convertView;
            if(convertView==null)
                vi = inflater.inflate(R.layout.item, null);

               ImageView image=BaseViewHolder.get(vi, R.id.image);
               ImageView image2=BaseViewHolder.get(vi, R.id.image2);
               imageLoader.DisplayImage(data[position], image);
               imageLoader.DisplayImage(data[position], image2);
            return vi;
        }
    }  </span>
5.从上面我们可以看出来其实最重要的封装显示图片的方法就在ImageLoader这个类中。
<span style="font-size:14px;">    public class ImageLoader {

        MemoryCache memoryCache=new MemoryCache();
        FileCache fileCache;
        private Map<ImageView, String> imageViews=Collections.synchronizedMap(new WeakHashMap<ImageView, String>());
        ExecutorService executorService;
        Handler handler=new Handler();//handler to display images in UI thread

        public ImageLoader(Context context){
            fileCache=new FileCache(context);
            executorService=Executors.newFixedThreadPool(5);
        }
        // 当进入listview时默认的图片,可换成你自己的默认图片
        final int stub_id=R.drawable.stub;
        public void DisplayImage(String url, ImageView imageView)
        {
            imageViews.put(imageView, url);
            // 先从内存缓存中查找
            Bitmap bitmap=memoryCache.get(url);
            if(bitmap!=null)
                imageView.setImageBitmap(bitmap);
            else
            {
                 // 若没有的话则开启新线程加载图片
                queuePhoto(url, imageView);
                imageView.setImageResource(stub_id);
            }
        }

        private void queuePhoto(String url, ImageView imageView)
        {
            PhotoToLoad p=new PhotoToLoad(url, imageView);
            executorService.submit(new PhotosLoader(p));
        }

        private Bitmap getBitmap(String url)
        {
            File f=fileCache.getFile(url);
            /**
             * 先从文件缓存中查找是否有
             */
            //from SD cache
            Bitmap b = decodeFile(f);
            if(b!=null)
                return b;
            /**
             *  最后从指定的url中下载图片
             */
            //from web
            try {
                Bitmap bitmap=null;
                URL imageUrl = new URL(url);
                HttpURLConnection conn = (HttpURLConnection)imageUrl.openConnection();
                conn.setConnectTimeout(30000);
                conn.setReadTimeout(30000);
                conn.setInstanceFollowRedirects(true);
                InputStream is=conn.getInputStream();
                OutputStream os = new FileOutputStream(f);
                Utils.CopyStream(is, os);
                os.close();
                conn.disconnect();
                bitmap = decodeFile(f);
                return bitmap;
            } catch (Throwable ex){
               ex.printStackTrace();
               if(ex instanceof OutOfMemoryError)
                   memoryCache.clear();
               return null;
            }
        }
        /**
         *  decode这个图片并且按比例缩放以减少内存消耗,虚拟机对每张图片的缓存大小也是有限制的
         */
        //decodes image and scales it to reduce memory consumption
        private Bitmap decodeFile(File f){
            try {
                //decode image size
                BitmapFactory.Options o = new BitmapFactory.Options();
                o.inJustDecodeBounds = true;
                FileInputStream stream1=new FileInputStream(f);
                BitmapFactory.decodeStream(stream1,null,o);
                stream1.close();

                //Find the correct scale value. It should be the power of 2.
                final int REQUIRED_SIZE=70;
                int width_tmp=o.outWidth, height_tmp=o.outHeight;
                int scale=1;
                while(true){
                    if(width_tmp/2<REQUIRED_SIZE || height_tmp/2<REQUIRED_SIZE)
                        break;
                    width_tmp/=2;
                    height_tmp/=2;
                    scale*=2;
                }

                //decode with inSampleSize
                BitmapFactory.Options o2 = new BitmapFactory.Options();
                o2.inSampleSize=scale;
                FileInputStream stream2=new FileInputStream(f);
                Bitmap bitmap=BitmapFactory.decodeStream(stream2, null, o2);
                stream2.close();
                return bitmap;
            } catch (FileNotFoundException e) {
            }
            catch (IOException e) {
                e.printStackTrace();
            }
            return null;
        }

        //Task for the queue
        private class PhotoToLoad
        {
            public String url;
            public ImageView imageView;
            public PhotoToLoad(String u, ImageView i){
                url=u;
                imageView=i;
            }
        }

        class PhotosLoader implements Runnable {
            PhotoToLoad photoToLoad;
            PhotosLoader(PhotoToLoad photoToLoad){
                this.photoToLoad=photoToLoad;
            }

            @Override
            public void run() {
                try{
                    if(imageViewReused(photoToLoad))
                        return;
                    Bitmap bmp=getBitmap(photoToLoad.url);
                    memoryCache.put(photoToLoad.url, bmp);
                    if(imageViewReused(photoToLoad))
                        return;
                    BitmapDisplayer bd=new BitmapDisplayer(bmp, photoToLoad);
                    handler.post(bd);
                }catch(Throwable th){
                    th.printStackTrace();
                }
            }
        }
        /**
         * 防止图片错位
         * @param photoToLoad
         * @return
         */
        boolean imageViewReused(PhotoToLoad photoToLoad){
            String tag=imageViews.get(photoToLoad.imageView);
            if(tag==null || !tag.equals(photoToLoad.url))
                return true;
            return false;
        }
        /**
         *  用于在UI线程中更新界面
         *
         */
        //Used to display bitmap in the UI thread
        class BitmapDisplayer implements Runnable
        {
            Bitmap bitmap;
            PhotoToLoad photoToLoad;
            public BitmapDisplayer(Bitmap b, PhotoToLoad p){
                bitmap=b;
                photoToLoad=p;
                }
            public void run()
            {
                if(imageViewReused(photoToLoad))
                    return;
                if(bitmap!=null)
                    photoToLoad.imageView.setImageBitmap(bitmap);
                else
                    photoToLoad.imageView.setImageResource(stub_id);
            }
        }

        public void clearCache() {
            memoryCache.clear();
            fileCache.clear();
        }

    }  </span>
由于篇幅的原因,FileCache和MenoryCache这两个缓存类,我就不贴大量代码了,全部都在我提供的demo示例代码中,你可以仔细的去研究一下,并有详细的注释,大家下载就可以用在自己的项目中了。
Listview优化的demo地址:http://download.csdn.net/detail/finddreams/8141689
原文:http://blog.csdn.net/finddreams/article/details/40977451


 7285
7285

 被折叠的 条评论
为什么被折叠?
被折叠的 条评论
为什么被折叠?
 到【灌水乐园】发言


