


UIView本身对于基本动画和关键帧动画、转场动画都有相应的封装,在对动画细节没有特殊要求的情况下使用起来也要简单的多。可以说在日常开发中90%以上的情况使用UIView的动画封装方法都可以搞定.
UIKit直接将动画集成到UIView类中,当内部的一些属性发生改变时,UIView将为这些改变提供动画支持.
常见方法解析:
+ (void)setAnimationDelegate:(id)delegate
设置动画代理对象,当动画开始或者结束时会发消息给代理对象
+ (void)setAnimationWillStartSelector:(SEL)selector
当动画即将开始时,执行delegate对象的selector,并且把beginAnimations:context:中传入的参数传进selector
+ (void)setAnimationDidStopSelector:(SEL)selector
当动画结束时,执行delegate对象的selector,并且把beginAnimations:context:中传入的参数传进selector
+ (void)setAnimationDuration:(NSTimeInterval)duration
动画的持续时间,秒为单位
+ (void)setAnimationDelay:(NSTimeInterval)delay
动画延迟delay秒后再开始
+ (void)setAnimationStartDate:(NSDate *)startDate
动画的开始时间,默认为now
+ (void)setAnimationCurve:(UIViewAnimationCurve)curve
动画的时间变化类型
+ (void)setAnimationRepeatCount:(float)repeatCount
动画的重复次数
+ (void)setAnimationRepeatAutoreverses:(BOOL)repeatAutoreverses
如果设置为YES,代表动画每次重复执行的效果会跟上一次相反
+ (void)setAnimationTransition:(UIViewAnimationTransition)transition forView:(UIView *)view cache:(BOOL)cache
设置视图view的过渡效果, transition指定过渡类型, cache设置YES代表使用视图缓存,性能较好.
一:基础动画
#import "ViewController.h"

@interface ViewController ()

@property(nonatomic,strong) UIImageView *imageView;

@end

@implementation ViewController

- (void)viewDidLoad {

    [super viewDidLoad];

    self.imageView=[[UIImageView alloc]initWithFrame:CGRectMake(100, 100, 135, 135)];
    self.imageView.image=[UIImage imageNamed:@"jt_03@3"];
    [self.view addSubview:_imageView];

}

//目标:实现点击屏幕的任意位置,改变图片的显示位置.
-(void)touchesBegan:(NSSet<UITouch *> *)touches withEvent:(UIEvent *)event{

    UITouch *touch=[touches anyObject];
    CGPoint location=[touch locationInView:self.view];

    //方法1 block 方式
    //下面方法是UIView的block动画
    /*
     开始动画,UIView的动画方法执行完后动画会停留在重点位置,而不需要进行任何特殊处理
     duration:动画执行时间
     delay:延迟时间,根据需求是否需要延时操作
     options:动画设置,例如自动恢复、匀速运动等,选择动画速度类型.这是一个枚举值,后面有解释.
     animations:block动画
     completion:动画完成回调方法.可以在这里进行一些相关的清理工作!
     */

//    [UIView animateWithDuration:0.5 delay:0.0 options:UIViewAnimationOptionCurveLinear animations:^{
//        self.imageView.center=location;
//    } completion:^(BOOL finished) {
//        NSLog(@"Animation Over!");
//    }];


    //方法二 + (void)beginAnimations:和 + (void)commitAnimations;实现动画操作!其实上面的 block 方式就是对其进行了封装,所以我们可以直接使用

    /*
     animationID  动画对象的 ID. 及身份标识
     context      可以为动画自定义所需要的数据,设置相应的动画代理,然后在代理方法可以获取这些数据. setAnimationWillStartSelector: and setAnimationDidStopSelector:
     */
    [UIView beginAnimations:nil context:nil];

    //这里可以根据需求设置相应的属性.
    [UIView setAnimationDuration:0.5];
    //[UIView setAnimationDelay:1.0];//设置延迟
    //[UIView setAnimationRepeatAutoreverses:NO];//是否反转
    //[UIView setAnimationRepeatCount:10];//重复次数
    //[UIView setAnimationDelegate:self];//设置代理
    //[UIView setAnimationWillStartSelector:(SEL)];//设置动画开始运动的执行方法
    //[UIView setAnimationDidStopSelector:(SEL)];//设置动画运行结束后的执行方法
    self.imageView.center=location;

     //开始动画
    [UIView commitAnimations];
}
@end
点击移动图片效果图:
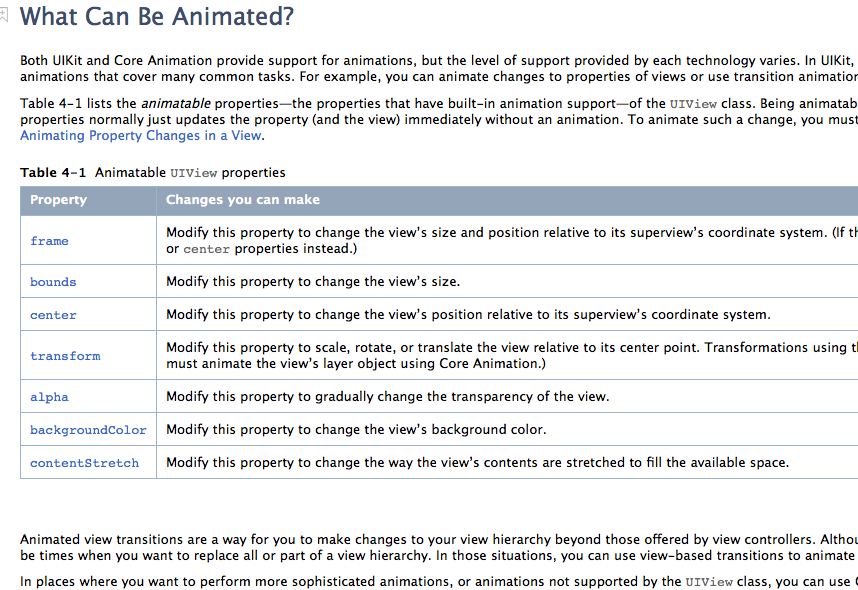
在上面的例子中仅仅是使用了UIView的 center属性,还有其他很多属性都是可以设置的,如下面的部分属性,这些属性都是动画属性.
• bounds: Animate this property to reposition the view’s content within the view’s frame.
• frame: Animate this property to move and/or scale the view.
• center: Animate this property when you want to move the view to a new location on screen.
• backgroundColor: Change this property of a view to have UIKit gradually change the tint of the background color over time.
• alpha: Change this property to create fade-in and fade-out effects.
• transform: Modify this property within an animation block to animate the rotation, scale, and/or position of a view.  该属性非常强大,可以进行旋转,缩放,和移动操作!
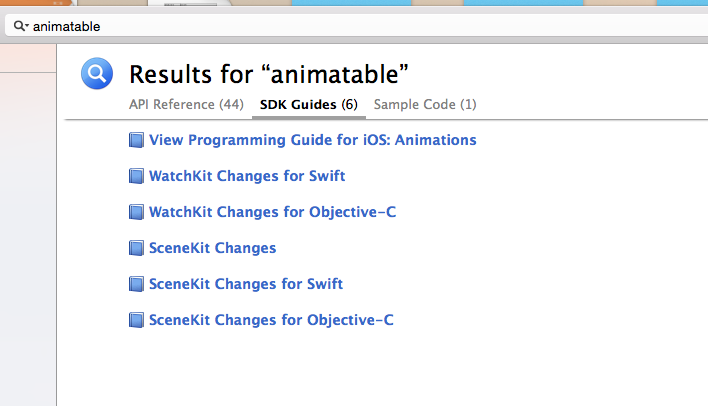
对于哪些可动画可以进入官方文档搜索animatable.然后进入View Programming Guide for iOS: Animations,得到如下界面即可査看.如下图所示:
二:弹簧动画效果(在用户登录界面,使用弹簧动画效果是一个不错的选择!)
在上面代码的基础上,再touchesBegan方法中更改代码,实现一个简单的弹簧动画效果.当点击屏幕的某个位置的时候,将会看到图片在该位置,进行类似弹簧的运动效果.
-(void)touchesBegan:(NSSet<UITouch *> *)touches withEvent:(UIEvent *)event{

    UITouch *touch=[touches anyObject];
    CGPoint location=[touch locationInView:self.view];
    /*
     创建弹性动画
     damping:阻尼,范围0-1,阻尼越接近于0,弹性效果越明显
     velocity:弹性的初始化速度
     */

    [UIView animateWithDuration:5.0 delay:0 usingSpringWithDamping:0.1 initialSpringVelocity:1.0 options:UIViewAnimationOptionCurveLinear animations:^{
        _testView.center=location;
    } completion:nil];
在动画方法中有一个option参数,UIViewAnimationOptions类型,它是一个枚举类型,动画参数分为三类,可以组合使用:
1.常规动画属性设置(可以同时选择多个进行设置)
UIViewAnimationOptionLayoutSubviews:动画过程中保证子视图跟随运动。
UIViewAnimationOptionAllowUserInteraction:动画过程中允许用户交互。
UIViewAnimationOptionBeginFromCurrentState:所有视图从当前状态开始运行。
UIViewAnimationOptionRepeat:重复运行动画。
UIViewAnimationOptionAutoreverse :动画运行到结束点后仍然以动画方式回到初始点。
UIViewAnimationOptionOverrideInheritedDuration:忽略嵌套动画时间设置。
UIViewAnimationOptionOverrideInheritedCurve:忽略嵌套动画速度设置。
UIViewAnimationOptionAllowAnimatedContent:动画过程中重绘视图(注意仅仅适用于转场动画)。
UIViewAnimationOptionShowHideTransitionViews:视图切换时直接隐藏旧视图、显示新视图,而不是将旧视图从父视图移除(仅仅适用于转场动画)
UIViewAnimationOptionOverrideInheritedOptions :不继承父动画设置或动画类型。
2.动画速度控制(可从其中选择一个设置)
UIViewAnimationOptionCurveEaseInOut:动画先缓慢,然后逐渐加速。
UIViewAnimationOptionCurveEaseIn :动画逐渐变慢。
UIViewAnimationOptionCurveEaseOut:动画逐渐加速。
UIViewAnimationOptionCurveLinear :动画匀速执行,默认值。
3.转场类型(仅适用于转场动画设置,可以从中选择一个进行设置,基本动画、关键帧动画不需要设置)
UIViewAnimationOptionTransitionNone:没有转场动画效果。
UIViewAnimationOptionTransitionFlipFromLeft :从左侧翻转效果。
UIViewAnimationOptionTransitionFlipFromRight:从右侧翻转效果。
UIViewAnimationOptionTransitionCurlUp:向后翻页的动画过渡效果。
UIViewAnimationOptionTransitionCurlDown :向前翻页的动画过渡效果。
UIViewAnimationOptionTransitionCrossDissolve:旧视图溶解消失显示下一个新视图的效果。
UIViewAnimationOptionTransitionFlipFromTop :从上方翻转效果。
UIViewAnimationOptionTransitionFlipFromBottom:从底部翻转效果。
三:过渡动画(即转场动画)
1)首先看一下单视图的转场动画.(UIView直接封装了转场动画,使用起来同样很简单。)
#import "MainViewController.h"

@interface MainViewController ()

@property (weak, nonatomic) UIImageView *imageView;
@property (strong, nonatomic) NSArray *imageList;

@end

@implementation MainViewController

- (void)viewDidLoad
{
    [super viewDidLoad];

    // 实例化imageView
    UIImageView *imageView = [[UIImageView alloc]initWithFrame:self.view.bounds];
    UIImage *image = [UIImage imageNamed:@"1.jpg"];
    [imageView setImage:image];
    [self.view addSubview:imageView];
    self.imageView = imageView;

    // 3. 初始化数据
    NSMutableArray *arrayM = [NSMutableArray arrayWithCapacity:9];

    for (NSInteger i = 1; i < 10; i++) {
        NSString *fileName = [NSString stringWithFormat:@"%d.jpg", i];
        UIImage *image = [UIImage imageNamed:fileName];

        [arrayM addObject:image];
    }

    self.imageList = arrayM;
}

//每次触摸以过渡方式更新对应的图片.
//这里也可以为imageView添加对应的滑动手势(UISwipeGestureRecognizer),通过滑动的效果进行过渡效果.
//其实仅仅有一个视图UIImageView做转场动画,每次转场通过切换UIImageView的内容而已.

- (void)touchesBegan:(NSSet *)touches withEvent:(UIEvent *)event
{
    //对于到底已何种方式进行过渡动画,可以参考之前options的枚举值解释.

    [UIView transitionWithView:self.imageView duration:1.0f options:UIViewAnimationOptionTransitionCrossDissolve animations:^{
        // 在此设置视图反转之后显示的对应的图片
        self.imageView.tag = (self.imageView.tag + 1) % self.imageList.count;
        [self.imageView setImage:self.imageList[self.imageView.tag]];

    } completion:^(BOOL finished) {
        NSLog(@"动画完成");
    }];

}
@end
2):双视图转场动画
- (void)transitionFromView:(UIView )fromView toView:(UIView )toView duration:(NSTimeInterval)duration options:(UIViewAnimationOptions)options completion:(void (^)(BOOL finished))completion;
-
注意:
使用双视图转场动画时,需要掌握视图的superView属性的变化
方法调用完毕后,相当于执行了下面两句代码:
// 添加toView到父视图
[fromView.superview addSubview:toView];
// 把fromView从父视图中移除
[fromView.superview removeFromSuperview];
参数说明:
duration:动画的持续时间
view:需要进行转场动画的视图
options:转场动画的类型
animations:将改变视图属性的代码放在这个block中
completion:动画结束后,会自动调用这个block
#import "MainViewController.h"

@interface MainViewController ()

@property (strong, nonatomic) UIView *subView1;
@property (strong, nonatomic) UIView *subView2;

@end

@implementation MainViewController
/*
 双视图转场时,转出视图的父视图会被释放

 强烈建议使用单视图转场,如果单视图转场无法满足需求,通常可以考虑视图控制器的切换.

 */
- (void)viewDidLoad
{
    [super viewDidLoad];


    UIView *view1 = [[UIView alloc]initWithFrame:self.view.bounds];
    view1.backgroundColor=[UIColor redColor];
    [self.view addSubview:view1];
    self.subView1 = view1;

    UIView *view2 = [[UIView alloc]initWithFrame:self.view.bounds];
    view2.backgroundColor=[UIColor blueColor];
    self.subView2 = view2;

}

- (void)touchesBegan:(NSSet *)touches withEvent:(UIEvent *)event
{
    // 在双视图转场时,我们可以根据是否有父视图,来判断谁进谁出
    UIView *fromView = nil;
    UIView *toView = nil;

    if (self.subView1.superview == nil) {
        // 说明subView1要转入
        toView = self.subView1;
        fromView = self.subView2;
    } else {
        // 说明subView2要转入
        toView = self.subView2;
        fromView = self.subView1;
    }

    [UIView transitionFromView:fromView toView:toView duration:1.0f options:UIViewAnimationOptionTransitionFlipFromTop completion:^(BOOL finished) {

        // 每次转场后,会调整参与转场视图的父视图,因此,参与转场视图的属性,需要是强引用
        // 转场之后,入场的视图会有两个强引用,一个是视图控制器,另一个是视图
        NSLog(@"subview 1 %@", self.subView1.superview);
        NSLog(@"subview 2 %@", self.subView2.superview);
    }];

}

@end
四:关键帧动画
1:从iOS2开始,UIView就有了实现动画的方法,而在iOS4中就添加了运用block的方法。这些方法都是对CoreAnimation层的一个装饰方法,UIView只是通过实例渲染的。
2:UIView中的实现动画的方法允许一下可以设置为动画的属性(例如transform, backgroundColor, frame, center等)——设置成为最终状态,运行时长和其他的一些运动曲线的选项。然而,设置中间动画的中间状态(被称之为关键帧),是不可能办到的。在这种情况下有必须运用CoreAnimation来创建一个CAKeyFrameAnimation.在iOS7中包含了这些变化,在UIView中新增了两个方法,所以不需要自己借助于CoreAnimation就可以实现关键这动画了。
3:UIView的关键帧动画需要用到两个方法,首先一个比较熟悉的block方法是animateKeyframesWithDuration:delay:options:animations:completion:这个方法需要浮点类型的动画持续时长(duraiton)和延迟(delay),一些二进制组成的选项(options)和动画运行的block和动画运行完成最后的block,这是一个标准的UIView的动画的实现。下一个有点儿不同的方法我们称之为内部块方法:addKeyframeWithRelativeStartTime:relativeDuration:。这个方法是用来添加动画序列内的不动点。
部分主要内容如下:(同样是一张图片显示在界面上,点击界面触发关键帧动画!)

-(void)touchesBegan:(NSSet<UITouch *> *)touches withEvent:(UIEvent *)event{

    //不错的博客讲解:http://blog.kingiol.com/blog/2014/01/13/ios7-day-by-day-day11-uiview-key-frame-animations/

    [UIView animateKeyframesWithDuration:5.0 delay:0.0 options:UIViewKeyframeAnimationOptionCalculationModeLinear animations:^{


        [UIView addKeyframeWithRelativeStartTime:0.0    //相对于5秒所开始的时间(第0秒开始动画)
                                relativeDuration:0.5    //相对于5秒所持续时间(也就是5.0*0.5=2.5秒)
                                      animations:^{
            _imageView.center=CGPointMake(80.0, 220.0);
        }];


        [UIView addKeyframeWithRelativeStartTime:0.5  //相对于5秒所开始的时间(从0.5*5.0秒开始)
                                relativeDuration:0.25 //相对于5秒所持续时间(持续5.0*0.25=1.25秒)
                                      animations:^{
            _imageView.center=CGPointMake(45.0, 300.0);
        }];


        [UIView addKeyframeWithRelativeStartTime:0.75  //相对于5秒所开始的时间(从0.75*5.0秒开始)
                                relativeDuration:0.25  //相对于5秒所持续时间(持续5.0*0.25=1.25秒)
                                      animations:^{
            _imageView.center=CGPointMake(55.0, 400.0);
        }];

    } completion:^(BOOL finished) {

        NSLog(@"Animation end.");
    }];

}
对于关键帧动画也有一些动画参数设置options,UIViewKeyframeAnimationOptions类型,和上面基本动画参数设置有些差别,关键帧动画设置参数分为两类,可以组合使用:
1.常规动画属性(可以同时选择多个进行设置)
UIViewAnimationOptionLayoutSubviews:动画过程中保证子视图跟随运动。
UIViewAnimationOptionAllowUserInteraction:动画过程中允许用户交互。
UIViewAnimationOptionBeginFromCurrentState:所有视图从当前状态开始运行。
UIViewAnimationOptionRepeat:重复运行动画。
UIViewAnimationOptionAutoreverse :动画运行到结束点后仍然以动画方式回到初始点。
UIViewAnimationOptionOverrideInheritedDuration:忽略嵌套动画时间设置。
UIViewAnimationOptionOverrideInheritedOptions :不继承父动画设置或动画类型。
2.动画模式(同前面关键帧动画动画模式一一对应,可以从其中选择一个进行设置)
UIViewKeyframeAnimationOptionCalculationModeLinear:连续运算模式。
UIViewKeyframeAnimationOptionCalculationModeDiscrete :离散运算模式。
UIViewKeyframeAnimationOptionCalculationModePaced:均匀执行运算模式。
UIViewKeyframeAnimationOptionCalculationModeCubic:平滑运算模式。
UIViewKeyframeAnimationOptionCalculationModeCubicPaced:平滑均匀运算模式。
注意:前面说过关键帧动画有两种形式,上面演示的是属性值关键帧动画,路径关键帧动画目前UIView还不支持。


 1771
1771

 被折叠的 条评论
为什么被折叠?
被折叠的 条评论
为什么被折叠?
 到【灌水乐园】发言


