


Linux服务器是CentOS 7.x
Elasticsearch下载地址:
https://www.elastic.co/downloa
解压 tar -avxf elasticsearch-7.6.2-linux-x86_64.tar.gz -C /usr/local/
进入解压后的elasticsearch目录:
(1)新建data目录:
mkdir data
1
(2)修改config/elasticsearch.yml:
vim config/elasticsearch.yml
1
取消下列项注释并修改:
cluster.name: my-application #集群名称
node.name: node-1 #节点名称
#数据和日志的存储目录
path.data: /usr/local/elasticsearch-7.1.1/data
path.logs: /usr/local/elasticsearch-7.1.1/logs
#设置绑定的ip,设置为0.0.0.0以后就可以让任何计算机节点访问到了
network.host: 0.0.0.0
http.port: 9200 #端口
#设置在集群中的所有节点名称,这个节点名称就是之前所修改的,当然你也可以采用默认的也行,目前是单机,放入一个节点即可
cluster.initial_master_nodes: ["node-1"]
修改完毕后,:wq 保存退出vim
准备启动es
进入/bin目录执行命令:
./elasticsearch
1
我这里出现如下错误:
Java HotSpot(TM) 64-Bit Server VM warning: INFO: os::commit_memory(0x00000000c5330000, 986513408, 0) failed; error='Cannot allocate memory' (errno=12)
#
# There is insufficient memory for the Java Runtime Environment to continue.
# Native memory allocation (mmap) failed to map 986513408 bytes for committing reserved memory.
# An error report file with more information is saved as:
# logs/hs_err_pid22863.log
[root@VM_0_2_centos bin]#
看来是我这1G的内存太小了啊,elasticsearch使用java的jvm默认是使用1G的内存的,这里我们修改一下内存,直接把内存改到200m
cd 到es目录修改 ./config/jvm.options:
vim ./config/jvm.options
修改该内容:
-Xms200m
-Xmx200m
:wq 保存并退出vim,再次启动es
再次启动出现如下错误:
[root@localhost bin]# ./elasticsearch
future versions of Elasticsearch will require Java 11; your Java version from [/usr/local/java/jdk1.8.0_231/jre] does not meet this requirement
[2020-04-19T20:41:50,510][ERROR][o.e.b.ElasticsearchUncaughtExceptionHandler] [node-1] uncaught exception in thread [main]
org.elasticsearch.bootstrap.StartupException: java.lang.RuntimeException: can not run elasticsearch as root
        at org.elasticsearch.bootstrap.Elasticsearch.init(Elasticsearch.java:174) ~[elasticsearch-7.6.2.jar:7.6.2]
        at org.elasticsearch.bootstrap.Elasticsearch.execute(Elasticsearch.java:161) ~[elasticsearch-7.6.2.jar:7.6.2]
        at org.elasticsearch.cli.EnvironmentAwareCommand.execute(EnvironmentAwareCommand.java:86) ~[elasticsearch-7.6.2.jar:7.6.2]
        at org.elasticsearch.cli.Command.mainWithoutErrorHandling(Command.java:125) ~[elasticsearch-cli-7.6.2.jar:7.6.2]
        at org.elasticsearch.cli.Command.main(Command.java:90) ~[elasticsearch-cli-7.6.2.jar:7.6.2]
        at org.elasticsearch.bootstrap.Elasticsearch.main(Elasticsearch.java:126) ~[elasticsearch-7.6.2.jar:7.6.2]
        at org.elasticsearch.bootstrap.Elasticsearch.main(Elasticsearch.java:92) ~[elasticsearch-7.6.2.jar:7.6.2]
Caused by: java.lang.RuntimeException: can not run elasticsearch as root
        at org.elasticsearch.bootstrap.Bootstrap.initializeNatives(Bootstrap.java:105) ~[elasticsearch-7.6.2.jar:7.6.2]
        at org.elasticsearch.bootstrap.Bootstrap.setup(Bootstrap.java:172) ~[elasticsearch-7.6.2.jar:7.6.2]
        at org.elasticsearch.bootstrap.Bootstrap.init(Bootstrap.java:349) ~[elasticsearch-7.6.2.jar:7.6.2]
        at org.elasticsearch.bootstrap.Elasticsearch.init(Elasticsearch.java:170) ~[elasticsearch-7.6.2.jar:7.6.2]
        ... 6 more
uncaught exception in thread [main]
java.lang.RuntimeException: can not run elasticsearch as root
        at org.elasticsearch.bootstrap.Bootstrap.initializeNatives(Bootstrap.java:105)
        at org.elasticsearch.bootstrap.Bootstrap.setup(Bootstrap.java:172)
        at org.elasticsearch.bootstrap.Bootstrap.init(Bootstrap.java:349)
        at org.elasticsearch.bootstrap.Elasticsearch.init(Elasticsearch.java:170)
        at org.elasticsearch.bootstrap.Elasticsearch.execute(Elasticsearch.java:161)
        at org.elasticsearch.cli.EnvironmentAwareCommand.execute(EnvironmentAwareCommand.java:86)
        at org.elasticsearch.cli.Command.mainWithoutErrorHandling(Command.java:125)
        at org.elasticsearch.cli.Command.main(Command.java:90)
        at org.elasticsearch.bootstrap.Elasticsearch.main(Elasticsearch.java:126)
        at org.elasticsearch.bootstrap.Elasticsearch.main(Elasticsearch.java:92)
For complete error details, refer to the log at /usr/local/elasticsearch-7.6.2/logs/my-application.log
这是不能使用root用户操作,添加一个其他的用户再试试:
创建一个esroot用户并设置初始密码
useradd -c 'ES user' -d /home/esroot esroot
passwd esroot
将es安装目录属主权限改为esroot用户
chown -R esroot /usr/local/elasticsearch-7.6.2/
切换用户到esroot
su esroot
改一下es目录所属用户:
chown esroot /usr/local/elasticsearch-7.6.2/ -R
vim 编辑 /etc/security/limits.conf,在末尾加上:
esroot nofile 65536
esroot hard nofile 65536
esroot soft nproc 4096
esroot hard nproc 4096
vim 编辑 vim /etc/security/limits.d/esroot-nproc.conf,将* 改为用户名(esroot):
# Default limit for number of user's processes to prevent
# accidental fork bombs.
# See rhbz #432903 for reasoning.
es soft nproc 4096
root soft nproc unlimited
vim 编辑 /etc/sysctl.conf,在末尾加上:
vm.max_map_count = 655360
执行:
[root@VM_0_2_centos ~]# sysctl -p
kernel.printk = 5
vm.max_map_count = 655360
[root@VM_0_2_centos ~]#
登录刚才新建的es用户,并启动elasticsearch,OK
[root@VM_0_2_centos elasticsearch-7.1.1]# su es
[es@VM_0_2_centos elasticsearch-7.1.1]$ ./bin/elasticsearch
后台启动:
[es@VM_0_2_centos elasticsearch-7.1.1]$ ./bin/elasticsearch -d
[es@VM_0_2_centos elasticsearch-7.1.1]$
1
2
查看进程:
[es@VM_0_2_centos elasticsearch-7.1.1]$ ./bin/elasticsearch -d
[es@VM_0_2_centos elasticsearch-7.1.1]$ ps -ef|grep elasticsearch
es 18652 1 19 17:48 pts/2 00:00:00 /usr/local/java/jdk1.8.0_211/bin/java -Xms200m -Xmx200m -XX:+UseConcMarkSweepGC -XX:CMSInitiatingOccupancyFraction=75 -XX:+UseCMSInitiatingOccupancyOnly -Des.networkaddress.cache.ttl=60 -Des.networkaddress.cache.negative.ttl=10 -XX:+AlwaysPreTouch -Xss1m -Djava.awt.headless=true -Dfile.encoding=UTF-8 -Djna.nosys=true -XX:-OmitStackTraceInFastThrow -Dio.netty.noUnsafe=true -Dio.netty.noKeySetOptimization=true -Dio.netty.recycler.maxCapacityPerThread=0 -Dlog4j.shutdownHookEnabled=false -Dlog4j2.disable.jmx=true -Djava.io.tmpdir=/tmp/elasticsearch-182563007296674551 -XX:+HeapDumpOnOutOfMemoryError -XX:HeapDumpPath=data -XX:ErrorFile=logs/hs_err_pid%p.log -XX:+PrintGCDetails -XX:+PrintGCDateStamps -XX:+PrintTenuringDistribution -XX:+PrintGCApplicationStoppedTime -Xloggc:logs/gc.log -XX:+UseGCLogFileRotation -XX:NumberOfGCLogFiles=32 -XX:GCLogFileSize=64m -Dio.netty.allocator.type=unpooled -Des.path.home=/usr/local/elasticsearch-7.1.1 -Des.path.conf=/usr/local/elasticsearch-7.1.1/config -Des.distribution.flavor=default -Des.distribution.type=tar -Des.bundled_jdk=true -cp /usr/local/elasticsearch-7.1.1/lib/* org.elasticsearch.bootstrap.Elasticsearch -d
es 18728 8399 0 17:48 pts/2 00:00:00 grep --color=auto elasticsearch
[es@VM_0_2_centos elasticsearch-7.1.1]$
执行命令ss -taln
[root@localhost ~]# ss -taln
State       Recv-Q Send-Q              Local Address:Port                Peer Address:Port
LISTEN      0      128                     127.0.0.1:9000                           *:*
LISTEN      0      128                             *:80                             *:*
LISTEN      0      128                             *:22                             *:*
LISTEN      0      128                             *:88                             *:*
LISTEN      0      100                     127.0.0.1:25                             *:*
LISTEN      0      80                             :::3306                          :::*
LISTEN      0      128                            :::9200                          :::*
LISTEN      0      128                            :::9300                          :::*
LISTEN      0      128                            :::22                            :::*
LISTEN      0      100                           ::1:25
设置防火墙 开启 9200端口号访问
firewall-cmd --zone=public --add-port=9200/tcp --permanent
systemctl restart firewalld
firewall-cmd --query-port=9200/tcp
· 可在浏览器中输入如下地址:http://192.168.1.54:9200/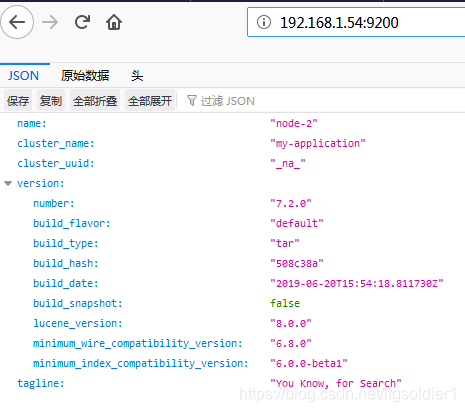
· 如果显示如上信息,则代表Linux下ES已经搭建完毕(单机)
停止
· 若是es的前台运行,则用ctrl + c 来停止。
· 若是es的后台运行,则用kill -9 进程号 来停止。(可通过jps命令,查看es进程号)
linux设置elasticsearch开机启动
vim /etc/rc.local
添加
#elasticsearch开机自启动
su esroot
/usr/local/elasticsearch-7.6.2/bin/elasticsearch -d
重启,查看进程
jps
或者ss -taln


 220
220


 被折叠的 条评论
为什么被折叠?
被折叠的 条评论
为什么被折叠?
 到【灌水乐园】发言


