


原文地址:https://blog.csdn.net/qq_27540925/article/details/79356799
前言
Android O的版本对RIL的框架的通信功能进行了改动,不在使用sockect进行通讯,而改用HIDL进行通信,这里结合7.0和8.0的源码,分析目前的RIL框架,如有错误还请不吝指正。
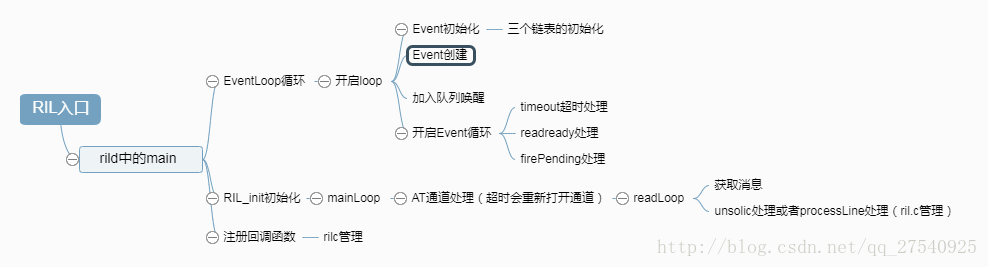
RIL的入口
xref: /hardware/ril/rild/rild.c
int main(int argc, char **argv) {

    //设置服务名,在7.0上是设置Socket端口名
    if (strncmp(clientId, "0", MAX_CLIENT_ID_LENGTH)) {
        strncpy(ril_service_name, ril_service_name_base, MAX_SERVICE_NAME_LENGTH);
        strncat(ril_service_name, clientId, MAX_SERVICE_NAME_LENGTH);
        RIL_setServiceName(ril_service_name);
    }
    //设置lib库地址
    if (rilLibPath == NULL) {
        if ( 0 == property_get(LIB_PATH_PROPERTY, libPath, NULL)) {
            // No lib sepcified on the command line, and nothing set in props.
            // Assume "no-ril" case.
            goto done;
        } else {
            rilLibPath = libPath;
        }
    }
    //链接lib库
    dlHandle = dlopen(rilLibPath, RTLD_NOW);

    if (dlHandle == NULL) {
        RLOGE("dlopen failed: %s", dlerror());
        exit(EXIT_FAILURE);
    }
    //1.开启loop循环
    RIL_startEventLoop();
    //从链接库中(也就是reference-ril.c)寻找RIL_Init函数地址
    rilInit =
        (const RIL_RadioFunctions *(*)(const struct RIL_Env *, int, char **))
        dlsym(dlHandle, "RIL_Init");
    ...
    //2.调用reference-ril.c中的RIL_Init函数进行初始化INIT,同时得到reference-ril的回调函数
    funcs = rilInit(&s_rilEnv, argc, rilArgv);
    RLOGD("RIL_Init rilInit completed");
    //3.注册得到的reference的回调函数
    RIL_register(funcs);
}- 与android N相比,其主要的差别就是将socket更改为service进行通信了,继续看到其主要做的操作:
1.开启loop循环
2.RIL_Init初始化
3.注册得到的reference的回调函数
这里主要对这些初始操作进行对比分析,完整RIL流程见RIL框架分析二
开启loop循环
继续跟踪RIL_startEventLoop
xref: /hardware/ril/libril/ril.cpp
extern "C" void
RIL_startEventLoop(void) {
    ...
    //创建线程并运行eventLoop
    int result = pthread_create(&s_tid_dispatch, &attr, eventLoop, NULL);
    ...
}- 继续分析eventLoop函数
static void *
eventLoop(void *param) {
    //event初始化
    ril_event_init();

    //创建event
    ril_event_set (&s_wakeupfd_event, s_fdWakeupRead, true,
                processWakeupCallback, NULL);
    //加入到队列中唤醒
    rilEventAddWakeup (&s_wakeupfd_event);

    // Only returns on error
    //开启event循环
    ril_event_loop();

    return NULL;
}- 1.1继续跟踪event_init函数
xref: /hardware/ril/libril/ril_event.cpp
// Initialize internal data structs
void ril_event_init()
{
    MUTEX_INIT();

    FD_ZERO(&readFds);
    init_list(&timer_list);
    init_list(&pending_list);
    memset(watch_table, 0, sizeof(watch_table));
}- 初始化文件句柄和,两个列表,timer_list和pending_list还有一个watch_table。
追踪其定义的类型看到两个表是ril_event变量,watch_table是一个指针数组
static struct ril_event * watch_table[MAX_FD_EVENTS];
static struct ril_event timer_list;
static struct ril_event pending_list;
- 分析ril_event的类型
xref: /hardware/ril/libril/ril_event.h
typedef void (*ril_event_cb)(int fd, short events, void *userdata);
//双向链表进行管理,持有句柄文件
struct ril_event {
    struct ril_event *next;
    struct ril_event *prev;

    int fd;
    int index;
    bool persist;
    struct timeval timeout;
    ril_event_cb func;
    void *param;
};- 可以看到其实该类型是双向链表,而timer_list和pending_list还有一个watch_table都是链表
1.2接着跟踪eventLoop循环的具体实现
xref: /hardware/ril/libril/ril_event.cpp
void ril_event_loop()
{

    n = select(nfds, &rfds, NULL, NULL, ptv);
    //主要循环调用三个方法
    for (;;) {
        // Check for timeouts
        processTimeouts();
        // Check for read-ready
        processReadReadies(&rfds, n);
        // Fire away
        firePending();
    }
}
处理timer_list列表
static void processTimeouts()
{
//如果timer_list中的事件超时,则从timer_list列表中移除,并添加到pending_list中
while ((tev != &timer_list) && (timercmp(&now, &tev->timeout, >))) {
// Timer expired
dlog("~~~~ firing timer ~~~~");
next = tev->next;
removeFromList(tev);
addToList(tev, &pending_list);
tev = next;
}
}
处理watch_table列表
static void processReadReadies(fd_set * rfds, int n)
{
//添加到pending_list中,设置persist为false后从watch_table中移除
for (int i = 0; (i < MAX_FD_EVENTS) && (n > 0); i++) {
struct ril_event * rev = watch_table[i];
if (rev != NULL && FD_ISSET(rev->fd, rfds)) {
addToList(rev, &pending_list);
if (rev->persist == false) {
removeWatch(rev, i);
}
n--;
}
}
}
处理pengding_list列表,从pending_list中移除,调用ev->func处理事件
static void firePending()
{
struct ril_event * ev = pending_list.next;
while (ev != &pending_list) {
struct ril_event * next = ev->next;
removeFromList(ev);
ev->func(ev->fd, 0, ev->param);
ev = next;
}
}- 总结event事件的处理
RIL的Event管理体系中存在3个链表结构:watch_table,timer_list,pending_list
watch(如果驻留的话就每次都处理)和timer(如果时间到了的话就分配进去处理)只是分配,实际最后处理的场所是pending_list,),并使用了一个设备句柄池readFDS,把所有的Socket管道的文件句柄保存起来。
而管理的过程可以归纳为以下6点:
1、可以将一个Event添加到watch_table或者timer_list中;
2、如果Event是添加到watch_table中,需要把当前Event的fd(事件设备句柄)添加到readFDS中;
3、如果Event是添加到timer_list中,不需要把当前Event的fd(事件设备句柄)添加到readFDS中,而且当前Event的fd值是无效的;
4、在循环检测过程中,如果发现watch_table中有Event就会把当前Event添加到pending_list中,如果当前Event的persist属性为false,说明不需要保留当前节点,就把当前的Event从watch_table中删除;如果persist为true,说明需要保留,就不需要从watch_table中删除当前节点。
5、在循环检测过程中,如果发现timer_list中的Event超时时,把当前Event移动到pending_list中,同时删除timer_list中的节点。
6、在循环检测的过程中,等watch_table和timer_list处理完毕后,就去pending_list中执行里面的Event所指向的func。
RIL_Init初始化
通过加载链接库加载reference文件
xref: /hardware/ril/reference-ril/reference-ril.c
const RIL_RadioFunctions *RIL_Init(const struct RIL_Env *env, int argc, char **argv)
{
    pthread_attr_init (&attr);
    pthread_attr_setdetachstate(&attr, PTHREAD_CREATE_DETACHED);
    //开启线程处理mainLoop
    ret = pthread_create(&s_tid_mainloop, &attr, mainLoop, NULL);
    //把ril的回调函数返回出来
    return &s_callbacks;
}
- 看到开启线程调用mainLoop处理
mainLoop(void *param __unused)
{
    //初始化AT通道的关闭方法和超时方法
    at_set_on_reader_closed(onATReaderClosed);
    at_set_on_timeout(onATTimeout);

    for (;;) {
            //控制关闭
                s_closed = 0;
                //注意传入的参数
        ret = at_open(fd, onUnsolicited);
        RIL_requestTimedCallback(initializeCallback, NULL, &TIMEVAL_0);
        waitForClose();
        RLOGI("Re-opening after close");
    }
}- 上面可以看到,不仅打开了AT通道,而且还设置了超时方法。
跟进waitForClose发现当 s_closed=0是会继续等待,搜索s_closed值的更改,发现在两个地方会更改该值为1,即onATTimeout和onATReaderClosed处。
当前线程在打开AT通道后,在waitForClose中阻塞等待,如果AT通道在检测超时后,将会主动的关闭当前的AT通道,此时将会激活waitForClose中的阻塞线程,然后waitForClose将会返回。
而一旦waitForClose函数返回,将会再次进入for循环,重新打开AT通道。
继续跟进AT通道的打开
xref: /hardware/ril/reference-ril/atchannel.c
/**
 * Starts AT handler on stream "fd'
 * returns 0 on success, -1 on error
 */
int at_open(int fd, ATUnsolHandler h)
{
    s_unsolHandler = h;
    pthread_attr_init (&attr);
    pthread_attr_setdetachstate(&attr, PTHREAD_CREATE_DETACHED);

    ret = pthread_create(&s_tid_reader, &attr, readerLoop, &attr);
}- 看到开启线程调用readLoop处理
static void *readerLoop(void *arg __unused)
{
    for (;;) {
        if(isSMSUnsolicited(line)) {
            //读取数据
            line1 = strdup(line);
            line2 = readline();
            if (s_unsolHandler != NULL) {
                //unsolHandler处理-->处理主动上报的消息,URC消息可以直接发送给RILJ
                s_unsolHandler (line1, line2);
            }
            free(line1);
        } else {
            //处理主动请求的消息
            processLine(line);
        }
    }
    //关闭读
    onReaderClosed();
}- 可以看到这里主要调用了s_unsolHandler或 processLine 方法处理消息。
2.1继续分析 s_unsolHandler (line1, line2);
查找s_unsolHandler的初始化,在 at_open中对其进行了初始化,也就是reference-ril.c中的 onUnsolicited 。
xref: /hardware/ril/reference-ril/reference-ril.c
static void onUnsolicited (const char *s, const char *sms_pdu)
{
    ...
    if (strStartsWith(s, "%CTZV:")) {
        /* TI specific -- NITZ time */
        char *response;

        line = p = strdup(s);
        at_tok_start(&p);

        err = at_tok_nextstr(&p, &response);

        if (err != 0) {
            RLOGE("invalid NITZ line %s\n", s);
        } else {
            RIL_onUnsolicitedResponse (
                RIL_UNSOL_NITZ_TIME_RECEIVED,
                response, strlen(response));
        }
        free(line);
    }
    ...省略多个else if
}- 可以看到这里是根据开头的不同进行分别处理,有多种情况,这里仅列出第一种情况
可以看出,URC消息的处理流程基本上就是根据命令头的不同将其转化为不同的命令索引,然后调用 RIL_onUnsolicitedResponse 函数
所以我们继续追溯RIL_onUnsolicitedResponse方法
而RIL_onUnsolicitedResponse的实现:
#define RIL_onUnsolicitedResponse(a,b,c) s_rilenv->OnUnsolicitedResponse(a,b,c)
- 说明这个函数调用的是s_rilenv变量的OnUnsolicitedResponse方法。那么s_rilenv是哪里初始化的呢?
搜索s_rilenv,可以发现其是在调用RIL_Init方法的时候初始化的
我们在rild.c中的main函数中对reference库初始化时是这样的形式:
funcs = rilInit(&s_rilEnv, argc, rilArgv); 上面的初始化过程将s_rilEnv全局变量传递给了reference,然后在reference-ril.c内部将这个值传给了s_rilenv,而s_rilEnv的各个处理函数是在ril.cpp中实现的。
上面绕了一圈,还是把对消息的处理从动态库(也就是reference-ril.c文件)饶回到了ril.c文件中。
这也正是整个RIL架构的设计理念:框架和处理方式由ril.c管理,差异化的AT命令由reference实现。
所以继续查看ril.c中的具体实现
#if defined(ANDROID_MULTI_SIM)
extern "C"
void RIL_onUnsolicitedResponse(int unsolResponse, const void *data,
                                size_t datalen)
{
    //确保已经注册
    if (s_registerCalled == 0) {
        // Ignore RIL_onUnsolicitedResponse before RIL_register
        RLOGW("RIL_onUnsolicitedResponse called before RIL_register");
        return;
    }


    appendPrintBuf("[UNSL]< %s", requestToString(unsolResponse));
    //使用读写锁
    pthread_rwlock_t *radioServiceRwlockPtr = radio::getRadioServiceRwlock((int) soc_id);
    int rwlockRet = pthread_rwlock_rdlock(radioServiceRwlockPtr);
    assert(rwlockRet == 0);

        //调用responseFunction,注意soc_id
    ret = s_unsolResponses[unsolResponseIndex].responseFunction(
            (int) soc_id, responseType, 0, RIL_E_SUCCESS, const_cast<void*>(data),
            datalen);

    rwlockRet = pthread_rwlock_unlock(radioServiceRwlockPtr);
    assert(rwlockRet == 0);
    //android7.0 上此函数主要操作有两步,1是对返回数据进行打包到p中,2调用send发送
    //ret = sendResponse(p,id);-->使用socket将打包的p数据发送

}
重点关注s_unsolResponses的跟进
static UnsolResponseInfo s_unsolResponses[] = {
#include "ril_unsol_commands.h"
};

xref: /hardware/ril/libril/ril_unsol_commands.h
    {RIL_UNSOL_RESPONSE_RADIO_STATE_CHANGED, radio::radioStateChangedInd, WAKE_PARTIAL},
    {RIL_UNSOL_RESPONSE_CALL_STATE_CHANGED, radio::callStateChangedInd, WAKE_PARTIAL},
    {RIL_UNSOL_RESPONSE_VOICE_NETWORK_STATE_CHANGED, radio::networkStateChangedInd, WAKE_PARTIAL},
    {RIL_UNSOL_RESPONSE_NEW_SMS, radio::newSmsInd, WAKE_PARTIAL},
    {RIL_UNSOL_RESPONSE_NEW_SMS_STATUS_REPORT, radio::newSmsStatusReportInd, WAKE_PARTIAL},
    {RIL_UNSOL_RESPONSE_NEW_SMS_ON_SIM, radio::newSmsOnSimInd, WAKE_PARTIAL},
    {RIL_UNSOL_ON_USSD, radio::onUssdInd, WAKE_PARTIAL},
    {RIL_UNSOL_ON_USSD_REQUEST, radio::onUssdInd, DONT_WAKE},
可以看到s_unsolResponses[unsolResponseIndex].responseFunction其实调用的就是radio::callStateChangedInd方法。
如果对比android N的ril_unsol_commands定义,发现其处理的方法发生了变化。
在原有N的代码上,ril_unsol_commands中的response方法实际上是由ril.cpp中进行了重新实现,而ril_unsol_commands.h仅定义处理方法而已。
那么我们继续在O的代码上进行跟踪radio::callStateChangedInd,可以发现其在ril_service.cpp中进行了实现
xref: /hardware/ril/libril/ril_service.cpp
int radio::callStateChangedInd(int slotId,
                               int indicationType, int token, RIL_Errno e, void *response,
                               size_t responseLen) {
    if (radioService[slotId] != NULL && radioService[slotId]->mRadioIndication != NULL) {
#if VDBG
        RLOGD("callStateChangedInd");
#endif
        Return<void> retStatus = radioService[slotId]->mRadioIndication->callStateChanged(
                convertIntToRadioIndicationType(indicationType));
        radioService[slotId]->checkReturnStatus(retStatus);
    } else {
        RLOGE("callStateChangedInd: radioService[%d]->mRadioIndication == NULL", slotId);
    }

    return 0;
}
继续跟进radioService[slotId]->mRadioIndication->callStateChanged方法
发现这里其实调用的就是mRadioIndication的方法,这里就和之前的Android8.0 MT流程一中的一样了。
跟踪 RadioIndication 类
public class RadioIndication extends IRadioIndication.Stub 我们继续看看其继承的 IRadioIndication.Stub,全局搜索 RadioIndication 可以发现其在 IRadioIndication.hal中定义了此接口。
注意RadioIndication类,发现其定义了大量类似callStateChanged的方法,再对比7.0上的processUnsolicited方法,发现本是通过一个方法统一管理的底层回复现在交由RadioIndication类处理,其callStateChanged对应与之前processUnsolicited方法中的switch-case的callStateChanged一项,其他的以此类推。
RIL通信的7.0和8.0差别变化比较大的一个地方。之后RIL层在接收到底层的消息后,会发起notify通知。
相比N的结构,其是先调用一个方法对回复的数据进行打包,之后使用socket进行发送,而O上则是直接调用一个方法对回复数据进行处理,通过RadioIndication进行HIDL调用,就直接到了RIL处。
2.2继续分析processLine方法的处理
static void processLine(const char *line)
{
    pthread_mutex_lock(&s_commandmutex);

    if (sp_response == NULL) {
        /* no command pending */
        handleUnsolicited(line);
        //判断是否已经把所有有效数据传输完毕
    } else if (isFinalResponseSuccess(line)) {
        sp_response->success = 1;
        //回复消息给上层
        handleFinalResponse(line);
    } else if (isFinalResponseError(line)) {
        sp_response->success = 0;
        handleFinalResponse(line);
    } else if (s_smsPDU != NULL && 0 == strcmp(line, "> ")) {
        // See eg. TS 27.005 4.3
        // Commands like AT+CMGS have a "> " prompt
        writeCtrlZ(s_smsPDU);
        s_smsPDU = NULL;
    } else switch (s_type) {
        case NO_RESULT:
            handleUnsolicited(line);
            break;
        case NUMERIC:
            if (sp_response->p_intermediates == NULL
                && isdigit(line[0])
            ) {
                addIntermediate(line);
            } else {
                /* either we already have an intermediate response or
                   the line doesn't begin with a digit */
                handleUnsolicited(line);
            }
            break;
        case SINGLELINE:
            if (sp_response->p_intermediates == NULL
                && strStartsWith (line, s_responsePrefix)
            ) {
                    //将数据放到反馈数据中
                addIntermediate(line);
            } else {
                /* we already have an intermediate response */
                handleUnsolicited(line);
            }
            break;
        case MULTILINE:
            if (strStartsWith (line, s_responsePrefix)) {
                addIntermediate(line);
            } else {
                handleUnsolicited(line);
            }
        break;

        default: /* this should never be reached */
            RLOGE("Unsupported AT command type %d\n", s_type);
            handleUnsolicited(line);
        break;
    }

    pthread_mutex_unlock(&s_commandmutex);
}
非URC消息通常有多行,处理到最后结束的时候会调用到handleFinalResponse 继续跟进
/** assumes s_commandmutex is held */
static void handleFinalResponse(const char *line)
{
        //把回应消息返回给eventLoop
    sp_response->finalResponse = strdup(line);

        //发信号给s_commandcond线程,使其脱离阻塞状态
    pthread_cond_signal(&s_commandcond);
}
注册得到的reference的回调函数
继续跟进RIL_register(funcs);追踪RIL.C中的注册方法,发现8.0已经做了变动,是通过注册服务来进行通信,之前是通过socket进行通信
extern "C" void
RIL_register (const RIL_RadioFunctions *callbacks) {
    ...

    memcpy(&s_callbacks, callbacks, sizeof (RIL_RadioFunctions));

    s_registerCalled = 1;

    RLOGI("s_registerCalled flag set, %d", s_started);
    // Little self-check

    for (int i = 0; i < (int)NUM_ELEMS(s_commands); i++) {
        assert(i == s_commands[i].requestNumber);
    }

    for (int i = 0; i < (int)NUM_ELEMS(s_unsolResponses); i++) {
        assert(i + RIL_UNSOL_RESPONSE_BASE
                == s_unsolResponses[i].requestNumber);
    }
    //通过注册服务获取
    radio::registerService(&s_callbacks, s_commands);
    RLOGI("RILHIDL called registerService");
}
继续跟进
//注册ril_service服务
xref: /hardware/ril/libril/ril_service.cpp
void radio::registerService(RIL_RadioFunctions *callbacks, CommandInfo *commands) {
    using namespace android::hardware;
    int simCount = 1;
    const char *serviceNames[] = {
            android::RIL_getServiceName()
            #if (SIM_COUNT >= 2)
            , RIL2_SERVICE_NAME
            #if (SIM_COUNT >= 3)
            , RIL3_SERVICE_NAME
            #if (SIM_COUNT >= 4)
            , RIL4_SERVICE_NAME
            #endif
            #endif
            #endif
            };

    #if (SIM_COUNT >= 2)
    simCount = SIM_COUNT;
    #endif

    configureRpcThreadpool(1, true /* callerWillJoin */);
    for (int i = 0; i < simCount; i++) {
        pthread_rwlock_t *radioServiceRwlockPtr = getRadioServiceRwlock(i);
        int ret = pthread_rwlock_wrlock(radioServiceRwlockPtr);
        assert(ret == 0);

        radioService[i] = new RadioImpl;
        radioService[i]->mSlotId = i;
        oemHookService[i] = new OemHookImpl;
        oemHookService[i]->mSlotId = i;
        RLOGD("registerService: starting IRadio %s", serviceNames[i]);
        android::status_t status = radioService[i]->registerAsService(serviceNames[i]);
        status = oemHookService[i]->registerAsService(serviceNames[i]);

        ret = pthread_rwlock_unlock(radioServiceRwlockPtr);
        assert(ret == 0);
    }

    s_vendorFunctions = callbacks;
    s_commands = commands;
}
注册服务的时候传入 callbacks,
#if defined(ANDROID_MULTI_SIM)
#define CALL_ONREQUEST(a, b, c, d, e) \
        s_vendorFunctions->onRequest((a), (b), (c), (d), ((RIL_SOCKET_ID)(e)))
#define CALL_ONSTATEREQUEST(a) s_vendorFunctions->onStateRequest((RIL_SOCKET_ID)(a))
#else
#define CALL_ONREQUEST(a, b, c, d, e) s_vendorFunctions->onRequest((a), (b), (c), (d))
#define CALL_ONSTATEREQUEST(a) s_vendorFunctions->onStateRequest()
#endif


int radio::radioStateChangedInd(int slotId,
                                 int indicationType, int token, RIL_Errno e, void *response,
                                 size_t responseLen) {
    if (radioService[slotId] != NULL && radioService[slotId]->mRadioIndication != NULL) {
            //这里其实调用的是callbacks的方法
        RadioState radioState =
                (RadioState) CALL_ONSTATEREQUEST(slotId);
        RLOGD("radioStateChangedInd: radioState %d", radioState);

        Return<void> retStatus = radioService[slotId]->mRadioIndication->radioStateChanged(
                convertIntToRadioIndicationType(indicationType), radioState);
        radioService[slotId]->checkReturnStatus(retStatus);
    } else {
        RLOGE("radioStateChangedInd: radioService[%d]->mRadioIndication == NULL", slotId);
    }

    return 0;
}
这里和之前分析的一样,使得ril_service.cpp实际调用也归ril.c管理
这里大致分析了RIL中两个比较关键的地方,更为完整的RIL处理流程见下篇分析。
1.eventLoop循环的构建,readLoop循环的构建。如何确保框架和处理方式由ril.c及command.h管理。
2.在O上由于通信方式的更改,对ril.java和ril.cpp进行了拆分,增加了ril_service.cpp和RadioIndication相关类及HIDL。


 780
780


 被折叠的 条评论
为什么被折叠?
被折叠的 条评论
为什么被折叠?
 到【灌水乐园】发言


