Java OCR tesseract 图像智能字符识别技术 Java代码实现

公司有需求啊,所以就得研究哈,最近公司需要读验证码,于是就研究起了图像识别,应该就是传说中的(OCR:光学字符识别OCR),下面把今天的收获整理一个给大家做个分享。

本人程序用的tesseract,官方地址:https://code.google.com/p/tesseract-ocr/,不为别的,谁让它支持我们的天朝的文字呢~哈

下载好程序后解压:

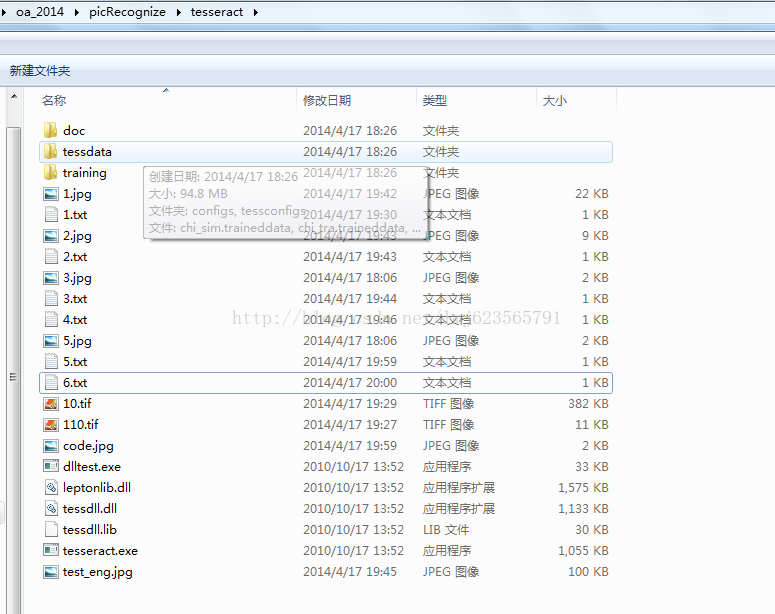
大概可以看到这样一个目录,别见怪楼主里面一堆测试文件。

然后就开始我们的测试之旅:

tesseract的用法:

参数1:需要识别的文件

参数2:输出的文件名称,输出的是文本文件,里面保存了识别的信息

识别英文这两个参数就可以了,下面做个实验:

我们在命令行输入:tesseract 5.jpg 6 ,可以看到程序生成了一个6.txt ,里面保存着识别后的文本,怎么样简单又给力~


上面说道tesseract 是支持中文的,所以么,接下来看看如何使用tesseract 实现我们中文的识别,下面继续介绍其他参数

参数3:-l

参数4: 使用的语言库

参数3 -l应该是知道参数4所使用的语言库,默认英文,也就是为什么上面识别英文的例子,并没有输入参数3和参数4,也实现了识别。

下面继续我们的实验:

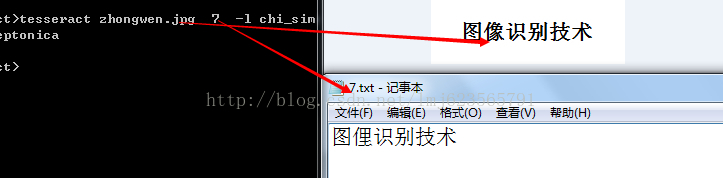
我们准备了一张图片,然后使用tesseract zhongwen.jpg  7  -l chi_sim 指明了中文语言,然后效果图上,还是很不错的,毕竟我们的中文是如此的博大精深,并且tesseract可以经过训练,然后识字的能力就会大幅度提升。

好了,由于一行代码没写,就不上传代码了,大家自己去官网下载。接下来我会使用Java带大家实现这样的小程序。


接着上一篇OCR所说的,上一篇给大家介绍了tesseract 在命令行的简单用法,当然了要继承到我们的程序中,还是需要代码实现的,下面给大家分享下Java实现的例子。


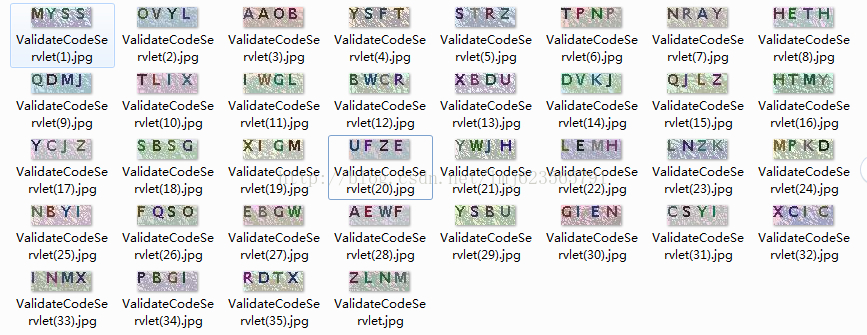
拿代码扫描上面的图片,然后输出结果。主要思想就是利用Java调用系统任务。

下面是核心代码:

[java]  view plain  copy
  在CODE上查看代码片 派生到我的代码片
  1. package com.zhy.test;  
  2.   
  3. import java.io.BufferedReader;  
  4.   
  5. import java.io.File;  
  6. import java.io.FileInputStream;  
  7. import java.io.InputStreamReader;  
  8. import java.util.ArrayList;  
  9. import java.util.List;  
  10.   
  11. import org.jdesktop.swingx.util.OS;  
  12.   
  13. public class OCRHelper  
  14. {  
  15.     private final String LANG_OPTION = "-l";  
  16.     private final String EOL = System.getProperty("line.separator");  
  17.     /** 
  18.      * 文件位置我防止在,项目同一路径 
  19.      */  
  20.     private String tessPath = new File("tesseract").getAbsolutePath();  
  21.   
  22.     /** 
  23.      * @param imageFile 
  24.      *            传入的图像文件 
  25.      * @param imageFormat 
  26.      *            传入的图像格式 
  27.      * @return 识别后的字符串 
  28.      */  
  29.     public String recognizeText(File imageFile) throws Exception  
  30.     {  
  31.         /** 
  32.          * 设置输出文件的保存的文件目录 
  33.          */  
  34.         File outputFile = new File(imageFile.getParentFile(), "output");  
  35.   
  36.         StringBuffer strB = new StringBuffer();  
  37.         List<String> cmd = new ArrayList<String>();  
  38.         if (OS.isWindowsXP())  
  39.         {  
  40.             cmd.add(tessPath + "\\tesseract");  
  41.         } else if (OS.isLinux())  
  42.         {  
  43.             cmd.add("tesseract");  
  44.         } else  
  45.         {  
  46.             cmd.add(tessPath + "\\tesseract");  
  47.         }  
  48.         cmd.add("");  
  49.         cmd.add(outputFile.getName());  
  50.         cmd.add(LANG_OPTION);  
  51. //      cmd.add("chi_sim");  
  52.         cmd.add("eng");  
  53.   
  54.         ProcessBuilder pb = new ProcessBuilder();  
  55.         /** 
  56.          *Sets this process builder's working directory. 
  57.          */  
  58.         pb.directory(imageFile.getParentFile());  
  59.         cmd.set(1, imageFile.getName());  
  60.         pb.command(cmd);  
  61.         pb.redirectErrorStream(true);  
  62.         Process process = pb.start();  
  63.         // tesseract.exe 1.jpg 1 -l chi_sim  
  64.         // Runtime.getRuntime().exec("tesseract.exe 1.jpg 1 -l chi_sim");  
  65.         /** 
  66.          * the exit value of the process. By convention, 0 indicates normal 
  67.          * termination. 
  68.          */  
  69. //      System.out.println(cmd.toString());  
  70.         int w = process.waitFor();  
  71.         if (w == 0)// 0代表正常退出  
  72.         {  
  73.             BufferedReader in = new BufferedReader(new InputStreamReader(  
  74.                     new FileInputStream(outputFile.getAbsolutePath() + ".txt"),  
  75.                     "UTF-8"));  
  76.             String str;  
  77.   
  78.             while ((str = in.readLine()) != null)  
  79.             {  
  80.                 strB.append(str).append(EOL);  
  81.             }  
  82.             in.close();  
  83.         } else  
  84.         {  
  85.             String msg;  
  86.             switch (w)  
  87.             {  
  88.             case 1:  
  89.                 msg = "Errors accessing files. There may be spaces in your image's filename.";  
  90.                 break;  
  91.             case 29:  
  92.                 msg = "Cannot recognize the image or its selected region.";  
  93.                 break;  
  94.             case 31:  
  95.                 msg = "Unsupported image format.";  
  96.                 break;  
  97.             default:  
  98.                 msg = "Errors occurred.";  
  99.             }  
  100.             throw new RuntimeException(msg);  
  101.         }  
  102.         new File(outputFile.getAbsolutePath() + ".txt").delete();  
  103.         return strB.toString().replaceAll("\\s*""");  
  104.     }  
  105. }  
代码很简单,中间那部分ProcessBuilder其实就类似Runtime.getRuntime().exec("tesseract.exe 1.jpg 1 -l chi_sim"),大家不习惯的可以使用Runtime。

测试代码:

[java]  view plain  copy
  在CODE上查看代码片 派生到我的代码片
  1. package com.zhy.test;  
  2.   
  3. import java.io.File;  
  4.   
  5. public class Test  
  6. {  
  7.     public static void main(String[] args)  
  8.     {  
  9.         try  
  10.         {  
  11.               
  12.             File testDataDir = new File("testdata");  
  13.             System.out.println(testDataDir.listFiles().length);  
  14.             int i = 0 ;   
  15.             for(File file :testDataDir.listFiles())  
  16.             {  
  17.                 i++ ;  
  18.                 String recognizeText = new OCRHelper().recognizeText(file);  
  19.                 System.out.print(recognizeText+"\t");  
  20.   
  21.                 if( i % 5  == 0 )  
  22.                 {  
  23.                     System.out.println();  
  24.                 }  
  25.             }  
  26.               
  27.         } catch (Exception e)  
  28.         {  
  29.             e.printStackTrace();  
  30.         }  
  31.   
  32.     }  
  33. }  

输出结果:


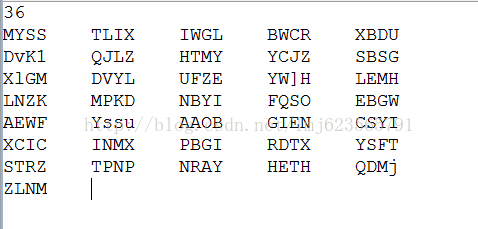
对比第一张图片,是不是很完美~哈哈 ,当然了如果你只需要实现验证码的读写,那么上面就足够了。下面继续普及图像处理的知识。


-------------------------------------------------------------------我的分割线--------------------------------------------------------------------

当然了,有时候图片被扭曲或者模糊的很厉害,很不容易识别,所以下面我给大家介绍一个去噪的辅助类,绝对碉堡了,先看下效果图。


来张特写:


一个类,不依赖任何jar,把图像中的干扰线消灭了,是不是很给力,然后再拿这样的图片去识别,会不会效果更好呢,嘿嘿,大家自己实验~

代码:

[java]  view plain  copy
  在CODE上查看代码片 派生到我的代码片
  1. package com.zhy.test;  
  2.   
  3. import java.awt.Color;  
  4. import java.awt.image.BufferedImage;  
  5. import java.io.File;  
  6. import java.io.IOException;  
  7.   
  8. import javax.imageio.ImageIO;  
  9.   
  10. public class ClearImageHelper  
  11. {  
  12.   
  13.     public static void main(String[] args) throws IOException  
  14.     {  
  15.   
  16.           
  17.         File testDataDir = new File("testdata");  
  18.         final String destDir = testDataDir.getAbsolutePath()+"/tmp";  
  19.         for (File file : testDataDir.listFiles())  
  20.         {  
  21.             cleanImage(file, destDir);  
  22.         }  
  23.   
  24.     }  
  25.   
  26.     /** 
  27.      *  
  28.      * @param sfile 
  29.      *            需要去噪的图像 
  30.      * @param destDir 
  31.      *            去噪后的图像保存地址 
  32.      * @throws IOException 
  33.      */  
  34.     public static void cleanImage(File sfile, String destDir)  
  35.             throws IOException  
  36.     {  
  37.         File destF = new File(destDir);  
  38.         if (!destF.exists())  
  39.         {  
  40.             destF.mkdirs();  
  41.         }  
  42.   
  43.         BufferedImage bufferedImage = ImageIO.read(sfile);  
  44.         int h = bufferedImage.getHeight();  
  45.         int w = bufferedImage.getWidth();  
  46.   
  47.         // 灰度化  
  48.         int[][] gray = new int[w][h];  
  49.         for (int x = 0; x < w; x++)  
  50.         {  
  51.             for (int y = 0; y < h; y++)  
  52.             {  
  53.                 int argb = bufferedImage.getRGB(x, y);  
  54.                 // 图像加亮(调整亮度识别率非常高)  
  55.                 int r = (int) (((argb >> 16) & 0xFF) * 1.1 + 30);  
  56.                 int g = (int) (((argb >> 8) & 0xFF) * 1.1 + 30);  
  57.                 int b = (int) (((argb >> 0) & 0xFF) * 1.1 + 30);  
  58.                 if (r >= 255)  
  59.                 {  
  60.                     r = 255;  
  61.                 }  
  62.                 if (g >= 255)  
  63.                 {  
  64.                     g = 255;  
  65.                 }  
  66.                 if (b >= 255)  
  67.                 {  
  68.                     b = 255;  
  69.                 }  
  70.                 gray[x][y] = (int) Math  
  71.                         .pow((Math.pow(r, 2.2) * 0.2973 + Math.pow(g, 2.2)  
  72.                                 * 0.6274 + Math.pow(b, 2.2) * 0.0753), 1 / 2.2);  
  73.             }  
  74.         }  
  75.   
  76.         // 二值化  
  77.         int threshold = ostu(gray, w, h);  
  78.         BufferedImage binaryBufferedImage = new BufferedImage(w, h,  
  79.                 BufferedImage.TYPE_BYTE_BINARY);  
  80.         for (int x = 0; x < w; x++)  
  81.         {  
  82.             for (int y = 0; y < h; y++)  
  83.             {  
  84.                 if (gray[x][y] > threshold)  
  85.                 {  
  86.                     gray[x][y] |= 0x00FFFF;  
  87.                 } else  
  88.                 {  
  89.                     gray[x][y] &= 0xFF0000;  
  90.                 }  
  91.                 binaryBufferedImage.setRGB(x, y, gray[x][y]);  
  92.             }  
  93.         }  
  94.   
  95.         // 矩阵打印  
  96.         for (int y = 0; y < h; y++)  
  97.         {  
  98.             for (int x = 0; x < w; x++)  
  99.             {  
  100.                 if (isBlack(binaryBufferedImage.getRGB(x, y)))  
  101.                 {  
  102.                     System.out.print("*");  
  103.                 } else  
  104.                 {  
  105.                     System.out.print(" ");  
  106.                 }  
  107.             }  
  108.             System.out.println();  
  109.         }  
  110.   
  111.         ImageIO.write(binaryBufferedImage, "jpg"new File(destDir, sfile  
  112.                 .getName()));  
  113.     }  
  114.   
  115.     public static boolean isBlack(int colorInt)  
  116.     {  
  117.         Color color = new Color(colorInt);  
  118.         if (color.getRed() + color.getGreen() + color.getBlue() <= 300)  
  119.         {  
  120.             return true;  
  121.         }  
  122.         return false;  
  123.     }  
  124.   
  125.     public static boolean isWhite(int colorInt)  
  126.     {  
  127.         Color color = new Color(colorInt);  
  128.         if (color.getRed() + color.getGreen() + color.getBlue() > 300)  
  129.         {  
  130.             return true;  
  131.         }  
  132.         return false;  
  133.     }  
  134.   
  135.     public static int isBlackOrWhite(int colorInt)  
  136.     {  
  137.         if (getColorBright(colorInt) < 30 || getColorBright(colorInt) > 730)  
  138.         {  
  139.             return 1;  
  140.         }  
  141.         return 0;  
  142.     }  
  143.   
  144.     public static int getColorBright(int colorInt)  
  145.     {  
  146.         Color color = new Color(colorInt);  
  147.         return color.getRed() + color.getGreen() + color.getBlue();  
  148.     }  
  149.   
  150.     public static int ostu(int[][] gray, int w, int h)  
  151.     {  
  152.         int[] histData = new int[w * h];  
  153.         // Calculate histogram  
  154.         for (int x = 0; x < w; x++)  
  155.         {  
  156.             for (int y = 0; y < h; y++)  
  157.             {  
  158.                 int red = 0xFF & gray[x][y];  
  159.                 histData[red]++;  
  160.             }  
  161.         }  
  162.   
  163.         // Total number of pixels  
  164.         int total = w * h;  
  165.   
  166.         float sum = 0;  
  167.         for (int t = 0; t < 256; t++)  
  168.             sum += t * histData[t];  
  169.   
  170.         float sumB = 0;  
  171.         int wB = 0;  
  172.         int wF = 0;  
  173.   
  174.         float varMax = 0;  
  175.         int threshold = 0;  
  176.   
  177.         for (int t = 0; t < 256; t++)  
  178.         {  
  179.             wB += histData[t]; // Weight Background  
  180.             if (wB == 0)  
  181.                 continue;  
  182.   
  183.             wF = total - wB; // Weight Foreground  
  184.             if (wF == 0)  
  185.                 break;  
  186.   
  187.             sumB += (float) (t * histData[t]);  
  188.   
  189.             float mB = sumB / wB; // Mean Background  
  190.             float mF = (sum - sumB) / wF; // Mean Foreground  
  191.   
  192.             // Calculate Between Class Variance  
  193.             float varBetween = (float) wB * (float) wF * (mB - mF) * (mB - mF);  
  194.   
  195.             // Check if new maximum found  
  196.             if (varBetween > varMax)  
  197.             {  
  198.                 varMax = varBetween;  
  199.                 threshold = t;  
  200.             }  
  201.         }  
  202.   
  203.         return threshold;  
  204.     }  
  205. }  

--------------------------------------------------------------------------------另外一篇文章-------------------------------------------------------------------------------------------------------------------------------------


Tesseract,这里就在这里分享下。

1、Tesserac-ocr简介

[一个Google支持的开源的OCR图文识别开源项目。去持多语言(当前3.02 版本支持包括英文,简体中文,繁体中文),支持Windows,Linux,Mac OSX 多平台。使用中Tesseract 的识别率非常高。可以在项目网站下载:http://code.google.com/p/tesseract-ocr,新版本支持中文,中文语言包定义http://code.google.com/p/tesseract-ocr/downloads/detail?name=chi_sim.traineddata.gz。]

2、Tesseract安装+ U2 E4 O# `2 [+ @

这里使用的版本为Tesseract3.02。直接点击上面的链接,下载windows下的安装文件tesseract-ocr-setup-3.02.02.exe。由于上面的链接经常很难打开,因此在这里提供百度云链接:http://pan.baidu.com/s/1mg21nMK

安装tesseract-ocr-setup-3.02.02.exe。安装成功后会在相应磁盘上生成一个Tesseract-OCR目录。如图我是安装到了如下位置


安装完成打开命令行,输入tesseract,展现如下图说明已经安装成功


3、命令行测试使用

接下来就可以使用tesseract进行图片识别了。准备一副待识别的图像,这里用画图工具随便写了一段字,然后定义成1.jpg

( |4 Z+ g& _. S; X7 N" R! C


在命令行中定位到图片路径然后输入命令:

  tesseract 1.jpg result -l eng

     其中result表示输出结果文件txt名称,eng表示用以识别的语言文件为英文。会发现图片当前目录下生成了1个result.txt文件里面结果为

/ T4 ?) P1 Q5 {9 R9 y) ~. ?2 C9 n' r' f


4、增加中文语言库

安装目录下的tessdata目录存放的是语言识别包,如果想增加中文识别功能,可以将中文的语言库放到此目录下,下载链接在下面地址:http://pan.baidu.com/s/1hqnGq4c,下载后将解压出的chi_sim.traineddata放到此目录下。然后调用的时候指明语言库即可,例如:tesseract xxx.jpg result -l chi_sim

照样,我们搞一个2.jpg图片,来测试下中文识别下的识别率怎么样。


执行后结果

2 Y& r+ n9 O* L5 o8 {2 H

,可以看到,识别率并不是十分令人满意。而且这边使用的例子都是十分正规的字体。如果遇到验证码那种不规则的字体,识别率也会大打折扣的。

当然可以参考网上的相关资料进行对Tesseract字符识别进行样本训练,通过使用训练后的语言库会提高识别精度。这里就不做演示了。参考地址:

http://blog.csdn.net/yasi_xi/article/details/8763385 。但是遗憾的是使用的工具jTessBoxEditor不支持中文训练。附带jTessBoxEditor1.0 下载地址:http://pan.baidu.com/s/1sjBe5el

5、使用java调用tesseract

那如何使用java程序调用相应的tesseract进行操作呢?

这里介绍2种方式。

一种是使用cmd方式,另外一种就是使用tess4j。tess4j的源码地址 http://sourceforge.jp/projects/sfnet_tess4j/ 中文首页

感兴趣的自己下载查看源代码。

由于范例代码较多就不一一贴出来了,会在文章结尾提供一个下载链接,大概讲下结构,


如上图,tess4j包下是使用tess4j调用tesseract,src下的dll文件是需要使用到的。同时,加载的语言库文件也要放到tessdata目录下。而cmd 包下是使用cmd方式调用的范例,额外需要swingx-1.6.1.jar,调用时直接配置使用的安装的路径,并配置语言库即可。


代码下载地址,由于附带了data文件,jar包等,所以会比较大,接近50M。导入到工程即可。各个包下都有测试的Test类,直接右键就可以运行。前提是对应目录下有相应图片。

在cmd包下ClearImageHelper这个类是对图片进行处理的类,比如灰度转换,二值化,缩放等等,对于复杂图片可以先进行处理,来提高图片识别率。而tess4j下也封装了图片处理的工具类,基本都包含这些功能,例子中也给出了部分样例。

Bty,话说使用原生态识别调用,跟tess4j得到的结果还是有所差别的。


  • 0
    点赞
  • 1
    收藏
    觉得还不错? 一键收藏
  • 0
    评论
评论
添加红包

请填写红包祝福语或标题

红包个数最小为10个

红包金额最低5元

当前余额3.43前往充值 >
需支付:10.00
成就一亿技术人!
领取后你会自动成为博主和红包主的粉丝 规则
hope_wisdom
发出的红包
实付
使用余额支付
点击重新获取
扫码支付
钱包余额 0

抵扣说明:

1.余额是钱包充值的虚拟货币,按照1:1的比例进行支付金额的抵扣。
2.余额无法直接购买下载,可以购买VIP、付费专栏及课程。

余额充值