


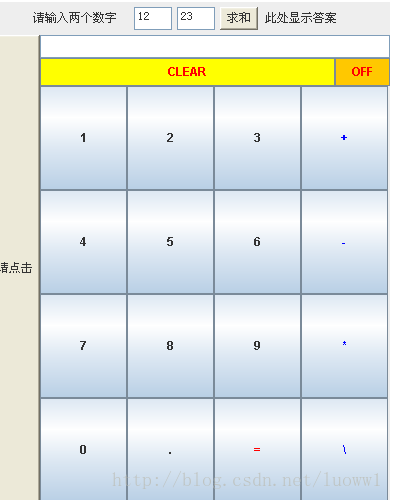
这篇文章写了如何自己顶一个类,该类实现了简单的计算器功能,然后通过浏览器访问。
1、定义一个web项目,编写一个类,该类主要实现计算器的布局及功能的实现。
package com;

import java.awt.*;
import java.awt.event.*;

import javax.swing.JApplet;
import javax.swing.JButton;
import javax.swing.JFrame;
import javax.swing.JPanel;
/**
 * JApplet 继承了Applet
 * @author lww
 *
 */
public class cal extends JApplet implements ActionListener {

	Label lblTwoNum = new Label ("请输入两个数字");
    Label lblAdd = new Label ("此处显示答案");

    TextField txtFirstNum = new TextField (2);
    TextField txtSecNum = new TextField (2);
    Button btnAdd = new Button ( "求和");

    TextField tf = new TextField();
    String s = "", s1;
	double d1, d2;

	private JFrame frame;
    public void init()
    {
    	//从页面上获取参数
    	int num1 = Integer.parseInt(getParameter("value1"));
    	int num2 = Integer.parseInt(getParameter("value2"));

    	txtFirstNum.setText(""+num1);
    	txtSecNum.setText(""+num2);
    	frame = new JFrame();
    	frame.setTitle("点击按钮改变颜色");
    	frame.getContentPane().add(new ButtonPanel());
    	frame.setSize(400, 300);

    	Button PopButton = new Button("请点击");

    	PopButton.addActionListener(this);

    	Panel o = new Panel(new BorderLayout());
        add(o);
        Panel addPanel = new Panel();
        addPanel.add (lblTwoNum);
        addPanel.add (txtFirstNum);
        addPanel.add (txtSecNum);
        addPanel.add (btnAdd);
        addPanel.add (lblAdd);
        o.add(addPanel,"North");
        o.add(PopButton,BorderLayout.WEST);

        Panel cal = new Panel(new BorderLayout());

        cal.add(tf, "North");

        o.add(cal,"Center");

        Panel pn3 = new Panel(new BorderLayout());
        cal.add(pn3, "Center");

		Panel pn2 = new Panel();// 功能键界面(清除键和关闭键)
		pn2.setLayout(new BorderLayout());

		Panel pn1 = new Panel();// 运算界面

		pn1.setLayout(new GridLayout(4, 4));

		pn3.add(pn2, "North");
		pn3.add(pn1);
		// 设置按钮
		JButton b = new JButton("CLEAR");
		b.setToolTipText("请按清除键!");// 设置清零键
		b.setForeground(Color.RED);// 设置字体颜色
		b.setBackground(Color.YELLOW);// 设置背景色
		b.addActionListener(this);
		pn2.add(b, "Center");
		b = new JButton("OFF");
		b.setToolTipText("请按退出键!");// 设置off键,点击退出应用程序b.addActionListener(this);
		b.setForeground(Color.RED);// 字体颜色
		b.setBackground(Color.ORANGE);// 背景色
		pn2.add(b, "East");
		b = new JButton("1");// add butten 1
		b.addActionListener(this);
		pn1.add(b);
		b = new JButton("2");// add butten 2
		b.addActionListener(this);
		pn1.add(b);
		b = new JButton("3");// add butten 3
		b.addActionListener(this);
		pn1.add(b);
		b = new JButton("+");// add butten +
		b.setForeground(Color.BLUE);// 设置字体颜色
		b.addActionListener(this);
		pn1.add(b);
		b = new JButton("4");// add butten 4
		b.addActionListener(this);
		pn1.add(b);
		b = new JButton("5");// add butten 5
		b.addActionListener(this);
		pn1.add(b);
		b = new JButton("6");// add button 6
		b.addActionListener(this);
		pn1.add(b);
		b = new JButton("-");// add button -
		b.setForeground(Color.BLUE);// 设置字体颜色
		b.addActionListener(this);
		pn1.add(b);
		b = new JButton("7");// add button 7
		b.addActionListener(this);
		pn1.add(b);
		b = new JButton("8");// add button 8
		b.addActionListener(this);
		pn1.add(b);
		b = new JButton("9");// add button 9
		b.addActionListener(this);
		pn1.add(b);
		b = new JButton("*");// add button *
		b.setForeground(Color.BLUE);// 设置字体颜色
		b.addActionListener(this);
		pn1.add(b);
		b = new JButton("0");// add button 0
		b.addActionListener(this);
		pn1.add(b);
		b = new JButton(".");// add button .
		b.addActionListener(this);
		pn1.add(b);
		b = new JButton("=");// add button =
		b.setForeground(Color.RED);// 设置字体颜色
		b.addActionListener(this);
		pn1.add(b);
		b = new JButton("\\");// add button \
		b.setForeground(Color.BLUE);// 设置字体颜色
		b.addActionListener(this);
		pn1.add(b);

        this.resize(400,300);
        btnAdd.addActionListener (this);
    }

    public void actionPerformed (ActionEvent e)
    {
    	if(e.getActionCommand().equals("请点击")) {
    		if (frame.isVisible())
    			frame.setVisible(false);
            else frame.show();
    	} else if(e.getActionCommand().equals("求和")){
    		try{
        		if(txtFirstNum.getText().length()!=0 &&txtSecNum.getText().length()!=0){
        			String firstNum = txtFirstNum.getText();
        	        String secNum = txtSecNum.getText();
        	        int add = Integer.parseInt(firstNum) + Integer.parseInt(secNum);
        	        lblAdd.setText ("两数之和:"+ add);
        		}

        	} catch (Exception ex) {
    			// TODO: handle exception
    		}
    	}else {
    		String command = e.getActionCommand();
    		tf.setText(tf.getText() + command);
    		if (command.equals("CLEAR")) // 清零键 按下时返回初始状态
    		{
    			s1 = null;
    			s = "";
    			tf.setText("");// 记录输入值的变量清空
    		}

    		else if (command.equals("OFF"))
    			System.exit(0);// off键 关闭应用程序

    		else if (!command.equals("*") && !command.equals("\\")
    				&& !command.equals("+") && !command.equals("-")
    				&& !command.equals("="))// 判断输入是否为数字
    		{
    			if (s1 == null)// 判断输入是否为第一个
    				s1 = command;
    			else
    				s1 += command;
    			d1 = new Double(s1).doubleValue();// 字符串型转换为双精度型,还原输入数字
    			try {
    				if (s.equals("+"))
    					d1 = d1 + d2;// 加法运算
    				else if (s.equals("-"))
    					d1 = d2 - d1;// 减法运算
    				else if (s.equals("*"))
    					d1 = d1 * d2;// 乘法运算
    				else if (s.equals("\\"))
    					d1 = d2 / d1;// 除法运算
    			} catch (Exception ex) {
    				tf.setText("Error");// 错误显示"Error"
    				System.out.println(ex.getMessage());
    			}
    		} else if (!command.equals("=")) // 判断输入是否为+ -
    		{
    			s = command;
    			s1 = null;
    			d2 = d1;
    		}

    		else// 输入=时,显示运算结果
    		{

    			tf.setText(tf.getText() + d1);

    		}
    	}
    }
    public void paint(Graphics g) {

	}
}
class ButtonPanel extends JPanel
{
    private class ColorAction implements ActionListener
    {
        private Color backgroundColor;
        public void actionPerformed(ActionEvent actionevent)
        {
            setBackground(backgroundColor);
            repaint();
        }

        public ColorAction(Color color)
        {
            backgroundColor = color;
        }
    }

    public ButtonPanel()
    {
        JButton jbutton = new JButton("橙色");
        JButton jbutton1 = new JButton("蓝色");
        JButton jbutton2 = new JButton("红色");
        add(jbutton);
        add(jbutton1);
        add(jbutton2);
        ColorAction coloraction = new ColorAction(Color.orange);
        ColorAction coloraction1 = new ColorAction(Color.blue);
        ColorAction coloraction2 = new ColorAction(Color.red);
        jbutton.addActionListener(coloraction);
        jbutton1.addActionListener(coloraction1);
        jbutton2.addActionListener(coloraction2);
    }
}运行---cmd 进入到该项目所在的WebRoot\WEB-INF\classes下
命令:jar -cvf Cal.jar *.* (打包该目录下的内容,jar包文件名称为Cal.jar)
创建一个keyStore 文件
keytool -genkey -alias examples(密钥名,任意取名) -keypass 12345678(密钥密码,任意取名) -storepass (密钥密码对,与上一密码密码一致) -keystore .mykeystore(生成密钥文件名,任意取名)

在class目录下会有Cal.jar 和 .mykeystore文件
然后用该文件对Cal.jar 进行签名
密钥库的口令短语是:123456
examples的密钥口令是:12345678
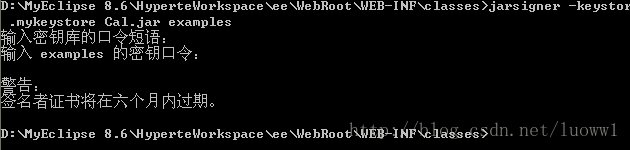
签名后可以查看Cal.jar 包META-INF中是否生成EXAMPLES.SF EXAMPLES.DSA两个文件
然后将该jar包拷贝放到项目的WebRoot中
然后定义index.jsp
<%@ page language="java" import="java.util.*" contentType="text/html; charset=GBK"
    pageEncoding="GBK"%>
<!DOCTYPE html PUBLIC "-//W3C//DTD HTML 4.01 Transitional//EN" "http://www.w3.org/TR/html4/loose.dtd">
<html>
<head>
<meta http-equiv="Content-Type" content="text/html; charset=GBK">
<title>demo</title>
</head>
<body>
	 <APPLET CODE="com.cal.class" <!--调用的类-->
	  id="cal"
	  codebase="."
	  ARCHIVE = "Cal.jar"<!--使用的jar包名称-->

	  WIDTH="800"
	  HEIGHT="800">
	  <PARAM NAME="value1" VALUE="12"><!--页面传递的参数-->
	  <PARAM NAME="value2" VALUE="23">
      </APPLET>

</body>
</html>
因为applet的运行是沙箱机制,在调用本地程序时需要做安全性设置。在本地运行该applet的jre\lib\security\java.policy文件里最后加permission java.security.AllPermission;这里需要注意的是如果客户端装有多个jre的话,需要找一下哪个jre是真正运行applet的
若不想修改这样,可以再调用的java类中对代码提升权限,例如:
private String runCmd(){
    String result = AccessController.doPrivileged(new PrivilegedAction<String>() {   //提升权限
        @Override
        public String run() {
                String res = null;
// 代码的具体实现
//TODO like 'Runtime.getRuntime().exec(cmd)' etc.....
return res;
}
});
return result;
}
部署流程,然后通过浏览器访问 localhost:8080/ee


 1084
1084


 被折叠的 条评论
为什么被折叠?
被折叠的 条评论
为什么被折叠?
 到【灌水乐园】发言


