


参考: http://blog.sina.com.cn/s/blog_74c22b21010173f8.html
一直以来都是手动打包android程序,真可谓苦不堪言啊,以前试过用ant打包,但是失败了,最近刚到新公司,又开始研究ant这玩意了,查阅了网上一些文章,结合自己的情况,硬是要弄出来才行,这里就作下记录吧。
1,准备
ant打包自然需要ant,可以去http://ant.apache.org/下载解压,也可以使用eclipse自带的(如果有的话)。
验证ant是否安装好,在控制台输入Cmd 回车, ant 回车,如果出现:
Buildfile: build.xml does not exist!
Build failed
恭喜你已经ant配置成功!!
2,配置环境变量和添加扩展组件
在环境变量中需要添加ANT_HOME,JAVA_HOME,ANDROID_SDK_HOME等着几个变量(原因是有些写法使用了此变量,尽可能多的写出来避免错误),并且还要path变量将%ANT_HOME%\bin;%ANT_HOME%\lib;%JAVA_HOME%/lib;%JAVA_HOME%/bin等。
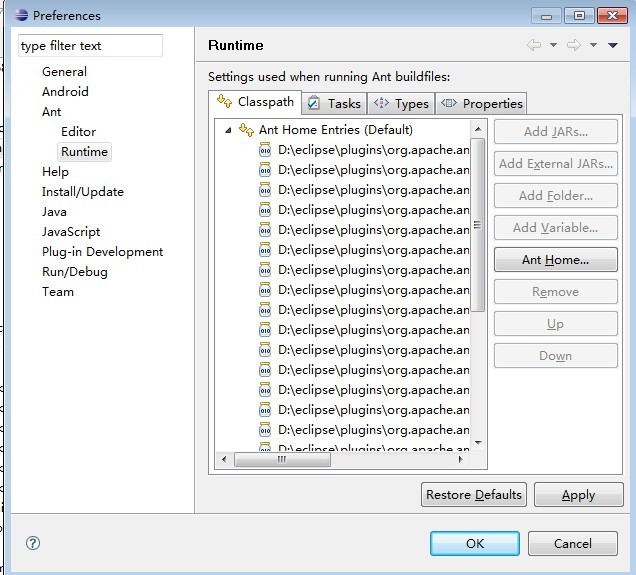
下载 ant-contrib-1.0b3.jar放在ant 的 lib文件夹下,(如果使用的是eclipse自带的,请配置ant变量并添加到指定位置如图,确保调用的ant包含有扩展组件)。
3,编写build.xml
<?xml version="1.0" encoding="UTF-8"?>
<!-- 项目名称yinyuedongting,可用全局替换为当前项目名称 -->
<project
    name="yinyuedongting"
    default="deploy" >

    <!--
         The local.properties file is created and updated by the 'android' tool.
         It contains the path to the SDK. It should *NOT* be checked into
         Version Control Systems.


    -->

    <property file="local.properties" />

    <!--
         The ant.properties file can be created by you. It is only edited by the
         'android' tool to add properties to it.
         This is the place to change some Ant specific build properties.
         Here are some properties you may want to change/update:

         source.dir
             The name of the source directory. Default is 'src'.
         out.dir
             The name of the output directory. Default is 'bin'.

         For other overridable properties, look at the beginning of the rules
         files in the SDK, at tools/ant/build.xml

         Properties related to the SDK location or the project target should
         be updated using the 'android' tool with the 'update' action.

         This file is an integral part of the build system for your
         application and should be checked into Version Control Systems.


    -->

    <property file="ant.properties" />

    <!--
         The project.properties file is created and updated by the 'android'
         tool, as well as ADT.

         This contains project specific properties such as project target, and library
         dependencies. Lower level build properties are stored in ant.properties
         (or in .classpath for Eclipse projects).

         This file is an integral part of the build system for your
         application and should be checked into Version Control Systems.


    -->

    <loadproperties srcFile="project.properties" />

    <!-- quick check on sdk.dir -->

    <fail
        message="sdk.dir is missing. Make sure to generate local.properties using 'android update project' or to inject it through an env var"
        unless="sdk.dir" />

    <!--
     extension targets. Uncomment the ones where you want to do custom work
     in between standard targets


    -->
    <!--
    <target name="-pre-build">
    </target>
    <target name="-pre-compile">
    </target>


    <target name="-post-compile">
    </target>


    -->


    <!--
         Import the actual build file.

         To customize existing targets, there are two options:
         - Customize only one target:
             - copy/paste the target into this file, *before* the
               <import> task.
             - customize it to your needs.
         - Customize the whole content of build.xml
             - copy/paste the content of the rules files (minus the top node)
               into this file, replacing the <import> task.
             - customize to your needs.

         ***********************
         ****** IMPORTANT ******
         ***********************
         In all cases you must update the value of version-tag below to read 'custom' instead of an integer,
         in order to avoid having your file be overridden by tools such as "android update project"


    -->
    <!-- version-tag: 1 -->

    <taskdef resource="net/sf/antcontrib/antcontrib.properties" >

        <classpath>

            <pathelement location="D:/androidDev/batch-package-tool/ant1.8.3/lib/ant-contrib-1.0b3.jar" />
        </classpath>
    </taskdef>

    <import file="${sdk.dir}/tools/ant/build.xml" />

    <target name="deploy" >

        <foreach
            delimiter=","
            list="${market_channels}"
            param="channel"
            target="modify_manifest" >
        </foreach>
    </target>

    <target name="modify_manifest" >

        <!-- <replaceregexp file="AndroidManifest.xml" encoding="utf-8" match="android:value="(.*)"" replace=""/> -->

        <replaceregexp
            byline="false"
            flags="g" >

            <regexp pattern="android:name="UMENG_CHANNEL" android:value="(.*)"" />

            <substitution expression="android:name="UMENG_CHANNEL" android:value="${channel}"" />

            <fileset
                dir=""
                includes="AndroidManifest.xml" />
        </replaceregexp>
        <!-- <property  name="out.release.file" value="${out.absolute.dir}/${channel}.apk"/> -->

        <antcall target="release" />

        <copy tofile="${gos.path}/yinyuedongting_${channel}.apk" >

            <fileset
                dir="${out.absolute.dir}/"
                includes="yinyuedongting-release.apk" />
        </copy>

        <delete includeEmptyDirs="true" >

            <fileset
                dir="${out.absolute.dir}"
                includes="**/*" />
        </delete>

        <echo message="===========================" />
    </target>

</project>
以上的可以全部拷贝,然后通过全局替换掉项目名称,例子中项目名称为yinyuedongting
4,配置local.properties
此处只有一个选项就是android sdk路径,
sdk.dir=D:\\adt-bundle-windows\\sdk,改为你自己的sdk路径,注意用双斜杠转义
5.配置ant.properties
application.package=com.yuanhang.yinyuedongting   程序包名
ant.project.name=yinyuedongting 项目名称
java.encoding=utf-8 项目编码

out.absolute.dir=d:/apk/compile  临时文件存放位置
gos.path=d:/apk/yinyuedongting   apk文件存放位置

key.store=D:/\u5F00\u53D1\u8D44\u6599\/rainie.keystore  秘钥所在位置
key.store.password=rainie  秘钥密码
key.alias=rainie   秘钥别名
key.alias.password=rainie  别名密码

app_version=1.0.0  版本
market_channels=default  渠道名称,要以逗号分隔,必须在一行内
以上这些都配置好后,即可巡行ant 打包应用,也可以通过eclipse插件快速运行编译指令,以上过程已运行成功,并且换了不同项目也同样没问题。
最后一个问题就是,这个ant的build.xml文件尚未对引用到library项目作出编译,所以有引用到library项目的不能运行成功,解决办法是将library项目所有资源文件copy到现有项目
中,方能编译成功。
资源文件下载地址:http://download.csdn.net/detail/luoxiangyu001/5344270


 1万+
1万+

 被折叠的 条评论
为什么被折叠?
被折叠的 条评论
为什么被折叠?
 到【灌水乐园】发言


