前言
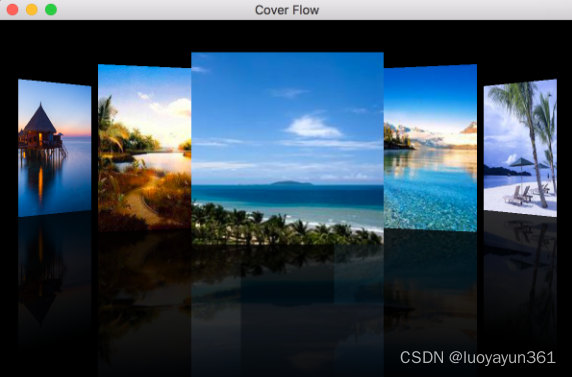
在 QML 中的 PathView 来实现一个 Cover Flow 图片切换效果,非常酷炫,并且代码也非常精简,先来看看效果图


源代码
Rectangle {
    id:coverflow
    color:"black"

    property ListModel model
    property int itemCount: 5

    PathView{
        id:pathView
        model:coverflow.model
        delegate: Item {
            id:delegateItem
            width: 200
            height: 200
            z:PathView.iconZ
            scale:PathView.iconScale

            Image{
                id:image
                source: url
                width: delegateItem.width
                height: delegateItem.height
            }
            ShaderEffect {
                anchors.top: image.bottom
                width: image.width
                height: image.height;
                anchors.left: image.left
                property variant source: image;
                property size sourceSize: Qt.size(0.5 / image.width, 0.5 / image.height);
                fragmentShader:
                        "varying highp vec2 qt_TexCoord0;
                        uniform lowp sampler2D source;
                        uniform lowp vec2 sourceSize;
                        uniform lowp float qt_Opacity;
                        void main() {

                            lowp vec2 tc = qt_TexCoord0 * vec2(1, -1) + vec2(0, 1);
                            lowp vec4 col = 0.25 * (texture2D(source, tc + sourceSize) + texture2D(source, tc- sourceSize)
                            + texture2D(source, tc + sourceSize * vec2(1, -1))
                            + texture2D(source, tc + sourceSize * vec2(-1, 1)));
                            gl_FragColor = col * qt_Opacity * (1.0 - qt_TexCoord0.y) * 0.2;
                        }"
            }


            transform: Rotation{
                origin.x:image.width/2.0
                origin.y:image.height/2.0
                axis{x:0;y:1;z:0}
                angle: delegateItem.PathView.iconAngle
            }
        }
        path:coverFlowPath
        pathItemCount: coverflow.itemCount
        anchors.fill: parent

        preferredHighlightBegin: 0.5
        preferredHighlightEnd: 0.5

    }

    Path{
        id:coverFlowPath
        startX: 0
        startY: coverflow.height/3

        PathAttribute{name:"iconZ";value: 0}
        PathAttribute{name:"iconAngle";value: 70}
        PathAttribute{name:"iconScale";value: 0.6}
        PathLine{x:coverflow.width/2;y:coverflow.height/3}

        PathAttribute{name:"iconZ";value: 100}
        PathAttribute{name:"iconAngle";value: 0}
        PathAttribute{name:"iconScale";value: 1.0}

        PathLine{x:coverflow.width;y:coverflow.height/3}
        PathAttribute{name:"iconZ";value: 0}
        PathAttribute{name:"iconAngle";value: -70}
        PathAttribute{name:"iconScale";value: 0.6}
        PathPercent{value:1.0}

    }

}
这里用ShaderEffect来实现图片的阴影倒影效果,之前的博客里面有介绍
Path中主要通过修改图片的 Z 值、缩放、以及旋转来改变图片属性达到我们想要的效果。
源码在这里,点击下载
本文参考http://www.qter.org/portal.php?mod=view&aid=20


 本文介绍如何使用QML中的PathView组件实现Coverflow图片切换效果。通过调整图片的Z值、缩放比例及旋转角度等属性,结合ShaderEffect实现阴影倒影,最终打造出炫酷的图片展示效果。


 347
347

 被折叠的 条评论
为什么被折叠?


