


邮件服务对于项目来说属于基础性服务了,使用spring-mail实现起来真是太简单了,但是其中还是会有一点小问题需要注意下,下面就来讲下结合spring-boot实现邮件服务的封装。
其实封装基础服务无非就以下几种形式
基础工具类
优点:简单实用,发送快捷
缺点:应用耦合度高,对于目前趋近于分布式系统来说,这样做是致命的
dubbo服务
因为我们公司用的是dubbo,所以就以dubbo来举例了。无非就是代表了rpc、http等类型的通信模式。
优点:应用解耦,部署不会影响到任何现有应用,可动态
缺点:在大型分布式项目中,需要依赖api,略复杂
mq异步通信
优点:对于MQ通信是我所喜欢的解耦方式,实现简单,通信快捷
缺点:实现略微复杂点,要注意监控消息的可靠性和处理的幂等性问题
对于以上三种方式我是比较倾向于MQ,所以下面简单说下MQ 邮件处理的封装
1、依赖包
spring-boot-starter-amqp
spring-boot-starter-mail
2、首先你要配置MQ,这就不再叙说了,想看MQ配置的可以翻翻以前的文章
3、我直接说下接收方的使用
package com.ecej.nove.sms.mail;

import javax.annotation.Resource;

import org.apache.commons.collections.MapUtils;
import org.slf4j.Logger;
import org.slf4j.LoggerFactory;
import org.springframework.amqp.rabbit.annotation.RabbitHandler;
import org.springframework.amqp.rabbit.annotation.RabbitListener;
import org.springframework.beans.factory.annotation.Value;
import org.springframework.stereotype.Component;

import com.ecej.nove.base.mail.BaseMail;

/**
 * 接收邮件信息
 *
 * @author QIANG
 *
 */
@Component
@RabbitListener(queues = "ecejmail")
public class MailReceiverService {

    private Logger LOG = LoggerFactory.getLogger(MailReceiverService.class);

    @Resource
    private MailSendService mailSendService;

    @Value("${mail.close.flag}")
    private boolean flag;

    @RabbitHandler
    public void ReceiverMessage(BaseMail mail) {
              //开关
        if (flag)
            return;

        if (MapUtils.isEmpty(mail.getPaths())) {
            mailSendService.sendMail(mail);
        } else {
            mailSendService.sendMailAndFile(mail);
        }
        LOG.info("Receiver Mail Obj !");
    }

    @RabbitHandler
    public void ReceiverMessage(String mail) {
        System.out.println(mail);
    }

}
4、编写发送mail的实际方法,使用异步线程发送
package com.ecej.nove.sms.mail;

import java.io.File;

import javax.annotation.Resource;
import javax.mail.MessagingException;
import javax.mail.internet.MimeMessage;

import org.slf4j.Logger;
import org.slf4j.LoggerFactory;
import org.springframework.beans.factory.annotation.Value;
import org.springframework.core.io.FileSystemResource;
import org.springframework.mail.SimpleMailMessage;
import org.springframework.mail.javamail.JavaMailSender;
import org.springframework.mail.javamail.MimeMessageHelper;
import org.springframework.scheduling.annotation.Async;
import org.springframework.stereotype.Service;

import com.ecej.nove.base.mail.BaseMail;

@Service("mailSendService")
public class MailSendService {

    private Logger LOG = LoggerFactory.getLogger(MailSendService.class);

    @Value("${spring.mail.username}")
    private String from;

    @Resource
    private JavaMailSender mailSender;

    @Async("mailAsync")
    public void sendMail(BaseMail mail) {

        SimpleMailMessage message = new SimpleMailMessage();
        message.setFrom(from);
        message.setTo(mail.getTo());
        message.setSubject(mail.getSubject());
        message.setText(mail.getText());
        message.setBcc(mail.getBcc());
        message.setCc(mail.getCc());
        mailSender.send(message);
        LOG.info("发送邮件成功,邮件详情:{}", message.toString());
    }

    @Async("mailAsync")
    public void sendMailAndFile(BaseMail mail) {

        try {
            MimeMessage mimeMessage = mailSender.createMimeMessage();
            MimeMessageHelper helper = new MimeMessageHelper(mimeMessage, true);
            helper.setFrom(from);
            helper.setTo(mail.getTo());
            helper.setSubject(mail.getSubject());
            helper.setText(mail.getText());
            helper.setBcc(mail.getBcc());
            helper.setCc(mail.getCc());
            mail.getPaths().entrySet().stream().forEach(set -> {
                FileSystemResource file = new FileSystemResource(new File(set.getValue()));
                try {
                    helper.addAttachment(set.getKey(), file);

                } catch (MessagingException e) {
                    LOG.error("SAVE MAIL FILE ERROR!", e);
                }

            });
            mailSender.send(mimeMessage);
            LOG.info("发送邮件成功,邮件详情:{}", mail.toString());
        } catch (Exception e) {
            LOG.error("SEND MAIL ERROR !", e);
        }
    }
}
5、异步线程配置
package com.ecej.nove.sms.config;

import java.util.concurrent.Executor;
import java.util.concurrent.ThreadPoolExecutor;

import org.springframework.beans.factory.annotation.Value;
import org.springframework.context.annotation.Bean;
import org.springframework.context.annotation.Configuration;
import org.springframework.scheduling.annotation.EnableAsync;
import org.springframework.scheduling.annotation.EnableScheduling;
import org.springframework.scheduling.concurrent.ThreadPoolTaskExecutor;

/**
 * 配置异步任务分发
 *
 * @author QIANG
 *
 */
@Configuration
@EnableScheduling
@EnableAsync
public class ExecutorConfig {

    @Value("${sms.executor.corePoolSize}")
    private int corePoolSize;

    @Value("${sms.executor.maxPoolSize}")
    private int maxPoolSize;

    @Value("${sms.executor.queueCapacity}")
    private int queueCapacity;


    @Bean(name = "mailAsync")
    public Executor mailAsync() {
        ThreadPoolTaskExecutor executor = new ThreadPoolTaskExecutor();
        executor.setCorePoolSize(corePoolSize);
        executor.setMaxPoolSize(maxPoolSize);
        executor.setQueueCapacity(queueCapacity);
        executor.setRejectedExecutionHandler(new ThreadPoolExecutor.CallerRunsPolicy());
        executor.setThreadNamePrefix("MailExecutor-");
        executor.initialize();
        return executor;
    }

}
6、配置
mail.close.flag=@ecej.mail.close.flag@
spring.mail.host=@ecej.mail.host@
spring.mail.username=@ecej.mail.username@
spring.mail.password=@ecej.mail.password@
spring.mail.properties.mail.smtp.auth=@ecej.properties.mail.smtp.auth@
spring.mail.properties.mail.smtp.starttls.enable=@ecej.properties.mail.smtp.starttls.enable@
spring.mail.properties.mail.smtp.starttls.required=@ecej.properties.mail.smtp.starttls.required@
至此,通过MQ接收对象,然后发送邮件的需求就完成了,这个简单实用的接收端完成了,可以发送普通和带附件的邮件。当然,发送HTML之类的只是增加实例方法就行了。
然而,事情并没有这么简单,如果我要正常连接某邮件服务器这样就可以了。但是现在大多数,比喻集团邮件服务器是需要进行验证的。如果只有以上配置,不好意思,咔嚓给你来个异常。
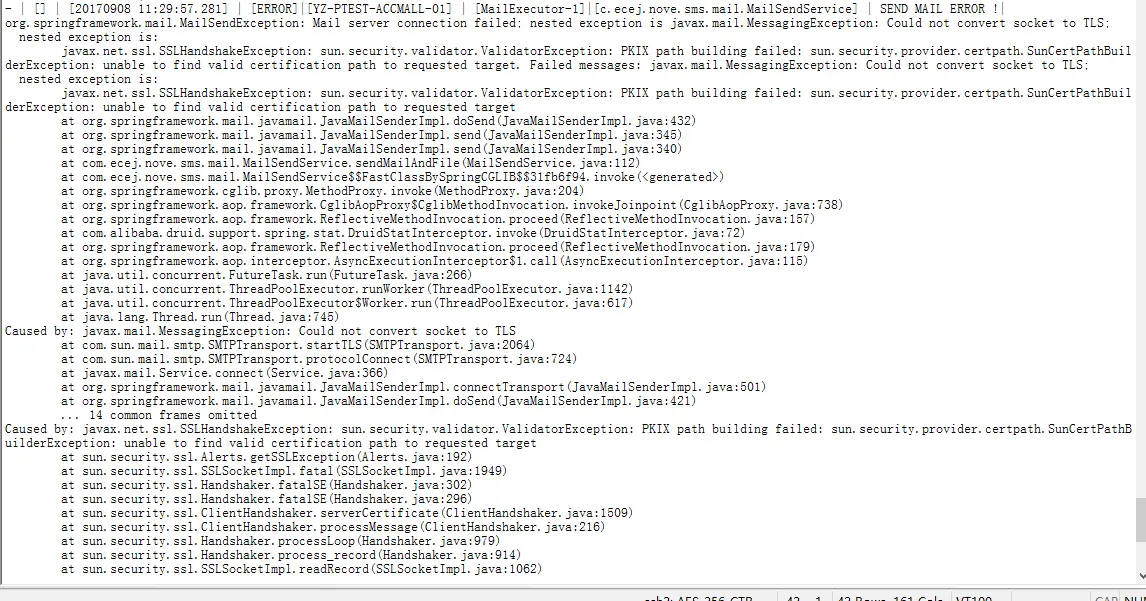
如此无奈,经各种官方打听,获得如下解决方案(网上什么加证书啊乱七八糟的,根本不靠谱)。
先来个官方版说法:
When using SSL/TLS, it's important to ensure that the server you connect
to is actually the server you expected to connect to, to prevent "man in
the middle" attacks on your communication. The recommended technique is
to configure the Java keystore using one of the methods described above.
If, for some reason, that approach is not workable, it's also possible
to configure the SSL/TLS implementation to use your own TrustManager
class to evaluate whether to trust the server you've connected to.
扯这么一大串,简单点说就是你可以自己搞个SSLSocketFactory自己去玩。
直接上菜:
package com.ecej.nove.sms.mail;

import java.io.IOException;
import java.net.InetAddress;
import java.net.Socket;

import javax.net.SocketFactory;
import javax.net.ssl.SSLContext;
import javax.net.ssl.SSLSocketFactory;
import javax.net.ssl.TrustManager;

public class DummySSLSocketFactory extends SSLSocketFactory {
    private SSLSocketFactory factory;

    public DummySSLSocketFactory() {
        try {
            SSLContext sslcontext = SSLContext.getInstance("TLS");
            sslcontext.init(null, new TrustManager[] { new DummyTrustManager() }, null);
            factory = sslcontext.getSocketFactory();
        } catch (Exception ex) {
            // ignore
        }
    }

    public static SocketFactory getDefault() {
        return new DummySSLSocketFactory();
    }

    @Override
    public Socket createSocket() throws IOException {
        return factory.createSocket();
    }

    @Override
    public Socket createSocket(Socket socket, String s, int i, boolean flag) throws IOException {
        return factory.createSocket(socket, s, i, flag);
    }

    @Override
    public Socket createSocket(InetAddress inaddr, int i, InetAddress inaddr1, int j) throws IOException {
        return factory.createSocket(inaddr, i, inaddr1, j);
    }

    @Override
    public Socket createSocket(InetAddress inaddr, int i) throws IOException {
        return factory.createSocket(inaddr, i);
    }

    @Override
    public Socket createSocket(String s, int i, InetAddress inaddr, int j) throws IOException {
        return factory.createSocket(s, i, inaddr, j);
    }

    @Override
    public Socket createSocket(String s, int i) throws IOException {
        return factory.createSocket(s, i);
    }

    @Override
    public String[] getDefaultCipherSuites() {
        return factory.getDefaultCipherSuites();
    }

    @Override
    public String[] getSupportedCipherSuites() {
        return factory.getSupportedCipherSuites();
    }
}
GO ON DOING...
package com.ecej.nove.sms.mail;

import java.security.cert.X509Certificate;

import javax.net.ssl.X509TrustManager;

public class DummyTrustManager implements X509TrustManager {
    public void checkClientTrusted(X509Certificate[] cert, String authType) {
        // everything is trusted
    }

    public void checkServerTrusted(X509Certificate[] cert, String authType) {
        // everything is trusted
    }

    public X509Certificate[] getAcceptedIssuers() {
        return new X509Certificate[0];
    }
}
增加一点点配置文件
spring.mail.properties.mail.imap.ssl.socketFactory.fallback=false
spring.mail.properties.mail.smtp.ssl.socketFactory.class=com.ecej.nove.sms.mail.DummySSLSocketFactory
SO,这下这个恶心的小问题就解决了,附赠原版解读(有事还得找官方)
http://www.oracle.com/technetwork/java/javamail145sslnotes-1562622.html
小结
spring 这一大群配置文件我还真记不住,所以给留一个全面的api
https://javaee.github.io/javamail/docs/api/com/sun/mail/smtp/package-summary.html
关注公众号,获取最新推送


 9995
9995

 被折叠的 条评论
为什么被折叠?
被折叠的 条评论
为什么被折叠?
 到【灌水乐园】发言


