


ART世界探险(15) - CompilerDriver,ClassLinker,Runtime三大组件
CompilerDriver
调用编译器的接口是CompilerDriver。
我们看一看CompilerDriver的结构图吧:
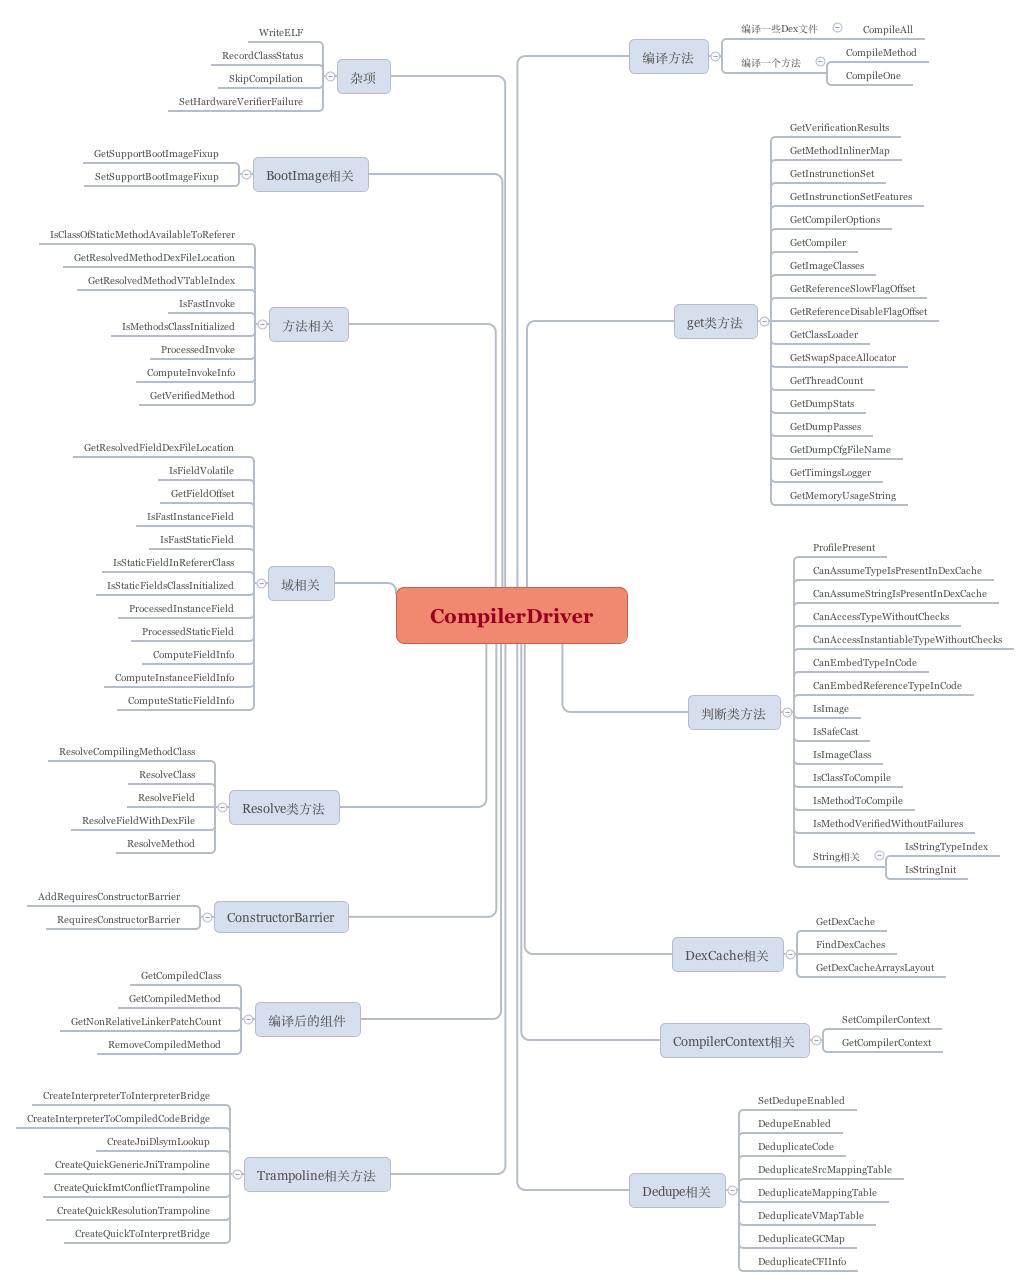
这是我们在ART里能遇见的第一个复杂的大类。但凡编译相关,都要通过它来打交道。结果,它就把自己搞成了一个大杂烩。
ClassLinker
Java是门面向对象的语言,导致类相关的操作比较复杂。
在应用层有ClassLoader,在运行环境层就有ClassLinker。
我们看一下ClassLinker的公开方法,私有的还有同样多的,汗。
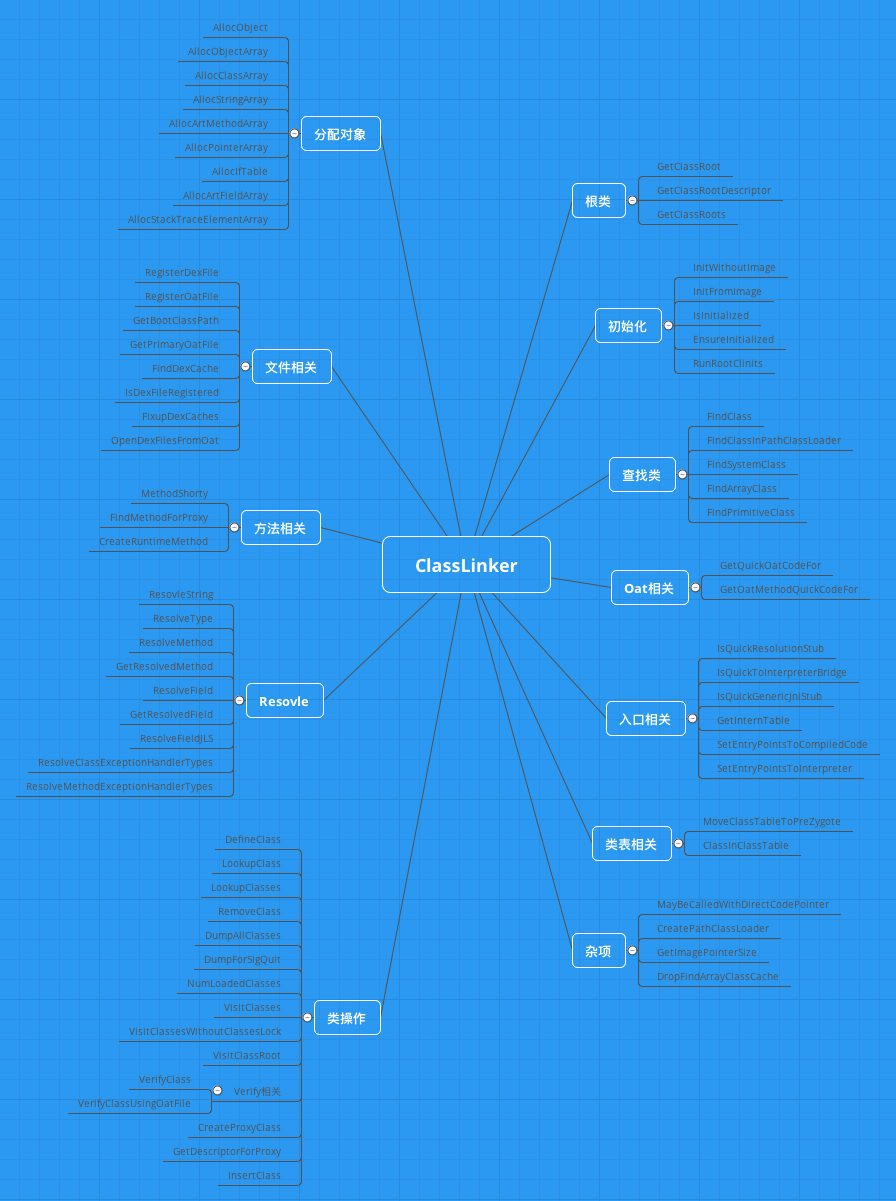
ClassLinker相对于CompilerDriver,逻辑上更为集中一些。
它主要是提供跟类相关的操作,包括类级的分配对象等。
CompilerDriver提供的主要是编译期底层代码的功能,而ClassLinker在面向对象的逻辑层提供服务。
Runtime
ART是Android Runtime的缩写,我们终于可以揭开Android Runtime的面纱了。
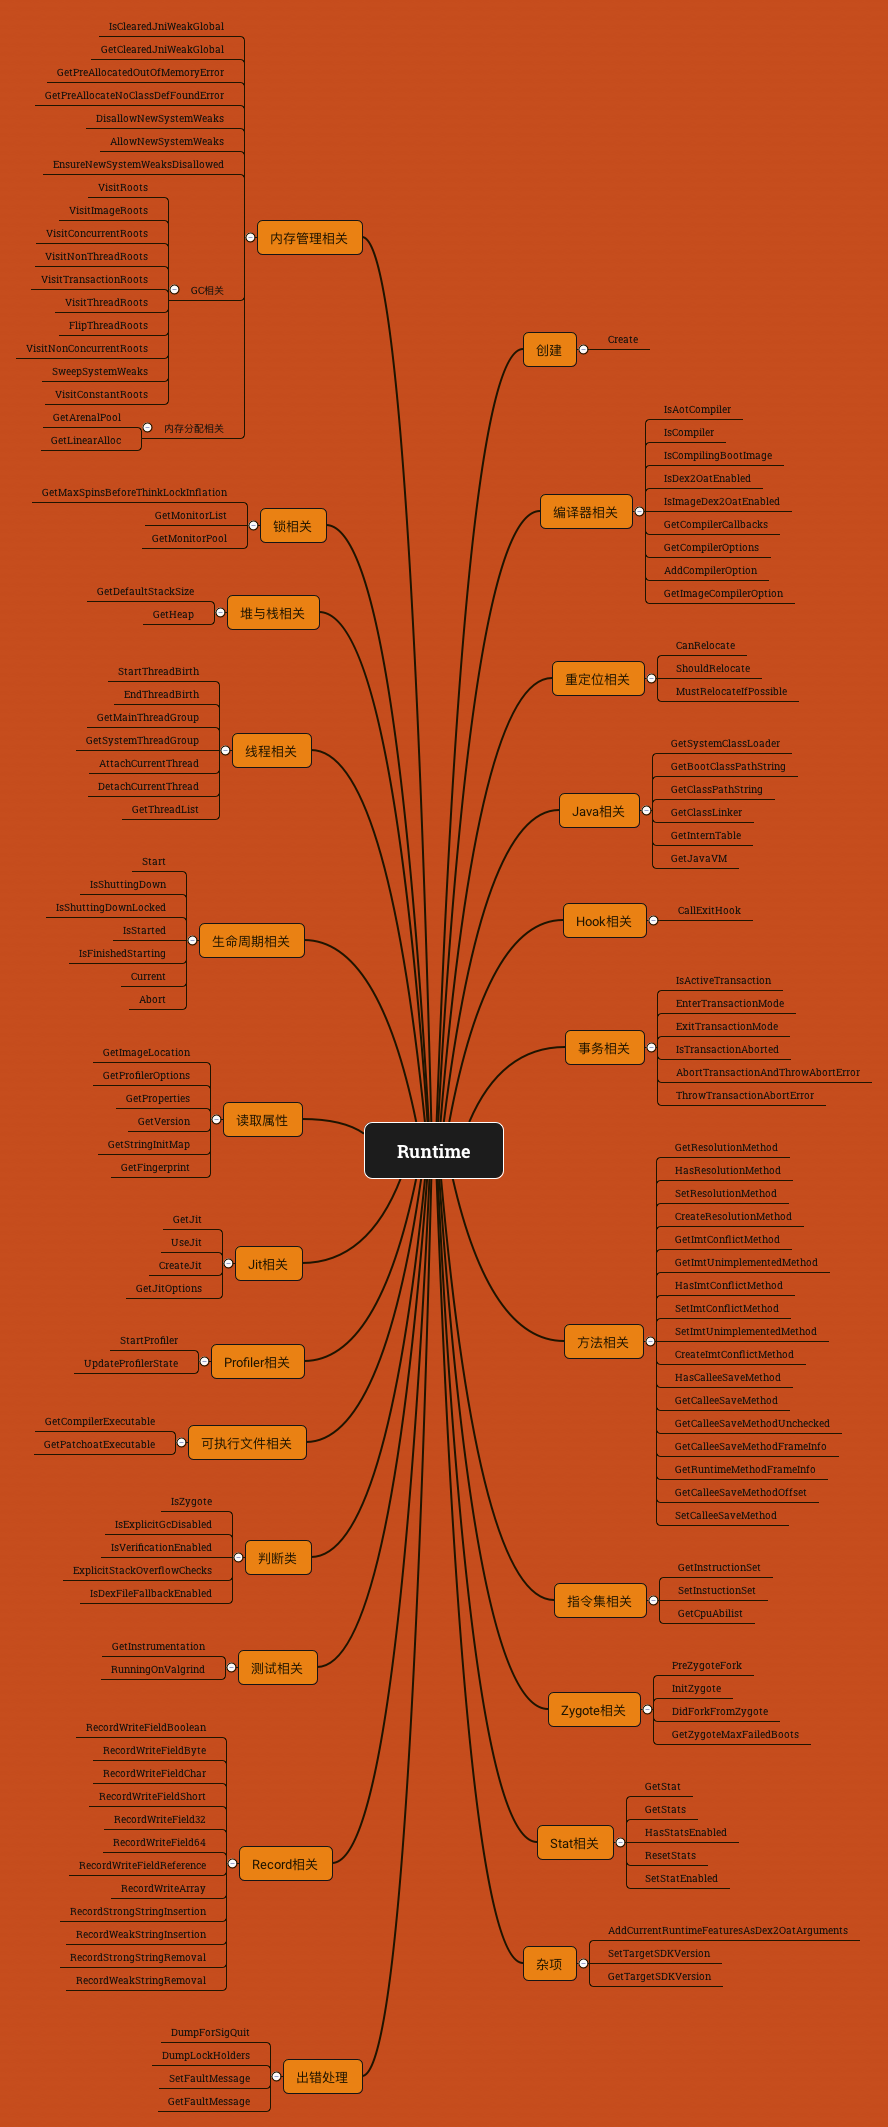
Runtime主要是提供一些运行时的服务,最重要的当然就是GC。另外,还有多线程和线程安全相关的支持,事务相关的支持等。
有了上面三个大组件的支持,不管是编译期还是运行时,我们都可以找到支持Java方法运行的基础设施。
最后,我们再复习一下上节最后出现的编译单元类:
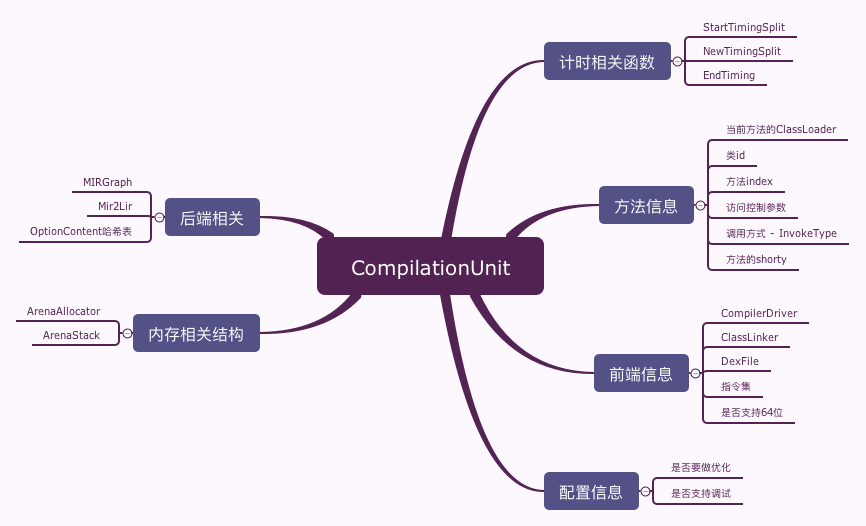
CompilationUnit的作用是连接前端和后端。
将前端的DexFile通过CompilerDriver进行编译之后,我们先得到中间层中间代码MIR,MIRGraph就是这一步要做的工作。很多优化也是在这一步完成的。
然后,再通过Mir2Lir,将MIR转化成更接近于机器指令的低层中间代码LIR。
最后,再将LIR落地成目标机器的指令。
dex2oat编译流程(续)
首先我们复习一下之前学到的,dex2oat做为入口点,会调用CompilerDriver的方法对dex文件进行编译。
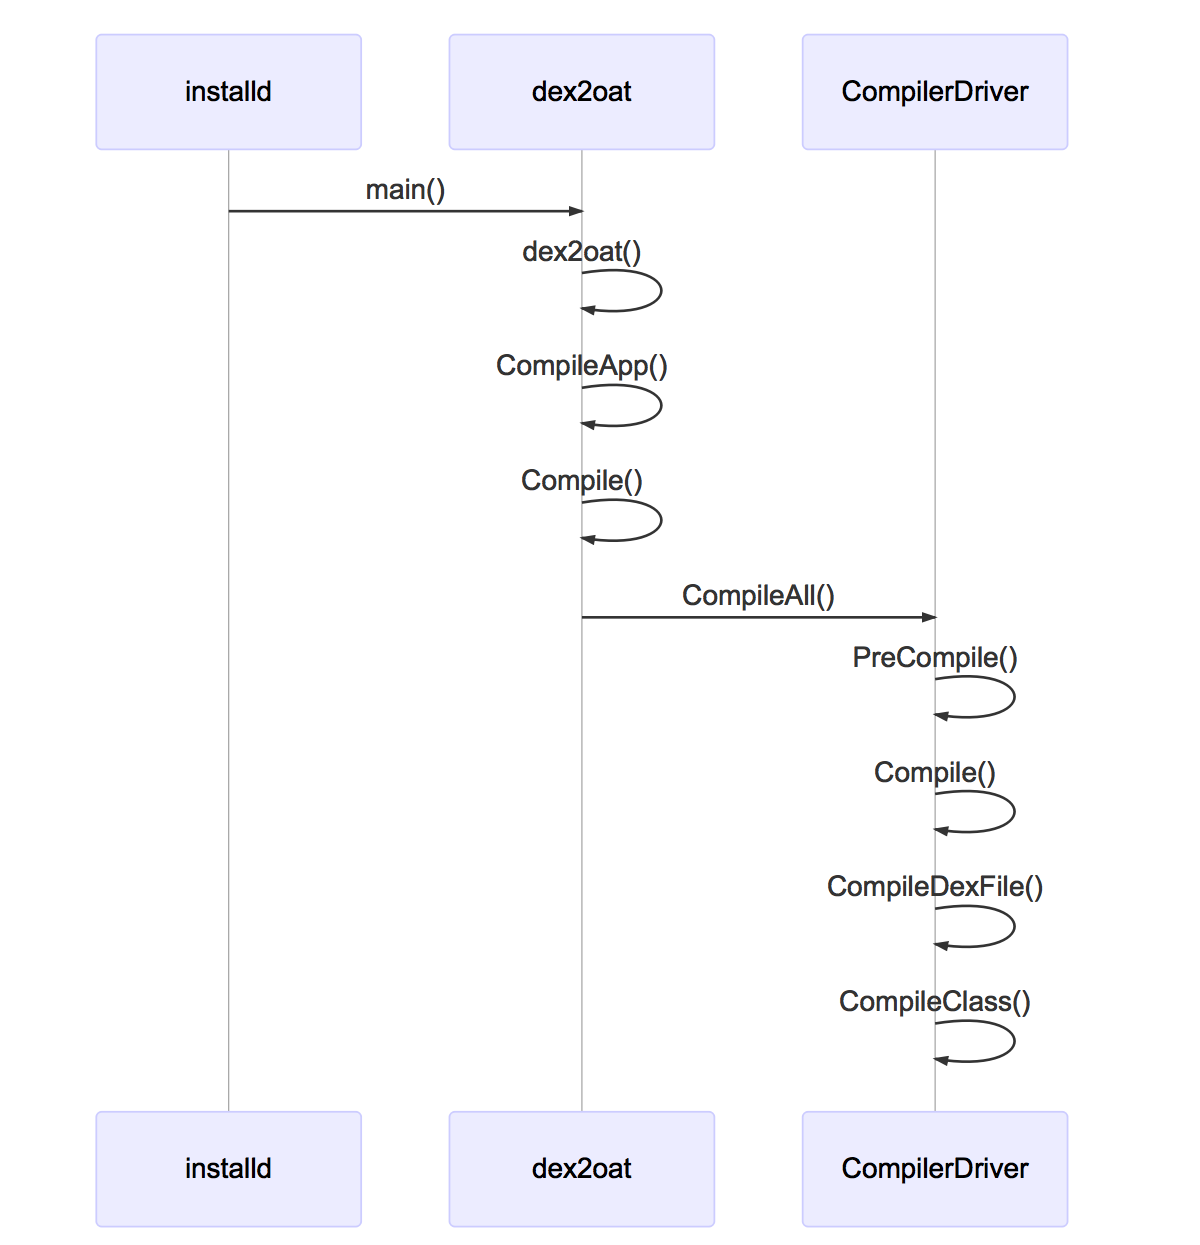
下面该开始CompilerDriver的CompileClass,看了CompilerDriver的大图之后,对于它是不是更亲切了呢?
CompileClass
编译类的重头戏还在于编译方法。
CompileClass类的主要逻辑,就是针对直接方法和虚拟方法,分别遍历然后编译。
我们将前面的判断和校验等细节都略过,这个函数的框架如下面所示:
void CompilerDriver::CompileClass(const ParallelCompilationManager* manager,
                                  size_t class_def_index) {
...
  CompilerDriver* const driver = manager->GetCompiler();
...

  // Compile direct methods
  int64_t previous_direct_method_idx = -1;
  while (it.HasNextDirectMethod()) {
    uint32_t method_idx = it.GetMemberIndex();
    if (method_idx == previous_direct_method_idx) {
      // smali can create dex files with two encoded_methods sharing the same method_idx
      // http://code.google.com/p/smali/issues/detail?id=119
      it.Next();
      continue;
    }
    previous_direct_method_idx = method_idx;
    driver->CompileMethod(self, it.GetMethodCodeItem(), it.GetMethodAccessFlags(),
                          it.GetMethodInvokeType(class_def), class_def_index,
                          method_idx, jclass_loader, dex_file, dex_to_dex_compilation_level,
                          compilation_enabled);
    it.Next();
  }
  // Compile virtual methods
  int64_t previous_virtual_method_idx = -1;
  while (it.HasNextVirtualMethod()) {
    uint32_t method_idx = it.GetMemberIndex();
    if (method_idx == previous_virtual_method_idx) {
      // smali can create dex files with two encoded_methods sharing the same method_idx
      // http://code.google.com/p/smali/issues/detail?id=119
      it.Next();
      continue;
    }
    previous_virtual_method_idx = method_idx;
    driver->CompileMethod(self, it.GetMethodCodeItem(), it.GetMethodAccessFlags(),
                          it.GetMethodInvokeType(class_def), class_def_index,
                          method_idx, jclass_loader, dex_file, dex_to_dex_compilation_level,
                          compilation_enabled);
    it.Next();
  }
  DCHECK(!it.HasNext());
}
CompileMethod
从这里开始,我们终于深入到可以生成代码的程度了。
void CompilerDriver::CompileMethod(Thread* self, const DexFile::CodeItem* code_item,
                                   uint32_t access_flags, InvokeType invoke_type,
                                   uint16_t class_def_idx, uint32_t method_idx,
                                   jobject class_loader, const DexFile& dex_file,
                                   DexToDexCompilationLevel dex_to_dex_compilation_level,
                                   bool compilation_enabled) {
  CompiledMethod* compiled_method = nullptr;
  uint64_t start_ns = kTimeCompileMethod ? NanoTime() : 0;
  MethodReference method_ref(&dex_file, method_idx);
首先是对JNI调用的处理,我们之前曾经看到过的序列。这里会调用JniCompile函数。下面开始处理JNI:
  if ((access_flags & kAccNative) != 0) {
    // Are we interpreting only and have support for generic JNI down calls?
    if (!compiler_options_->IsCompilationEnabled() &&
        InstructionSetHasGenericJniStub(instruction_set_)) {
      // Leaving this empty will trigger the generic JNI version
    } else {
      compiled_method = compiler_->JniCompile(access_flags, method_idx, dex_file);
      CHECK(compiled_method != nullptr);
    }
抽象方法不需要生成代码:
  } else if ((access_flags & kAccAbstract) != 0) {
    // Abstract methods don't have code.
下面再开始编普通方法,通过调用Compile方法来完成。
  } else {
    bool has_verified_method = verification_results_->GetVerifiedMethod(method_ref) != nullptr;
    bool compile = compilation_enabled &&
                   // Basic checks, e.g., not <clinit>.
                   verification_results_->IsCandidateForCompilation(method_ref, access_flags) &&
                   // Did not fail to create VerifiedMethod metadata.
                   has_verified_method &&
                   // Is eligable for compilation by methods-to-compile filter.
                   IsMethodToCompile(method_ref);
    if (compile) {
      // NOTE: if compiler declines to compile this method, it will return null.
      compiled_method = compiler_->Compile(code_item, access_flags, invoke_type, class_def_idx,
                                           method_idx, class_loader, dex_file);
    }
...
}
如上一讲我们所介绍的,ART有两种Compiler,QuickCompiler和OptimizationCompiler。
所以,根据dex2oat参数的不同,分别调用这两种Compiler的Compile方法来实现真正的编译。
我们看一个图来复习一下:


 2397
2397

 被折叠的 条评论
为什么被折叠?
被折叠的 条评论
为什么被折叠?
 到【灌水乐园】发言


