


1.创建Angular Library
1.1创建项目工程
	ng new test-commonlib-ui --no-create-application
	cd test-commonlib-ui
	ng g application test-commonlib-app-ui
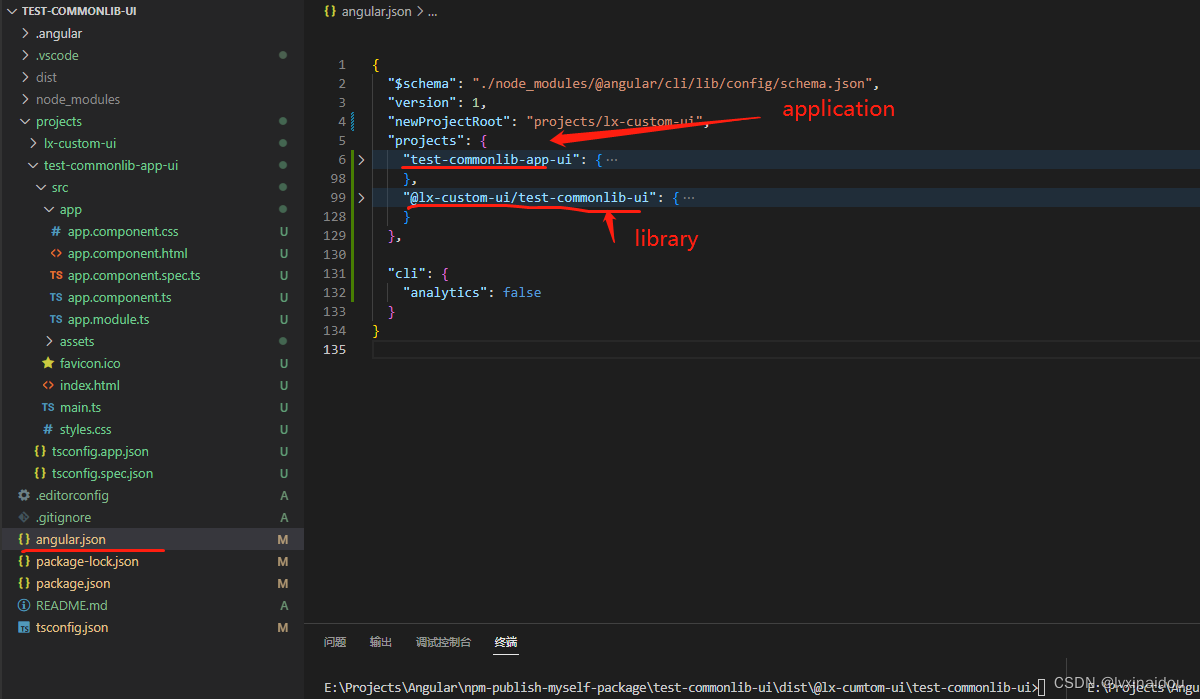
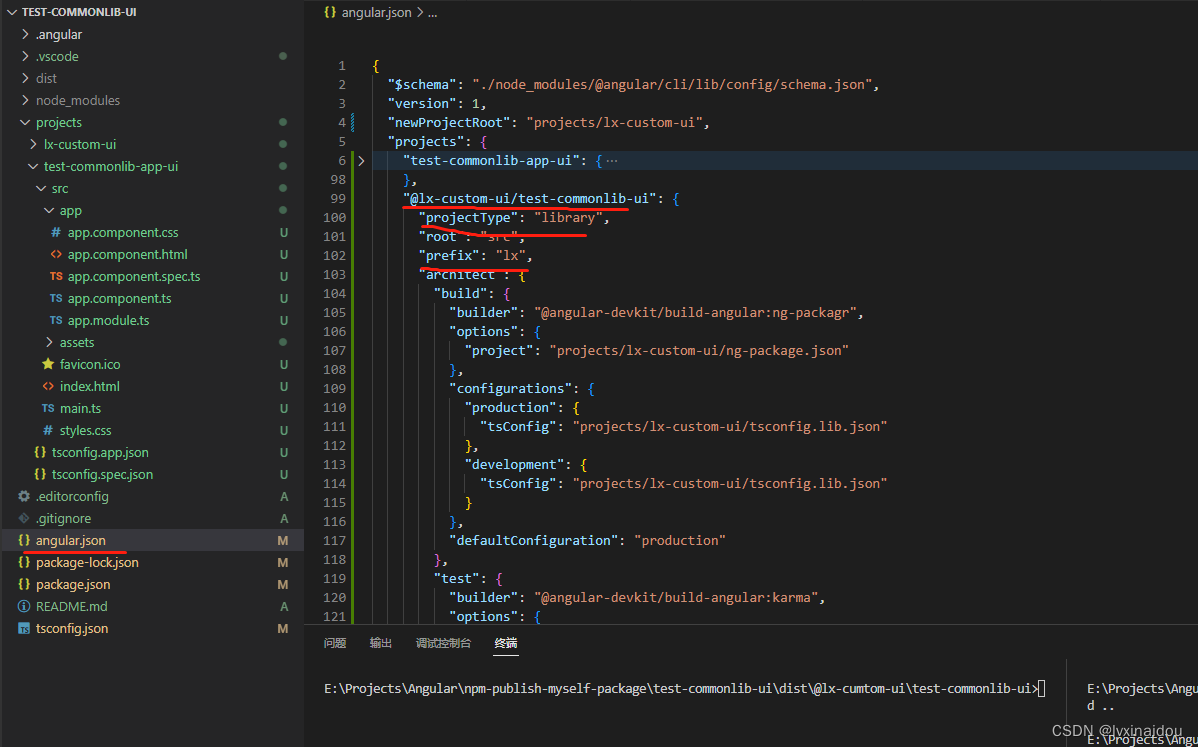
1.2配置angular.json
- 在projects文件下新建lx-custom-ui文件夹
- 修改newProjectRoot
"newProjectRoot": "projects/lx-custom-ui",
- 配置以@开头的库名字
"@lx-custom-ui/test-commonlib-ui": {
      "projectType": "library",
      "root": "src",
      "prefix": "lx",
      "architect": {
        "build": {
          "builder": "@angular-devkit/build-angular:ng-packagr",
          "options": {
            "project": "projects/lx-custom-ui/ng-package.json"
          },
          "configurations": {
            "production": {
              "tsConfig": "projects/lx-custom-ui/tsconfig.lib.json"
            },
            "development": {
              "tsConfig": "projects/lx-custom-ui/tsconfig.lib.json"
            }
          },
          "defaultConfiguration": "production"
        },
        "test": {
          "builder": "@angular-devkit/build-angular:karma",
          "options": {
            "main": "projects/lx-custom-ui/src/test.ts",
            "tsConfig": "projects/lx-custom-ui/tsconfig.spec.json",
            "karmaConfig": "projects/lx-custom-ui/karma.conf.js"
          }
        }
      }
    }
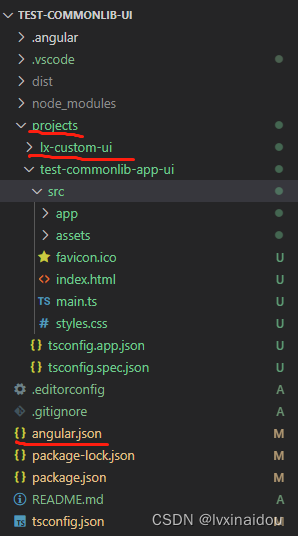
- 执行后的文件结构

1.3配置Library工程
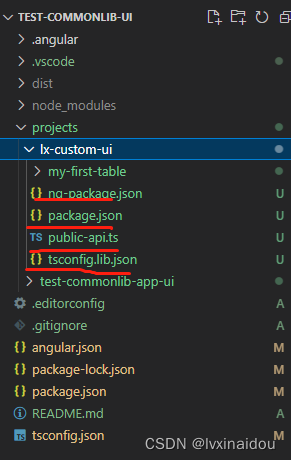
- 添加4个文件ng-package.json, package.json,public-api.ts,tsconfig.lib.json
- 文件结构
- 具体代码
a). ng-package.json
{
  "$schema": "../../node_modules/ng-packagr/ng-package.schema.json",
  "dest": "../../dist/@lx-custom-ui/test-commonlib-ui",
  "deleteDestPath": true,
  "lib": {
    "entryFile": "public-api.ts"
  }
}
b). package.json
{
    "name": "@lx-custom-ui/test-commonlib-ui",
    "version": "1.0.0",
    "peerDependencies": {
        "@angular/core": "^12.0.0 || ^13.0.0 || ^14.0.0 || ^15.0.0",
        "@angular/common": "^12.0.0 || ^13.0.0 || ^14.0.0 || ^15.0.0",
        "@angular/forms": "^12.0.0 || ^13.0.0 || ^14.0.0 || ^15.0.0",
        "rxjs": "^6.0.0",
        "zone.js": "^0.10.2"
    }
}
c). public-api.ts
export * from '@lx-custom-ui/test-commonlib-ui/my-first-table';
d). tsconfig.lib.json
{
  "compilerOptions": {
    "declaration": true,
    "target": "es2015",
    "module": "es2015",
    "baseUrl": ".",
    "stripInternal": true,
    "emitDecoratorMetadata": false,
    "experimentalDecorators": true,
    "moduleResolution": "node",
    "outDir": "../build",
    "rootDir": ".",
    "lib": [
      "es2015",
      "dom",
      "es2017"
    ],
    "skipLibCheck": true,
    "types": [],
    "paths": {
      "@lx-custom-ui/test-commonlib-ui/*": [
        "projects/lx-custom-ui/*/src/public-api"
      ]
    }
  },
  "angularCompilerOptions": {
    "annotateForClosureCompiler": true,
    "skipTemplateCodegen": true,
    "strictMetadataEmit": true,
    "fullTemplateTypeCheck": true,
    "strictInjectionParameters": true,
    "flatModuleId": "AUTOGENERATED",
    "flatModuleOutFile": "AUTOGENERATED"
  },
  "files": [
    "./public-api.ts"
  ]
}
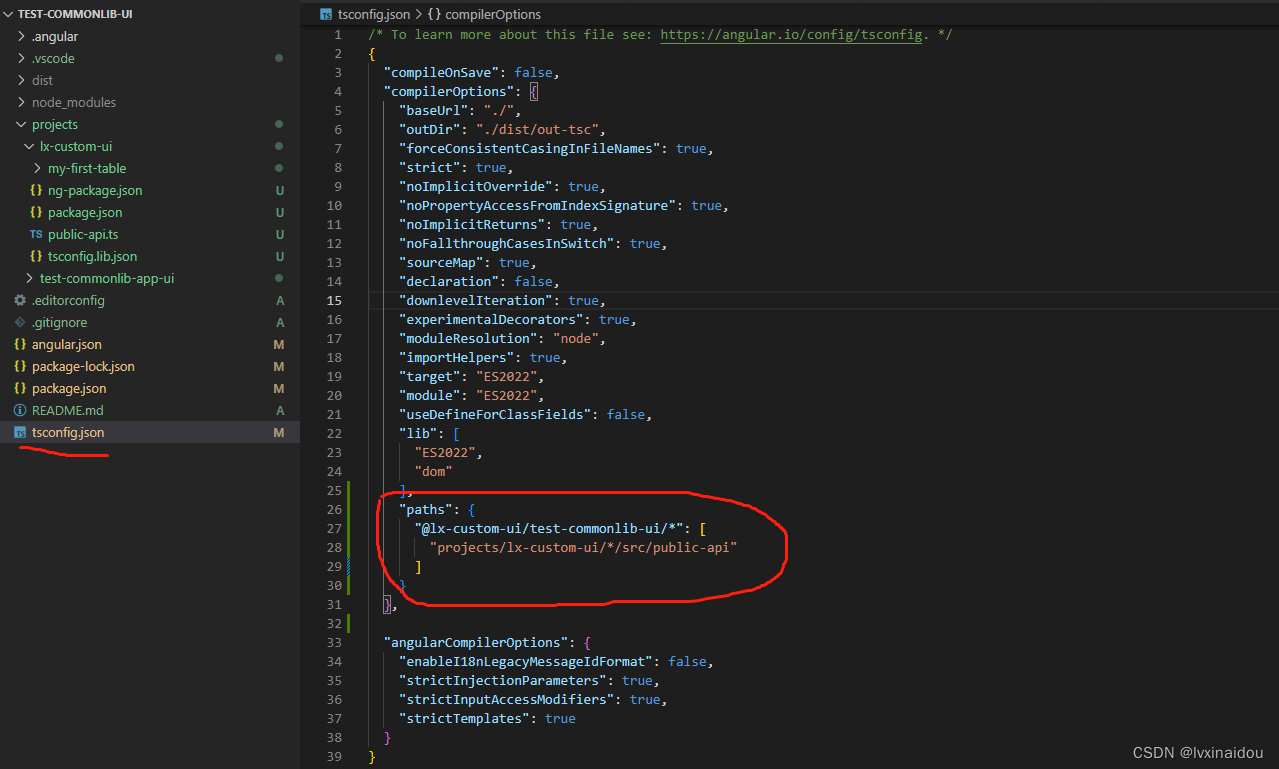
1.4修改tsconfig.json配置
 "compilerOptions": {
    "baseUrl": "./",
    "outDir": "./dist/out-tsc",
    "forceConsistentCasingInFileNames": true,
    "strict": true,
    "noImplicitOverride": true,
    "noPropertyAccessFromIndexSignature": true,
    "noImplicitReturns": true,
    "noFallthroughCasesInSwitch": true,
    "sourceMap": true,
    "declaration": false,
    "downlevelIteration": true,
    "experimentalDecorators": true,
    "moduleResolution": "node",
    "importHelpers": true,
    "target": "ES2022",
    "module": "ES2022",
    "useDefineForClassFields": false,
    "lib": [
      "ES2022",
      "dom"
    ],
    "paths": {
      "@lx-custom-ui/test-commonlib-ui/*": [
        "projects/lx-custom-ui/*/src/public-api"
      ]
    }
  },
注意,一定要修改paths,否则模块引入会报错的。
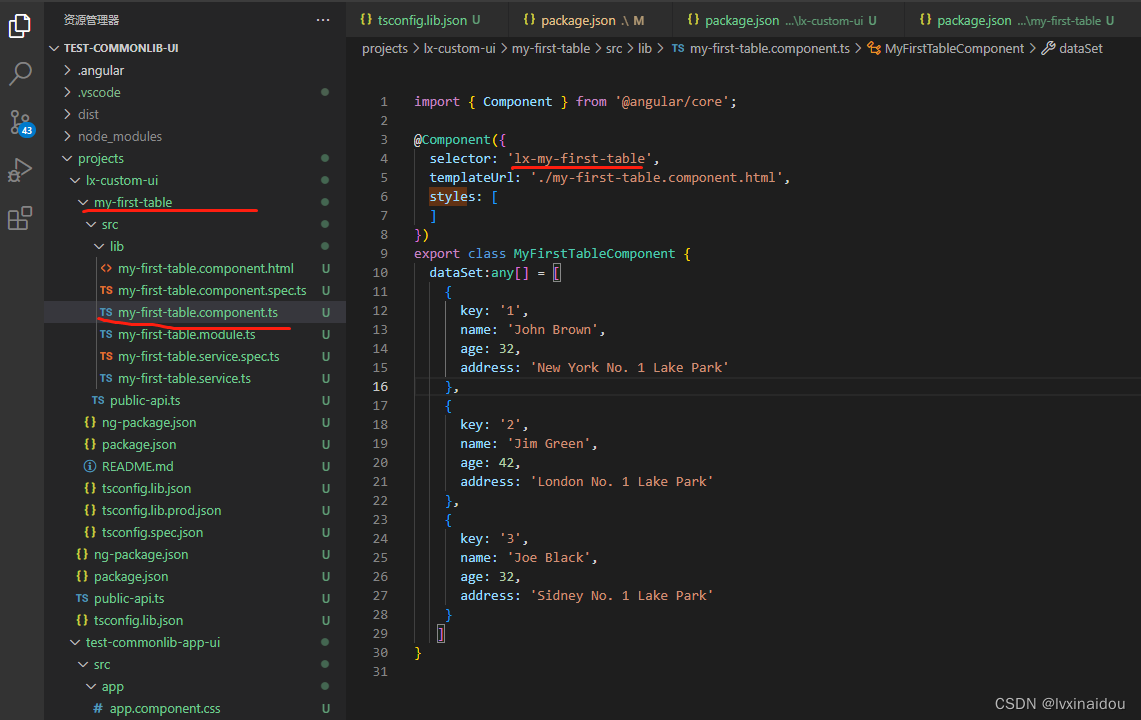
1.5 执行ng g library命令
- 创建自己的库
ng g library my-first-table
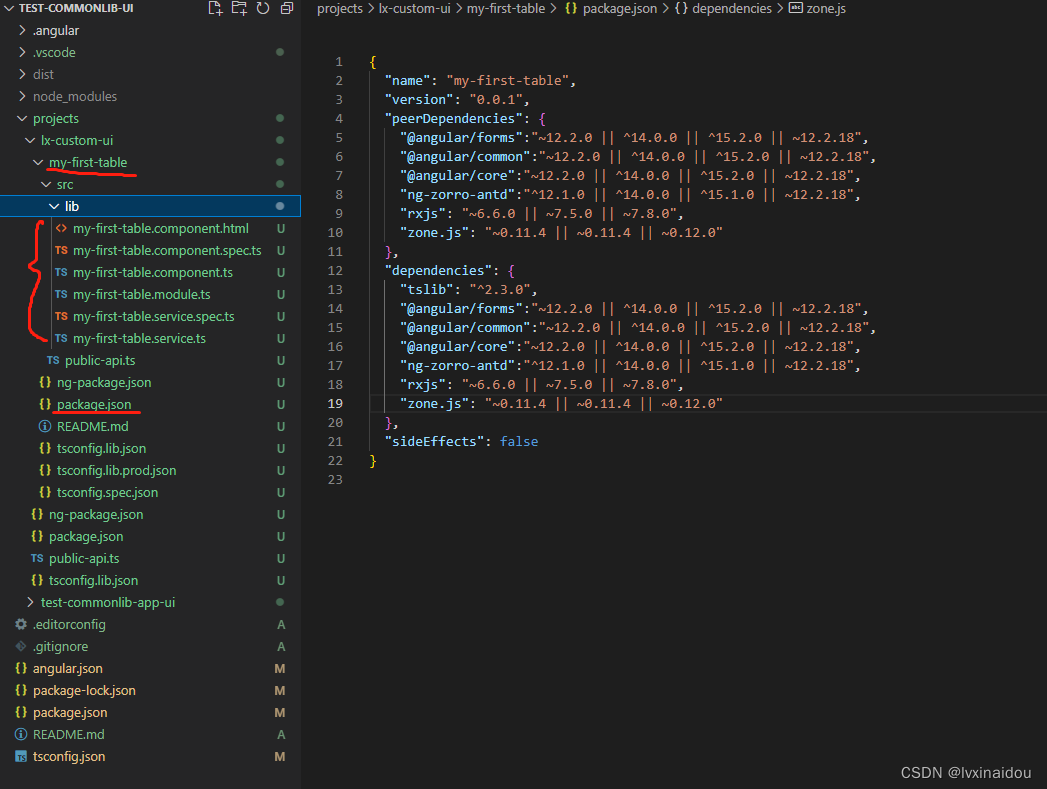
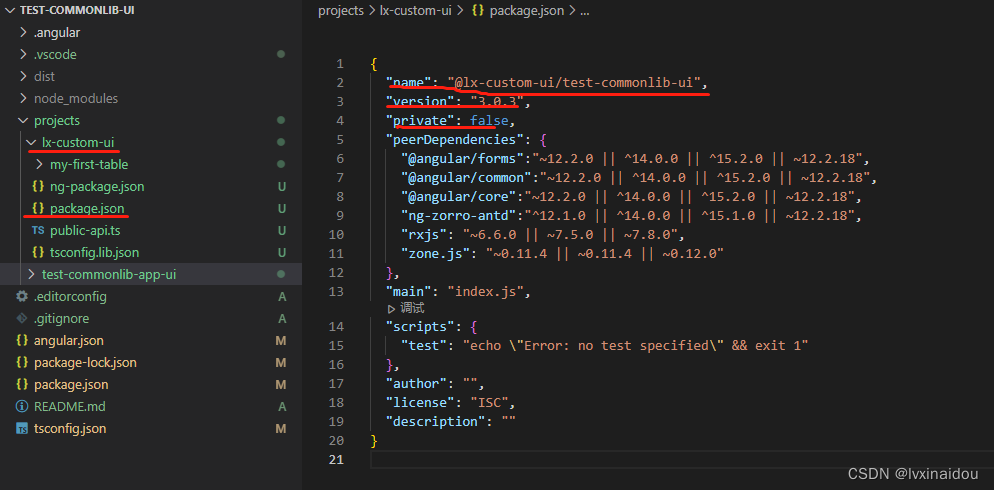
- 配置lib下的package.json, 注意这里的版本要和整个引用的项目版本一致,不然会有依赖报错。
{
  "name": "my-first-table",
  "version": "0.0.1",
  "peerDependencies": {
    "@angular/forms":"~12.2.0 || ^14.0.0 || ^15.2.0 || ~12.2.18",
    "@angular/common":"~12.2.0 || ^14.0.0 || ^15.2.0 || ~12.2.18",
    "@angular/core":"~12.2.0 || ^14.0.0 || ^15.2.0 || ~12.2.18",
    "ng-zorro-antd":"^12.1.0 || ^14.0.0 || ^15.1.0 || ~12.2.18",
    "rxjs": "~6.6.0 || ~7.5.0 || ~7.8.0",
    "zone.js": "~0.11.4 || ~0.11.4 || ~0.12.0"
  },
  "dependencies": {
    "tslib": "^2.3.0",
    "@angular/forms":"~12.2.0 || ^14.0.0 || ^15.2.0 || ~12.2.18",
    "@angular/common":"~12.2.0 || ^14.0.0 || ^15.2.0 || ~12.2.18",
    "@angular/core":"~12.2.0 || ^14.0.0 || ^15.2.0 || ~12.2.18",
    "ng-zorro-antd":"^12.1.0 || ^14.0.0 || ^15.1.0 || ~12.2.18",
    "rxjs": "~6.6.0 || ~7.5.0 || ~7.8.0",
    "zone.js": "~0.11.4 || ~0.11.4 || ~0.12.0"
  },
  "sideEffects": false
}
-
自动生成文件结构
-
具体代码(有第三方组件一定要应用module)
my-first-table.module.ts
import { NgModule } from '@angular/core';
import { MyFirstTableComponent } from './my-first-table.component';
import { NzTableModule } from 'ng-zorro-antd/table';
import { FormsModule } from '@angular/forms';
import { CommonModule } from '@angular/common';
import { BrowserModule } from '@angular/platform-browser';

@NgModule({
  declarations: [
    MyFirstTableComponent
  ],
  imports: [
    BrowserModule,
    NzTableModule,
    FormsModule,
    CommonModule,
  ],
  exports: [
    MyFirstTableComponent
  ]
})
export class MyFirstTableModule { }

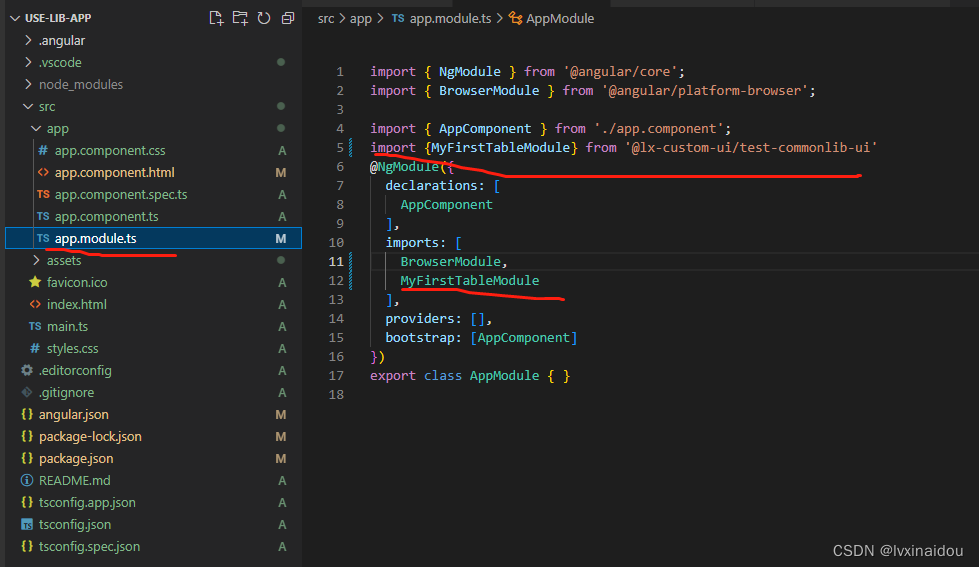
2.与Library同一个项目文件下测试
2.1angular.json结构
2.2测试项目使用
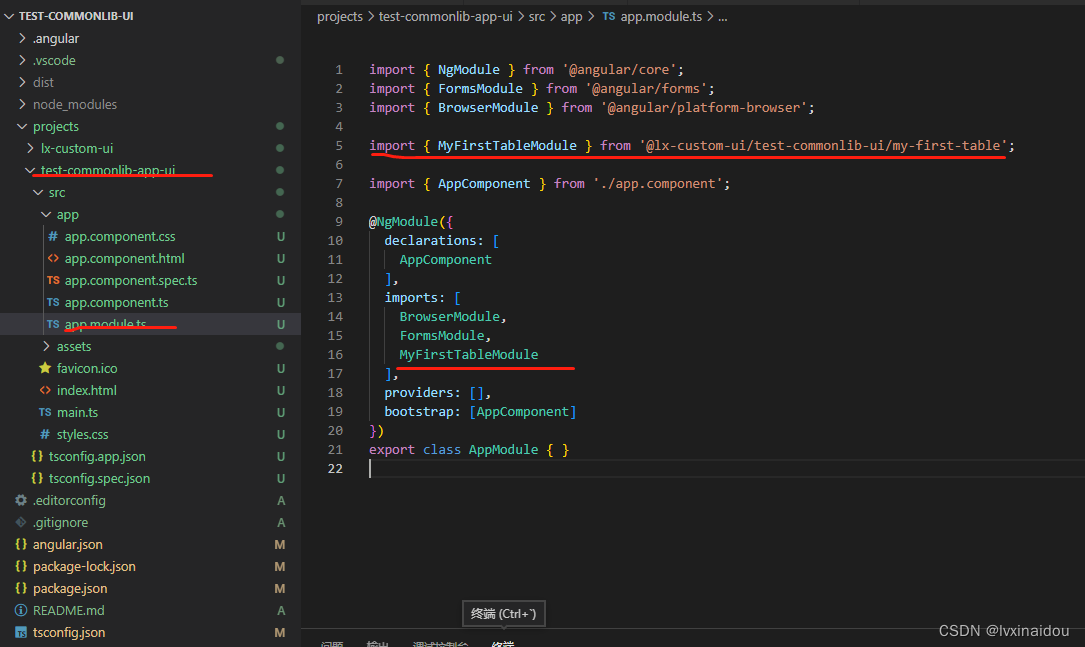
-
引用模块
-
可以修改html的前缀
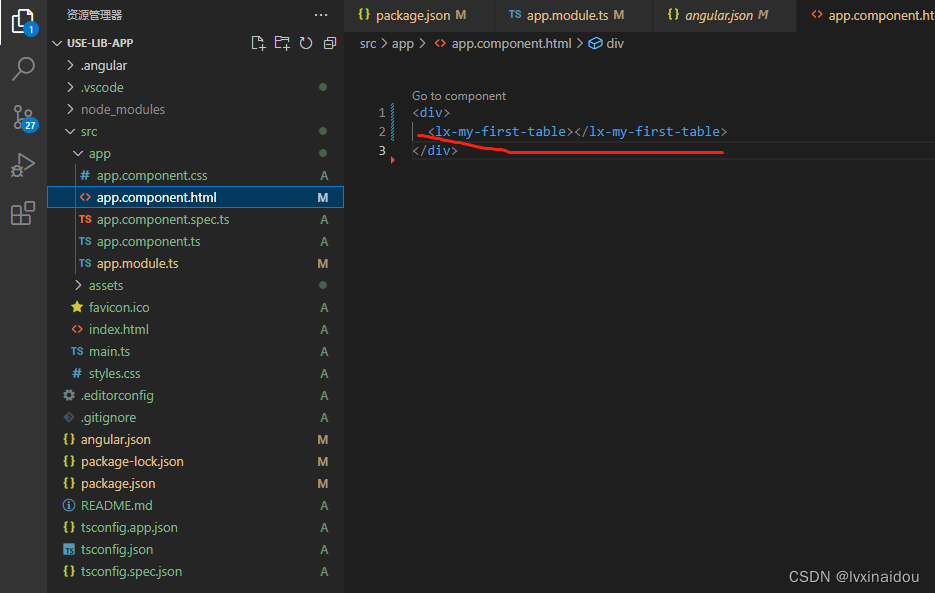
-
使用自己定义的html
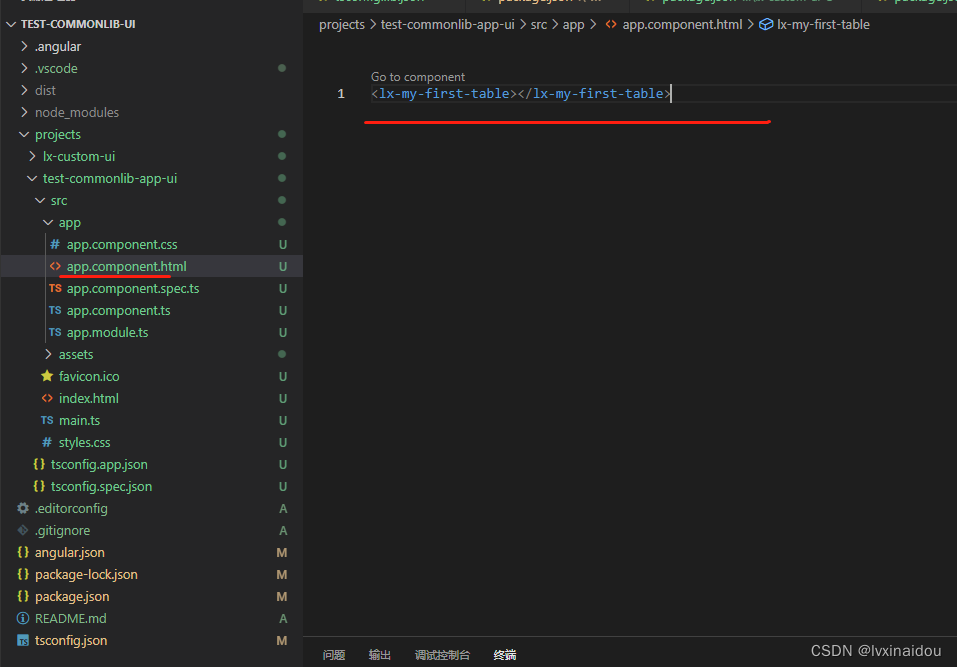
-
运行命令,结果如下


3. 发布Angular Library
1.1build包的命令
ng build @lx-custom-ui/test-commonlib-ui
1.2发布dist文件夹
- 登录npm(先到官网上注册一个自己的npm包, 注意发布@开头的,要与npm用户名一致,你也可以创建组织)
npm login
- 发布dist/@lx-custom-ui/test-commonlib-ui
npm publish --access public
- 每次发布版本要更新
- 发布成功
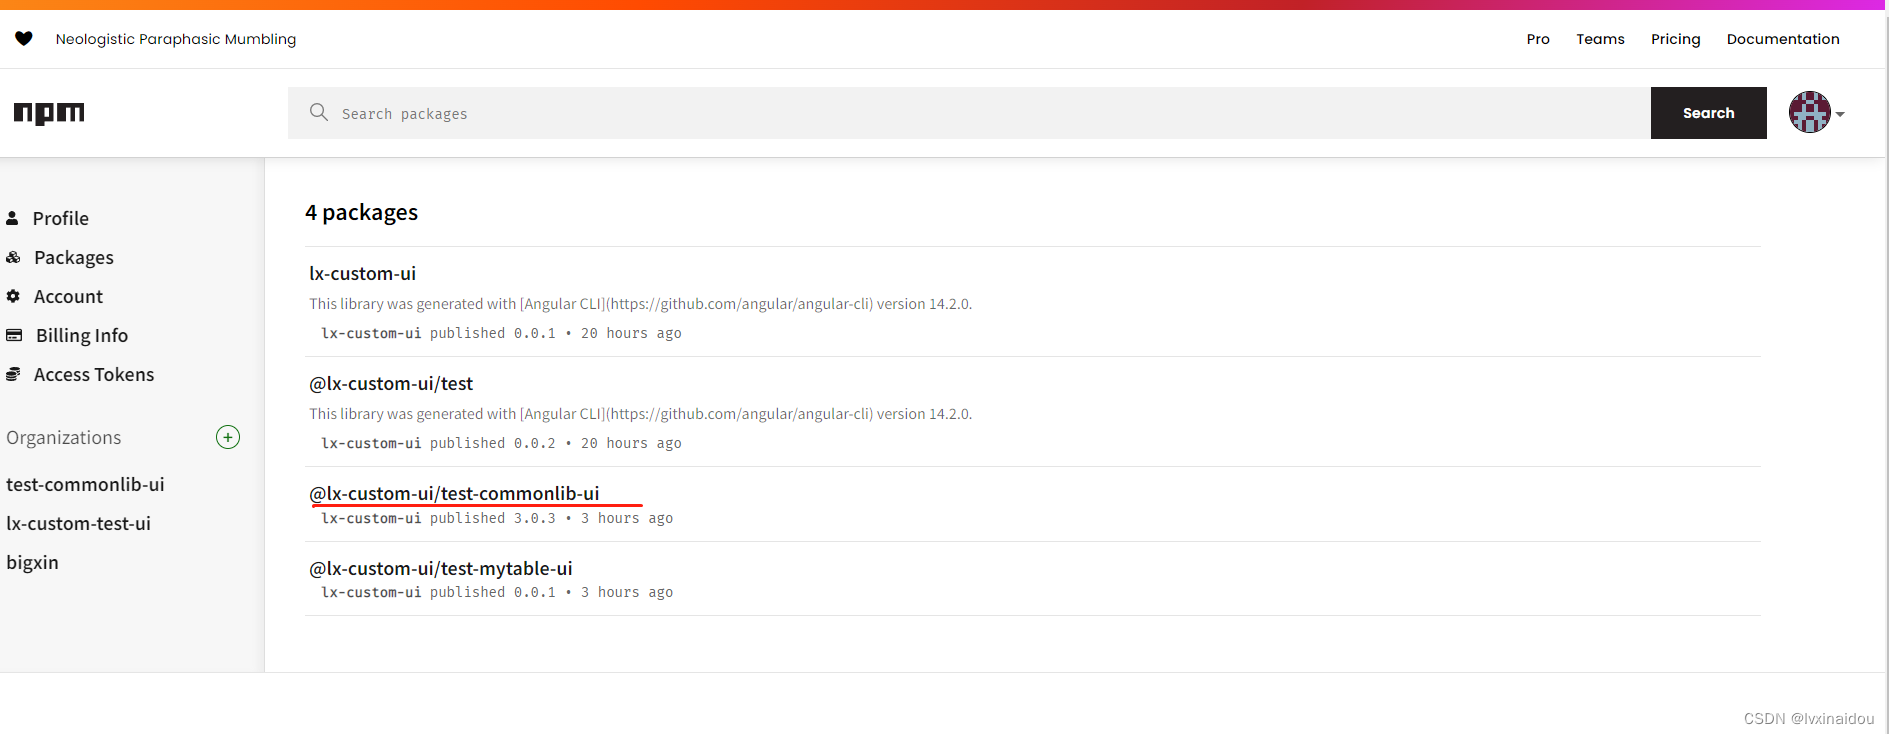
1.3npm官网上有自己发布的包
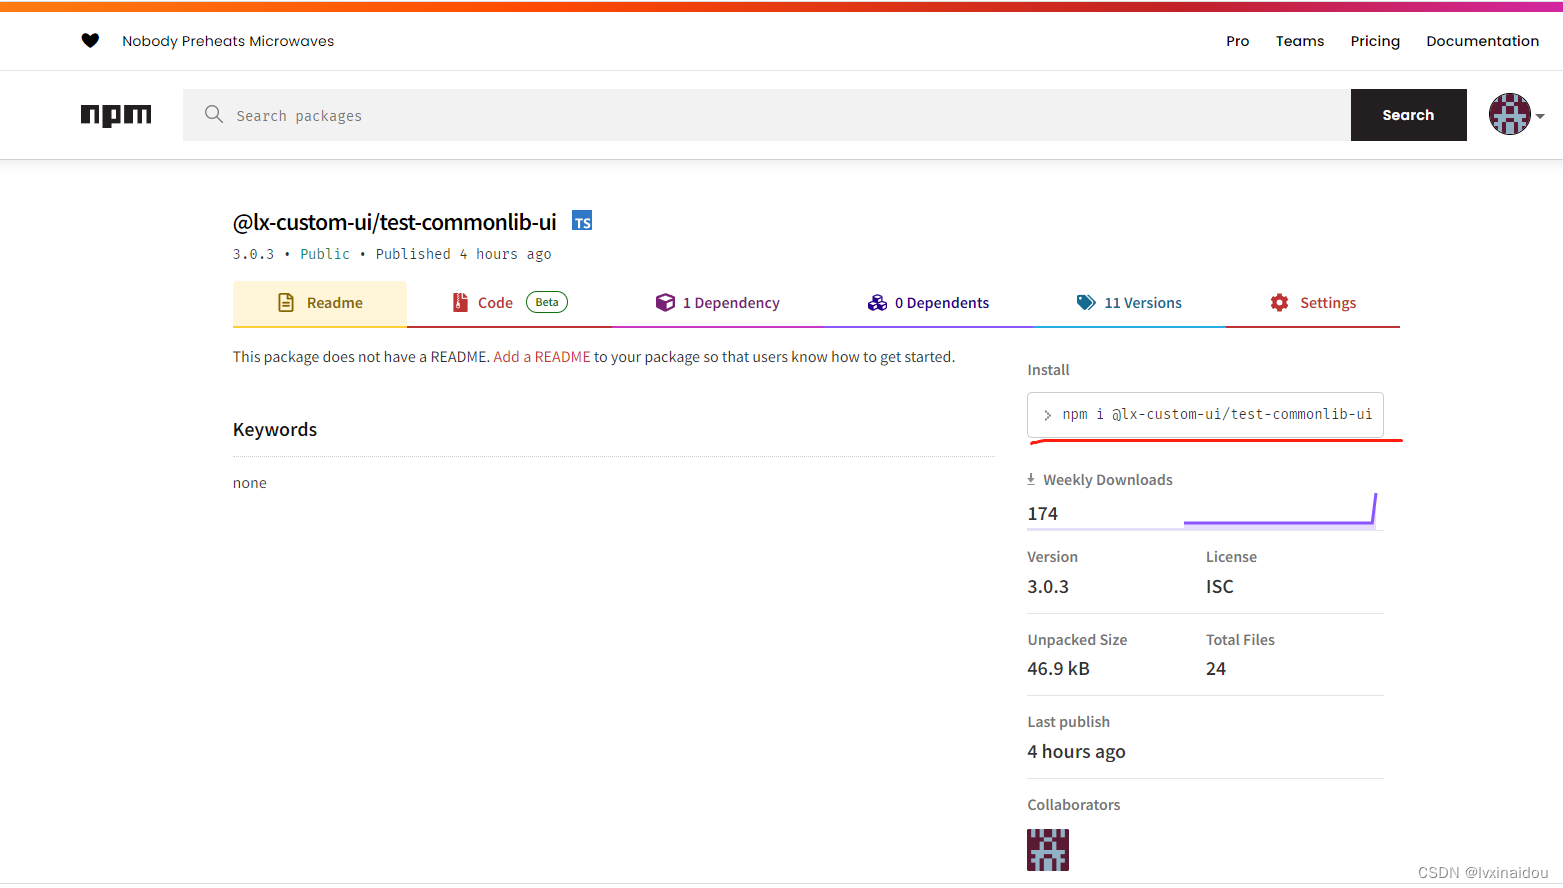
4.使用自己的Angular Library
1.1tgz方式
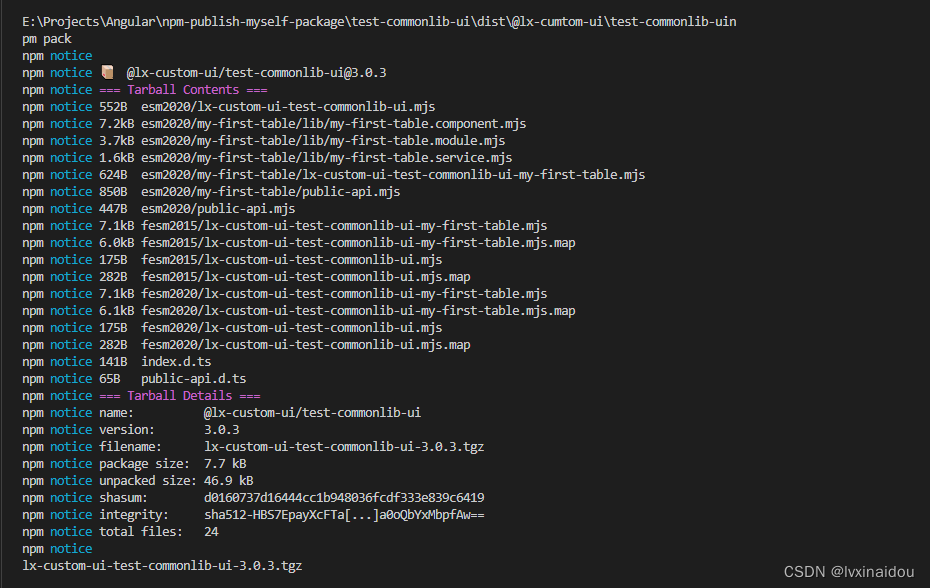
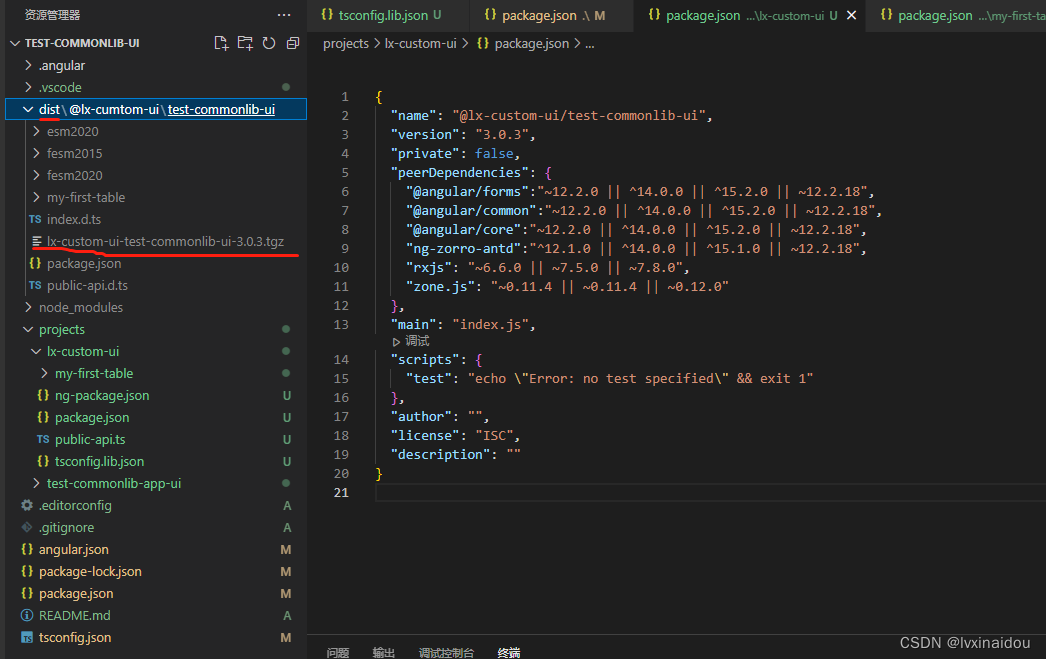
- 打包成tgz,手动复制到其他项目中
"npm-pack": "cd dist/@lx-custom-ui/test-commonlib-ui && npm pack",
"npm-lib-install": "npm install ./dist/@lx-custom-ui/test-commonlib-ui/lx-custom-ui-test-commonlib-ui-3.0.3.tgz"
- 配置好后, 在根文件下,执行
npm run build-lib
npm run npm-pack
npm run npm-lib-install
- 生成tgz在dist下
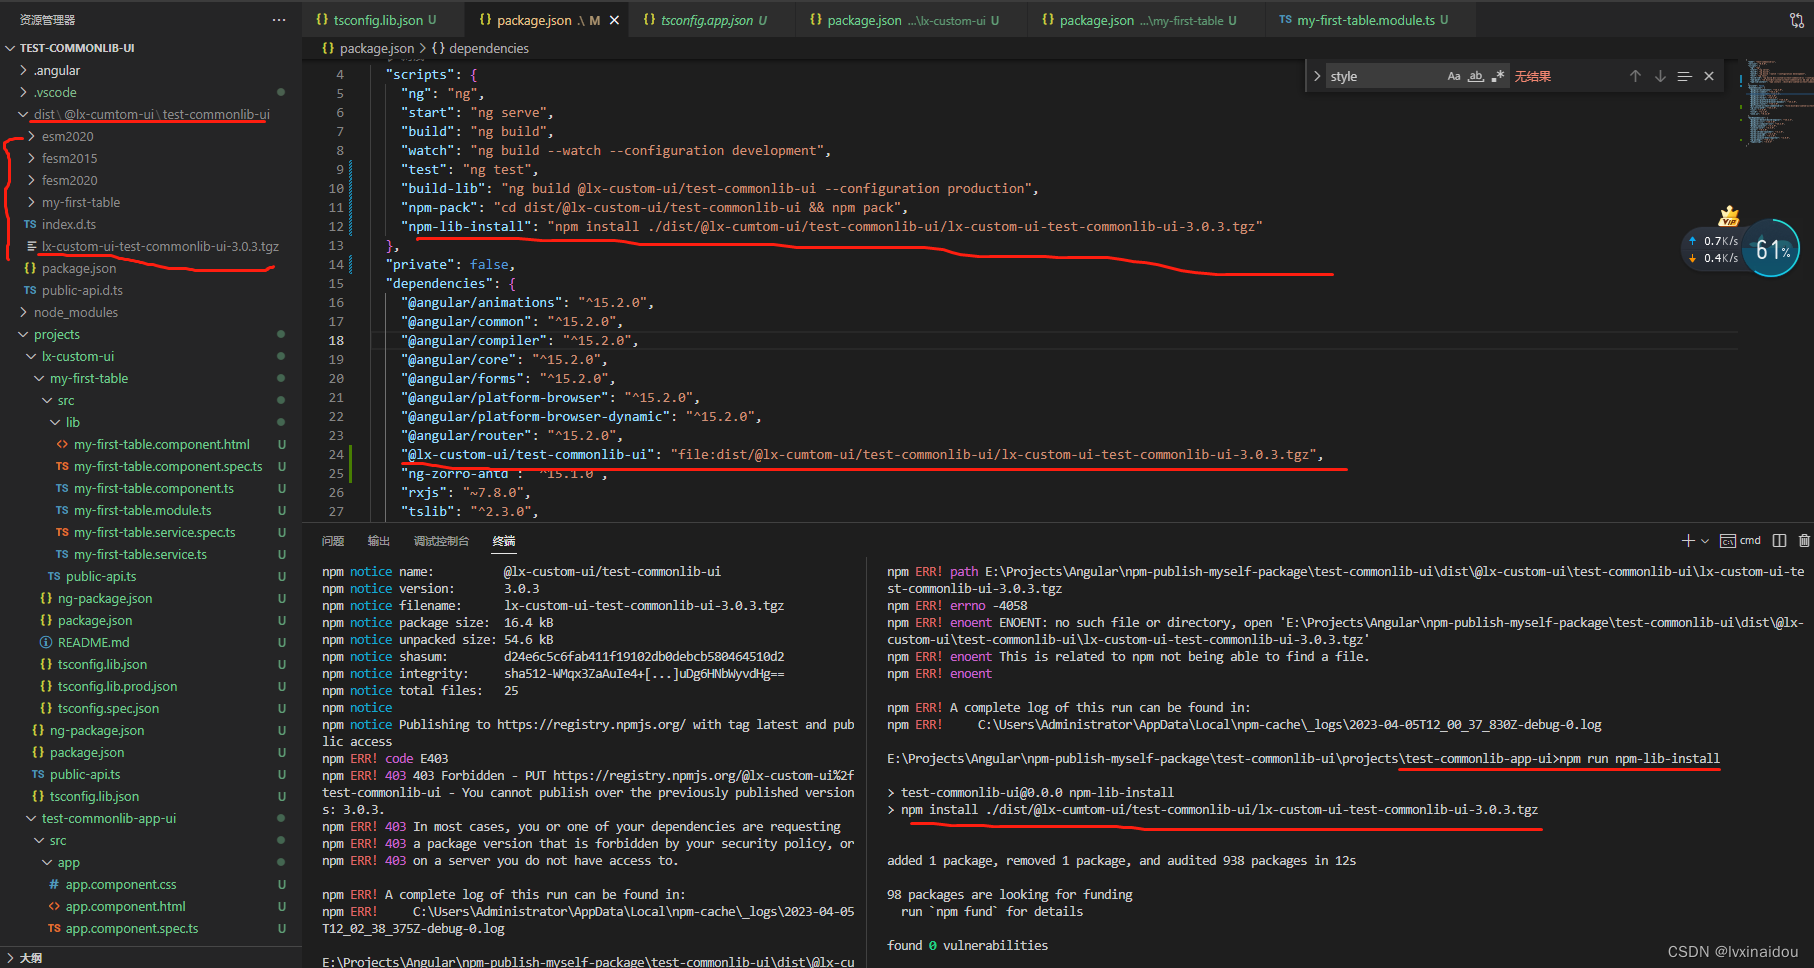
4.复制tgz到任意项目,任意目录下,只要路径正确,都能本地安装(本地安装命令"npm-lib-install": “npm install ./dist/@lx-custom-ui/test-commonlib-ui/lx-custom-ui-test-commonlib-ui-1.0.0.tgz”), 执行
 "dependencies": {
    "@lx-custom-ui/test-commonlib-ui": "file:dist/@lx-custom-ui/test-commonlib-ui/lx-custom-ui-test-commonlib-ui-3.0.3.tgz",
  },
- 结果如下:在测试项目下安装本地的tgz文件
1.1npm方式
- 任意项目下,前提angular版本要对应,执行命令
npm i @lx-custom-ui/test-commonlib-ui
-
引入模块
-
使用自己的html


 1329
1329


 被折叠的 条评论
为什么被折叠?
被折叠的 条评论
为什么被折叠?
 到【灌水乐园】发言


