


在之前的文章Okio—— 更加高效易用的IO库中参考官方的demo简单学习了一下Okio的使用方法,这篇就来简要分析学习一下Okio的源码实现。
Okio源码中主要有这么几个重要的东西:
- Source和Sink
- Segment
- Buffer
- ByteString
- Timeout
下面依次来看一下这几个东东:
Source & Sink
这两个是Okio中最基本的两个接口,分别对应java的InputStream和OutputStream即输入流和输出流,Source 是输入流,Sink是输出流:
actual interface Source {

  actual fun read(sink: Buffer, byteCount: Long): Long

  actual fun timeout(): Timeout

  actual fun close()
}
actual interface Sink {

  actual fun write(source: Buffer, byteCount: Long)

  actual fun flush()

  actual fun timeout(): Timeout

  actual fun close()
}
这两个接口方法比较少,基本一个读一个写一个超时,没了。。
当然在实际使用中基本不需要你去实现这两个接口,我们可以通过Okio.source()和Okio.sink()来获取对应的输入流和输出流对象,其中Okio.source()可以接收File、InputStream以及Socket等作为输入源:
Okio.source(File file);
Okio.source(InputStream in);
Okio.source(Socket socket);
Okio.source(Path path, OpenOption... options);
类似的,Okio.sink()也接受这几种对象源生成对应输出流对象
Okio.sink(File file);
Okio.appendingSink(File file);//内容可追加
Okio.sink(OutputStream out);
Okio.sink(Socket socket);
Okio.sink(Path path, OpenOption... options);
看一下Okio.source()内部实现
fun File.source(): Source = inputStream().source()
fun InputStream.source(): Source = InputStreamSource(this, Timeout())
fun Socket.source(): Source {

  val timeout = SocketAsyncTimeout(this)
  val source = InputStreamSource(getInputStream(), timeout)
  return timeout.source(source)
}
可以看到Okio.source()内部生成的是一个InputStreamSource对象,这个是啥呢?
private class InputStreamSource(
  private val input: InputStream,
  private val timeout: Timeout
) : Source {


  override fun read(sink: Buffer, byteCount: Long): Long {

    if (byteCount == 0L) return 0
    require(byteCount >= 0) {
    "byteCount < 0: $byteCount" }
    try {

      timeout.throwIfReached()
      val tail = sink.writableSegment(1)
      val maxToCopy = minOf(byteCount, Segment.SIZE - tail.limit).toInt()
      //从输入流读到sink buffer的尾节点segment对象中
      val bytesRead = input.read(tail.data, tail.limit, maxToCopy)
      if (bytesRead == -1) return -1
      tail.limit += bytesRead
      sink.size += bytesRead
      return bytesRead.toLong()
    } catch (e: AssertionError) {

      if (e.isAndroidGetsocknameError) throw IOException(e)
      throw e
    }
  }

  override fun close() = input.close()

  override fun timeout() = timeout

  override fun toString() = "source($input)"
}
其实就是Source接口的一个内部实现类,同时具备输入源的InputStream对象和一个超时对象,然后内部是调用的是java的InputStream的read方法进行读取操作,类似的Okio.sink()内部也会返回一个实现Sink接口的内部实现类OutputStreamSink。
在我们通过Okio.source()和Okio.sink()获取了Souce和Sink对象后,一般不会直接使用,而是会再调用一次Okio.buffer()生成一个实现BufferedSource和BufferedSink接口的对象:
fun Source.buffer(): BufferedSource = RealBufferedSource(this)
fun Sink.buffer(): BufferedSink = RealBufferedSink(this)
内部分别返回的是RealBufferedSource和RealBufferedSink对象,他们分别实现了BufferedSource和BufferedSink接口,而这两个接口则是分别继承了Source和Sink接口的并基础上进行了方法扩展,提供了丰富的读写接口方法,几乎可以对各种基础数据类型进行读写。
为了更好的理解,直接来看一下Source和Sink家族类的UML关系图:
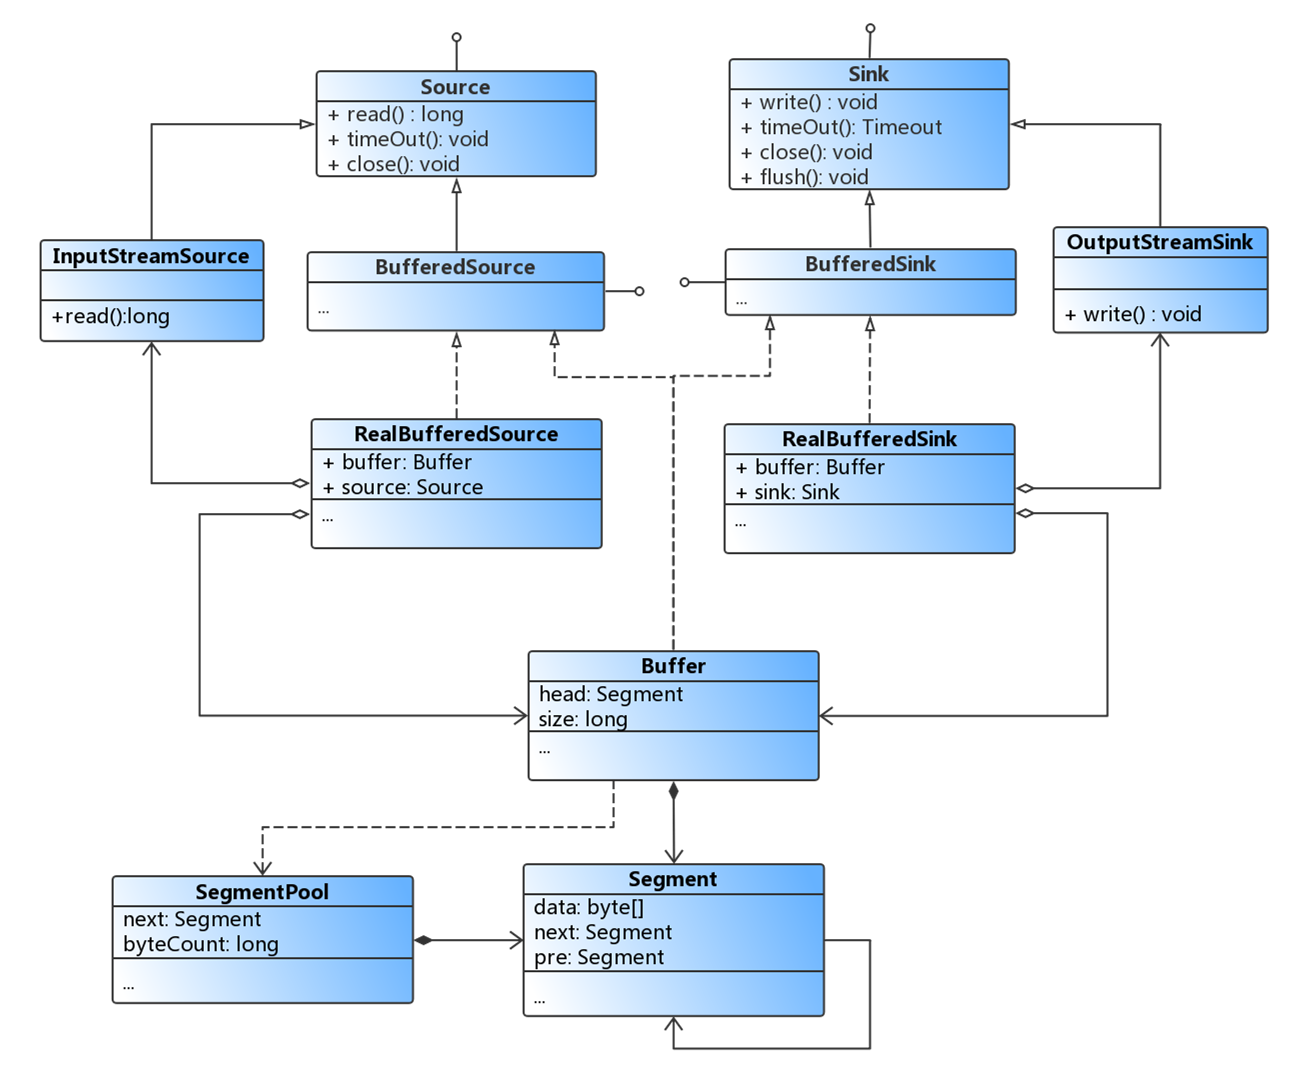
RealBufferedSource和RealBufferedSink其实就是两个装饰者对象,除了分别实现BufferedSource和BufferedSink接口外,内部还分别持有Source和Sink对象,另外这两个Real实现类中都持有了一个Okio的Buffer对象。我们拿到Okio.buffer()返回的BufferedSource和BufferedSink接口就可以进行实际的IO操作了。
而在RealBufferedSource和RealBufferedSink类中实现的read以及write等众多方法,内部则最终都是调用的buffer对象的方法:
  override fun read(sink: ByteArray, offset: Int, byteCount: Int): Int {

    checkOffsetAndCount(sink.size.toLong(), offset.toLong(), byteCount.toLong())

	//如果buffer的数据为空,则先调用被装饰的对象(也就是InputStreamSource)将数据读到buffer当中
    if (buffer.size == 0L) {

      val read = source.read(buffer, Segment.SIZE.toLong())
      if (read == -1L) return -1
    }

    val toRead = minOf(byteCount, buffer.size).toInt()
    return buffer.read(sink, offset, toRead)
  }
  override fun write(source: ByteArray): BufferedSink {

    check(!closed) {
    "closed" }
    buffer.write(source)
    return emitCompleteSegments()
  }
此外,Sink和Source它门还各自有一个支持gzip压缩的实现类GzipSink和GzipSource;一个具有委托功能的抽象类ForwardingSink和ForwardingSource;还有一个实现类便是InflaterSource和DeflaterSink,这两个类主要用于压缩,为GzipSink和GzipSource服务,这里就不详细看了。Sink和Source还有其他的类,如HashingSink, HashingSource, 也是装饰者,这里就不一一列举了,其实Okio的Source和Sink装饰者家族类似于java的InputStream和OutStream家族。
Segment
在前面的RealBufferedSource和RealBufferedSink的读写方法中都是调用buffer对象进行操作的,但其实Buffer类的内部读写对象则最终是Segment对象,因此要想了解Buffer的机制首先要了解一下Segment,Segment是Buffer的核心依赖对象,也是Okio中最底层数据的持有者。
在Buffer中的每一个Segment都是双向循环链表中的一个节点,该节点分别拥有指向前驱节点的Segment对象引用以及指向后驱节点的Segment对象引用。而在Segment池中的Segment则是一个单向链表的节点,Segment池持有对下一个Segment节点对象的引用。如果Segment中的字节数据是在buffer和byte string间共享的,那么该Segment对象是不可以被回收的,也是不能修改其中的数据的,除非是它的持有者。
其实Segment的源码注释都写的很清楚了,直接贴出来看一下好了:
/**
 * A segment of a buffer.
 *
 * <p>Each segment in a buffer is a circularly-linked list node referencing the following and
 * preceding segments in the buffer.
 *
 * <p>Each segment in the pool is a singly-linked list node referencing the rest of segments in the
 * pool.
 *
 * <p>The underlying byte arrays of segments may be shared between buffers and byte strings. When a
 * segment's byte array is shared the segment may not be recycled, nor may its byte data be changed.
 * The lone exception is that the owner segment is allowed to append to the segment, writing data at
 * {@code limit} and beyond. There is a single owning segment for each byte array. Positions,
 * limits, prev, and next references are not shared.
 */
final class Segment {

  /** The size of all segments in bytes. */
  static final int SIZE = 8192;

  /** Segments will be shared when doing so avoids {@code arraycopy()} of this many bytes. */
  static final int SHARE_MINIMUM = 1024;

  final byte[] data;

  /** The next byte of application data byte to read in this segment. */
  int pos;

  /** The first byte of available data ready to be written to. */
  int limit;

  /** True if other segments or byte strings use the same byte array. */
  boolean shared;

  /** True if this segment owns the byte array and can append to it, extending {@code limit}. */
  boolean owner;

  /** Next segment in a linked or circularly-linked list. */
  Segment next;

  /** Previous segment in a circularly-linked list. */
  Segment prev;

  Segment() {

    this.data = new byte[SIZE];
    this.owner = true;
    this.shared = false;
  }

  Segment(Segment shareFrom) {

    this(shareFrom.data, shareFrom.pos, shareFrom.limit);
    shareFrom.shared = true;
  }

  Segment(byte[] data, int pos, int limit) {

    this.data = data;
    this.pos = pos
最低0.47元/天 解锁文章


 1196
1196

 被折叠的 条评论
为什么被折叠?
被折叠的 条评论
为什么被折叠?
 到【灌水乐园】发言


