前言:本文是总结慕课网上的redux课程的redux部分,以做todoList功能为例
1.初始redux,一张图简单介绍redux的运行流程

简单来说就是:react组件通过dispatch方法,将action触发到store里面去,store通过reducers函数处理数据后,返回处理过后的数据,然后新数据反应到页面上,页面视图改变
2.通过todoList来举例具体说明一下用法和api
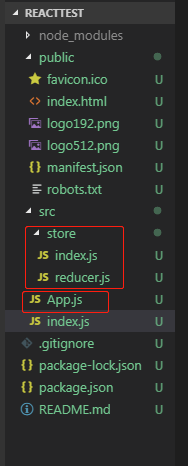
2.1 目录结构:

App.js就是todoList的组件部分代码,store下就是redux相关的文件
2.2 页面效果

实现的功能主要是: 输入框输入值之后点击提交,列表下面就会一行,点击列表的某一行,从列表中删除
2.3 代码实现
App.js 中:
import React, { Component } from "react";
import 'antd/dist/antd.css'
import { Input,Button,List } from 'antd';
import store from './store/index'


class TodoList extends Component {
    constructor(props) {
      super(props);
      this.state = store.getState();
      this.changeInputValue = this.changeInputValue.bind(this);
      this.handleStoreChange = this.handleStoreChange.bind(this);
      this.btnClick = this.btnClick.bind(this);
      store.subscribe(this.handleStoreChange);
    };
    render () {
        return (<div>
                  <div>
                     <Input
                      value = {this.state.inputValue}
                      placeholder="请输入"
                      style={
  {width:'300px',marginRight:'10px'}}
                      onChange={this.changeInputValue}
                      />
                     <Button type="primary" onClick={this.btnClick}>提交</Button>
                     <List
                        style={
  {width:'300px',marginTop:'10px'}}
                        size="small"
                        bordered
                        dataSource={this.state.list}
                        renderItem={(item,index) => <List.Item onClick={this.clickItem.bind(this,index)}>{item}</List.Item>}
                        />
                  </div>
               </div>)
    };
    changeInputValue(e) {
      const action = {
        type:"change_input_value",
        value:e.target.value
      }
      store.dispatch(action);

    };
    handleStoreChange() {
      this.setState(store.getState());
    };
    btnClick() {
      const action = {
        type:'add_todo_item'
      }
      store.dispatch(action);
    };
    clickItem(index) {
       const action = {
         type:'delet_item',
         index
       }
       store.dispatch(action);
    }
}
export default TodoList
onChange={this.changeInputValue}这个方法作用是输入改变后,通过store.dispatch(action);触发定义的actionconst action = { type:"change_input_value", value:e.target.value },action结构是一个对象,里面的type属性是必须的。
store/index.js文件用于创建store,代码如下:
import {
    createStore } from 'redux'
import reducer from './reducer'

let store = createStore(reducer);

export default store;
createStore是redux的一个原生方法,将reducer函数传递进去之后,会自动与reducer关联处理数据,
reducer.js代码如下:
在这里插入代码片const defaultState = {

    inputValue:"",
    list: []
};
//reduce可以接收state,但是不能修改state,所以需要复制原来的state.
export default (state = defaultState, action) => {

    if(action.type === "change_input_value") {

        let newState = JSON.parse(JSON.stringify(state));
        newState.inputValue = action.value;
        return newState;
    }
    if(action.type === 'add_todo_item') {

        let newState = JSON.parse(


 最低0.47元/天 解锁文章


 359
359


 被折叠的 条评论
为什么被折叠?


