


第一章 HTTP相关
1.1 官方文档
1.2 HTTP请求基本过程

- 浏览器向服务器发送HTTP请求(请求报文)
- 后台服务器接收到请求后,处理请求,向浏览器端返回HTTP响应(响应报文)
- 浏览器接收到响应,解析显式响应体或调用回调函数
1.3 HTTP请求报文
请求行
格式:method url
例如:GET/product_detail?id=2 或 POST/login
请求头(一般有多个请求头)
host:www.baidu.com
Cookie:BAIDUID=AD3B0FA706E;BIDUPSID=AD3B0FA706;
Content-Type:application/x-www-form-urlencoded 或者 application/json
请求体
name=lyc&pwd=123
{"name":"lyc","pwd":123}
1.4 HTTP响应报文
响应体
格式: status statusText
例如: 200 OK 或者 404 Not Found
响应头(一般有多个)
Content-Type:text/html;charset=utf-8
Set-Cookie:BD_CK_SAM = 1;path=/
响应体
html/json/js/css/图片...
1.5 常见响应状态码
200 OK 请求成功。一般用于GET与POST请求
201 Created 已创建。成功请求并创建了新资源
304 Not Modified 表示资源未修改过,是从浏览器缓存中直接拿取的
401 Unauthorized 未授权/请求要求用户的身份认证
404 Not Found 服务器无法根据客户端的请求找到资源
500 Internal Server Error 服务器内部错误,无法完成请求
1.6 请求方式与请求参数
1.6.1 请求方式
- GET(索取):从服务器读取数据 ------ 查(R)
- POST(交差): 向服务器添加新数据 ------ 增(C)
- PUT:更新服务器端已存在的数据 ------ 改(U)
- DETELE:删除服务器端数据 ------ 删(D)
1.6.2 请求参数
query参数(查询字符串参数)
- 参数包含在请求地址中,格式为:/xxx?name=lyc&age=20
- 敏感数据不要用query参数,因为参数是地址的一部分,比较危险
- 备注:query参数又称查询字符串参数,编码方式为urlencoded
params参数
- 参数包含在请求地址中,格式如下:
http://localhost:8080/add/lyc/20
- 敏感数据不要用params参数,因为参数是地址的一部分,比较危险
1.6.3 请求体参数
参数包含在请求体中,可通过浏览器开发者工具查看
常用的两种格式
- 格式一: urlencoded格式
例如:name=lyc&age=20
对应请求头:Content-Type:application/x-www-form-urlencoded
- 格式二: json格式
例如:{"name":"lyc","age":20}
对应请求头:Content-Type:application/json
注意:
- GET请求不能携带请求体参数,因为GET请求没有请求体
- 理论上一次请求可以随意使用上诉3种类型参数中的任何一种,甚至一次请求的3个参数可以用3种形式携带,但是一般不这样做(脑子。。。)
- 一般来说我们有一些"约定俗成"的规矩
例如form表单发送post请求时:自动使用请求体参数,用urlencoded编码
- 开发中请求到底发给谁?用什么请求方式?携带什么参数? ------- 参考项目API接口文档
第二章 API相关
2.1 API分类
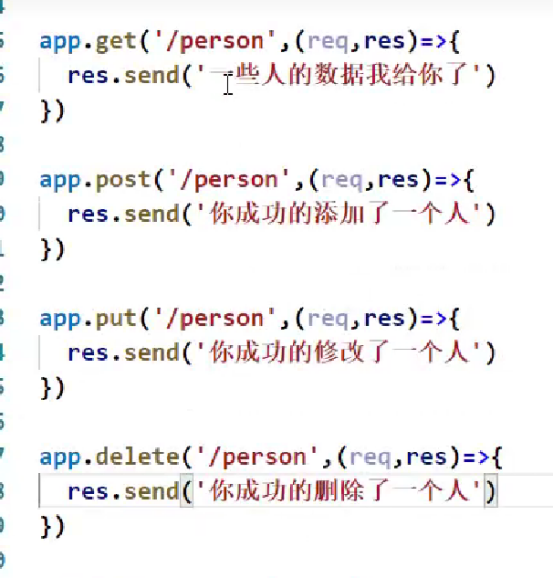
2.1.1 REST API(restful风格的API)
- 发送请求进行CRUD哪个操作由请求方式决定
- 同一个请求路径可以进行多个操作
- 请求方式会用到GET/POST/PUT/DELETE
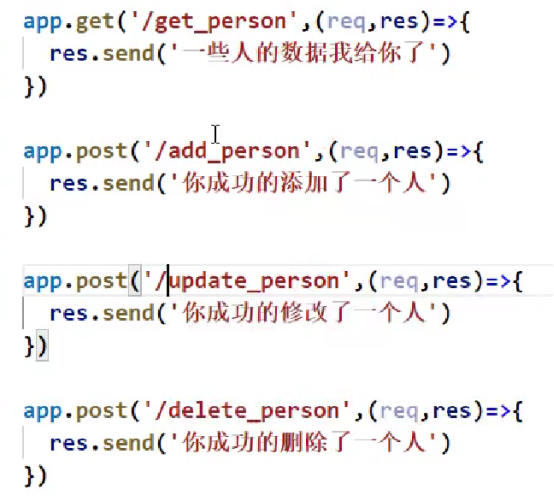
2.1.2 非REST API(restless风格的API)
- 请求方式不决定请求的CRUD操作
- 一个请求路径只对应一个操作
- 一般只有GET/POST
2.2 使用json-server搭建REST API
2.2.1 json-server是什么?
用于快速搭建REST API的工具包
2.2.2 使用json-serve
- 在线文档https://github.com/typicode/json-server
- 下载:npm i -g json-server
- 目标目录下启动服务器执行命令: json-server db.json
json文件名随意,可以直接打开创建的文件,修改里面的数据,直接使用
2.2.3 使用浏览器访问测试
启动服务器后,可以复制生成的地址,测试一下接口,或者下面postman更高级。。
2.2.4 使用postman测试接口
下载地址:Download Postman | Get Started for Free
2.2.5 一般http请求与ajax请求
- ajax请求是一种特别的http请求
- 对服务器端来说,没有任何区别,区别在于浏览器端
- 浏览器端发请求:只有XHR或fetch发出的才是ajax请求,其他所有的都是非ajax请求
- 浏览器端接收到响应:
一般请求:浏览器一般会直接显示响应体数据,也就是我们常说的自动刷新/跳转页面
ajax请求:浏览器不会对界面进行任何更新操作,只是调用监视的回调函数并传入响应相关数据
第三章 Axios的理解和使用
3.1 axios是什么?
基于promise可以用于浏览器和node.js的网络请求库,在服务端它使用原生 node.js http 模块, 而在客户端 (浏览端) 则使用 XMLHttpRequests。
- 前端最流行的ajax请求库
- vue/react官方都推荐使用axios发ajax请求
- 官网Axios
3.2 axios特点
- 基于promise的异步ajax请求库
- 拦截请求和响应
- 取消请求
- 转换请求和响应数据
- 自动转换JSON数据
- 客户端支持防御XSRF
- 批量发送多个请求
3.3 使用axios发请求
- axios调用的返回值是Promise实例
- 成功的值叫response,失败的值叫error
- axios成功的值是一个axios封装的response对象,服务器返回的真正的数据在response.data中
- 携带query参数时,编写的配置项叫做params(因为params英文意思有参数的意思),params参数直接写在请求路径上
- 如果需要携带params参数,需要自己拼接到url上
开始发请求,可以先自己使用json-server开启一个服务器
3.3.1 发送GET请求
//不传参get,获取全部学生
<button id="btn1">获取学生信息</button>

const btn1 = document.getElementById('btn1')

btn1.onclick = function(){
    //完整写法
    axios({
        url: 'http://localhost:3000/xuesheng',    //请求地址
        method: 'GET'                             //请求方式
    }).then(
        response => { console.log('请求成功',response.data); },
        error => { console.log('请求失败',error); }
    )

    //别名写法
    axios.get('http://localhost:3000/xuesheng').then(
        response => { console.log('请求成功',response.data); },
        error => { console.log('请求失败',error); }
    )
}


//代码还可以更简,在这主要是演示一下两种写法
//这里举个例子
btn1.onclick = async () => {
    const result = await axios.get('http://localhost:3000/xuesheng')
        console.log(result.data);
}
//传idGET,获取某一个
<button id="btn2">获取某个学生信息</button>
<input type="text" id="person_id" placeholder="请输入一个人的id">
const btn2 = document.getElementById('btn2')
const personId = document.getElementById('person_id')
btn2.onclick = function(){
//完整写法
axios({
url: 'http://localhost:3000/xuesheng',
method: 'GET',
//此处写的是params,但是携带的是query参数,因为params英文意思有参数的意思
//get带参数都是在后面,如果不是拼在路径后,而是写成一个对象的,还必须加上params:{},
//在params对象里写参数
params: { id: personId.value }
}).then(
response => { console.log('成功', response.data); },
error => { console.log('失败', error); }
)
//别名
axios.get(`http://localhost:3000/xuesheng?id=${personId.value}`
//axios.get('http://localhost:3000/xuesheng',{
//params:{id:personId.value}
//})
).then(
response => { console.log('成功', response.data); },
error => { console.log('失败', error); }
)
}3.3.2 发送POST请求
const btn3 = document.getElementById('btn3')
const personName = document.getElementById('person_name')
const personAge = document.getElementById('person_age')

btn3.onclick = function(){
    //完整版
    axios({
        url: 'http://localhost:3000/xuesheng',
        method: 'POST',
        //携带请求体参数(json编码)
        //data: { name:personName.value, age:personAge.value }
        //携带请求体参数(urlencoded编码)
        data: `name=${personName.value}&age=${personAge.value}`
        }).then(
            response => { console.log('成功', response.data); },
            error => { console.log('失败', error); }
        // )

        //精简版
        axios.post('http://localhost:3000/xuesheng',
            //{ name: personName.value, age: personAge.value }).then(
            `name=${personName.value}&age=${personAge.value}`).then(
                response => { console.log('成功', response.data); },
                error => { console.log('失败', error); }
            )
}
3.3.3 发送PUT请求
<body>
    <button id="btn4">更新一个人</button>
    <input type="text" id="person_update_id" placeholder="请输入一个人的id">
    <input type="text" id="person_update_name" placeholder="请输入名字">
    <input type="text" id="person_update_age" placeholder="请输入年龄"><br>
</body>

<script>
    const btn4 = document.getElementById('btn4')
    const personUpdateId = document.getElementById('person_update_id')
    const personUpdateName = document.getElementById('person_update_name')
    const personUpdateAge = document.getElementById('person_update_age')

    btn4.onclick = function () {
        //完整写法
        axios({
            url: 'http://localhost:3000/xuesheng',
            method: 'PUT',
            data: {
                id: personUpdateId.value,
                name: personUpdateName.value,
                age: personUpdateAge.value
            }
        }).then(
            response => { console.log('成功', response.data); },
            error => { console.log('失败', error); }
        )

        //别名
        axios.put('http://localhost:3000/xuesheng', {
            id: personUpdateId.value,
            name: personUpdateName.value,
            age: personUpdateAge.value
        }).then(
            response => { console.log('成功', response.data); },
            error => { console.log('失败', error); }
        )
    }
</script>
3.3.4 发送DETELE请求
<body>
    <button id="btn5">删除一个人</button>
    <input type="text" id="person_detele_id" placeholder="请输入删除的id">
</body>

<script>
    const btn5 = document.getElementById('btn5')
    const personDeteleId = document.getElementById('person_detele_id')

    //删除一个人---detele---携带params参数
    btn5.onclick = function(){
        axios({
            url: `http://localhost:3000/xuesheng?${personDeteleId.value}`,
            method: 'DETELE',
        }).then(
            response => { console.log('成功', response); },
            error => { console.log('失败', error); }
        )
    }
</script>
3.4 axios常用配置项
需要更详细,可以去官网
<button id="btn">点我获取</button>

const btn = document.getElementById('btn')

//常用配置项
btn.onclick = function () {
    axios({
        url: 'http://localhost:3000/xuesheng',
        method: 'GET',
        //params:{id:1},    //配置query参数
        //data: { a: 1, b: 2 },//配置请求体参数(json编码)
        //data: 'a=1&b=2',//配置请求体参数(urlencoded编码)
        //timeout: 2000,//配置超时时间
        //responseType: 'json',//配置响应数据的格式(默认值)
    }).then(
        response => { console.log('成功', response.data); },
        error => { console.log('失败', error); }
    )
}
3.5 axios全局配置项
指定默认配置,它将作用于每个请求。
//按需求添加
axios.defaults.baseURL = 'https://api.example.com';
axios.defaults.timeout = 2000
3.6 axios.create方法
根据指定配置创建一个新的axios,也就是每个新axios都有自己的配置
- 新axios只是没有取消请求和批量发请求的方法,其他语法都是一致的
- 为什么要设计这个语法?项目中有部分接口需要的配置与另一部分接口需要的配置不太一样
const axios2 = axios.create({
  baseURL: 'https://api.example.com',
  timeout:2000
});

//创建完这个新的axios2,就可以用这个新的去发请求,每次请求都会带上上面的默认配置,
//解决上面的需求
3.7 axios请求拦截器和响应拦截器
在请求或响应被 then 或 catch 处理前拦截它们
移除拦截器
const myInterceptor = axios.interceptors.request.use(function () {/*...*/});
axios.interceptors.request.eject(myInterceptor);
3.7.1 请求拦截器
在真正发请求前执行的一个回调函数
对所有的请求做统一处理:追加请求头、追加参数、界面loading提示等
//语法
axios.interceptors.request.use(function (config) {
    // 在发送请求之前做些什么
    return config;
}
3.7.2 响应拦截器
得到响应之后执行的一个回调函数
//语法
axios.interceptors.response.use(
    function (response) {
        // 2xx 范围内的状态码都会触发该函数。
        // 对响应数据做点什么
        return response;
    },
    function (error) {
        // 超出 2xx 范围的状态码都会触发该函数。
        // 对响应错误做点什么
        return Promise.reject(error);
    }
);
axios认为返回的不是2开头的状态码都是失败的
不管请求成功还是请求失败都会先走响应拦截器的回调,然后根据响应拦截器的返回值,去调用请求时指定的回调,不过我们都会在响应拦截器失败的回调中,统一处理错误,返回pending状态的Promise,中断Promise链,一旦请求失败,我们中断了Promise链,就意味着我们在发请求时指定的回调是不会执行的
<button id="btn">获取</button>

const btn = document.getElementById('btn')

axios.interceptors.response.use(
    //根据请求成功或失败先走响应拦截器的相应回调
    function (response) {
        if(Date.now() % 2 === 0){
            return response.data
        }else{
            return '时间戳不是偶数,不能给你数据'
        }
    },
    function (error) {
            console.log('失败的回调执行了', error);
            //这里中断了Promise链,也就是当请求是失败的,就不会走下面的回调了
            return new Promise(() => { })
        }
    )

//btn.addEventListener('click', function () {
    //axios.get('http://localhost:3000/xuesheng').then(
        //不走
        //response => { console.log(response); },
        //error => { console.log('error'); }
    //)
//})

//所以就可以直接使用await,请求失败的响应拦截器会统一处理
btn.addEventListener('click', async function () {
    const result = await axios.get('http://localhost:3000/xuesheng')
    console.log(result);
})
3.8 取消请求
从 v0.22.0 开始,Axios 支持以 fetch API 方式—— AbortController 取消请求,CancelToken此 API 从 v0.22.0 开始已被弃用。
这个fetchAPI挺好看的,它会自动识别,失败原因是取消请求,还是请求失败,并在error.message中指出(canceled就是取消了的意思)
//这个是官方的,可以对比一下下面怎么使用
const controller = new AbortController();

axios.get('/foo/bar', {
   signal: controller.signal
}).then(function(response) {
   //...
});
// 取消请求
controller.abort()


<body>
    <button id="btn">发请求</button>
    <button id="btn1">取消请求</button>
</body>
<script>
    const btn = document.getElementById('btn')
    const btn1 = document.getElementById('btn1')
    const controller = new AbortController();
    btn.addEventListener('click', function () {
        axios({
            url: 'http://localhost:3000/xuesheng',
            signal: controller.signal
        }).then(
            response => { console.log('成功', response.data); },
            error => { console.log('失败', error.message); }
        )
    })
    btn1.addEventListener('click', function () {
        controller.abort()
    })
</script>
3.9 Axios批量发请求
//这个是同时发多个
<button id="btn">同时发多次请求</button>

const btn = document.getElementById('btn')

//加一个响应拦截器处理一下数据
axios.interceptors.response.use(
    response => {
        return response.data
    },
    error => {
        return Promise.reject(error.message)
    }
)

btn.addEventListener('click', () => {
    axios.all([
        axios.get('http://localhost:3000/xuesheng'),
        axios.get('http://localhost:3000/xueli'),
        axios.get('http://localhost:3000/profile')
    ]).then(
        response => { console.log(response); },
        error => { console.log(error); }
    )
})


//这个是上一次请求成功,再发下一个,连着发
<button id="btn">批量发请求</button>

const btn = document.getElementById('btn')

btn.addEventListener('click', async () => {
    const result1 = await axios.get('http://localhost:3000/xuesheng')
    console.log(result1);
    const result2 = await axios.get('http://localhost:3000/xueli')
    console.log(result2);
    const result3 = await axios.get('http://localhost:3000/profile')
    console.log(result3);
})


 95
95


 被折叠的 条评论
为什么被折叠?
被折叠的 条评论
为什么被折叠?
 到【灌水乐园】发言


