


1、grep
帮助:grep --help
用法:grep [OPTION]...patterns[FILE]...
示例:grep -i 'hello world' menu.h main.c // 在每个 FILE 中搜索 patterns。
当 FILE 为 '-' 时,读取标准输入。 没有 FILE,读 '.'
参数说明:
patterns 说明:
-E, --extended-regexp patterns 是扩展的正则表达式
-F, --fixed-strings patterns 是字符串
-G, --basic-regexp patterns 是基本的正则表达式
-P, --perl-regexp patterns 是 Perl 正则表达式
-e, --regexp=patterns 使用 patterns 进行匹配
-f, --file=FILE 从 FILE 中获取 patterns
-i, --ignore-case 忽略模式和数据中的大小写区别
--no-ignore-case 不忽略大小写区别(默认)
-w, --word-regexp 只匹配整个单词
-x, --line-regexp 只匹配整行
-z, --null-data 数据行以 0 字节结尾,而不是换行符杂项:
-s, --no-messages 不显示 不存在或无匹配文本的错误信息。
-v, --invert-match 反向选择。就是选择不匹配的
-V, --version 版本
--help 帮助输出控制:
-m,--max-count=NUM 打印多少行
-b, --byte-offset 打印字节偏移量
-n, --line-number 打印行号。
--line-buffered 每行刷新输出
-H, --with-filename 每行打印文件名
-h, --no-filename 查询多文件时,不显示文件名。
--label=LABEL 使用 LABEL 作为标准输入文件名前缀
-o, --only-matching 只显示匹配的行的非空部分
-q, --quiet, --silent 静默模式,抑制所有正常输出
--binary-files=TYPE 文件格式,TYPE 可以为 'binary', 'text', 'without-match'
-a, --text 等价于 --binary-files=text。将 binary 文件以 text 文件的方式搜寻数据
-I 等价于 --binary-files=without-match
-d, --directories=ACTION 如何处理 "目录"。ACTION 可以为 'read', 'recurse', 'skip'
-D, --devices=ACTION 如何处理 "设备、FIFO、套接字"。ACTION 可以为 'read', 'recurse', 'skip'
-r, --recursive 递归。等价于 --directories=recurse
-R, --dereference-recursive 递归,但是 跟随 所有符号链接
--include=GLOB 仅搜索与 GLOB 匹配的文件(文件模式)
--exclude=GLOB 跳过匹配 GLOB 的文件
--exclude-from=FILE 跳过与 FILE 中任何文件模式匹配的文件
--exclude-dir=GLOB 跳过匹配 GLOB 的目录
-L, --files-without-match
-l, --files-with-matches 查询多文件时,只输出包含匹配字符的文件名。
-c, --count 打印匹配的行数
-T, --initial-tab 使标签对齐(如果需要)
-Z, --null 在文件名后打印 0 字节上下文控制:
-B, --before-context=NUM 打印前导上下文的 NUM 行
-A, --after-context=NUM 打印 NUM 行尾随上下文
-C, --context=NUM 打印 NUM 行输出上下文
-NUM 与 --context=NUM 相同
--group-separator=SEP 在上下文匹配之间打印 SEP
--no-group-separator 不打印与上下文匹配的分隔符
--color[=WHEN] 高亮显示。WHEN 可以为 'always', 'never', or 'auto'
--color=auto 将找到的关键词部分加上颜色显示。
-U, --binary 在 EOL (MSDOS/Windows) 时不去除 CR 字符
常用参数
-a 将 binary 文件以 text 文件的方式搜寻数据
-c 只输出匹配行的计数。计算找到 '搜寻字符串' 的次数
-h 查询多文件时不显示文件名。
-i 不区分大小写(只适用于单字符)。所以大小写视为相同
-l 查询多文件时只输出包含匹配字符的文件名。
-n 显示匹配行及行号。
-s 不显示不存在或无匹配文本的错误信息。
-v 反向选择。选择不匹配的所有行。
--color=auto :将找到的关键词部分加上颜色显示
grep 可以使用 --color=auto 来将关键字部分使用颜色显示。 如果每次使用 grep 都得要自行加上 --color=auto 又显的很麻烦,可以在 ~/.bashrc 加上这行:alias grep='grep --color=auto'
再执行 source ~/.bashrc 立即生效,这样每次运行 grep 都会自动帮你加上颜色显示
示例:grep 基本使用 ( 不带正则 )
将/etc/passwd,有出现 root 的行取出来
命令:grep root /etc/passwd将/etc/passwd,有出现 root 的行取出来,同时显示这些行在/etc/passwd的行号
命令:grep -n root /etc/passwd将/etc/passwd,将没有出现 root 的行取出来
命令:grep -v root /etc/passwd将/etc/passwd,将没有出现 root 和nologin的行取出来
命令:grep -v root /etc/passwd | grep -v nologin使用dmesg列出核心信息,再用 grep 找出含eth的行,再将关键字高亮,再加上行号:
命令:dmesg | grep -n --color=auto 'eth'使用 dmesg 列出核心信息,再用 grep 找出含eth的行
再在关键字所在行的前两行与后三行也一起输出显示
命令:dmesg | grep -n -A3 -B2 --color=auto 'eth'根据文件内容递归查找目录。(这几个命令很使用,是查找文件的利器。)
命令:grep 'energywise' * # 在当前目录搜索带'energywise'行的文件
命令:grep -r 'energywise' * # 在当前目录及其子目录下搜索'energywise'行的文件
命令:grep -l -r 'energywise' * #在当前目录及其子目录下搜索,但是不显示匹配的行,只显示匹配的文件
示例:grep 与 正则
^ 符号,在字符类符号(括号[])之内与之外是不同的:
- 在 [] 内代表 "反向选择"
- 在 [] 之外则代表 "定位在行首"
. (小数点):代表『一定有一个任意字节』的意思;
* (星号):代表『重复前一个字符, 0 到无穷多次』的意思,为组合形态
在 shell 中 { 与 } 符号有特殊意义,因此要使用字符 \ 让他失去特殊意义才行在正则中使用
grep -n 't[ae]st' regular_express.txt
grep -n '[0-9]' regular_express.txt
grep -n '[^g]aaa' regular_express.txt
grep -n '[^a-z]123' regular_express.txtgrep -n '^the' regular_express.txt
grep -n '^[^a-zA-Z]' regular_express.txt
grep -n '\.$' regular_express.txt .在正则中表示任意字符,反斜杠转义后只表示点号
grep -n '^$' regular_express.txt 匹配空行
grep -n 'google' regular_express.txt
grep -n 'g..d' regular_express.txt
grep -n 'goo*g' regular_express.txt
grep -n 'g.*g' regular_express.txt
grep -n 'o\{2\}' regular_express.txt
grep -n 'go\{2,5\}g' regular_express.txt
grep -n 'go\{2,\}g' regular_express.txt
2、grep -E 和 egrep
对于标准 grep,如果在扩展元字符前面加 \ ,grep 会自动启用扩展选项 -E
使用 扩展 grep 的主要好处:增加了额外的正则表达式元字符集。
或 操作
grep -E '123|abc' filename // 找出文件(filename)中包含123 或者 包含abc的行
egrep '123|abc' filename // 用 egrep 同样可以实现
awk '/123|abc/' filename // awk 的实现方式
与 操作
grep pattern1 files | grep pattern2 //显示既匹配 pattern1 又匹配 pattern2 的行。
示例:
# 满足任意条件(word1、word2 和 word3 之一 )将匹配。
grep -E "word1|word2|word3" file.txt必须同时满足三个条件(word1、word2 和 word3 )才匹配。
grep word1 file.txt | grep word2 |grep word3grep -i pattern files //不区分大小写地搜索。默认情况区分大小写,
grep -l pattern files //只列出匹配的文件名,
grep -L pattern files //列出不匹配的文件名,
grep -w pattern files //只匹配整个单词而不是字符串一部分(如匹配magic,而不是magical)
grep -C number pattern files //匹配的上下文分别显示[number]行
egrep
打印所有包含 NW 或 EA 的行。如果不是使用 egrep,而是grep,将不会有结果查出。
# egrep 'NW|EA' testfile
# grep 'NW\|EA' testfile搜索所有包含0个或1个小数点字符的行。
# egrep '2\.?[0-9]' testfile
# grep -E '2\.?[0-9]' testfile
# grep '2\.\?[0-9]' testfile搜索一个或者多个连续的no的行。
# egrep '(no)+' testfile
# grep -E '(no)+' testfile
# grep '\(no\)\+' testfile # 3个命令返回相同结果
3、ngrep
分析 网络数据包 可以使用 Wireshark,Wireshark 还有一个命令行版本 Tshark。如果只是针对简单的任务,Wireshark 就太重量级了。一般情况使用 ngrep 或者 tcpdump 来处理。Ngrep可以让你像类似 grep 处理文件的方式来处理网络封包。
grep 和 ngrep 区别:
- grep 是在文本中搜索字符串的工具。
- ngrep 是 在 数据包 中搜索。所以 ngrep 是一个网络抓包工具,可以用来侦听各端口的数据流入和流出。和 tcpdump 功能类似。可以查看 man 手册是如何介绍 ngrep 的。
参考:http://lnmp.ailinux.net/ngrep
github:https://github.com/jpr5/ngrep/
ngrep 命令是 grep 命令的网络版,ngrep 力求更多的 grep 特征,用于搜寻指定的数据包。支持大量的操作系统和网络协议。能识别TCP、UDP和ICMP包,理解 bpf 的过滤机制。
ngrep 参数
root@kali:~# man ngrep
用法: ngrep <-hNXViwqpevxlDtTRM> <-IO pcap_dump> <-n num> <-d dev> <-A num>
<-s snaplen> <-S limitlen> <-W normal|byline|single|none> <-c cols>
<-P char> <-F file> <match expression> <bpf filter>
-h 帮助
-V 版本信息
-q 静默模式,如果没有此开关,未匹配的数据包都以 # 显示
-e 显示空数据包
-i 忽略大小写
-v 反向选择。 ngrep -v '' port 23 // 显示除telnet的数据包
-R is don't do privilege revocation logic
-x 以16进制格式显示
-X 以16进制格式匹配
-w 整字匹配(is word-regex)
-p 不使用混杂模式
-l is make stdout line buffered
-D is replay pcap_dumps with their recorded time intervals
-t is print timestamp every time a packet is matched
-T is print delta timestamp every time a packet is matched
-M 仅进行单行匹配
-I pcap_dump 从捕获的数据包文件pcap_dump中读取数据进行匹配
-O pcap_dump 将匹配的数据保存到pcap格式的文件pcap_dump中
-n num 仅捕获指定数目的数据包,然后退出。
-A num 匹配到数据包后,Dump指定数目的数据包
-s snaplen 设置 bpf caplen(default 65536)
-S limitlen 在匹配的包上设置 上限长度
-W normal | byline | single | none 设置 dump 格式。
byline是解析包中的换行符 (normal, byline, single, none) 。
加个-W byline参数后,将解析包中的换行符
-c cols 强制显示列的宽度
-P char 将不可打印的显示字符设置为指定的字符
-F file 从文件中读取 bpf filter
-N 显示由IANA定义的子协议号
-d dev ngrep 会选择一个默认的网络接口进行监听,
使用 -d 选项可以指定接口进行监听。 -d any 捕获所有的包
-K num 杀死匹配的 TCP 连接(类似 tcpkill)。数值参数控制发送了多少个RST段。
简单使用
首先我们可以模拟一个请求。打开两个终端:
- 终端 1 模拟一个请求,执行:curl -s "www.baidu.com"
- 终端 2 监听指定本地网络接口的数据包,执行:ngrep -d ens33
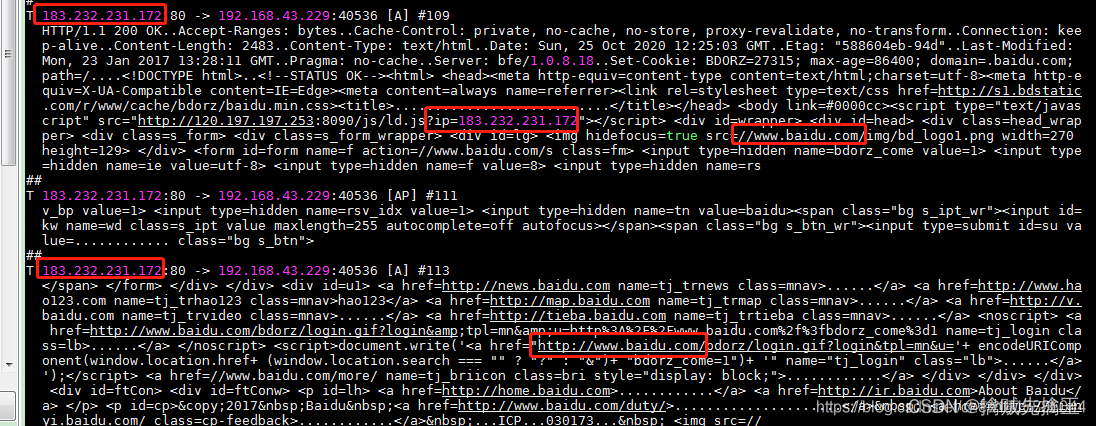
可以看到抓到了 www.baidu.com 数据流,但是内容没有完整显示出来。ip 表示 :183.232.231.172是百度的 ip。端口为80
支持换行符
内容要完整显示,其示就是把换行符展示出来。
- 终端 1 执行:curl -s "www.baidu.com"
- 终端 2 执行:ngrep -W byline -d ens33 port 80 // 监听网页的 request 和 response,注意需要以管理员身份运行.必须是root用户。
-W byline 是指遇到换行符时换行显示,否则数据是连续的不可读。
-d ens33 是指侦听 ens33 网卡。port 80 是指侦听 80 端口。
抓包结果:

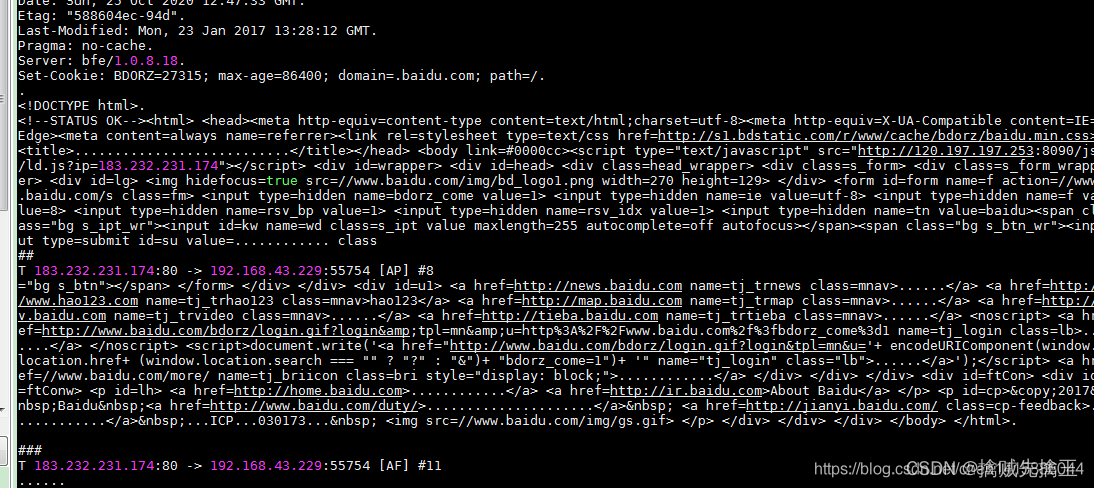
// 抓本机eth0 与192.168.32.229的通信信息,并且以行来打印出来
ngrep -d ens33 -W byline host 192.168.32.229
// 抓ssh包,要使用 grep 命令在 Linux 中查找指定服务的默认端口号,只需运行
grep ssh /etc/services // SSH 服务的默认端口号是 22。
ngrep -W byline -d ens33 port 22
// -q 参数 减少不必要的输出
// -d 使用哪个网卡,可以用-L选项查询,
ngrep -Wbyline -d ens33 -q baidu port 80
ngrep -Wbyline -d ens33 'GET /' port 80
// 以 十六进制显示
ngrep -x -d ens33 -q baidu port 80
伯克利包过滤(Berkeley Packet Filter,BPF)语言
libpcap 支持一种功能非常强大的过滤语言——“伯克利包过滤”语法。使用BPF过滤规则,你可以确定该获取和检查哪些流量,忽略哪些流量。BPF让你能够通过比较第2、3、4层协议中各个数据字段值的方法对流量进行过滤。BPF中内置了一些“基元”来指代一些常用的协议字段。可以用“host”、"prot"之类的基元写出非常简洁的BPF过滤规则,也可以检测位于指定偏移量上的字段(甚至可以是一个位)的值。BPF过滤器也可以由详尽的条件链和嵌套的逻辑“与”、“或”操作组成。
BPF基元
现在,构造一个BPF过滤器的最简单的办法就是使用BPF“基元”来指定协议、协议元素或者其他抓包规则。基元通常是由一个id(名称或序号)再加上一个或多个限定符组成的。
- type 限定符:规定了id名或id序号指的是哪种类型的数据,可能的type有host、net、prot和protrange
- dir 限定符:规定了流量是从id流进还是流出的(或两种兼有)。可能的dir有src、dst、ser or dst、src and dst、addr1、addr2、addr3和addr4
- Proto 限定符:规定了所匹配的协议。可能的 proto 有:ether、fddi、tr、wlan、ip、ip6、arp、rarp、decnet、tcp和udp
最常用的BPF基元要数“host id”,它是用来过滤与某台主机相关的流量的,其中id一栏中应该填上一个地址或主机名。输入“tcp and host 10.10.10.10”这样的过滤规则,将值获取流入/流出得做10.10.10.10的TCP流量,其他的所有帧都会被过滤掉。
举例说明:假设我们现在希望仅仅获取IP地址为192.168.0.1的计算机与除IP地址10.1.1.1之外的其他所有计算机在138、139和445端口上发送的所有通信,下面这个BPF过滤规则就能完成上述任务:'host 192.168.0.1 and not host 10.1.1.1 and (port 138 or port 139 or port 445)'
常用的 BPF 基元有
- host id , dst host id , src host id
- net id , dst net id , src net id
- ether host id , ether dst host id , ether src host id
- port id , dst port id , src port id
- gateway id , ip proto id , ether proto id
- tcp, udp, icmp, arp
- vlan id
根据字节的值过滤数据包
BPF语言也可以用来检查帧内任意一个单字节字段(或多字节字段)的值是不是规定值。下面是一些例子:
ip[8]<64
这个过滤规则规定要抓取的是:所有自ip头偏移8个字节的那个单字节字段的值小于64的IP包。被检查的这个字段表示的是“包的存活时间”或称“TTL”。大多数Windows系统中TTL的默认值是128,所以这个过滤规则将丢弃局域网中所有来自Windows系统的流量,只获取所有来自Linux系统的流量(因为在LInux系统中TTL的默认起始值是64)
ip[9]!=1
这一过滤规则规定要抓取的是所有IP头部偏移9个字节的那个单字节字段的值不等于“1”的帧。因为IP头部偏移9个字节的这个字段表示的是嵌入协议,如果等于“1”则表示“ICMP”协议,所以这个过滤规则将抓取除ICMP包之外的所有流量。这一表达式也等价于基元“not icmp”。
icmp[0] = 3 and icmp[1] = 0
这个语句规定要抓取的是:所有ICMP头部偏移0个字节的那个单字节字段等于3,且偏移1个字段的单字节字段等于0的ICMP数据包。换而言之,这一过滤规则将只抓取ICMPtype为3,code为0的“网络不可达”消息。
tcp[0:2] = 31337
这个语句检查了一个多字节字段,它检查的是:TCP头部偏移0个字节起的一个多字节字段(2个字节),该字段表示的是TCP源端口。所以这个表达式就等价于BPF基元“src prot 31337”
ip[12:4] = 0xC0A80101
我们看到的这是一个4字节的比较,它检查的是IP头部偏移12个字节起的4个字节里存放的数据——源IP地址。注意这个表达式里使用了十六进制表示法。转换成十进制数字,它就是192.168.1.1(0xC0=192,0xA8=168,0x01=1)。所以这一过滤规则将捕获所有源IP地址为192.168.1.1的流量。
根据位(bit)的值过滤数据包
BPF语言还提供了一种方法让我们能检查更小的字段或精度更高的偏移量。具体做法是:我们先引用相关的字节,或多个字节,然后再用“位掩码”逐位地把我们需要检查的位分离出来。
假设要过滤所有IP头部中可选字段被启用的包(就是IP头的长度大于20个字节的包)。IP头部的低半个字节表示的是IP头的长度,以“word”(字)为单位(一个word等于4个字节)。我们只需要找出这半个字节的值大于5(5word*4个字节/word=20个字节)的包就等于找出所有IP头部大于20个字节的包了。具体做法是用位掩码“00001111”(或者0x0F)创建一个BPF过滤规则,通过逻辑“与”运算提取目标值。
ip[0] & 0x0F > 0x05
与之类似,如果我们要找出所有“不分片”标志位(位于IP头部偏移6个字节位置上的一位二进制位)被置1的IP包,我们亦可用二进制位掩码“01000000”(0x40)来表示我们只关心IP头部偏移6个字节位置上那个第二最高位的bit值是是不是1。
在构造位掩码是,如果对应的那一位是我们需要检查的,那就用1表示,否则就用0表示。
ip[6] & 0x40 != 0
dst host host // True if the IP destination field of the packet is host, which may be either an address or a name.
src host host // True if the IP source field of the packet is host.
host host
True if either the IP source or destination of the packet is host. Any of the above host expressions can be prepended with the
keywords, ip, arp, or rarp as in:ip host host
相当于:ether dst ehost
True if the ethernet destination address is ehost. Ehost may be either a name from /etc/ethers or a number (see ethers(3N) for
numeric format).ether src ehost
True if the ethernet source address is ehost.ether host ehost
True if either the ethernet source or destination address is ehost.gateway host
True if the packet used host as a gateway. I.e., the ethernet source or destination address was host but neither the IP source
nor the IP destination was host. Host must be a name and must be found in both /etc/hosts and /etc/ethers. (An equivalent
expression is ether host ehost and not host host which can be used with either names or numbers for host / ehost.)dst net net
True if the IP destination address of the packet has a network number of net. Net may be either a name from /etc/networks or a
network number (see networks(4) for details).src net net // True if the IP source address of the packet has a network number of net.
net net // True if either the IP source or destination address of the packet has a network number of net.
net net mask mask // True if the IP address matches net with the specific netmask. May be qualified with src or dst.
net net/len // True if the IP address matches net a netmask len bits wide. May be qualified with src or dst.
dst port port
True if the packet is ip/tcp or ip/udp and has a destination port value of port. The port can be a number or a name used in
/etc/services (see tcp(4P) and udp(4P)). If a name is used, both the port number and protocol are checked. If a number or
ambiguous name is used, only the port number is checked (e.g., dst port 513 will print both tcp/login traffic and udp/who traf-
fic, and port domain will print both tcp/domain and udp/domain traffic).src port port // True if the packet has a source port value of port.port port
True if either the source or destination port of the packet is port. Any of the above port expressions can be prepended with
the keywords, tcp or udp, as in:tcp src port port // which matches only tcp packets whose source port is port.less length // True if the packet has a length less than or equal to length. This is equivalent to:len <= length.
greater length // True if the packet has a length greater than or equal to length. This is equivalent to:len >= length.
ip proto protocol
True if the packet is an ip packet (see ip(4P)) of protocol type protocol. Protocol can be a number or one of the names tcp,
udp or icmp. Note that the identifiers tcp and udp are also keywords and must be escaped via backslash (\), which is \\ in the
C-shell.ip broadcast
True if the packet is an IP broadcast packet. It checks for both the all-zeroes and all-ones broadcast conventions, and looks
up the local subnet mask.ip multicast // True if the packet is an IP multicast packet.
ip Abbreviation for:ether proto ip
tcp, udp, icmp
Abbreviations for:ip proto p
where p is one of the above protocols.
数据包 过滤 示例:
// 把所有流经Google的流量做一个过滤,只针对80端口且报文中包含 search。
ngrep -q -W byline "search" host www.google.com and port 80// 抓本机eth0 与192.168.1.9的通信信息,并且以行来打印出来
ngrep -d eth0 -W byline host 192.168.1.9// 抓本机与192.168.1.8的通信端口为80(本机)的信息
ngrep -W byline host 192.168.1.8 and port 80// 抓本机与192.168.1.8和192.168.1.9的通信,并且本地端口为80
ngrep -W byline host 192.168.1.8 or host 192.168.1.9 port 80// 抓udp包
ngrep host 192.168.1.8 udp// 统计请求头长度
ngrep -W byline 'GET /' 'tcp and dst port 80' -d eth1 | awk -v RS="#+" -v FS="\n" '{ print length() }'// 查询一下大于 1K 的请求头
ngrep -W byline 'GET /' 'tcp and dst port 80' -d eth1 | awk -v RS="#+" -v FS="\n" 'length() > 1000'
// 捕获字符串.flv,比如要查看在Web Flash 视频中的.flv文件的下载地址:
// 执行完下面命令后,然后打开一个视频页面
ngrep -d3 -N -q \.flvngrep '' udp // 匹配udp包
ngrep '' icmp // 匹配icmp包
ngrep '' port 53 // 显示所有的dns请求
ngrep '../' // 监听远程主机的'../'请求
ngrep -d rl0 port 80 // 服务器端http数据
ngrep -d rl0 'error' port syslog
ngrep -wi -d rl0 'user|pass' port 21 // 关注端口21上的user和pass
ngrep -d eth0 '' // 显示所有的数据包,-d 指定硬件接口。// -W byline 选项 会保留换行符,-q 选项可以抑制某些非匹配数据包而产生的输出。
ngrep -q -W byline "^(GET|POST) .*" // 抓取所有包含有 GET 或 POST 请求数据包
在服务端抓取两客户端(117.136.x.x和202.104.x.x)与服务端(10.35.x.x)之间交互的的数据包来清楚整个交互流程。通信协议既有http也有websocket。
ngrep -q -d eth0 -W byline host 10.135.x.x and \(117.136.x.x or 202.104.x.x\) and port 80 or port 8089 or port 11211 or port 3478
4、kill、pgrep、pidof、awk、pkill、killall
From:https://wenku.baidu.com/view/fb605641b9f3f90f76c61bf1.html
How to Kill a Process in Linux? Commands to Terminate:https://phoenixnap.com/kb/how-to-kill-a-process-in-linux
无论你使用哪种操作系统,一定会遇到某个行为失常的应用,它把自己锁死并拒绝关闭。在Linux(还有Mac),你可以用一个"kill"命令强制终结它。这里展示多种方式使用"kill"命令终结应用。
kill 命令、kill 信号
当执行一个 kill 命令,你实际上发送了一个信号给系统,让它去终结不正常的应用。总共有60个你可以使用的信号,但是基本上只需要知道 SIGTERM(15) 和 SIGKILL(9) 即可。
看到所有信号的列表:kill -l

- SIGTERM :当没有指定信号时 SIGTERM 是默认信号 。此信号请求一个进程停止运行。这个信号是可以被忽略的。进程可以用一段时间来正常关闭,一个程序的正常关闭一般需要一段时间来保存进度并释放资源。换句话说,它不是强制停止。
- SIGKILL : 这个信号是强制进程立刻停止运行。程序不能忽略此信号,而未保存的进度将会丢失。
kill 用法:kill [信号或选项] PID(s)
示例:kill SIGKILL 15572
示例:kill -9 15572 // "-9" 代表着 SIGKILL 信号。
示例:kill -s 9 15572
示例: kill -15572 // 使用默认信号 结束 15572 进程。默认采用信号(signal)号是15
如果进程启动了子进程,只杀死父进程,子进程仍在运行,因此仍消耗资源。为了防止这些所谓的“僵尸进程”,应确保在杀死父进程之前,先杀死其所有的子进程。
kill -9 这个命令强制进程在运行时突然终止,进程在结束后不能自我清理。危害是导致系统资源无法正常释放,一般不推荐使用,除非其他办法都无效。 当使用此命令时,一定要通过 ps -ef 确认没有剩下任何僵尸进程。否则只能通过终止父进程来消除僵尸进程。如果僵尸进程被 init 接管,问题就比较严重了。杀死 init 进程意味着关闭系统。 如果系统中有僵尸进程,并且其父进程是 init,而且僵尸进程占用了大量的系统资源,那么就需要在某个时候重启机器以清除进程表了。
如果不知道应用的 PID,可以执行命令:ps ux 或者 ps -aux 或者 ps -ef 会显示所有正在运行的应用还有应用的 PID。也可以在同一时间 kill 多个进程:kill -9 PID1 PID2 PID3
示例: kill -l PID
-l 选项, 告诉 kill 命令用好像启动进程的用户已注销的方式结束进程。当使用该选项时,kill命令也试图杀死所留下的子进程。但这个命令也不是总能成功--或许仍然需要先手工杀死子进程,然后再杀死父进程。
示例: kill -HUP PID
该命令让Linux和缓的执行进程关闭,然后立即重启。在配置应用程序的时候,这个命令很方便,在对配置文件修改后需要重启进程时就可以执行此命令。
pgrep
命令:http://lnmp.ailinux.net/pgrep
用法:pgrep 进程名
部分参数:
-o:仅显示找到的最小(起始)进程号;
-n:仅显示找到的最大(结束)进程号;
-l:显示进程名称;
-P:指定父进程号;
-g:指定进程组;
-t:指定开启进程的终端;
-u:指定进程的有效用户ID。
pgrep 也支持类似 grep 指令中的匹配模式。
PKill
"pkill" 命令是 “按名字” 杀掉进程。允许使用扩展的正则表达式和其它匹配方式。你现在可以使用应用的进程名 kill 掉它们,而不是使用 PID。
例如,要 kill 掉 Firefox 浏览器,只需要运行命令:pkill firefox
使用正则表达式匹配的话,你可以输入进程名的部分字符,比如:pkill fire
为了避免 kill 掉错误的进程,你应该用一下 " pgrep -l [进程名] " 列表来匹配进程名称。
Killall
killall 同样使用 进程名 替代 PID,并且它会 kill 掉所有的同名进程。例如,如果你正在运行多个Firefox浏览器的实例,可以用命令把它们全部 kill 掉:( killall 和 pkill 是相似的,不过如果给出的进程名不完整,killall 会报错。pkill 不需要完整的进程名就行)
结束 firefox 进程:killall firefox
在Gnome中,你可以使用这个命令重启 Nautilus:killall nautilus
xkill
xkill 是图形方式 kill 一个应用。当你在终端键入"xkill",你的光标将立刻变成一个"十字"。你只需要做的是在不正常的应用上点击一下,它就会立刻 kill 掉这个应用。如果你经常用的话,你也可以添加一个键盘快捷键来激活 xkill。
示例:
实例1:列出所有信号名称
kill -l
只有第9种信号(SIGKILL)才可以无条件终止进程,其他信号进程都有权利忽略。
下面是常用的信号:
HUP    1     终端断线
INT     2    中断(同 Ctrl + C)
QUIT    3    退出(同 Ctrl + \)
TERM   15    终止
KILL    9    强制终止
CONT   18    继续(与STOP相反, fg/bg命令)
STOP    19   暂停(同 Ctrl + Z)

实例2:得到指定信号的数值
[root@localhost test6]# kill -l KILL
[root@localhost test6]# kill -l SIGKILL
[root@localhost test6]# kill -l TERM
[root@localhost test6]# kill -l SIGTERM
[root@localhost test6]#

实例3:先用ps查找进程,然后用kill杀掉
[root@localhost test6]# ps -ef | grep vim
root      3268  2884  0 16:21 pts/1    00:00:00 vim install.log
root      3370  2822  0 16:21 pts/0    00:00:00 grep vim
[root@localhost test6]# kill 3268
[root@localhost test6]# kill 3268

实例4:彻底杀死进程
[root@localhost test6]# ps -ef | grep vim
root      3268  2884  0 16:21 pts/1    00:00:00 vim install.log
root      3370  2822  0 16:21 pts/0    00:00:00 grep vim
[root@localhost test6]# kill –9 3268
[root@localhost test6]# kill 3268

实例5:杀死指定用户所有进程
[root@localhost ~]# kill -9 $(ps -ef | grep peidalinux)
[root@localhost ~]# kill -u peidalinux

实例6:init进程是不可杀的
[root@localhost ~]# ps -ef | grep init
root         1     0  0 Nov02 ?        00:00:00 init [3]
root     17563 17534  0 17:37 pts/1    00:00:00 grep init
[root@localhost ~]# kill -9 1
[root@localhost ~]# kill -HUP 1
[root@localhost ~]# ps -ef | grep init
root         1     0  0 Nov02 ?        00:00:00 init [3]
root     17565 17534  0 17:38 pts/1    00:00:00 grep init
[root@localhost ~]# kill -KILL 1
[root@localhost ~]# ps -ef|grep init
root         1     0  0 Nov02 ?        00:00:00 init [3]
root     17567 17534  0 17:38 pts/1    00:00:00 grep init
[root@localhost ~]#
示例:进阶
进阶篇:

改进 1 --- grep
把ps的查询结果通过管道传给grep,查找包含特定字符串的进程。
管道符“|”用来隔开两个命令,管道符左边命令的输出会作为管道符右边命令的输入。
例如: homer@ubuntu:~$ ps -aux | grep firefox
直接找到firefox进程PID, 输入: kill  -s  9  15572

改进 2 --- pgrep
pgrep的p表明了这个命令是专门用于进程查询的grep
例如: homer@ubuntu:~$ pgrep firefox

改进 3 --- pidof
pidof命令,表示 pid of xx,字面翻译过来就是 xx的PID。
和 pgrep 相比稍显不足的是,pidof 必须给出 "进程的全名"。
例如: homer@ubuntu:~$ pidof firefox

改进 4  --- kill + xargs
$ps -ef | grep firefox | grep -v grep | cut -c 9-15 | xargs kill -s 9
说明:
        grep firefox 的输出结果是,所有含有关键字 firefox 的进程。
        grep -v grep 是在列出的进程中去除含有关键字 grep 的进程。
        cut -c 9-15 是截取输入行的第9个字符到第15个字符,而这正好是进程号 PID。
        xargs kill -s 9 中的 xargs 命令是把前面命令的输出结果作为 kill -s 9 命令的参数,并执行该命令。
        kill -s 9 会强行杀掉指定进程。

杀死进程的方式有以下几种:
        a) ps -ef | grep firefox | grep -v grep | awk '{print $2}' | xargs kill -s 9
        b) pgrep firefox | xargs kill -s 9
        c) pidof firefox | xargs kill -s 9
或
        d) kill -s 9 `ps -ef | grep firefox | grep -v grep | awk '{print $2}'`
        e) kill -s 9 `pgrep firefox`
        f) kill -s 9 `pidof firefox`

改进 5
知道 pgrep 和 pidof 两个命令,干嘛还要打那么长一串!
$ pgrep firefox | xargs kill -s 9

改进 6 --- grep + awk
$ ps -ef | grep firefox | grep -v grep | awk '{print $2}' | xargs kill -9
其中awk '{print $2}' 的作用就是打印(print)出第二列的内容。
ps输出的第二列正好是PID。就把进程相应的PID通过xargs传递给kill作参数,杀掉对应的进程。

改进 7:
难道每次都要调用xargs把PID传递给kill?答案是否定的:
$kill -s 9 `ps -aux | grep firefox | awk '{print $2}'`

改进 8:
没错,命令依然有点长,换成pgrep。
$kill -s 9 `pgrep firefox`

改进 9 --- pkill:
pkill 类似于 pgrep, pkill 表示 pgrep+kill。即 pkill=pgrep+kill。
$pkill -9 firefox    // 或者 pkill firefox
说明:"-9" 即发送的信号是9,pkill与kill在这点的差别是:pkill无须 s,终止信号等级直接跟在-后面。

改进 10 --- killall:
killall命令, 杀死同一进程组内的所有进程,其允许指定要终止的进程的名称,而非PID。
killall和pkill是相似的,不过如果给出的进程名不完整,killall会报错。
pkill或者pgrep只要给出进程名的一部分就可以终止进程。
$killall firefo
firefo: no process found
$killall firefox
$killall -9 firefox
示例:踢掉 "登录用户 和 用户进程"
linux系统root用户可强制踢制其它登录用户
首先可用$w命令查看登录用户信息,显示信息如下:
[root@Wang ~]# w
10:01:23 up 1:23, 3 users, load average: 0.71, 0.58, 0.57
USER     TTY      FROM              LOGIN@   IDLE   JCPU   PCPU WHAT
root     tty2     -                09:59    1:53   0.01s 0.01s -bash
root     pts/0    :0.0             10:01    0.00s 0.03s 0.00s w
wangbo   pts/2    192.168.0.196    09:42   18:50   0.01s 0.01s -bash
[root@Wang ~]#pkill -kill -t pts/1

[root@Wang ~]# ps -ef | grep pts/0
root     15846 15842 0 10:04 pts/0    00:00:00 bash
root     15876 15846 0 10:06 pts/0    00:00:00 ps -ef
root     15877 15846 0 10:06 pts/0    00:00:00 grep pts/0
踢掉用户的命令:
kill -9 15846


结束掉某个用户的所有进程。初学者一般会先查询出用户的所有pid,然后一条条kill结束掉,或者写一个脚本。
实际上结束的方法有很多,这边总结了下面4种方法,以kill用户zhangnq为例。
1. pkill方式
# pkill -u zhangnq
2. killall方式
# killall -u zhangnq
3. ps方式 ps列出zhangnq的pid,然后依次kill掉,比较繁琐。
# ps -ef | grep zhangnq | awk '{ print $2 }' | xargs kill -9
4. pgrep方式 pgrep -u参数查出用户的所有pid,然后依次kill
# pgrep -u zhangnq | xargs kill -9


 2051
2051


 被折叠的 条评论
为什么被折叠?
被折叠的 条评论
为什么被折叠?
 到【灌水乐园】发言


