


原本定于20号更新下微博,怎奈公司人少活多,小编以一名android工程师的身份,“勇敢”的投入到了SSH的开发当中,已深深不能自拔,没办法只好把Dialog的相关方法一分为二,分期发布,这一讲里会介绍Dialog的类型和基本使用方法,下一讲里将会介绍几种常见的Dialog效果.
Dialog(对话框)有四个子类,分别是:
1、AlertDialog,具有0-3个按钮,可以放选项、复选框单选框等,以建议的方式域用户交互可以。
2、ProgressDialog,显示一个进度的圆环或者进度条。
3、DataPickerDialog,选择日期的dialog。
4、TimePickerDialog,选择时间的dialog
我们最常用的就是AlertDialog和ProgressDialog,AlertDialog的构造方法都是Protected类型的,所以不能简单的new一个出来,只有通过创建工具即Bulider来创建。
AlertDialog的常用方法有以下几种:
setTitle(CharSequence title),setTitle(int titleId),设置标题字符串
setSingleChoiceItems,设置为单选项对话框
setMultiChoiceItems设置为多选选项对话款
setItems,设置为选项对话框,不区分多选单选
setPositiveButton(CharSequence text, DialogInterface.OnClickListener listener),确定按键
setNegativeButton(CharSequence text, DialogInterface.OnClickListener listener),取消按键
setNeutralButton(CharSequence text, DialogInterface.OnClickListener listener),中间按键
setCustomTitle(View customTitleView),设置自定义的Title视图
setView(View view),设置对话框内容为自定义的视图
下面我们来看一下今天的内容。
package com.teach.dialog;
/**
* @author Arthur Lee
* @time 04/19/2014
* */
import java.util.Calendar;
import android.app.AlertDialog;
import android.app.AlertDialog.Builder;
import android.app.DatePickerDialog;
import android.app.Notification.Style;
import android.app.ProgressDialog;
import android.app.TimePickerDialog;
import android.app.TimePickerDialog.OnTimeSetListener;
import android.content.Context;
import android.content.DialogInterface;
import android.content.DialogInterface.OnClickListener;
import android.widget.DatePicker;
import android.widget.EditText;
import android.widget.TimePicker;
import android.widget.Toast;
/**
* */
public class DialogHelper {
private Context context;
//构造函数,用以绑定当前的Context.
public DialogHelper(Context context){
this.context = context;
}
//普通的Dialog提示框,由标题栏,信息栏和按钮区三部分组成。
public void setNormal(){
AlertDialog.Builder dialog = new AlertDialog.Builder(context);
dialog.setTitle("这是标题栏").setMessage("这是信息栏").setPositiveButton("确定", new OnClickListener(){
@Override
public void onClick(DialogInterface arg0, int arg1) {
// TODO Auto-generated method stub
Toast.makeText(context, "你点击了确定按钮", Toast.LENGTH_LONG).show();
}}).setNegativeButton("取消", new OnClickListener(){
@Override
public void onClick(DialogInterface arg0, int arg1) {
// TODO Auto-generated method stub
Toast.makeText(context, "你点击了取消按钮", Toast.LENGTH_LONG).show();
}}).setNeutralButton("中间选项", new OnClickListener(){
@Override
public void onClick(DialogInterface arg0, int arg1) {
// TODO Auto-generated method stub
Toast.makeText(context, "你点击了中间选项", Toast.LENGTH_LONG).show();
}});
dialog.create().show();
}
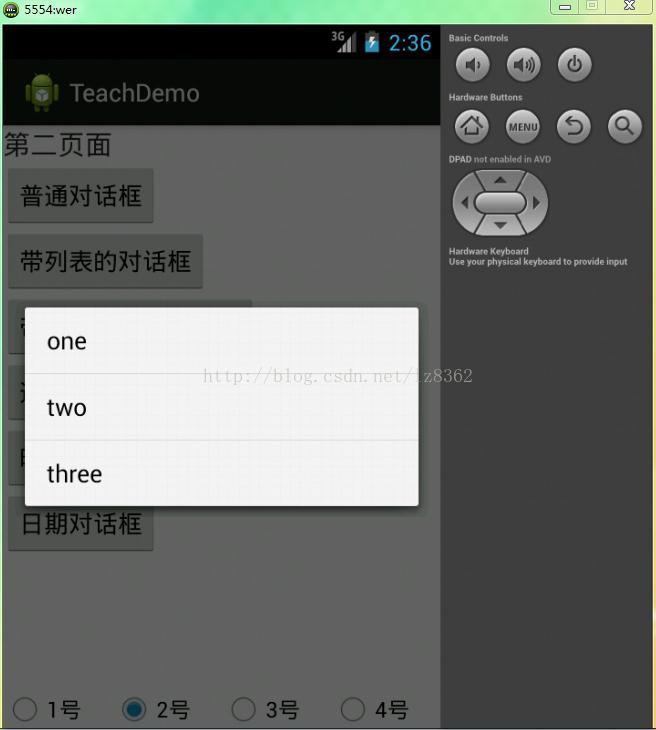
//带列表选项的Dialog
public void setList(){
AlertDialog.Builder dialog = new AlertDialog.Builder(context);
final String[] str = new String[]{"one","two","three"};
/*
*在setItems中有两个参数,
*第一个参数是选项数据源,格式不固定,我在此使用的是字符串数组,若想实现更高级的选项模式,可使用Adapter,仿照第二讲里介绍的那样即可,在这里不再叙述
*第二个参数就是监听,用于处理点击选项后的操作*/
dialog.setItems(str, new OnClickListener() {
@Override
public void onClick(DialogInterface arg0, int position) {
// TODO Auto-generated method stub
Toast.makeText(context, "你选择了"+str[position], Toast.LENGTH_LONG).show();
}
});
dialog.create().show();
}
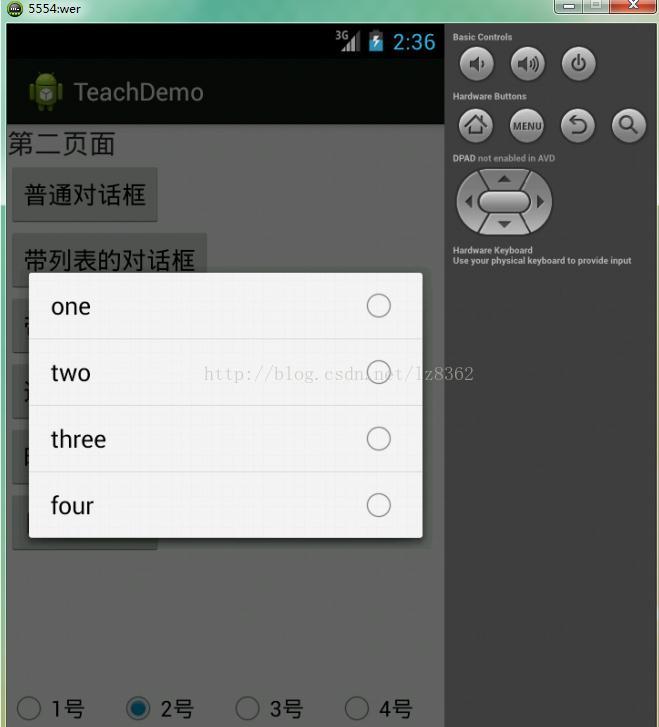
//带单选项的Dialog
public void setSingleList(){
AlertDialog.Builder dialog = new AlertDialog.Builder(context);
final String[] str = new String[]{"one","two","three","four"};
/*
*在setSingleChoiceItems中有三个参数,
*第一个参数是选项数据源,格式不固定,我在此使用的是字符串数组,若想实现更高级的选项模式,可使用Adapter,仿照第二讲里介绍的那样即可,在这里不再叙述
*第二个参数是当前选中的选项,在列表项中是从0开始计数的,所以我在此设置为-1,即表示初始化生成后不选中任何选项
*第三个参数就是监听,用于处理点击选项后的操作*/
dialog.setSingleChoiceItems(str, -1, new OnClickListener() {
@Override
public void onClick(DialogInterface dialog, int position) {
// TODO Auto-generated method stub
Toast.makeText(context, "你选择了"+str[position], Toast.LENGTH_LONG).show();
}
});
dialog.create().show();
}
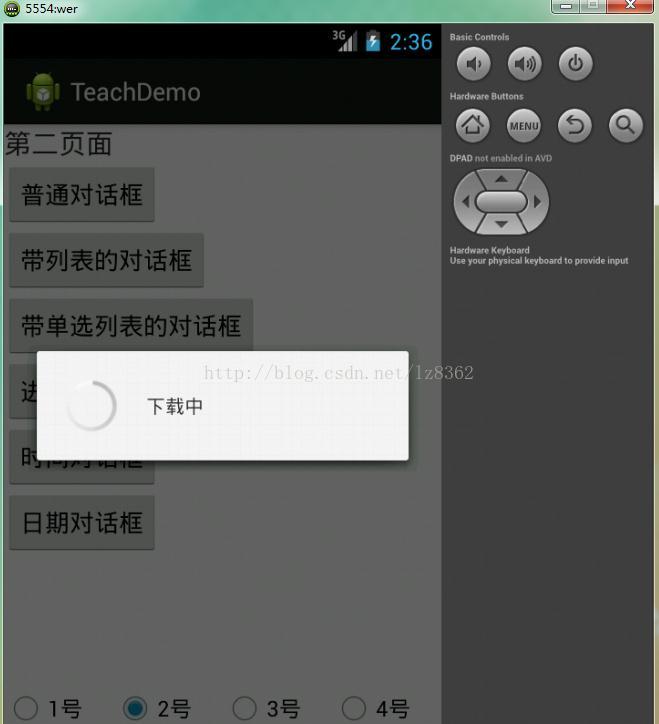
//加载进度条框
public void setProgreess(){
/* ProgressDialog是AlertDialog的子类,
* 可以显示进度动画:用旋转的环表示进度未定义的task;用进度条表示定义了进度的task。
* 这个类型的dialog也可以提供按钮,比如下载过程中的取消按钮。 打开一个进度dialog简单到只要调用ProgressDialog.show()就可以了。
**/
ProgressDialog progress = new ProgressDialog(context);
/*
* 这是一个最简单的进度条,用以表示进度未定义的task
* 第一个参数是程序的context,
* 第二个参数是标题信息
* 第三个参数表示这个进程是不清楚的,它只在创建进度条的时候有意义 */
// progress.show(context, "标题", "下载中,请耐心等待",true);
/*
* 下面来做一个可移动化显示进度的加载框
*/
//设置当前进度条的格式为水平模式
progress.setProgress(ProgressDialog.STYLE_HORIZONTAL);
progress.setMessage("下载中");
//设置当前进度条是否可通过点击阴影区关 闭,true可以,false 不可以
progress.setCancelable(true);
progress.show();
//真正应用进度条时,大家应该把ProgressDialog和Handler结合起来使用
//因为控制进度条的变化最终需要Thread的接入,而Handler可以再线程之间相互传值,控制progressDialog的开启和关闭,我会在Dialog常用方法(二)中举一个很实用的小例子。
}
//时间设置对话框
public void setTimer(){
Calendar can = Calendar.getInstance();
TimePickerDialog.OnTimeSetListener timeListener = new OnTimeSetListener() {
@Override
public void onTimeSet(TimePicker arg0, int hour, int minute) {
// TODO Auto-generated method stub
Toast.makeText(context, "你选择了"+hour+"点"+minute+"分", Toast.LENGTH_LONG).show();
}
};
/**
* TimePickerDialog方法有五个参数:
* 第一个参数为弹出的时间对话框所在的activity指针;
* 第二个参数是监听类;
* 第三个参数是对话框弹出时的初始小时
* 第四个参数是弹出对话框的初始分钟,
* 第五个参数为设置24时显示参数,true代表时间以24时制显示时间,false为不是以24小时显示*/
TimePickerDialog dialog = new TimePickerDialog(context, timeListener, can.get(Calendar.HOUR_OF_DAY), can.get(Calendar.MINUTE), false);
dialog.show();
}
//日期设置对话框
public void setDate(){
Calendar can = Calendar.getInstance();
//设置日期监听事件
DatePickerDialog.OnDateSetListener dateListener =
new DatePickerDialog.OnDateSetListener() {
@Override
public void onDateSet(DatePicker datePicker,
int year, int month, int dayOfMonth) {
//Calendar月份是从0开始,所以month要加1
Toast.makeText(context,"你选择了" + year + "年" +
(month+1) + "月" + dayOfMonth + "日",Toast.LENGTH_LONG).show();
}
};
/**
* DatePickerDialog方法有五个参数:
* 第一个参数为弹出的时间对话框所在的activity指针;
* 第二个参数是监听类;
* 第三个参数是对话框弹出时的初始年份
* 第四个参数是对话框的初始月份,
* 第五个参数是对话框的初始日期,*/
DatePickerDialog dialog = new DatePickerDialog(context,dateListener , can.get(Calendar.YEAR),can.get(Calendar.MONTH), can.get(Calendar.DAY_OF_MONTH));
dialog.show();
}
}
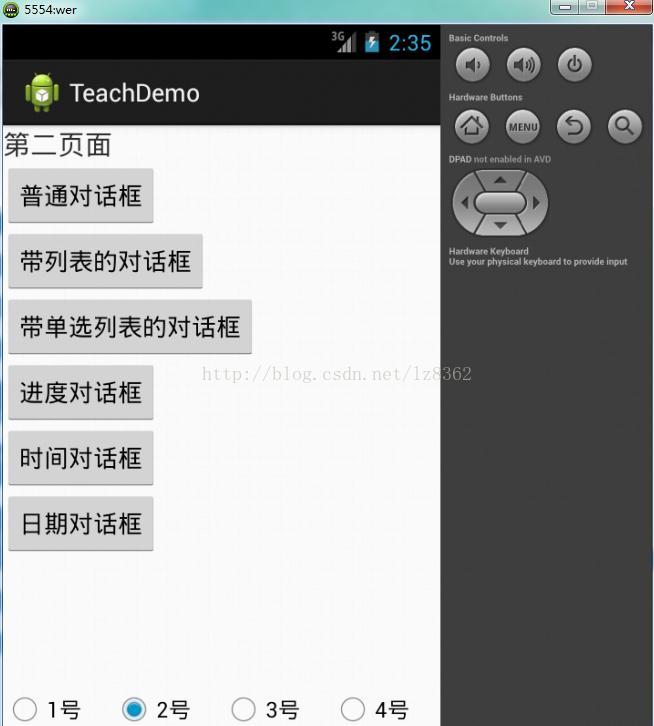
小编这次选择SecondFragment作为展示页面,继续使用第一讲里创建的模板。
dHelper = new DialogHelper(getActivity());
bt_normal = (Button)view.findViewById(R.id.second_bt_normal);
bt_list = (Button)view.findViewById(R.id.second_bt_list);
bt_singlelist = (Button)view.findViewById(R.id.second_bt_singlelist);
bt_progress = (Button)view.findViewById(R.id.second_bt_progress);
bt_time = (Button)view.findViewById(R.id.second_bt_time);
bt_date = (Button)view.findViewById(R.id.second_bt_date);
bt_normal.setOnClickListener(new OnClickListener() {
@Override
public void onClick(View arg0) {
// TODO Auto-generated method stub
dHelper.setNormal();
}
});
bt_list.setOnClickListener(new OnClickListener() {
@Override
public void onClick(View arg0) {
// TODO Auto-generated method stub
dHelper.setList();
}
});
bt_singlelist.setOnClickListener(new OnClickListener() {
@Override
public void onClick(View arg0) {
// TODO Auto-generated method stub
dHelper.setSingleList();
}
});
bt_progress.setOnClickListener(new OnClickListener() {
@Override
public void onClick(View arg0) {
// TODO Auto-generated method stub
dHelper.setProgreess();
}
});
bt_time.setOnClickListener(new OnClickListener() {
@Override
public void onClick(View arg0) {
// TODO Auto-generated method stub
dHelper.setTimer();
}
});
bt_date.setOnClickListener(new OnClickListener() {
@Override
public void onClick(View arg0) {
// TODO Auto-generated method stub
dHelper.setDate();
}
});
相应的SecongFragement的XML文件我们做以下修改,这是用IE打开的所以出现这种情况,在这里先对大家说声不好意思啊。
<?xml version="1.0" encoding="UTF-8"?>
-<LinearLayout android:orientation="vertical" android:layout_height="match_parent" android:layout_width="match_parent" xmlns:android="http://schemas.android.com/apk/res/android">
<!-- @author Arthur Lee -->
<TextView android:layout_height="wrap_content" android:layout_width="wrap_content" android:textSize="20sp" android:text="第二页面" android:id="@+id/view_second"/>
<Button android:layout_height="wrap_content" android:layout_width="wrap_content" android:text="普通对话框" android:id="@+id/second_bt_normal"/>
<Button android:layout_height="wrap_content" android:layout_width="wrap_content" android:text="带列表的对话框" android:id="@+id/second_bt_list"/>
<Button android:layout_height="wrap_content" android:layout_width="wrap_content" android:text="带单选列表的对话框" android:id="@+id/second_bt_singlelist"/>
<Button android:layout_height="wrap_content" android:layout_width="wrap_content" android:text="进度对话框" android:id="@+id/second_bt_progress"/>
<Button android:layout_height="wrap_content" android:layout_width="wrap_content" android:text="时间对话框" android:id="@+id/second_bt_time"/>
<Button android:layout_height="wrap_content" android:layout_width="wrap_content" android:text="日期对话框" android:id="@+id/second_bt_date"/>
</LinearLayout>
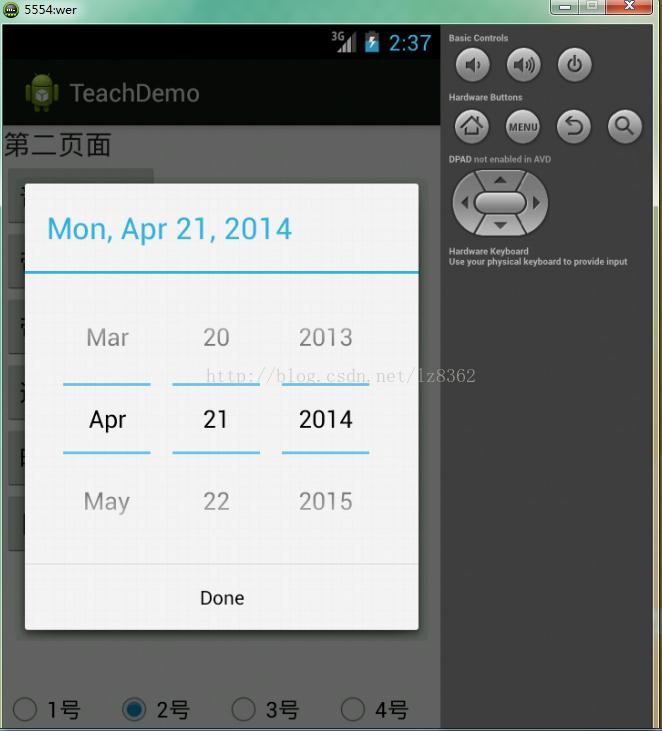
下面我们来看一下效果图,


最后,还是用一句话结尾:我不是一名好的程序员,因为我只会默默奉献。


 301
301

 被折叠的 条评论
为什么被折叠?
被折叠的 条评论
为什么被折叠?
 到【灌水乐园】发言


