


一、实时采集人脸并绘点
1、代码
打开摄像头,实时采集人脸并保存、绘制68个特征点
import cv2
import dlib
import os
import sys
import random
# 存储位置
output_dir = 'D:/631907060115'
size = 64

if not os.path.exists(output_dir):
    os.makedirs(output_dir)
# 改变图片的亮度与对比度

def relight(img, light=1, bias=0):
    w = img.shape[1]
    h = img.shape[0]
    #image = []
    for i in range(0,w):
        for j in range(0,h):
            for c in range(3):
                tmp = int(img[j,i,c]*light + bias)
                if tmp > 255:
                    tmp = 255
                elif tmp < 0:
                    tmp = 0
                img[j,i,c] = tmp
    return img

#使用dlib自带的frontal_face_detector作为我们的特征提取器
detector = dlib.get_frontal_face_detector()
# 打开摄像头 参数为输入流,可以为摄像头或视频文件
camera = cv2.VideoCapture(0)
index = 1
while True:
    if (index <= 20):#存储20张人脸特征图像
        print('Being processed picture %s' % index)
        # 从摄像头读取照片
        success, img = camera.read()
        # 转为灰度图片
        gray_img = cv2.cvtColor(img, cv2.COLOR_BGR2GRAY)
        # 使用detector进行人脸检测
        dets = detector(gray_img, 1)

        for i, d in enumerate(dets):
            x1 = d.top() if d.top() > 0 else 0
            y1 = d.bottom() if d.bottom() > 0 else 0
            x2 = d.left() if d.left() > 0 else 0
            y2 = d.right() if d.right() > 0 else 0

            face = img[x1:y1,x2:y2]
            # 调整图片的对比度与亮度, 对比度与亮度值都取随机数,这样能增加样本的多样性
            face = relight(face, random.uniform(0.5, 1.5), random.randint(-50, 50))

            face = cv2.resize(face, (size,size))

            cv2.imshow('image', face)

            cv2.imwrite(output_dir+'/'+str(index)+'.jpg', face)

            index += 1
        key = cv2.waitKey(30) & 0xff
        if key == 27:
            break
    else:
        print('Finished!')
        # 释放摄像头 release camera
        camera.release()
        # 删除建立的窗口 delete all the windows
        cv2.destroyAllWindows()
        break
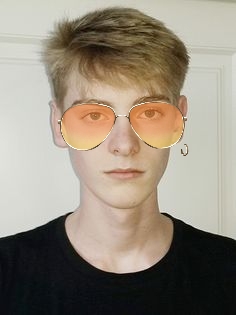
2、结果

二、人脸虚拟P上一付墨镜
1、代码
# -*- coding: utf-8 -*-
"""
Created on Fri Nov 12 17:21:36 2021

@author: 春风浅作序
"""

import dlib
from PIL import Image, ImageDraw, ImageFont
import random

import cv2

from imutils.video import VideoStream
from imutils import face_utils, translate, rotate, resize

import numpy as np

vs = VideoStream().start()

detector = dlib.get_frontal_face_detector()
predictor = dlib.shape_predictor("E:/face/shape_predictor_68_face_landmarks.dat")

max_width = 500
frame = vs.read()
frame = resize(frame, width=max_width)

fps = vs.stream.get(cv2.CAP_PROP_FPS) # need this for animating proper duration

animation_length = fps * 5
current_animation = 0
glasses_on = fps * 3

# uncomment for fullscreen, remember 'q' to quit
# cv2.namedWindow('deal generator', cv2.WND_PROP_FULLSCREEN)
#cv2.setWindowProperty('deal generator', cv2.WND_PROP_FULLSCREEN,
#                          cv2.WINDOW_FULLSCREEN)

deal = Image.open("D:/631907060115/glasses.png")
text = Image.open('D:/631907060115/renlian.jpg')

dealing = False
number =0
while True:
    frame = vs.read()
    frame = resize(frame, width=max_width)
    img_gray = cv2.cvtColor(frame, cv2.COLOR_BGR2GRAY)
    faces = []

    rects = detector(img_gray, 0)
    img = Image.fromarray(cv2.cvtColor(frame, cv2.COLOR_BGR2RGB))
    # print(rects)
    for rect in rects:
        face = {}
        shades_width = rect.right() - rect.left()

        # predictor used to detect orientation in place where current face is
        shape = predictor(img_gray, rect)
        shape = face_utils.shape_to_np(shape)

        # grab the outlines of each eye from the input image
        leftEye = shape[36:42]
        rightEye = shape[42:48]

        # compute the center of mass for each eye
        leftEyeCenter = leftEye.mean(axis=0).astype("int")
        rightEyeCenter = rightEye.mean(axis=0).astype("int")

	    # compute the angle between the eye centroids
        dY = leftEyeCenter[1] - rightEyeCenter[1]
        dX = leftEyeCenter[0] - rightEyeCenter[0]
        angle = np.rad2deg(np.arctan2(dY, dX))
        # print((shades_width, int(shades_width * deal.size[1] / deal.size[0])))
        # 图片重写
        current_deal = deal.resize((shades_width, int(shades_width * deal.size[1] / deal.size[0])),
                               resample=Image.LANCZOS)
        current_deal = current_deal.rotate(angle, expand=True)
        current_deal = current_deal.transpose(Image.FLIP_TOP_BOTTOM)

        face['glasses_image'] = current_deal
        left_eye_x = leftEye[0,0] - shades_width // 4
        left_eye_y = leftEye[0,1] - shades_width // 6
        face['final_pos'] = (left_eye_x, left_eye_y)

        # I got lazy, didn't want to bother with transparent pngs in opencv
        # this is probably slower than it should be
        # 图片动画以及配置
        if dealing:
            # print("current_y",int(current_animation / glasses_on * left_eye_y))
            if current_animation < glasses_on:
                current_y = int(current_animation / glasses_on * left_eye_y)
                img.paste(current_deal, (left_eye_x, current_y-20), current_deal)
            else:
                img.paste(current_deal, (left_eye_x, left_eye_y-20), current_deal)
                # img.paste(text, (75, img.height // 2 - 52), text)

    # 起初动画配置
    if dealing:
        current_animation += 1
        frame = cv2.cvtColor(np.asarray(img), cv2.COLOR_RGB2BGR)
    # 按键选择
    cv2.imshow("deal generator", frame)
    key = cv2.waitKey(1) & 0xFF
    #退出程序
    if key == ord("q"):
        break
    # 开始程序
    if key == ord("d"):
        dealing = not dealing
    # 图片切换
    if key == ord("c"):
        # 让图片从上面重新开始
        # current_animation = 0

        number = str(random.randint(0, 8))
        print(number)
        deal = Image.open("'D:/631907060115/'"+number+".png")
cv2.destroyAllWindows()
vs.stop()
2、结果
三、总结
本次实验初步了解了人脸识别的原理以及实现,采集面貌,将这些面像文件生成面纹编码贮存起来。收获较多。


 3300
3300


 被折叠的 条评论
为什么被折叠?
被折叠的 条评论
为什么被折叠?
 到【灌水乐园】发言


