


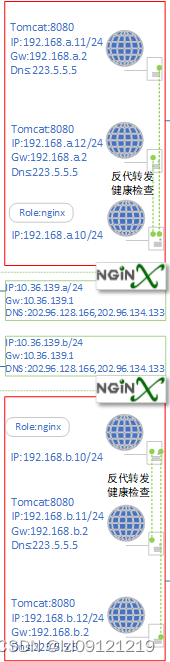
| 角色 | lb-1 | lb-2 | web-1 | web-2 |
| ip | 公:10.36.139.164 私:192.168.152.149 | 公:10.36.139.165 私:192.168.152.150 | 192.168.152.151 | 192.168.152.152 |
| 服务器 | nginx | nginx | tomcat | tomcat |
| 网关 | 公:10.36.139.1 | 公:10.36.139.1 | 私:192.168.152.2 | 私:192.168.152.2 |
| dns | 202.96.128.166 202.96.134.133 | 202.96.128.166 202.96.134.133 | 114.114.114.114 | 114.114.114.114 |
一、系统初始化性能优化
1.所有服务器关闭防火墙,selinux
systemctl stop firewalld && sed -i 's/SELINUX=enforcing/SELINUX=disabled/g' /etc/selinux/config
setenforce 0
2.条件文件打开数
cat >>/etc/security/limits.d/20-nproc.conf<<EOF
* soft nproc 65535
* hard nproc 65535
* soft nofile 65535
* hard nofile 65535
EOF
ulimit -n 65535
3.时间同步
yum install ntpdate -y
cat >>/var/spool/cron/root<<EOF
*/5 * * * * /usr/sbin/ntpdate ntp1.aliyun.com &>/dev/null
EOF
二、lb安装配置
1.安装nginx:
上次健康检查模块并解压:
yum -y install gcc gcc-c++ pcre pcre-devel gd-devel openssl openssl-devel zlib zlib-devel
useradd nginx
wget http://nginx.org/download/nginx-1.16.0.tar.gz
tar xzf nginx-1.16.0.tar.gz
cd /nginx-1.16.0/
patch -p1 <../ngx_healthcheck_module-master/nginx_healthcheck_for_nginx_1.16+.patc
预编译
./configure \
--prefix=/usr/local/nginx \
--group=nginx \
--user=nginx \
--with-http_stub_status_module \
--with-http_v2_module \
--with-http_ssl_module \
--with-http_gzip_static_module \
--with-http_realip_module \
--with-http_flv_module \
--with-http_mp4_module \
--with-stream \
--with-stream_ssl_module \
--with-stream_realip_module\
--add-module=/root/ngx_healthcheck_module-master/
编译安装
make && make install
cat >/etc/profile.d/nginx.sh<<EOF
export PATH=\${PATH}:/usr/local/nginx/sbin
EOF
source /etc/profile
cat >/usr/lib/systemd/system/nginx.service<<EOF
[Unit]
Description=nginx
After=network.target remote-fs.target nss-lookup.target

[Service]
Type=forking
PIDFile=/usr/local/nginx/logs/nginx.pid
ExecStartPre=/usr/bin/rm -f /usr/local/nginx/logs/nginx.pid
ExecStartPost=/bin/sleep 0.1
ExecStartPre=/usr/local/nginx/sbin/nginx -t -c /usr/local/nginx/conf/nginx.conf
ExecStart=/usr/local/nginx/sbin/nginx
ExecReload=/bin/kill -s HUP $MAINPID
ExecStop=/bin/kill -s QUIT $MAINPID
PrivateTmp=true
LimitNOFILE=51200
LimitNPROC=51200
LimitCORE=51200

[Install]
WantedBy=multi-user.target
EOF
systemctl daemon-reload
systemctl enable nginx
systemctl start nginx
2.修改配置文件
mv /usr/local/nginx/conf/nginx.conf{,.bak}
cat >/usr/local/nginx/conf/nginx.conf<<EOF
user  nginx;
worker_processes  1;
error_log  logs/error.log;
pid        logs/nginx.pid;
events {
    worker_connections  1024;
}
http {
    include       mime.types;
     include proxy.conf;
    default_type  application/octet-stream;
    log_format  main  '$remote_addr - $remote_user [$time_local] "$request" '
                      '$status  "$http_referer" '
                      '"$http_user_agent" "$http_x_forwarded_for"';
    access_log  logs/access.log  main;
    sendfile        on;
    tcp_nopush     on;
    keepalive_timeout  65;
    gzip  on;
include tomcat.conf;
}


cat > /usr/local/nginx/conf/tomcat.conf <<eof
 server {
        listen 80;
        location /status {
            healthcheck_status;
            auth_basic "Auth access test!";
            auth_basic_user_file  /usr/local/nginx/conf/auth_conf;
        }
        location / {
        proxy_pass http://tomcat-cluster;
        proxy_redirect default;
        proxy_set_header Host $host;
        proxy_set_header  X-Real-IP        $remote_addr;
        proxy_set_header  X-Forwarded-For  $proxy_add_x_forwarded_for;
        proxy_set_header X-NginX-Proxy true;
        }
location ~* \.(gif|jpg|jpeg|png|svg|css|js|swf|flv|txt)$ {
    proxy_cache cache_one;
    proxy_cache_valid 200 304 302 30d;
    add_header X-Accel-Expires 10800;
    add_header Cache-Control 'max-age=10800';
    add_header X-Cache-Status $upstream_cache_status;
        add_header X-Cache '$upstream_cache_status from $host';
    proxy_cache_key '$host$uri$is_args$args';
    proxy_pass http://tomcat-cluster;
   }
    }
    upstream tomcat-cluster {
        server 192.168.152.151:8080;
        server 192.168.152.152:8080;
        check interval=3000 rise=2 fall=5 timeout=5000 type=http;
        check_http_send "GET / HTTP/1.0\r\n\r\n";
        check_http_expect_alive http_2xx http_3xx;
    }
>>eof
#建立网页口令文件
 yum install -y httpd-tools
touch /usr/local/nginx/conf/auth_conf
htpasswd -m  -b  /usr/local/nginx/conf/auth_conf user01 '123456'
本地缓存:
mkdir -p /data/{proxy_temp_path,proxy_cache_path}
chown -R nginx:nginx  /data/{proxy_temp_path,proxy_cache_path}

#反代时将静态资源缓存在本机磁盘
vim /usr/local/nginx/conf/proxy.conf
##定义缓存记录标记
proxy_cache_key '$host:$server_port$request_uri';
#缓存临时写入大小
proxy_temp_file_write_size 1024k;
#本地缓存临时目录
proxy_temp_path /data/proxy_temp_path;
#本地缓存目录,levels=1:2为2级目录, keys_zone=cache_one:200m缓存名为cache_one,200m大小,
##inactive=5d,活路周期为5天,max_size=1g;最大空间为1gg
proxy_cache_path /data/proxy_cache_path levels=1:2 keys_zone=cache_one:200m inactive=5d max_size=1g;
#定义缓存忽略头部信息
proxy_ignore_headers X-Accel-Expires Expires Cache-Control Set-Cookie Vary;
3.检查配置
nginx -t && systemctl restart nginx
三、web安装与配置
1.上传jdk,tomcat安装包
 tar xzf jdk-8u311-linux-x64.tar.gz
 mv jdk1.8.0_311/ /usr/local/jdk
#设置环境变量:
cat >>/etc/profile.d/jdk.sh<<EOF
export JAVA_HOME=/usr/local/jdk/
export CLASSPATH=.:\$JAVA_HOME/lib/dt.jar:\$JAVA_HOME/lib/tools.jar
export PATH=\$JAVA_HOME/bin:\$PATH
EOF
source /etc/profile
#安装tomcat
wget http://mirrors.tuna.tsinghua.edu.cn/apache/tomcat/tomcat-8/v8.5.83/bin/apache-tomcat-8.5.83.tar.g
tar xzf apache-tomcat-8.5.83.tar.gz
mv apache-tomcat-8.5.83 /usr/local/tomcat
#启动tomcat
/usr/local/tomcat/bin/startup.sh
2.部署考试系统
上传项目包到/data 目录
mkdir -p /data
cd /data
unzip TomExam
/usr/local/tomcat/bin/shutdown.sh
rm -fr /usr/local/tomcat/webapps/ROOT  #注意里面内容别误删  本操作只针对 新安装的tomcat 删除原有的根目录下文件
mv ROOT/    /usr/local/tomcat/webapps/ROOT
vim /usr/local/tomcat/webapps/ROOT/WEB-INF/classes/config.properties#连接数据库
配置好数据库连接重启tomcat
/usr/local/tomcat/bin/startup.sh


 823
823


 被折叠的 条评论
为什么被折叠?
被折叠的 条评论
为什么被折叠?
 到【灌水乐园】发言


