


使用Vue仿一个网易云网站
小记
预期

进程记录
12-09
目前实现的效果如下

项目架构初步搭建起来了,记录组件拆分

12-14
在封装首页的一个类似于轮播图的组件,点击左右可切换

然后它这个是有一定的过度效果的,首先想起的是Animate(),淘到几篇讲Vue的Animate的博客:
12-17
记录一下

组件实现的心路历程
- 首先获取数据还是 写在 song 中
- 数据传递:song.vue->NewDiscShow->NewDiscList(此时须将完整数据拆解成4部分供NewDiscList使用)->NewDiscItem
在NewDiscShow传NewDiscList时遇到了一些问题:
props中的数据(动态的)在created和mounted中能获取到嘛?
我试了一下是:都是有时候可以获取到,但是大部分时间是获取不到的
解决方法:
考虑使用watch实现
上一下代码段
<script>
export default {
    name:"NewDiscShow",
    components:{
        NewDiscFrame,
        NewDiscItem,
        NewDiscList
    },
    methods:{
    },
    props:{
        DiscData:Array
    },
    data(){
        return {
            DiscDataOne:[],
            DiscDataTwo:[],
            DiscDataThree:[],
            DiscDataFour:[]
        }
    },
    watch:{
        DiscData: function(newVal,oldVal){
            for(var i=0;i<4;i++){
                this.DiscDataOne.push(newVal[i]);
            }
        }
    },
    computed:{
    }
}
</script>
这里找到一篇博客可以参考一下:
https://www.cnblogs.com/taohuaya/p/11413178.html
下面我计划做一下查询功能
对项目做一下防抖节流优化:
上代码:
// 防抖
export function Debounce(fn, delay) {
    var delay = delay || 200;
    var timer;
    return function () {
        var th = this;
        var args = arguments;
        if (timer) {
            clearTimeout(timer);
        }
        timer = setTimeout(function () {
            timer = null;
            fn.apply(th, args);
        }, delay);
    };
}
// 节流
export function Throttle(fn, interval) {
    var last;
    var timer;
    var interval = interval || 200;
    return function () {
        var th = this;
        var args = arguments;
        var now = +new Date();
        if (last && now - last < interval) {
            clearTimeout(timer);
            timer = setTimeout(function () {
                last = now;
                fn.apply(th, args);
            }, interval);
        } else {
            last = now;
            fn.apply(th, args);
        }
    }
}
应用:
<template>
    <div>
        <div class="toptitle-one">
            <div>
                <ul>
                    <a href="#">
                        <li v-for="(item,index) in title" :key="index" class="title-item" @click="ChangeRouter(index)" :class="{itemactive:index===currentIndex}">{{item.title}}</li>
                    </a>
                </ul>
                <div class="search">
                    <el-input placeholder="请输入内容" v-model="input" clearable></el-input>
                    <el-button icon="el-icon-search" circle></el-button>
                </div>
            </div>
        </div>

        <div class="toptitle-two">
            <div>
                <ul>
                    <a href="#">
                    </a>
                </ul>
            </div>
        </div>
    </div>
</template>
<script>
import {Debounce,Throttle} from 'assets/js/public'
export default {
    name:'TopTitle',
    props:{

    },
    data(){
        return {
            currentIndex:-1,
            title:[
                {
                    title:'发现音乐',
                    path:'/songs',
                    child:[
                        {
                            title:'推荐',
                            path:'/recommend'
                        },
                        {
                            title:'排行榜',
                            path:'/recommend'
                        },
                        {
                            title:'歌单',
                            path:'/recommend'
                        },
                        {
                            title:'主播电台',
                            path:'/recommend'
                        }
                    ]
                },
                {
                    title:'我的音乐',
                    path:'/mysongs'
                },
                {
                    title:'朋友',
                    path:'/friends'
                },
                {
                    title:'商城',
                    path:'/mysongs'
                },
                {
                    title:'音乐人',
                    path:'/mysongs'
                },
                {
                    title:'下载客户端',
                    path:'/mysongs'
                }
            ],
            input:""
        }
    },
    watch:{
        input:Debounce(
            function(newVal,oldVal){
            console.log(newVal)
        },200)
    },
    methods:{
        ChangeRouter(index){
            this.currentIndex=index
            // this.$emit('ChangeRouter',index)
            this.$router.replace(this.title[index].path)
        }
    },
    computed:{
        isActive(){
            return this.$route.path.indexOf(this.path)!=-1
        }
    }
}
</script>
查询的input绑定了input数据,对input采用实时监听watch,在其监听处做防抖处理
12-18
今天在做搜索功能模块,发现每个页面都会用到这个搜索功能模块,而且输入的搜索内容在每个页面都会保留,我想到将它交给vuex管理。记录一下实现过程:
- 首先配置下vuex
1.安装vuex
	npm install vuex
2.配置vuex
	1)import
		import Vue from 'vue'
		import Vuex from 'vuex'
	2)Vue.use
		Vue.use(Vuex)
	3)使用Vuex
		const store=new Vuex.Store({
		    state:{
		        keywords:"测试keywords"
		    },
		    mutations:{
		        ChangeKeyWords(state,payload){
		            state.keywords=payload.keywords
		        }
		    },
		    getters:{

		    },
		    actions:{

		    },
		    modules:{

		    }
		})
	4)导出store
		export default store
3.引入并使用store
	import store from './store/index'
	new Vue({
	  el: '#app',
	  router,
	  render: h => h(App),
	  store:store
	})
验证一下vuex配置的有效性
在某一视图的created属性中:
        console.log("测试")
        console.log(this.$store.state)
输出结果:
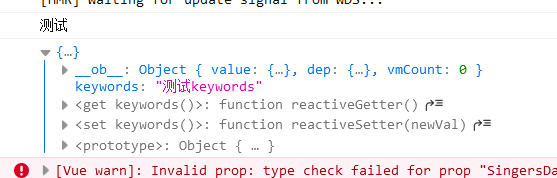
成功
接下来实现将搜索框中的内容赋值到vuex的keywords中
我们直接跑到 TopTitle.vue 中,封装好了就是省事儿,对搜索加一个监听,实现修改vuex中的keywords
上代码:
        search(){
            //查询:跳转路由,带参;修改vuex
            this.$store.commit('ChangeKeyWords',{
                keywords:this.input
            })
            this.$router.push({path:'/search',query: {keywords:this.input}})
        }
上面的路由跳转时带参的,起始完全没有必要(在做的时候一开始没想着用vuex,做了做发现每次输入框中的内容都会消失掉,非常不合理,才想到引入vuex)
然后vuex中的源码对应上面(翻上去看上面,这里不再罗列)
修改数据使用
			mutations
			和
            this.$store.commit('ChangeKeyWords',{
                keywords:this.input
            })
            带参写法:
         	mutations:{
		        ChangeKeyWords(state,payload){
		            state.keywords=payload.keywords
		        }
		    },
动态(异步)数据使用
			actions
源码
https://github.com/lzlv587/MusicPlayer
组件分析
Views
Songs

TopTitle
所有界面顶部的导航栏,控制路由
Carousel
轮播图
PopMuiRec
首页热门推荐部分,这个组件目前做的并不好,在最开始设计的时候考虑的太浅;总结如下几个不足:
1、在传参时跳过了MusicList直接跟MusicItem交互
2、TitlePopRec这个组件可以舍弃
3、应当同下面的组件似的建一个 “show” 组件,组件规范统一

TitlePopRec
其实这个组件没必要
MusicList
专辑列表的框架
MusicItem
专辑卡片单元
RecommendSinger
首页入驻歌手部分

RecommendSingerShow
入驻歌手部分的主体
RecommendSingerList
入驻歌手部分列表的框架
RecommendSingerItem
入驻歌手部分的单元
SongList
展示歌单详情页面

TargetSongShow
展示歌单的基本信息
SongListShow
展示歌单的歌曲信息
NewDisc
新碟上市组件
![[外链图片转存失败,源站可能有防盗链机制,建议将图片保存下来直接上传(img-rtsE2dep-1608174307842)(C:\Users\10651\AppData\Roaming\Typora\typora-user-images\image-20201217110055327.png)]](https://img-blog.csdnimg.cn/20201217110522723.png?x-oss-process=image/watermark,type_ZmFuZ3poZW5naGVpdGk,shadow_10,text_aHR0cHM6Ly9ibG9nLmNzZG4ubmV0L2x6bDk4MDExMQ==,size_16,color_FFFFFF,t_70)
首先它是有一个类似轮播图的框架
我先去封装了一个轮播图框架
NewDiscFrame
新碟上市轮播框架
接着我又对这个组件进行拆解
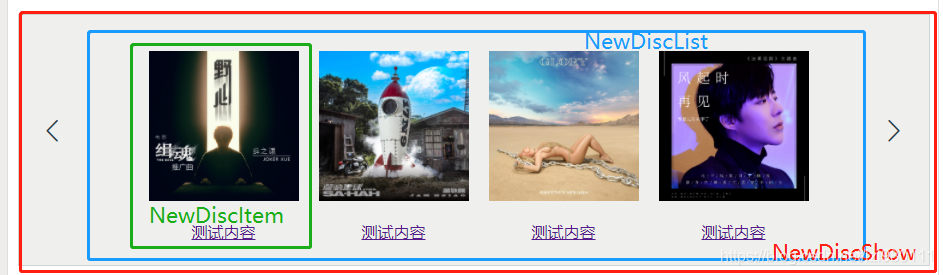
NewDiscShow
用于完整组装新碟上市组件
NewDiscList
列表
NewDiscItem
单项
大学生资料站,一个面向大学生的资源共享平台


 1万+
1万+


 被折叠的 条评论
为什么被折叠?
被折叠的 条评论
为什么被折叠?
 到【灌水乐园】发言


