


概要
本章,会对线程等待/唤醒方法进行介绍。涉及到的内容包括:
1. wait(), notify(), notifyAll()等方法介绍
2. wait()和notify()
3. wait(long timeout)和notify()
4. wait() 和 notifyAll()
5. 为什么notify(), wait()等函数定义在Object中,而不是Thread中
转载请注明出处:http://www.cnblogs.com/skywang12345/p/3479224.html
wait(), notify(), notifyAll()等方法介绍
在Object.java中,定义了wait(), notify()和notifyAll()等接口。wait()的作用是让当前线程进入等待状态,同时,wait()也会让当前线程释放它所持有的锁。而notify()和notifyAll()的作用,则是唤醒当前对象上的等待线程;notify()是唤醒单个线程,而notifyAll()是唤醒所有的线程。
Object类中关于等待/唤醒的API详细信息如下:
notify() -- 唤醒在此对象监视器上等待的单个线程。
notifyAll() -- 唤醒在此对象监视器上等待的所有线程。
wait() -- 让当前线程处于“等待(阻塞)状态”,“直到其他线程调用此对象的 notify() 方法或 notifyAll() 方法”,当前线程被唤醒(进入“就绪状态”)。
wait(long timeout) -- 让当前线程处于“等待(阻塞)状态”,“直到其他线程调用此对象的 notify() 方法或 notifyAll() 方法,或者超过指定的时间量”,当前线程被唤醒(进入“就绪状态”)。
wait(long timeout, int nanos) -- 让当前线程处于“等待(阻塞)状态”,“直到其他线程调用此对象的 notify() 方法或 notifyAll() 方法,或者其他某个线程中断当前线程,或者已超过某个实际时间量”,当前线程被唤醒(进入“就绪状态”)。
2. wait()和notify()示例
下面通过示例演示"wait()和notify()配合使用的情形"。
// WaitTest.java的源码
class ThreadA extends Thread{

    public ThreadA(String name) {
        super(name);
    }

    public void run() {
        synchronized (this) {
            System.out.println(Thread.currentThread().getName()+" call notify()");
            // 唤醒当前的wait线程
            notify();
        }
    }
}

public class WaitTest {

    public static void main(String[] args) {

        ThreadA t1 = new ThreadA("t1");

        synchronized(t1) {
            try {
                // 启动“线程t1”
                System.out.println(Thread.currentThread().getName()+" start t1");
                t1.start();

                // 主线程等待t1通过notify()唤醒。
                System.out.println(Thread.currentThread().getName()+" wait()");
                t1.wait();

                System.out.println(Thread.currentThread().getName()+" continue");
            } catch (InterruptedException e) {
                e.printStackTrace();
            }
        }
    }
}
运行结果:
main start t1
main wait()
t1 call notify()
main continue
结果说明:
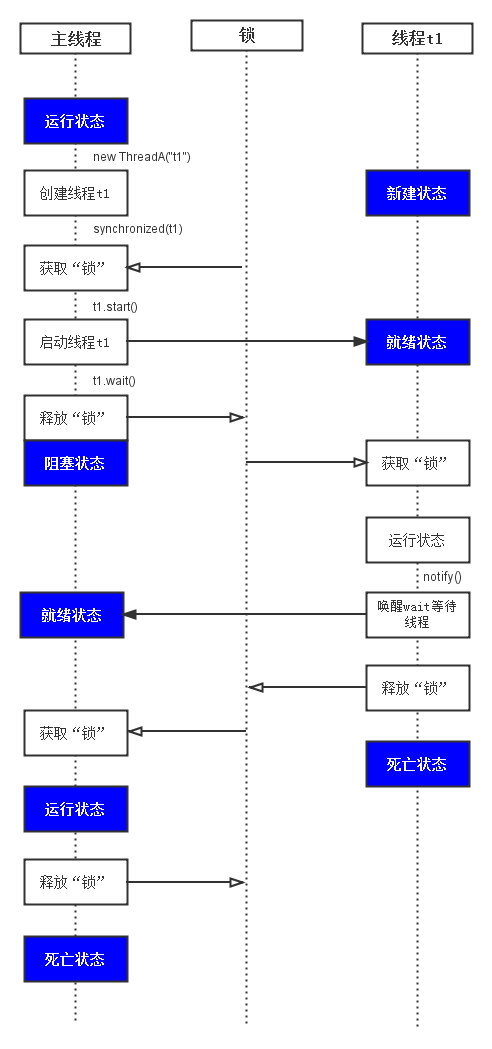
如下图,说明了“主线程”和“线程t1”的流程。
(01) 注意,图中"主线程" 代表“主线程main”。"线程t1" 代表WaitTest中启动的“线程t1”。 而“锁” 代表“t1这个对象的同步锁”。
(02) “主线程”通过 new ThreadA("t1") 新建“线程t1”。随后通过synchronized(t1)获取“t1对象的同步锁”。然后调用t1.start()启动“线程t1”。
(03) “主线程”执行t1.wait() 释放“t1对象的锁”并且进入“等待(阻塞)状态”。等待t1对象上的线程通过notify() 或 notifyAll()将其唤醒。
(04) “线程t1”运行之后,通过synchronized(this)获取“当前对象的锁”;接着调用notify()唤醒“当前对象上的等待线程”,也就是唤醒“主线程”。
(05) “线程t1”运行完毕之后,释放“当前对象的锁”。紧接着,“主线程”获取“t1对象的锁”,然后接着运行。
对于上面的代码?曾经有个朋友问到过:t1.wait()应该是让“线程t1”等待;但是,为什么却是让“主线程main”等待了呢?
在解答该问题前,我们先看看jdk文档中关于wait的一段介绍:
Causes the current thread to wait until another thread invokes the notify() method or the notifyAll() method for this object.
In other words, this method behaves exactly as if it simply performs the call wait(0).
The current thread must own this object's monitor. The thread releases ownership of this monitor and waits until another thread notifies threads waiting on this object's monitor to wake up either through a call to the notify method or the notifyAll method. The thread then waits until it can re-obtain ownership of the monitor and resumes execution.
中文意思大概是:
引起“当前线程”等待,直到另外一个线程调用notify()或notifyAll()唤醒该线程。换句话说,这个方法和wait(0)的效果一样!(补充,对于wait(long millis)方法,当millis为0时,表示无限等待,直到被notify()或notifyAll()唤醒)。
“当前线程”在调用wait()时,必须拥有该对象的同步锁。该线程调用wait()之后,会释放该锁;然后一直等待直到“其它线程”调用对象的同步锁的notify()或notifyAll()方法。然后,该线程继续等待直到它重新获取“该对象的同步锁”,然后就可以接着运行。
注意:jdk的解释中,说wait()的作用是让“当前线程”等待,而“当前线程”是指正在cpu上运行的线程!
这也意味着,虽然t1.wait()是通过“线程t1”调用的wait()方法,但是调用t1.wait()的地方是在“主线程main”中。而主线程必须是“当前线程”,也就是运行状态,才可以执行t1.wait()。所以,此时的“当前线程”是“主线程main”!因此,t1.wait()是让“主线程”等待,而不是“线程t1”!
3. wait(long timeout)和notify()
wait(long timeout)会让当前线程处于“等待(阻塞)状态”,“直到其他线程调用此对象的 notify() 方法或 notifyAll() 方法,或者超过指定的时间量”,当前线程被唤醒(进入“就绪状态”)。
下面的示例就是演示wait(long timeout)在超时情况下,线程被唤醒的情况。
// WaitTimeoutTest.java的源码
class ThreadA extends Thread{

    public ThreadA(String name) {
        super(name);
    }

    public void run() {
        System.out.println(Thread.currentThread().getName() + " run ");
        // 死循环,不断运行。
        while(true)
            ;
    }
}

public class WaitTimeoutTest {

    public static void main(String[] args) {

        ThreadA t1 = new ThreadA("t1");

        synchronized(t1) {
            try {
                // 启动“线程t1”
                System.out.println(Thread.currentThread().getName() + " start t1");
                t1.start();

                // 主线程等待t1通过notify()唤醒 或 notifyAll()唤醒,或超过3000ms延时;然后才被唤醒。
                System.out.println(Thread.currentThread().getName() + " call wait ");
                t1.wait(3000);

                System.out.println(Thread.currentThread().getName() + " continue");
            } catch (InterruptedException e) {
                e.printStackTrace();
            }
        }
    }
}
运行结果:
main start t1
main call wait
t1 run                  // 大约3秒之后...输出“main continue”
main continue
结果说明:
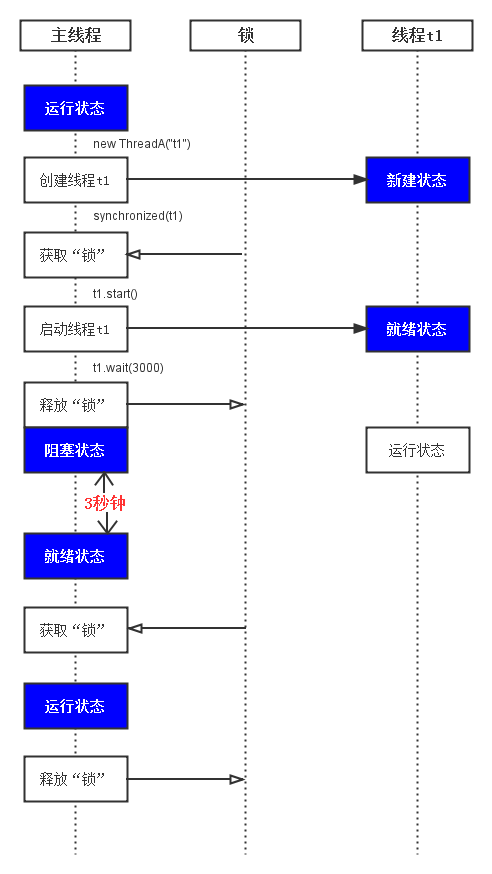
如下图,说明了“主线程”和“线程t1”的流程。
(01) 注意,图中"主线程" 代表WaitTimeoutTest主线程(即,线程main)。"线程t1" 代表WaitTest中启动的线程t1。 而“锁” 代表“t1这个对象的同步锁”。
(02) 主线程main执行t1.start()启动“线程t1”。
(03) 主线程main执行t1.wait(3000),此时,主线程进入“阻塞状态”。需要“用于t1对象锁的线程通过notify() 或者 notifyAll()将其唤醒” 或者 “超时3000ms之后”,主线程main才进入到“就绪状态”,然后才可以运行。
(04) “线程t1”运行之后,进入了死循环,一直不断的运行。
(05) 超时3000ms之后,主线程main会进入到“就绪状态”,然后接着进入“运行状态”。
4. wait() 和 notifyAll()
通过前面的示例,我们知道 notify() 可以唤醒在此对象监视器上等待的单个线程。
下面,我们通过示例演示notifyAll()的用法;它的作用是唤醒在此对象监视器上等待的所有线程。
 1 public class NotifyAllTest {
 2
 3     private static Object obj = new Object();
 4     public static void main(String[] args) {
 5
 6         ThreadA t1 = new ThreadA("t1");
 7         ThreadA t2 = new ThreadA("t2");
 8         ThreadA t3 = new ThreadA("t3");
 9         t1.start();
10         t2.start();
11         t3.start();
12
13         try {
14             System.out.println(Thread.currentThread().getName()+" sleep(3000)");
15             Thread.sleep(3000);
16         } catch (InterruptedException e) {
17             e.printStackTrace();
18         }
19
20         synchronized(obj) {
21             // 主线程等待唤醒。
22             System.out.println(Thread.currentThread().getName()+" notifyAll()");
23             obj.notifyAll();
24         }
25     }
26
27     static class ThreadA extends Thread{
28
29         public ThreadA(String name){
30             super(name);
31         }
32
33         public void run() {
34             synchronized (obj) {
35                 try {
36                     // 打印输出结果
37                     System.out.println(Thread.currentThread().getName() + " wait");
38
39                     // 唤醒当前的wait线程
40                     obj.wait();
41
42                     // 打印输出结果
43                     System.out.println(Thread.currentThread().getName() + " continue");
44                 } catch (InterruptedException e) {
45                     e.printStackTrace();
46                 }
47             }
48         }
49     }
50 }
运行结果:
t1 wait
main sleep(3000)
t3 wait
t2 wait
main notifyAll()
t2 continue
t3 continue
t1 continue
结果说明:
参考下面的流程图。
(01) 主线程中新建并且启动了3个线程"t1", "t2"和"t3"。
(02) 主线程通过sleep(3000)休眠3秒。在主线程休眠3秒的过程中,我们假设"t1", "t2"和"t3"这3个线程都运行了。以"t1"为例,当它运行的时候,它会执行obj.wait()等待其它线程通过notify()或额nofityAll()来唤醒它;相同的道理,"t2"和"t3"也会等待其它线程通过nofity()或nofityAll()来唤醒它们。
(03) 主线程休眠3秒之后,接着运行。执行 obj.notifyAll() 唤醒obj上的等待线程,即唤醒"t1", "t2"和"t3"这3个线程。 紧接着,主线程的synchronized(obj)运行完毕之后,主线程释放“obj锁”。这样,"t1", "t2"和"t3"就可以获取“obj锁”而继续运行了!

5. 为什么notify(), wait()等函数定义在Object中,而不是Thread中
Object中的wait(), notify()等函数,和synchronized一样,会对“对象的同步锁”进行操作。
wait()会使“当前线程”等待,因为线程进入等待状态,所以线程应该释放它锁持有的“同步锁”,否则其它线程获取不到该“同步锁”而无法运行!
OK,线程调用wait()之后,会释放它锁持有的“同步锁”;而且,根据前面的介绍,我们知道:等待线程可以被notify()或notifyAll()唤醒。现在,请思考一个问题:notify()是依据什么唤醒等待线程的?或者说,wait()等待线程和notify()之间是通过什么关联起来的?答案是:依据“对象的同步锁”。
负责唤醒等待线程的那个线程(我们称为“唤醒线程”),它只有在获取“该对象的同步锁”(这里的同步锁必须和等待线程的同步锁是同一个),并且调用notify()或notifyAll()方法之后,才能唤醒等待线程。虽然,等待线程被唤醒;但是,它不能立刻执行,因为唤醒线程还持有“该对象的同步锁”。必须等到唤醒线程释放了“对象的同步锁”之后,等待线程才能获取到“对象的同步锁”进而继续运行。
总之,notify(), wait()依赖于“同步锁”,而“同步锁”是对象锁持有,并且每个对象有且仅有一个!这就是为什么notify(), wait()等函数定义在Object类,而不是Thread类中的原因。
更多内容
3. Java多线程系列--“基础篇”02之 常用的实现多线程的两种方式
4. Java多线程系列--“基础篇”03之 Thread中start()和run()的区别
5. Java多线程系列--“基础篇”04之 synchronized关键字


 1784
1784


 被折叠的 条评论
为什么被折叠?
被折叠的 条评论
为什么被折叠?
 到【灌水乐园】发言


