


LinkedBlockingQueue
接上文, LinkedBlockingQueue 实现了 BlockingQueue 接口
类图:
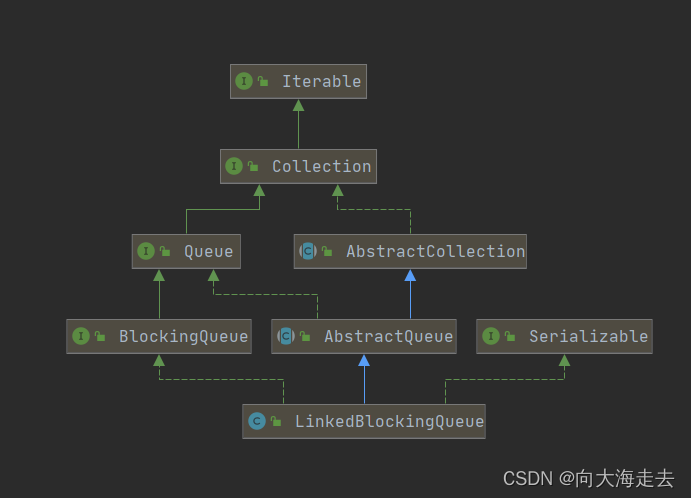
它的特性:
- 基于链表节点的阻塞队列
- 队列元素FIFO(先进先出)排序
- 队列的头部元素是停留时间最长的,尾部是停留时间最短的新元素,(尾部追加,头部取出)
- 链表队列比数组队列具有更高的吞吐量
- 可通过构造方法指定队列容量,默认是Integer的最大值
- 实现了
Collection和Iterator接口方法
内部构成
从 LinkedBlockingQueue 特性可知,元素添加在链表节点 ,而它的内部便维护了 链表节点类 Node
 /**
     * Linked list node class
     */
    static class Node<E> {
        E item;

        /**
         * One of:
         * - the real successor Node
         * - this Node, meaning the successor is head.next
         * - null, meaning there is no successor (this is the last node)
         */
        Node<E> next;

        Node(E x) { item = x; }
    }
- item 表示当前元素
- next 表示当前节点的下一节点,为null,则是最后一个
成员变量
/** 容量 */
    private final int capacity;

    /** 当前元素数量,线程安全 */
    private final AtomicInteger count = new AtomicInteger();

    /**
     * 头部节点
     */
    transient Node<E> head;

    /**
     * 尾部节点
     */
    private transient Node<E> last;

    /** 读取元素锁 */
    private final ReentrantLock takeLock = new ReentrantLock();

    /** 读取元素条件等待队列 */
    private final Condition notEmpty = takeLock.newCondition();

    /** 写入元素锁 */
    private final ReentrantLock putLock = new ReentrantLock();

    /** 写入元素条件等待队列 */
    private final Condition notFull = putLock.newCondition();
由此可知,LinkedBlockingQueue 提供了两把锁,目的是take和put能同时进行。
构造方法
初始化一个 LinkedBlockingQueue 支持无参构造和有参构造
无参构造,默认初始化容量大小为Integer的最大值
public LinkedBlockingQueue() {
        this(Integer.MAX_VALUE);
    }
有参构造,可以指定容量大小,也可通过集合初始化
public LinkedBlockingQueue(int capacity) {
        if (capacity <= 0) throw new IllegalArgumentException();
        this.capacity = capacity;
        // 头尾节点相同,都为null
        last = head = new Node<E>(null);
    }
public LinkedBlockingQueue(Collection<? extends E> c) {
        this(Integer.MAX_VALUE);
        final ReentrantLock putLock = this.putLock;
        putLock.lock(); // Never contended, but necessary for visibility
        try {
            int n = 0;
            for (E e : c) {
                if (e == null)
                    throw new NullPointerException();
                if (n == capacity)
                    throw new IllegalStateException("Queue full");
                enqueue(new Node<E>(e));
                ++n;
            }
            count.set(n);
        } finally {
            putLock.unlock();
        }
    }
/**
     * Links node at end of queue.
     *
     * @param node the node
     */
    private void enqueue(Node<E> node) {
        // assert putLock.isHeldByCurrentThread();
        // assert last.next == null;
        last = last.next = node;
    }
- 通过putLock加锁
- 集合元素不能为null
- 队尾添加,赋值给链表的最后节点
- 赋值总的元素个数
成员方法
Put方法
public void put(E e) throws InterruptedException {
        if (e == null) throw new NullPointerException();
        // Note: convention in all put/take/etc is to preset local var
        // holding count negative to indicate failure unless set.
        // 临时变量,负数表示新增失败
        int c = -1;
        // 新增一个Node节点
        Node<E> node = new Node<E>(e);
        // 获取put锁
        final ReentrantLock putLock = this.putLock;
        // 当前容器元素个数
        final AtomicInteger count = this.count;
        // 可中断锁
        putLock.lockInterruptibly();
        try {
            /*
             * Note that count is used in wait guard even though it is
             * not protected by lock. This works because count can
             * only decrease at this point (all other puts are shut
             * out by lock), and we (or some other waiting put) are
             * signalled if it ever changes from capacity. Similarly
             * for all other uses of count in other wait guards.
             */
             // 如果队列满了
             // 则阻塞当前线程,等待其他线程唤醒(take成功后,会唤醒此处等待的线程)
            while (count.get() == capacity) {
                notFull.await();
            }
            // 队尾添加节点
            enqueue(node);
            // 先获取再自增
            // c 比 真实的count 小1
            c = count.getAndIncrement();
            // 添加完后,队列未满,则唤醒其他阻塞的put线程
            if (c + 1 < capacity)
                notFull.signal();
        } finally {
            // 释放锁
            putLock.unlock();
        }
        // c=0,表示队列有一个元素
        if (c == 0)
            // 尝试唤醒阻塞的take线程
            signalNotEmpty();
    }
从源码中,我们可以总结几点:
- 添加元素时第一步先加锁,所以新增数据是线程安全的。
- 新增时,如果队列满了,则会阻塞当前线程。
- 队列新增,简单的追加都尾部节点即可。
- 新增元素成功后,如果队列未满,会唤醒其他阻塞的put线程,队列不为空,会唤醒其他阻塞的take线程,这样就能保证队列一旦满足put或take条件时,立马就能唤醒阻塞线程,继续运行,保证唤起的时机不被浪费。
offer方法
offer 我们重点看一下,带超时参数的方法
public boolean offer(E e, long timeout, TimeUnit unit)
        throws InterruptedException {
		// 同put一样,元素不能为null
        if (e == null) throw new NullPointerException();
        // 转换超时时间单位
        long nanos = unit.toNanos(timeout);
        // 预设值,负数表示添加失败
        int c = -1;
     	// put 锁
        final ReentrantLock putLock = this.putLock;
        // 当前队列个数
        final AtomicInteger count = this.count;
        // 可中断锁
        putLock.lockInterruptibly();
        try {
            // 当前队列个数 等于 容量,表示队列满了
            while (count.get() == capacity) {
               // 已过设置的超时时间
                if (nanos <= 0)
                    // 返回添加失败
                    return false;
                // 底层通过调用 LockSupport#parkNanos 方法阻塞当前线程
                // 方法剩余时间 : deadline - 当前时间
                nanos = notFull.awaitNanos(nanos);
            }
            // 队尾添加
            enqueue(new Node<E>(e));
            c = count.getAndIncrement();
            if (c + 1 < capacity)
                notFull.signal();
        } finally {
            putLock.unlock();
        }
        if (c == 0)
            signalNotEmpty();
        return true;
    }
从源码,我们总结一下,offer 对比 put 方法,不同之处在于 :
- 通过调用
LockSupport#parkNanos方法睡眠当前线程,等待timeout时间之后,队列仍满,则返回false,表示新增失败。
取数据方法
取数据分为 :
- 取数据并删除 take/poll
- 只取不删除 peek
我们看一下 take 方法
public E take() throws InterruptedException {
        E x;
        int c = -1;
        // 当前队列元素总数
        final AtomicInteger count = this.count;
        // take锁,可中断锁
        final ReentrantLock takeLock = this.takeLock;
        takeLock.lockInterruptibly();
        try {
            // 如果队列为空,则阻塞当前线程,等待其他线程唤醒
            while (count.get() == 0) {
                notEmpty.await();
            }
            // 从队列头部拿出一个元素
            x = dequeue();
            // 赋值再自增
            // c 比 count 大 1
            c = count.getAndDecrement();
            // 取出元素成功,表示队列里面有数据
            if (c > 1)
                // 唤醒其他take线程
                notEmpty.signal();
        } finally {
            takeLock.unlock();
        }
        // 如果队列空闲
        if (c == capacity)
            // 则尝试唤醒put线程
            signalNotFull();
        return x;
    }

/**
     * Removes a node from head of queue.
     *
     * @return the node
     */
    private E dequeue() {
        // assert takeLock.isHeldByCurrentThread();
        // assert head.item == null;
        Node<E> h = head;
        Node<E> first = h.next;
        h.next = h; // help GC
        head = first;
        E x = first.item;
        // 头节点指向null,删除
        first.item = null;
        return x;
    }
查看并不删除元素,如果队列为空,则返回null
public E peek() {
        if (count.get() == 0)
            return null;
        final ReentrantLock takeLock = this.takeLock;
        takeLock.lock();
        try {
            Node<E> first = head.next;
            if (first == null)
                return null;
            else
                return first.item;
        } finally {
            takeLock.unlock();
        }
    }


 264
264


 被折叠的 条评论
为什么被折叠?
被折叠的 条评论
为什么被折叠?
 到【灌水乐园】发言


